Apache-Flume日志收集+自定义HTTP Sink处理 测试用例搭建
Flume简介和安装
简介
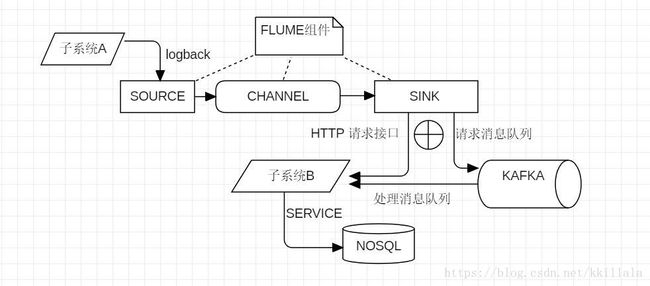
Flume前身是cloudera 开发的实时日志收集系统,后来纳入Apache旗下。作为一个日志收集系统,他能很轻易的与log4j/logback结合并传输日志。可以用来收集各个子系统的日志做统一处理和查询。
常见的搭配是Flume+kafka消息队列+mongodb/hbase等nosql数据库。这里介绍一下用Flume收集子系统logback日志的结合操作以及用自定义的HTTP 接口处理SINK转发的日志。当然也可以用SINK转发到kafka消息队列,由消息队列继续处理日志【这里不介绍】。
flume的数据流由事件(Event)贯穿始终。事件是Flume的基本数据单位,它携带日志数据(字节数组形式)并且携带有头信息,这些Event由Agent外部的Source生成,当
Source捕获事件后会进行特定的格式化,然后Source会把事件推入(单个或多个)Channel中。你可以把Channel看作是一个缓冲区,它将保存事件直到Sink处理完该事件。
安装FLUME
- 下载APACHE-FLUME并解压到目录,apache-flume-1.8.0-bin.tar.gz
- 本地安装JDK1.8并且配置好相关的环境变量【这个不描述了开发都懂的】
- 打开FLUME安装目录下的conf
1 复制flume-env.ps1.template 并改名为flume-env.ps1
2 新建一个配置文件netcat.conf ,此名称后面启动命令需要用到。内容如下:
# Name the components on this agent
a1.sources = r1
a1.sinks = k1
a1.channels = c1

# Describe/configure the source
a1.sources.r1.type = netcat
#你自己的IP地址,也可以写127.0.0.1但是后面的实验写127会有问题。
a1.sources.r1.bind = 127.0.0.1
#开启的端口
a1.sources.r1.port = 44444
a1.sources.r1.channels = c1

# Describe the sink
a1.sinks.k1.type = logger

# Use a channel which buffers events in memory
a1.channels.c1.type = memory
a1.channels.c1.capacity = 1000
a1.channels.c1.transactionCapacity = 100
3 修改log4j.properties。
flume.root.logger=TRACE,console- 打开FLUME安装目录下的bin,新增一个启动命令bat文件,startup.bat
set "JAVA_HOME=你自己的jdk路径\jdk1.8.0_60"
flume-ng agent -property "file.encoding=UTF-8" --conf ../conf --conf-file ../conf/netcat.conf --name a1- 双击启动脚本,会出现安全提示两次,都输入R
- 运行CMD telnet 127.0.0.1 44444 然后就可以输入内容了回车确认,可以观察flume控制台信息
应用logback融入FLUME
1 POM引入相应JAR
        <dependency>
            <groupId>com.teambytes.logbackgroupId>
            <artifactId>logback-flume-appender_2.11artifactId>
            <version>0.0.9version>
        dependency>
2 修改logback文件加入以下内容,并启用appender
<appender name="flume" class="com.teambytes.logback.flume.FlumeLogstashV1Appender">

        <flumeAgents>局域网IP:44444flumeAgents>
        <flumeProperties>connect-timeout=4000;request-timeout=8000flumeProperties>
        <batchSize>100batchSize>
        <reportingWindow>1000reportingWindow>

        <additionalAvroHeaders>dir=logsadditionalAvroHeaders>

        <application>${domain}application>
        <filter class="ch.qos.logback.classic.filter.ThresholdFilter">


            <level>debuglevel>
        filter>
    appender>

    <logger name="com.dzmsoft.framework.log.service.impl.LogServiceImpl"  level="TRACE" >
        <appender-ref ref="flume" />
    logger>
3 修改FLUME安装目录的conf / netcat.conf配置
a1.sources.r1.type = avro
a1.sources.r1.bind = 局域网IP
如果不修改会报连接不上问题
启动flume并启动应用,查看应用是否会把Logback打印的日志发送到flume。
自定义SINK HTTP转发日志消息
新建一个MAVEN工程 logSink用来定义SINK并生产jar包。
POM.XML如下:
<project xmlns="http://maven.apache.org/POM/4.0.0" xmlns:xsi="http://www.w3.org/2001/XMLSchema-instance"
         xsi:schemaLocation="http://maven.apache.org/POM/4.0.0 http://maven.apache.org/xsd/maven-4.0.0.xsd">
    <modelVersion>4.0.0modelVersion>

    <groupId>flumegroupId>
    <artifactId>logSinkartifactId>
    <version>1.0-SNAPSHOTversion>

    <name>logSinkname>

    <url>http://www.example.comurl>

    <properties>
        <project.build.sourceEncoding>UTF-8project.build.sourceEncoding>
        <maven.compiler.source>1.8maven.compiler.source>
        <maven.compiler.target>1.8maven.compiler.target>
        <version.flume>1.8.0version.flume>
    properties>

    <dependencies>
        <dependency>
            <groupId>junitgroupId>
            <artifactId>junitartifactId>
            <version>4.11version>
            <scope>testscope>
        dependency>

        <dependency>
            <groupId>com.squareup.okhttp3groupId>
            <artifactId>okhttpartifactId>
            <version>3.6.0version>
        dependency>
        <dependency>
            <groupId>org.apache.flumegroupId>
            <artifactId>flume-ng-coreartifactId>
            <version>${version.flume}version>
        dependency>
        <dependency>
            <groupId>org.apache.flumegroupId>
            <artifactId>flume-ng-configurationartifactId>
            <version>${version.flume}version>
        dependency>

        <dependency>
            <groupId>com.alibabagroupId>
            <artifactId>fastjsonartifactId>
            <version>1.2.5version>
        dependency>
    dependencies>

    <build>
        <pluginManagement>
            <plugins>
                <plugin>
                    <artifactId>maven-compiler-pluginartifactId>
                    <configuration>

                        <source>1.7source>
                        <target>1.7target>
                        <encoding>UTF-8encoding>
                    configuration>
                plugin>

                <plugin>
                    <groupId>org.apache.maven.pluginsgroupId>
                    <artifactId>maven-jar-pluginartifactId>
                    <version>2.4version>
                    <configuration>
                        <archive>

                            <manifest>
                                <addClasspath>trueaddClasspath>
                                <classpathPrefix>lib/classpathPrefix>
                                <mainClass>flume.LogCollectormainClass>
                            manifest>
                        archive>
                    configuration>
                plugin>


                <plugin>
                    <groupId>org.apache.maven.pluginsgroupId>
                    <artifactId>maven-dependency-pluginartifactId>
                    <executions>
                        <execution>
                            <id>copy-dependenciesid>
                            <phase>prepare-packagephase>
                            <goals>
                                <goal>copy-dependenciesgoal>
                            goals>
                            <configuration>
                                <outputDirectory>liboutputDirectory>
                                <overWriteReleases>falseoverWriteReleases>
                                <overWriteSnapshots>falseoverWriteSnapshots>
                                <overWriteIfNewer>trueoverWriteIfNewer>
                            configuration>
                        execution>
                    executions>
                plugin>
            plugins>
        pluginManagement>
    build>
project>
新建一个包flume并创建类LogCollector.java
package flume;

import com.alibaba.fastjson.JSONArray;
import com.google.common.base.Preconditions;
import com.google.common.base.Throwables;
import okhttp3.*;
import org.apache.flume.*;
import org.apache.flume.conf.Configurable;
import org.apache.flume.sink.AbstractSink;
import java.io.IOException;
import java.util.ArrayList;
import java.util.List;
public class LogCollector extends AbstractSink implements Configurable{

    private String hostname;
    private String port;
    private String url;
    private int batchSize;
    private String postUrl;
    public LogCollector() {
        System.out.println("LogCollector start...");
    }

    @Override
    public void configure(Context context) {
        hostname = context.getString("hostname");
        Preconditions.checkNotNull(hostname, "hostname must be set!!");
        port = context.getString("port");
        Preconditions.checkNotNull(port, "port must be set!!");
        batchSize = context.getInteger("batchSize", 100);
        Preconditions.checkNotNull(batchSize > 0, "batchSize must be a positive number!!");
        postUrl = "http://"+hostname+":"+port+url;
        System.out.println("postURL..."+postUrl);
    }

    @Override
    public void start() {
        super.start();
        System.out.println("LogCollector start...");
    }

    @Override
    public void stop() {
        super.stop();
        System.out.println("LogCollector stop...");
    }

    public Status process() {
        Transaction tx = null ;
        Status status=null;
        Channel channel= getChannel();
        try{
            tx= channel.getTransaction();
            tx.begin();
            for(int i=0;i// 使用take方法尽可能的以批量的方式从Channel中读取事件,直到没有更多的事件
                Event event =  channel.take();
                if(event==null)
                {
                    break;
                }
                else{  // 也可以不需要else
                    byte[] body = event.getBody();
                    String str=new String(body);
                    System.out.println("======================================="+str);
                    Response response= postJson(postUrl, JSONArray.toJSON(str).toString());
                }
            }
            tx.commit();
            status=Status.READY;
        }catch (Exception e) {
            if (tx != null) {
                tx.commit();// commit to drop bad event, otherwise it will enter dead loop.
            }
        } finally {
            if (tx != null) {
                try{

                    tx.close();
                }catch (Exception e){
                    tx.commit();
                    tx.close();
                }
            }
        }
        return status;
    }

    public Status process4() throws EventDeliveryException {
        Status result = Status.READY;
        Channel channel = getChannel();
        Transaction transaction = null;
        try {
            transaction = channel.getTransaction();
            transaction.begin();
            Event event = null;
            String content = null;
            List contents=new ArrayList<>();
            for (int i = 0; i < batchSize; i++) {
                event = channel.take();
                if (event != null) {//对事件进行处理
                    content = new String(event.getBody());
                    contents.add(content);
                } else {
                    result = Status.BACKOFF;
                    break;
                }
            }
            if (contents.size() > 0) {
                Response response= postJson(postUrl, JSONArray.toJSON(contents).toString());
                if(response!=null && response.isSuccessful()){
                    transaction.commit();//通过 commit 机制确保数据不丢失
                }
            }else
            {
                transaction.commit();
            }
        } catch (Exception e) {
            try {
                transaction.rollback();
            } catch (Exception e2) {
                System.out.println("Exception in rollback. Rollback might not have been" +
                        "successful.");
            }
            System.out.println("Failed to commit transaction." +
                    "Transaction rolled back.");
            Throwables.propagate(e);
        }finally {
            if (transaction != null) {
//              transaction.commit();
                transaction.close();
                System.out.println("close Transaction");
            }
        }
        System.out.println("LogCollector ..."+result);
        return result;
    }

    /**
     * post请求,json数据为body
     *
     * @param url
     * @param json
     */
    public Response postJson(String url, String json) {
        OkHttpClient client = new OkHttpClient();
        RequestBody body = RequestBody.create(MediaType.parse("application/json"), json);
        Request request = new Request.Builder()
                .url(url)
                .post(body)
                .build();
        Response response = null;
        try {
            response = client.newCall(request).execute();
            if (!response.isSuccessful()){
                System.out.println("request was error");
            }
        } catch (IOException e) {
            e.printStackTrace();
        }
        return response;
    }
}
接下来用mvn package打包并拷贝jar包到FLUME的安装目录下的lib文件夹,同时把项目依赖的其他JAR也拷贝进来,这里需要拷贝
okhttp-3.6.0.jar
okio-1.11.0.jar
额外两个JAR
自定义的http 的SINK就算完成了,接下来需要修改一下 conf 下面的navicate.conf配置
# example.conf: A single-node Flume configuration

# Name the components on this agent
a1.sources = r1
#a1.sinks = k1
a1.sinks = avroSinks
a1.channels = c1

# Describe/configure the source
#a1.sources.r1.type = netcat
a1.sources.r1.type = avro
#自己局域网的ip地址
a1.sources.r1.bind = 局域网IP地址[eg:192.168.0.108]
a1.sources.r1.port = 44444
a1.sources.r1.channels = c1

# Describe the sink
#a1.sinks.k1.type = logger

##use epp sink
a1.sinks.avroSinks.type = flume.LogCollector
a1.sinks.avroSinks.channel = c1
#处理sink发送的http地址
a1.sinks.avroSinks.hostname = localhost
#处理sink发送的http地址
a1.sinks.avroSinks.url = /sink/logCollector
#处理sink发送的http端口
a1.sinks.avroSinks.port = 8003
a1.sinks.avroSinks.batchSize = 100

# Use a channel which buffers events in memory
a1.channels.c1.type = memory
a1.channels.c1.capacity = 1000
a1.channels.c1.transactionCapacity = 100
根据配置可知,我这里处理sink发送日志的地址接口为:
http://localhost:8003/sink/logCollector
那么我们需要编写一个controller来获取接口发送的日志
package com.main.sink;

import io.swagger.annotations.ApiOperation;
import org.springframework.stereotype.Controller;
import org.springframework.web.bind.annotation.PostMapping;
import org.springframework.web.bind.annotation.RequestBody;
import org.springframework.web.bind.annotation.ResponseBody;

import javax.servlet.http.HttpServletRequest;

@Controller
public class LogCollector {

    @ApiOperation(value = "日志拦截", notes = "接受flume日志请求并处理", hidden = true)
    @PostMapping(value = "/sink/logCollector")
    @ResponseBody
    public void logCollector(HttpServletRequest request, @RequestBody String jsonObject) {
        //获取表单中所有文本域的name
        System.out.println("=========================FLUME==================");
        System.out.println(jsonObject);
        System.out.println("=========================END FLUME===============");
    }

}
测试:
- 启动FLUME
- 启动之前logback融合FLUME的项目
- 启动处理自定义SINK的http接口所在的web工程。【为了方便我这个工程就是融合FLUME项目的工程】
接下来就会看到 logback打印的日志在 /sink/logCollector都能接受到。接下来就可以用controller结合service把对应的数据写入到nosql并做查询的功能了。
这里只是介绍了自定义一个http请求的sink,可以自行百度sink转发到kafka消息队列的例子,具体融合方法都是一致的。controller或者消息队列在接受到日志后就能做后续的处理,例如写入到nosql或者写入到文件中持久化。再开发一个读取日志的功能就能实现对所有子应用日志统一收集查询的功能了。
如果在网络通顺的情况下,甚至可以采集部署到各个不同地方的应用的日志,只要在部署应用的机器上部署flume并且此机器可以访问公司的外网地址,就能实现收集各个项目日志的功能,做一个统一日志处理和查询系统。
夜已深,点一根烟,喝一口茶【有助睡眠】
天灰灰,会不会,让我忘记你是谁~~~

