vue-cli3 多入口,多环境打包
本篇文章讲解如何进行多入口打包以及多环境打包.
1.多入口打包
假设我们的项目,分为手机端商城和pc端后台管理,手机上是用户访问,pc上是自己的后台管理,
后台管理使用elementUI框架,H5不使用任何框架.打包的时候,pc和h5分开打包.本机运行的时候pc和h5也是分开的
2.多环境打包
一个项目想要正式上线,首先需要本地开发没问题后,发到测试线上给测试人员测试,测完没问题再发到预发布环境(类似正式环境)上,最后没问题了才发到正式线,这个过程中每个环境连的接口地址都不一样,这是肯定不能每打包一次,就手动改下打包地址,
此时我们需要更改几行代码,执行不同的命令,只懂打包到对应的环境下.
首先是多入口打包
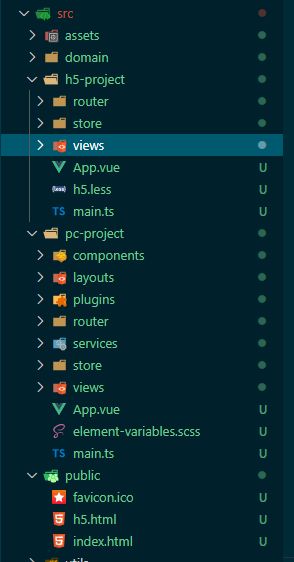
1.新建一个项目,删掉src原有的目录
2.新建pc-project和h5-project文件夹,这俩文件一个用来放pc的工程,一个用来放h5的工程
3.新建public文件夹(原先的public文件夹在src外面,cli打包的时候默认会将此文件夹下的所有文件都打包,所以需要自己新建一个),
public下新建两个index.html和h5.html
4.package.json添加如下命令
"scripts": {
    ...
    "serve-index": "vue-cli-service serve --mode index --port 9011",
    "serve-h5": "vue-cli-service serve --mode h5 --port 9012",
    "build-index": "vue-cli-service build index ",
    "build-h5": "vue-cli-service build h5"
}
在根目录下(和package.json平级),新建vue.config.js文件
然后添加如下代码
// 本地运行vue-cli-service serve --mode index --port 9011 的时候 ServerSign = 'index ';
const ServerSign = process.argv[4] || 'index';
// 打包时候 运行vue-cli-service build h5    BuildSign = 'h5';
// 打印process.argv可以看到,node运行的命令所带的参数.
const BuildSign = process.argv[3] || 'index';

// 根据入口来设置pages
function setPage() {
  const pages = new Map([
    ['h5',{
      h5: {
        entry: "src/h5-project/main.ts",
        template: "src/public/h5.html",
        filename: "index.html",
        title: "vue-h5",
        chunks: ["chunk-vendors", "chunk-common", "h5"]
      }
    }],
    ['index', {
      index: {
        entry: "src/pc-project/main.ts",
        template: "src/public/index.html",
        filename: "index.html",
        title: "vue-pc",
        chunks: ["chunk-vendors", "chunk-common", "index"]
      }
    }],
  ])


  let page = {}; // 如果是PC首页则是index:{...},如果是h5首页,则是h5:{...}
  if (process.env.NODE_ENV == 'development') {
    // 开发环境下,运行不同的命令,打开不同的项目首页
    page = pages.get(ServerSign) || pages.get('index');
  } else {
    // 生产环境下
    page = pages.get(BuildSign) || pages.get(index);
  }
  return page;
}

module.exports = {
    lintOnSave: false,
    publicPath: "./",
    outputDir:`dist/${BuildSign}` ,
    pages: setPage(),
    filenameHashing: true
};
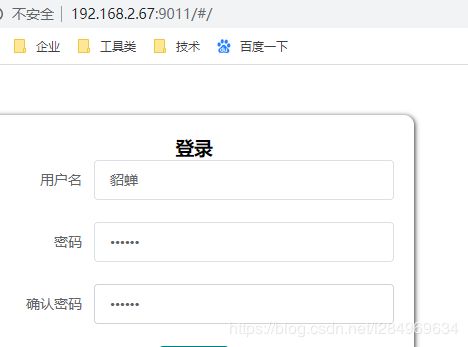
最后运行命令npm run serve-index,就可以访问pc系统首页
运行npm run serve-h5,就可以访问h5商城首页
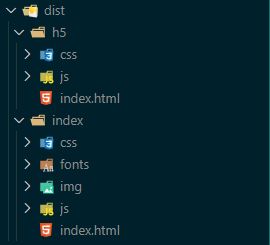
运行npm run build-index 就可以将pc-project系统打包到dist/index文件夹下
运行npm run build-h5 就可以将h5-project系统打包到dist/h5文件夹下
打包结果:
多环境配置打包
在vue-cli3中,只提供development /production /test这三种环境变量,使用--mode changeEnv
更改环境变量NODE_ENV,如果不是vue内置的这三种,则全部按照development处理,使用的时候总会引起一些不必要的麻烦,
假设我们除了开发环境,还有4个环境,
Debug(测试环境) | PublishTest01(模拟正式环境1) | PublishTest02(模拟正式环境2) | Release(正式环境) ,
vue,vue-cli3提供的就很难满足我们所需要.
在文档中,我们能看到 vue-cli3提供了.env来配置全局变量,规则是
只有以 VUE_APP_ 开头的变量会被 webpack.DefinePlugin 静态嵌入到客户端侧的包中,
我在项目中试了下,直接给process.env添加以VUE_APP_开头的变量,完全是可以再静态客户点使用的.
在package中我们先把打包命令设置好
  "scripts": {
    ...
    "build-index": "vue-cli-service build index",
    "build-h5": "vue-cli-service build h5",
    "Release-index": "npm run build-index release", // 将index项目打包到Release环境目录下
    "Debug-index": "npm run build-index debug",
    "PublishTest01-index": "npm run build-index test1",
    "PublishTest02-index": "npm run build-index test2",
    "Release-h5": "npm run build-h5 release", // 将h5项目打包到Release环境目录下
    "Debug-h5": "npm run build-h5 debug",
    "PublishTest01-h5": "npm run build-h5 test1",
    "PublishTest02-h5": "npm run build-h5 test2",
    ...
  },
然后在vue.config.js中新增一个比变量标记,用来识别,当前打包的环境是哪个(BuildNODE_ENV)
...
const BuildSign = process.argv[3] || 'index';

// 打包时候的环境变量标记 npm run Release-index   BuildNODE_ENV = Release;
const BuildNODE_ENV = process.argv[4] || 'debug'; // process.argv[4];

// 设置打包的出口地址
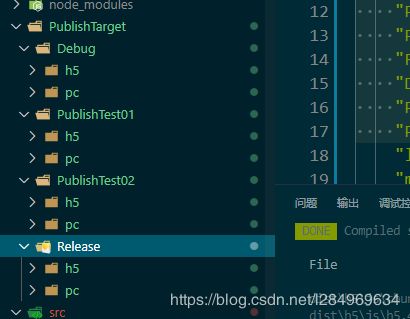
function setOutputDir() {
  const arr = new Map([
    ['index_debug', 'PublishTarget/Debug/pc'],
    ['index_test1', 'PublishTarget/PublishTest01/pc'],
    ['index_test2', 'PublishTarget/PublishTest02/pc'],
    ['index_release', 'PublishTarget/Release/pc'],
    ['h5_debug', 'PublishTarget/Debug/h5'],
    ['h5_test1', 'PublishTarget/PublishTest01/h5'],
    ['h5_test2', 'PublishTarget/PublishTest02/h5'],
    ['h5_release', 'PublishTarget/Release/h5'],
  ])

  var arg = BuildSign;
  var NODE_ENV = BuildNODE_ENV;

  // 打印process.argv可以看到,运行的命令所带的参数.
  // npm run Debug-index    NODE_ENV = Debug;
  var outputDir = arr.get(arg+'_'+NODE_ENV) || 'PublishTarget/Debug';
  return outputDir;
}

module.exports = {
    ...
    publicPath: "./",
    outputDir:process.env.NODE_ENV == 'development'?'PublishTarget/Debug':setOutputDir() ,
    ...
};
接下来根据环境变量排配置全局接口地址,
我们在src下新建个文件 utils/api.js,代码如下
const envMap = new Map([
    ['debug', { pc: 'http://www.debug-PC.com', h5: 'http://www.debug-h5.com' }],
    ['test1', { pc: 'http://www.test1-PC.com', h5: 'http://www.test1-h5.com' }],
    ['test2', { pc: 'http://www.test2-PC.com', h5: 'http://www.test2-h5.com' }],
    ['release', { pc: 'http://www.release-PC.com', h5: 'http://www.release-h5.com' }],
    ['development', { pc: 'http://www.dev-PC.com', h5: 'http://www.dev-h5.com' }],
  ]);

module.exports.api = function(env){
    const ret = envMap.get(env) ||envMap.get('development');

    process.env.VUE_APP_BASE_PC = ret.pc;
    process.env.VUE_APP_BASE_H5 = ret.h5;
}
然后再vue.config.js的BuildNODE_ENV 下面使用
var api = require("./src/utils/api.js").api;

...

const BuildNODE_ENV = process.argv[4] || 'debug'; // process.argv[4];

if(process.env.NODE_ENV == 'development'){
  api('development');
}else{
  api(BuildNODE_ENV);
}
这样就大功告成了,
运行
npm run Release-index
npm run Debug-index
npm run PublishTest01-index
npm run PublishTest02-index
npm run Release-h5
npm run Debug-h5
npm run PublishTest01-h5
npm run PublishTest02-h5
这样就可以就达到了不同的环境下,打包到不同的文件夹下,发版的时候,我们只需要上传到svn,然后将svn文件地址发给运维就行啦
demo地址:https://github.com/slailcp/vue-cli3


