Mybatis运行原理及源码解析
Mybatis源码解析
一、前言
本文旨在mybatis源码解析,将整个mybatis运行原理讲解清楚,本文代码地址:
https://github.com/lchpersonal/mybatis-learn
本文使用的mybatis版本:3.2.8,
jdk版本:1.8
数据库版本:mysql 5.6,数据库脚本如下,此外在源文件为:resources/mybatis.sql
-- 导出 mybatis 的数据库结构
CREATE DATABASE IF NOT EXISTS `mybatis` /*!40100 DEFAULT CHARACTER SET utf8 */;
USE `mybatis`;

-- 导出  表 mybatis.user 结构
CREATE TABLE IF NOT EXISTS `user` (
  `id` int(11) NOT NULL AUTO_INCREMENT,
  `name` varchar(50) NOT NULL,
  `age` int(11) NOT NULL,
  `sex` int(11) NOT NULL,
  PRIMARY KEY (`id`)
) ENGINE=MyISAM AUTO_INCREMENT=6 DEFAULT CHARSET=utf8;

-- 正在导出表  mybatis.user 的数据:3 rows
DELETE FROM `user`;

INSERT INTO `user` (`id`, `name`, `age`, `sex`) VALUES
 (1, '张三', 42, 0),
 (2, '李四', 15, 0),
 (3, '王五', 45, 0),
 (4, '赵六', 47, 0),
 (5, '孙艳', 26, 1);
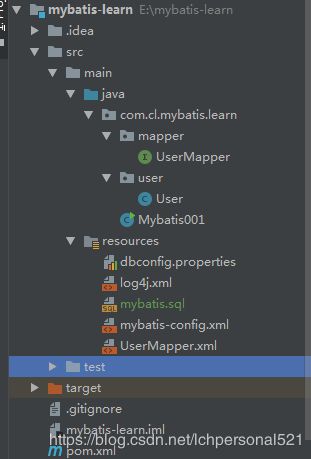
本文主要是探究mybatis运行原理,所以示例项目非常简单,目录结构如下:
mybatis主配置文件mybatis-config.xml内容如下:
<configuration>
    <properties resource="dbconfig.properties">properties>

    <environments default="development">
        <environment id="development">
            <transactionManager type="JDBC"/>
            <dataSource type="POOLED">
                <property name="driver" value="${jdbc.driver}"/>
                <property name="url" value="${jdbc.url}"/>
                <property name="username" value="${jdbc.username}"/>
                <property name="password" value="${jdbc.password}"/>
            dataSource>
        environment>
    environments>
    <mappers>
        <mapper resource="UserMapper.xml"/>
    mappers>
configuration>
UserMapper.xml的内容如下:
<mapper namespace="com.cl.mybatis.learn.mapper.UserMapper">
    <select id="selectById" resultType="com.cl.mybatis.learn.user.User">
    select * from user where id = #{id}
  select>
mapper>
UserMapper.java内容如下:
package com.cl.mybatis.learn.mapper;
import com.cl.mybatis.learn.user.User;
/**
 * @Author: chengli
 * @Date: 2018/11/24 12:08
 */
public interface UserMapper {
    User selectById(int id);
}
Mybatis001.java 主函数内容如下:
package com.cl.mybatis.learn;
/**
 * @Author: chengli
 * @Date: 2018/11/24 12:00
 */
public class Mybatis001 {
    public static void main(String[] args) throws IOException {
        String resource = "mybatis-config.xml";
        InputStream inputStream = Resources.getResourceAsStream(resource);
        SqlSessionFactory sqlSessionFactory = new SqlSessionFactoryBuilder().build(inputStream);
        SqlSession session = sqlSessionFactory.openSession();
        try {
            UserMapper mapper = session.getMapper(UserMapper.class);
            System.out.println(mapper.selectById(1));
        } finally {
            session.close();
        }
    }
}
其他内容过于简单,详情请移步github下载源代码查看。
从main函数的运行步骤,本文将主要通过四个部分探讨mybatis的原理:
- SqlSessionFactory的创建
- SqlSession的创建
- UserMapper代理的生成
- 数据库查询操作执行流程
二、SqlSessionFactory的创建
2.1 整体介绍
SqlSessionFactory的创建是SqlSessionFactoryBuilder通过mybatis主配置文件构建出的:
public SqlSessionFactory build(InputStream inputStream, String environment, Properties properties) {
    SqlSessionFactory var5;
    try {
        XMLConfigBuilder parser = new XMLConfigBuilder(inputStream, environment, properties);
        /**主要逻辑在下面这行代码*/
        var5 = this.build(parser.parse());
    }
    ……
    ……
    return var5;
}
parser.parse()到底做了什么呢?看如下代码:
private void parseConfiguration(XNode root) {
    try {
        /**解析配置文件中的各种属性*/
        this.propertiesElement(root.evalNode("properties"));
        /**解析别名配置*/
        this.typeAliasesElement(root.evalNode("typeAliases"));
        /**解析插件配置*/
        this.pluginElement(root.evalNode("plugins"));
        /**解析对象工厂元素*/
        this.objectFactoryElement(root.evalNode("objectFactory"));
        this.objectWrapperFactoryElement(root.evalNode("objectWrapperFactory"));
        /**解析mybatis的全局设置信息*/
        this.settingsElement(root.evalNode("settings"));
        /**解析mybatis的环境配置*/
        this.environmentsElement(root.evalNode("environments"));
        this.databaseIdProviderElement(root.evalNode("databaseIdProvider"));
        /**解析类型处理器配置信息*/
        this.typeHandlerElement(root.evalNode("typeHandlers"));
        /**解析mapper配置信息*/
        this.mapperElement(root.evalNode("mappers"));
    } catch (Exception var3) {
        throw new BuilderException("Error parsing SQL Mapper Configuration. Cause: " + var3, var3);
    }
}
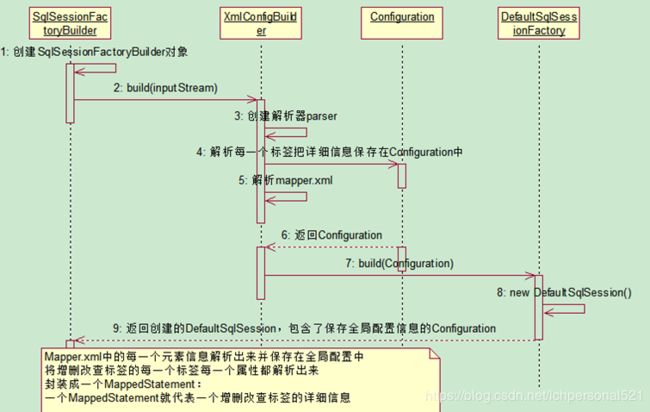
实际上就是解析主配置文件中的各个节点,然后保存在Configuration当中,然后使用Configuration创建出一个DefaultSqlsessionFactory对象,至此过程结束:
public SqlSessionFactory build(Configuration config) {
    return new DefaultSqlSessionFactory(config);
}
此处,我们可以重点关注如下两个地方,看看具体在做了什么动作:
this.pluginElement(root.evalNode("plugins")); this.mapperElement(root.evalNode("mappers"));
以上两个点分别是插件注册,和mapper的扫描注册。
2.2 插件的注册
首先我们先看一下源代码:
    private void pluginElement(XNode parent) throws Exception {
        if (parent != null) {
            Iterator i$ = parent.getChildren().iterator();
            while(i$.hasNext()) {
                XNode child = (XNode)i$.next();
                String interceptor = child.getStringAttribute("interceptor");
                Properties properties = child.getChildrenAsProperties();
                /**实例化拦截器类*/
                Interceptor interceptorInstance = (Interceptor)this.resolveClass(interceptor).newInstance();
                interceptorInstance.setProperties(properties);
                /**将实例化的拦截器类放到configuration中的interceptorChain中*/
                this.configuration.addInterceptor(interceptorInstance);
            }
        }
    }
实际上就是通过interceptor标签,解析出拦截器类,然后将其实例化并保存到Configuration类中的InterceptorChain中,以备后用。
public void addInterceptor(Interceptor interceptor) {
    this.interceptorChain.addInterceptor(interceptor);
}
2.3 mappers的扫描与解析
this.mapperElement(root.evalNode("mappers"));
通过代码我们可以知道,这里主要是解析mappers标签的。我们先来看一下mappers标签里面是什么:
<mappers>
    <mapper resource="UserMapper.xml"/>
mappers>
所以他会去解析UserMapper.xml中的内容:
<mapper namespace="com.cl.mybatis.learn.mapper.UserMapper">
    <select id="selectById" resultType="com.cl.mybatis.learn.user.User">
    select * from user where id = #{id}
  select>
mapper>
我们看一下源代码:
private void mapperElement(XNode parent) throws Exception {
  if (parent != null) {
    for (XNode child : parent.getChildren()) {
      /**如果子节点是配置的package,那么进行包自动扫描处理*/
      if ("package".equals(child.getName())) {
        String mapperPackage = child.getStringAttribute("name");
        configuration.addMappers(mapperPackage);
      } else {
        String resource = child.getStringAttribute("resource");
        String url = child.getStringAttribute("url");
        String mapperClass = child.getStringAttribute("class");
        /**如果子节点配置的是resource、url、mapperClass,本文我们使用的是resource*/
        if (resource != null && url == null && mapperClass == null) {
          ErrorContext.instance().resource(resource);
          InputStream inputStream = Resources.getResourceAsStream(resource);
          XMLMapperBuilder mapperParser = new XMLMapperBuilder(inputStream, configuration, resource, configuration.getSqlFragments());
          mapperParser.parse();
        } else if (resource == null && url != null && mapperClass == null) {
          ErrorContext.instance().resource(url);
          InputStream inputStream = Resources.getUrlAsStream(url);
          /**解析resource引入的另外一个xml文件*/
          XMLMapperBuilder mapperParser = new XMLMapperBuilder(inputStream, configuration, url, configuration.getSqlFragments());
          mapperParser.parse();
        } else if (resource == null && url == null && mapperClass != null) {
          Class<?> mapperInterface = Resources.classForName(mapperClass);
          configuration.addMapper(mapperInterface);
        } else {
          throw new BuilderException("A mapper element may only specify a url, resource or class, but not more than one.");
        }
      }
    }
  }
}
下面我们具体看一下他是如何解析另一个xml文件的:
public void parse() {
  if (!configuration.isResourceLoaded(resource)) {
    /**解析sql语句*/
    configurationElement(parser.evalNode("/mapper"));
    configuration.addLoadedResource(resource);
    /**解析名称空间,实际上就是对应绑定的接口类*/
    bindMapperForNamespace();
  }
  parsePendingResultMaps();
  parsePendingChacheRefs();
  parsePendingStatements();
}
下面我们来看一下 configurationElement(parser.evalNode("/mapper"))到底做了什么:
public void parseStatementNode() {
  String id = context.getStringAttribute("id");
  String databaseId = context.getStringAttribute("databaseId");
  if (!databaseIdMatchesCurrent(id, databaseId, this.requiredDatabaseId)) return;
  Integer fetchSize = context.getIntAttribute("fetchSize");
  Integer timeout = context.getIntAttribute("timeout");
  String parameterMap = context.getStringAttribute("parameterMap");
  String parameterType = context.getStringAttribute("parameterType");
  Class<?> parameterTypeClass = resolveClass(parameterType);
  String resultMap = context.getStringAttribute("resultMap");
  String resultType = context.getStringAttribute("resultType");
  String lang = context.getStringAttribute("lang");
  LanguageDriver langDriver = getLanguageDriver(lang);
  Class<?> resultTypeClass = resolveClass(resultType);
  String resultSetType = context.getStringAttribute("resultSetType");
  StatementType statementType = StatementType.valueOf(context.getStringAttribute("statementType", StatementType.PREPARED.toString()));
  ResultSetType resultSetTypeEnum = resolveResultSetType(resultSetType);

  String nodeName = context.getNode().getNodeName();
  SqlCommandType sqlCommandType = SqlCommandType.valueOf(nodeName.toUpperCase(Locale.ENGLISH));
  boolean isSelect = sqlCommandType == SqlCommandType.SELECT;
  boolean flushCache = context.getBooleanAttribute("flushCache", !isSelect);
  boolean useCache = context.getBooleanAttribute("useCache", isSelect);
  boolean resultOrdered = context.getBooleanAttribute("resultOrdered", false);

  // Include Fragments before parsing
  XMLIncludeTransformer includeParser = new XMLIncludeTransformer(configuration, builderAssistant);
  includeParser.applyIncludes(context.getNode());

  // Parse selectKey after includes and remove them.
  processSelectKeyNodes(id, parameterTypeClass, langDriver);

  // Parse the SQL (pre:  and  were parsed and removed)
  SqlSource sqlSource = langDriver.createSqlSource(configuration, context, parameterTypeClass);
  String resultSets = context.getStringAttribute("resultSets");
  String keyProperty = context.getStringAttribute("keyProperty");
  String keyColumn = context.getStringAttribute("keyColumn");
  KeyGenerator keyGenerator;
  String keyStatementId = id + SelectKeyGenerator.SELECT_KEY_SUFFIX;
  keyStatementId = builderAssistant.applyCurrentNamespace(keyStatementId, true);
  if (configuration.hasKeyGenerator(keyStatementId)) {
    keyGenerator = configuration.getKeyGenerator(keyStatementId);
  } else {
    keyGenerator = context.getBooleanAttribute("useGeneratedKeys",
        configuration.isUseGeneratedKeys() && SqlCommandType.INSERT.equals(sqlCommandType))
        ? new Jdbc3KeyGenerator() : new NoKeyGenerator();
  }

  builderAssistant.addMappedStatement(id, sqlSource, statementType, sqlCommandType,
      fetchSize, timeout, parameterMap, parameterTypeClass, resultMap, resultTypeClass,
      resultSetTypeEnum, flushCache, useCache, resultOrdered,
      keyGenerator, keyProperty, keyColumn, databaseId, langDriver, resultSets);
}
public MappedStatement addMappedStatement(
    String id,
    SqlSource sqlSource,
    StatementType statementType,
    SqlCommandType sqlCommandType,
    Integer fetchSize,
    Integer timeout,
    String parameterMap,
    Class<?> parameterType,
    String resultMap,
    Class<?> resultType,
    ResultSetType resultSetType,
    boolean flushCache,
    boolean useCache,
    boolean resultOrdered,
    KeyGenerator keyGenerator,
    String keyProperty,
    String keyColumn,
    String databaseId,
    LanguageDriver lang,
    String resultSets) {

  if (unresolvedCacheRef) throw new IncompleteElementException("Cache-ref not yet resolved");

  id = applyCurrentNamespace(id, false);
  boolean isSelect = sqlCommandType == SqlCommandType.SELECT;

  MappedStatement.Builder statementBuilder = new MappedStatement.Builder(configuration, id, sqlSource, sqlCommandType);
  statementBuilder.resource(resource);
  statementBuilder.fetchSize(fetchSize);
  statementBuilder.statementType(statementType);
  statementBuilder.keyGenerator(keyGenerator);
  statementBuilder.keyProperty(keyProperty);
  statementBuilder.keyColumn(keyColumn);
  statementBuilder.databaseId(databaseId);
  statementBuilder.lang(lang);
  statementBuilder.resultOrdered(resultOrdered);
  statementBuilder.resulSets(resultSets);
  setStatementTimeout(timeout, statementBuilder);

  setStatementParameterMap(parameterMap, parameterType, statementBuilder);
  setStatementResultMap(resultMap, resultType, resultSetType, statementBuilder);
  setStatementCache(isSelect, flushCache, useCache, currentCache, statementBuilder);

  MappedStatement statement = statementBuilder.build();
  configuration.addMappedStatement(statement);
  return statement;
}
通过解析一个个的标签,最终将sql语句的所有信息封装成MappedStatement对象,然后存储在configuration对象中。
那么bindMapperForNamespace();又做了什么呢?
private void bindMapperForNamespace() {
  String namespace = builderAssistant.getCurrentNamespace();
  if (namespace != null) {
    Class<?> boundType = null;
    try {
      boundType = Resources.classForName(namespace);
    } catch (ClassNotFoundException e) {
      //ignore, bound type is not required
    }
    if (boundType != null) {
      if (!configuration.hasMapper(boundType)) {
        // Spring may not know the real resource name so we set a flag
        // to prevent loading again this resource from the mapper interface
        // look at MapperAnnotationBuilder#loadXmlResource
        configuration.addLoadedResource("namespace:" + namespace);
        configuration.addMapper(boundType);
      }
    }
  }
}
实际上就是解析该sql对应的class,并把该class放到configuration中的mapperRegistry中。实际上mybatis的所有配置信息以及运行时的配置参数全部都保存在configuration对象中。
所以整个流程可以用如下的时序图表示:
三、SqlSession的创建
我们知道,SqlSessionFactory创建的时候实际上返回的是一个DefaultSqlSessionFactory对象。
当执行openSession()操作的时候,实际上执行的代码如下:
private SqlSession openSessionFromDataSource(ExecutorType execType, TransactionIsolationLevel level, boolean autoCommit) {
  Transaction tx = null;
  try {
    final Environment environment = configuration.getEnvironment();
    final TransactionFactory transactionFactory = getTransactionFactoryFromEnvironment(environment);
    tx = transactionFactory.newTransaction(environment.getDataSource(), level, autoCommit);
    /**根据execType创建Executor对象*/
    final Executor executor = configuration.newExecutor(tx, execType);
    return new DefaultSqlSession(configuration, executor, autoCommit);
  } catch (Exception e) {
    closeTransaction(tx); // may have fetched a connection so lets call close()
    throw ExceptionFactory.wrapException("Error opening session.  Cause: " + e, e);
  } finally {
    ErrorContext.instance().reset();
  }
}
从代码可以知道,openSession操作会创建Mybatis四大对象之一的Executor对象,创建过程如下:
public Executor newExecutor(Transaction transaction, ExecutorType executorType) {
  executorType = executorType == null ? defaultExecutorType : executorType;
  executorType = executorType == null ? ExecutorType.SIMPLE : executorType;
  Executor executor;
  if (ExecutorType.BATCH == executorType) {
    executor = new BatchExecutor(this, transaction);
  } else if (ExecutorType.REUSE == executorType) {
    executor = new ReuseExecutor(this, transaction);
  } else {
    executor = new SimpleExecutor(this, transaction);
  }
  /**如果开启了二级缓存,executor会被CachingExecutor包装一次*/
  if (cacheEnabled) {
    executor = new CachingExecutor(executor);
  }
  /**尝试将executor使用interceptorChain中的每个interceptor包装一次(根据配置),这里是对Mybatis强大的插件开发功能做支持*/
  executor = (Executor) interceptorChain.pluginAll(executor);
  return executor;
}
默认情况下会返回一个SimpleExecutor对象。然后SimpleExecutor被封装到DefaultSqlSession。这里我们需要注意一下,在Executor创建完毕之后,会根据配置是否开启了二级缓存,来决定是否使用CachingExecutor包装一次Executor。最后尝试将executor使用interceptorChain中的每个interceptor包装一次(根据配置),这里是对Mybatis强大的插件开发功能做支持。
四、Mapper代理的生成
当我们使用如下代码:
UserMapper mapper = session.getMapper(UserMapper.class);
来获取UserMapper的时候,实际上是从configuration当中的MapperRegistry当中获取UserMapper的代理对象:
  public <T> T getMapper(Class<T> type, SqlSession sqlSession) {
    final MapperProxyFactory<T> mapperProxyFactory = (MapperProxyFactory<T>) knownMappers.get(type);
    if (mapperProxyFactory == null)
      throw new BindingException("Type " + type + " is not known to the MapperRegistry.");
    try {
      return mapperProxyFactory.newInstance(sqlSession);
    } catch (Exception e) {
      throw new BindingException("Error getting mapper instance. Cause: " + e, e);
    }
  }
knownMappers属性里面的值,实际上就是我们在mappers扫描与解析的时候放进去的。
protected T newInstance(MapperProxy<T> mapperProxy) {
  return (T) Proxy.newProxyInstance(mapperInterface.getClassLoader(), new Class[] { mapperInterface }, mapperProxy);
}

public T newInstance(SqlSession sqlSession) {
  final MapperProxy<T> mapperProxy = new MapperProxy<T>(sqlSession, mapperInterface, methodCache);
  return newInstance(mapperProxy);
}
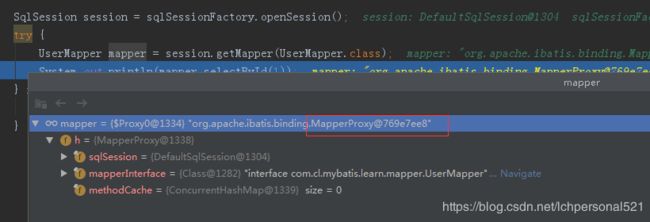
并且MapperProxy实现了InvocationHandler接口,从以上代码可以看出,实际上使用的就是jdk的动态代理,给UserMapper接口生成一个代理对象。实际上就是MapperProxy的一个对象,如下图调试信息所示:
所以整个代理对象生成过程可以用如下时序图表示:
五、执行查询语句
我们知道,我们获取到的UserMapper实际上是代理对象MapperProxy,所以我们执行查询语句的时候实际上执行的是MapperProxy的invoke方法:
public Object invoke(Object proxy, Method method, Object[] args) throws Throwable {
  /**如果调用的是Object原生的方法,则直接放行*/
  if (Object.class.equals(method.getDeclaringClass())) {
    try {
      return method.invoke(this, args);
    } catch (Throwable t) {
      throw ExceptionUtil.unwrapThrowable(t);
    }
  }
  final MapperMethod mapperMethod = cachedMapperMethod(method);
  return mapperMethod.execute(sqlSession, args);
}
我们再来看看cachedMapperMethod方法:
private MapperMethod cachedMapperMethod(Method method) {
  MapperMethod mapperMethod = methodCache.get(method);
  if (mapperMethod == null) {
    mapperMethod = new MapperMethod(mapperInterface, method, sqlSession.getConfiguration());
    methodCache.put(method, mapperMethod);
  }
  return mapperMethod;
}
可以看到,先根据方法签名,从方法缓存中获取方法,如果为空,则生成一个MapperMethod放入缓存并返回。
所以最终执行查询的是MapperMethod的execute方法:
public Object execute(SqlSession sqlSession, Object[] args) {
  Object result;
  if (SqlCommandType.INSERT == command.getType()) {
    Object param = method.convertArgsToSqlCommandParam(args);
    result = rowCountResult(sqlSession.insert(command.getName(), param));
  } else if (SqlCommandType.UPDATE == command.getType()) {
    Object param = method.convertArgsToSqlCommandParam(args);
    result = rowCountResult(sqlSession.update(command.getName(), param));
  } else if (SqlCommandType.DELETE == command.getType()) {
    Object param = method.convertArgsToSqlCommandParam(args);
    result = rowCountResult(sqlSession.delete(command.getName(), param));
      /**select查询语句*/
  } else if (SqlCommandType.SELECT == command.getType()) {
      /**档返回类型为空*/
    if (method.returnsVoid() && method.hasResultHandler()) {
      executeWithResultHandler(sqlSession, args);
      result = null;
      /**当返回many的时候*/
    } else if (method.returnsMany()) {
      result = executeForMany(sqlSession, args);
      /**当返回值类型为Map时*/
    } else if (method.returnsMap()) {
      result = executeForMap(sqlSession, args);
    } else {
      /**除去以上情况,执行这里的步骤*/
      Object param = method.convertArgsToSqlCommandParam(args);
      result = sqlSession.selectOne(command.getName(), param);
    }
  } else {
    throw new BindingException("Unknown execution method for: " + command.getName());
  }
  if (result == null && method.getReturnType().isPrimitive() && !method.returnsVoid()) {
    throw new BindingException("Mapper method '" + command.getName()
        + " attempted to return null from a method with a primitive return type (" + method.getReturnType() + ").");
  }
  return result;
}
我们示例中执行的分支语句是:
 Object param = method.convertArgsToSqlCommandParam(args);
 result = sqlSession.selectOne(command.getName(), param);
这里有一个查询参数的解析过程:
 public Object convertArgsToSqlCommandParam(Object[] args) {
      final int paramCount = params.size();
      if (args == null || paramCount == 0) {
        return null;
        /**参数没有标注@Param注解,并且参数个数为一个*/
      } else if (!hasNamedParameters && paramCount == 1) {
        return args[params.keySet().iterator().next()];
        /**否则执行这个分支*/
      } else {
        final Map<String, Object> param = new ParamMap<Object>();
        int i = 0;
        for (Map.Entry<Integer, String> entry : params.entrySet()) {
          param.put(entry.getValue(), args[entry.getKey()]);
          // issue #71, add param names as param1, param2...but ensure backward compatibility
          final String genericParamName = "param" + String.valueOf(i + 1);
          if (!param.containsKey(genericParamName)) {
            param.put(genericParamName, args[entry.getKey()]);
          }
          i++;
        }
        return param;
      }
    }
这里的代码看起来可能逻辑不太好懂,我这里解释一下结论就好,这里参数解析如果判断参数一个只有一个(一个单一参数或者是一个集合参数),并且没有标注@Param注解,那么直接返回这个参数的值,否则会被封装为一个Map,然后再返回。
封装的样式如下用几个示例解释:
例1:
/**接口为*/
User selectByNameSex(String name, int sex);
/**我们用如下格式调用*/
userMapper.selectByNameSex("张三",0);
/**参数会被封装为如下格式:*/
0 ---> 张三
1 ---> 0
param1 ---> 张三
param2 ---> 0
如下图所示:
例2:
/**接口为*/
User selectByNameSex(@Param("name") String name, int sex);
/**我们用如下格式调用*/
userMapper.selectByNameSex("张三",0);
/**参数会被封装为如下格式:*/
name ---> 张三
1 ---> 0
param1 ---> 张三
param2 ---> 0
如下图所示:
参数处理完接下来就是调用执行过程,最终调用执行的是DefaultSqlSession中的selectList方法:
public <E> List<E> selectList(String statement, Object parameter, RowBounds rowBounds) {
  try {
    MappedStatement ms = configuration.getMappedStatement(statement);
    List<E> result = executor.query(ms, wrapCollection(parameter), rowBounds, Executor.NO_RESULT_HANDLER);
    return result;
  } catch (Exception e) {
    throw ExceptionFactory.wrapException("Error querying database.  Cause: " + e, e);
  } finally {
    ErrorContext.instance().reset();
  }
}
这里调用SimpleExecutor的query方法执行查询操作,接着调用doQuery方法:
public <E> List<E> doQuery(MappedStatement ms, Object parameter, RowBounds rowBounds, ResultHandler resultHandler, BoundSql boundSql) throws SQLException {
  Statement stmt = null;
  try {
    Configuration configuration = ms.getConfiguration();
      /**这里出现了Mybatis四大对象中的StatementHandler*/
    StatementHandler handler = configuration.newStatementHandler(wrapper, ms, parameter, rowBounds, resultHandler, boundSql);
    stmt = prepareStatement(handler, ms.getStatementLog());
    return handler.<E>query(stmt, resultHandler);
  } finally {
    closeStatement(stmt);
  }
}
public StatementHandler newStatementHandler(Executor executor, MappedStatement mappedStatement, Object parameterObject, RowBounds rowBounds, ResultHandler resultHandler, BoundSql boundSql) {
  StatementHandler statementHandler = new RoutingStatementHandler(executor, mappedStatement, parameterObject, rowBounds, resultHandler, boundSql);
  statementHandler = (StatementHandler)
   /**创建StatementHandler并应用到插件支持*/
      interceptorChain.pluginAll(statementHandler);
  return statementHandler;
}
在创建StatementHandler的同时,应用插件功能,同时创建了Mybatis四大对象中的另外两个对象:
protected BaseStatementHandler(Executor executor, MappedStatement mappedStatement, Object parameterObject, RowBounds rowBounds, ResultHandler resultHandler, BoundSql boundSql) {
   ……
   ……
   ……
 /**Mybatis四大对象中的ParameterHandler*/
  this.parameterHandler = configuration.newParameterHandler(mappedStatement, parameterObject, boundSql);
  /**Mybatis四大对象中的ResultSetHandler*/
  this.resultSetHandler = configuration.newResultSetHandler(executor, mappedStatement, rowBounds, parameterHandler, resultHandler, boundSql);
}
同时在创建的时候,也运用到了插件增强功能:
public ParameterHandler newParameterHandler(MappedStatement mappedStatement, Object parameterObject, BoundSql boundSql) {
   ……
   ……
   ……
  interceptorChain.pluginAll(parameterHandler);
  return parameterHandler;
}

  public ResultSetHandler newResultSetHandler(Executor executor, MappedStatement mappedStatement, RowBounds rowBounds, ParameterHandler parameterHandler,
      ResultHandler resultHandler, BoundSql boundSql) {
   ……
   ……
   ……
    interceptorChain.pluginAll(resultSetHandler);
    return resultSetHandler;
  }
接下来就是执行正常的JDB C查询功能了,参数设置由ParameterHandler操作,结果集处理由ResultSetHandler处理。至此,整个查询流程结束。
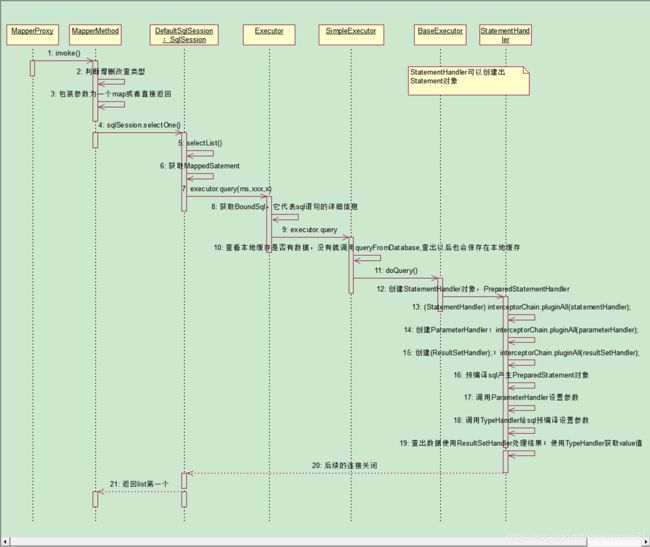
整个查询阶段的时序图可以用如下图表示:
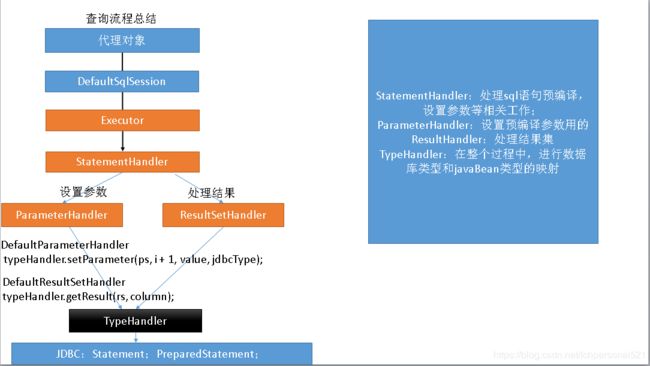
整个查询流程,可以总结如下图:
六、Mybatis插件开发
6.1 四大对象
Mybatis四大对象指的是:Executor、StatementHandler、ParamaterHandler、ResultSetHandler。Mybatis允许我们在四大对象执行的过程中对其指定方法进行拦截,这样就可以很方便了进行功能的增强,这个功能跟Spring的切面编程非常类似。上文我们都有提到过,在四大对象创建的时候,都进行了插件增强,下面我们就来讲解一下其实现原理。
例如我们希望在sql语句之前前后进行时间打印,计算出sql执行的时间。此功能我们就可以拦截StatementHandler。这里我们需要时间Mybatis提供的Intercaptor接口。
package com.cl.mybatis.learn.intercaptor;

/**
 * @Author: chengli
 * @Date: 2018/11/24 17:37
 */

/**该注解签名告诉此拦截器拦截四大对象中的哪个对象的哪个方法,以及方法的签名信息*/
@Intercepts({
        @Signature(type = StatementHandler.class, method = "query", args = {Statement.class, ResultHandler.class})
})
public class SqlLogPlugin implements Interceptor {
    @Override
    public Object intercept(Invocation invocation) throws Throwable {
        long begin = System.currentTimeMillis();
        try {
            return invocation.proceed();
        } finally {
            long time = System.currentTimeMillis() - begin;
            System.out.println("sql 运行了 :" + time + " ms");
        }
    }

    @Override
    public Object plugin(Object target) {
        return Plugin.wrap(target, this);
    }

    @Override
    public void setProperties(Properties properties) {

    }
}
接下来我们需要在mybatis-config.xml配置该拦截器:
<plugins>
    <plugin interceptor="com.cl.mybatis.learn.intercaptor.SqlLogPlugin">
        <property name="参数1" value="root"/>
        <property name="参数2" value="123456"/>
    plugin>
plugins>
此时,拦截器的配置就完成了,运行结果如下:
DEBUG 11-24 17:51:34,877 ==>  Preparing: select * from user where id = ?   (BaseJdbcLogger.java:139)
DEBUG 11-24 17:51:34,940 ==> Parameters: 1(Integer)  (BaseJdbcLogger.java:139)
DEBUG 11-24 17:51:34,990 <==      Total: 1  (BaseJdbcLogger.java:139)
sql 运行了 :51 ms
User{id=1, name='张三', age=42, sex=0}
6.2 插件原理探究
从代码我们可以看出:
  public Object plugin(Object target) {
        return Plugin.wrap(target, this);
    }
该代码是对目标对象的包装,实际运行的时候,是使用的包装之后的类,运行的时候执行的是intercept方法。那么现在我们来看下它是怎么进行包装的:
public static Object wrap(Object target, Interceptor interceptor) {
  Map<Class<?>, Set<Method>> signatureMap = getSignatureMap(interceptor);
  Class<?> type = target.getClass();
  Class<?>[] interfaces = getAllInterfaces(type, signatureMap);
  if (interfaces.length > 0) {
    return Proxy.newProxyInstance(
        type.getClassLoader(),
        interfaces,
        new Plugin(target, interceptor, signatureMap));
  }
  return target;
}
而Plugin类实现了InvocationHanlder接口:
public class Plugin implements InvocationHandler {
    ……
}
显然这里使用的就是JDK的动态代理,对目标对象包装了一层。
假如一个对象被多个拦截器进行了多次包装,那么后包装的在最外层会先执行。
