Asp.Net Core 3.1 发布至Linux并使用Nginx托管
.Net Core最重要的特性就是跨平台(Cross-Platform),此前一直在Windows平台上打转,这次尝试将Asp.Net Core发布至Linux,特记录备查。
主要环境
本文用到的操作系统和软件版本如下:
Visual Studio 2019 Professional
.NET Core 3.1
CentOS 8 X64
nginx/1.14.1
创建和发布ASP.NET Core WebApi站点
1. 创建项目
1.1 打开VS2019,创建项目,选择ASP.NET Core Web应用程序
1.2 配置新项目
1.3 选择API类型创建新的ASP.NET Core Web应用程序
2.增加Url网址配置文件
项目默认使用http://localhost:5000的Url进行侦听,我们可以增加一个配置文件来随时修改Url地址。在项目根目录中增加一个hosting.json文件,文件内容如下(8080端口可以改成自己喜欢的):
{
  "server.urls": "http://*:8080"
}
同时,修改Program.cs文件,内容如下:
public static void Main(string[] args)
        {
            var config = new ConfigurationBuilder()
                .SetBasePath(Directory.GetCurrentDirectory())
                .AddJsonFile("hosting.json", optional: true)
                .Build();

            var host = new WebHostBuilder()
                .UseKestrel()
                .UseConfiguration(config)
                .UseContentRoot(Directory.GetCurrentDirectory())
                .UseIISIntegration()
                .UseStartup()
                .Build();

            host.Run();
        }
3.发布项目
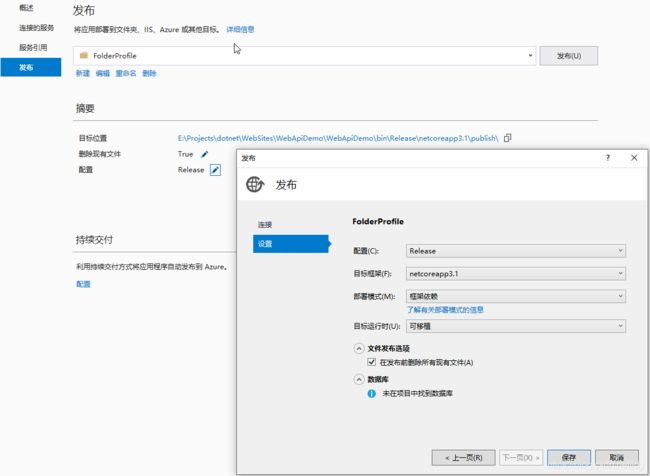
右键项目-发布,选择文件夹模式。
 发布后,只需要将Publish文件夹下的内容上传到CentOS服务器下即可。
为CentOS准备.NET Core环境
参考微软官方网站:https://docs.microsoft.com/zh-cn/dotnet/core/install/linux-package-manager-centos7#install-the-aspnet-core-runtime 。
1. 注册 Microsoft 密钥和源
这本质上就是向微软提交投名状,表示我这台服务器要用.NET Core
sudo rpm -Uvh https://packages.microsoft.com/config/centos/7/packages-microsoft-prod.rpm
2.安装 .NET Core SDK
sudo yum install dotnet-sdk-3.13.安装 ASP.NET Core 运行时
如果先安装SDK,运行时已经作为依赖项安装,本步骤也可省略。
sudo yum install aspnetcore-runtime-3.1说明:在微软的官方文档中还有安装“安装 .NET Core 运行时”步骤,但实际在安装 ASP.NET Core 运行时,依赖软件包已经包括了.NET Core运行时。
站点配置
1. 建立目录
mkdir dotnet
cd dotnet
2.将发布文件夹(Publish)目录文件复制至新建的目录
[dotnba@CentOS8 ~]$ cd dotnet
[dotnba@CentOS8 dotnet]$ pwd
/home/dotnba/dotnet
[dotnba@CentOS8 dotnet]$ ls
appsettings.json  hosting.json  WebApiDemo.dll  WebApiDemo.runtimeconfig.json
3.启动站点
dotnet WebApiDemo.dll4.访问站点
此时,通过http://localhost:8080/weatherforecast,已经能访问站点。如果未修改Program.cs,那么默认地将使用5000端口,也就是通过http://localhost:5000/weatherforecast来访问。
安装配置Nginx
1.安装Nginx
sudo yum -y install nginx 2.启动Nginx并查看Nginx状态
systemctl enable nginx
service nginx start
ps -ef | grep nginx
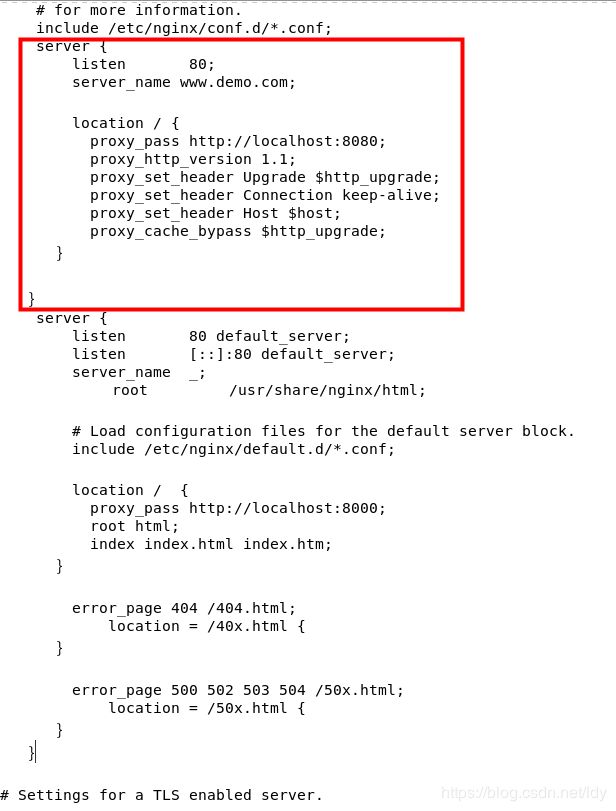
3.为.NET Core Web站点配置反向代理
     listen       80;
        server_name www.demo.com;

        location / {
          proxy_pass http://localhost:8080;
          proxy_http_version 1.1;
          proxy_set_header Upgrade $http_upgrade;
          proxy_set_header Connection keep-alive;
          proxy_set_header Host $host;
          proxy_cache_bypass $http_upgrade;
        }

    }
4.重新加载配置,访问站点
service nginx reload
在hosts文件中添加静态地址映射
192.168.202.142 www.demo.com输入地址:http://www.demo.com/weatherforecast 即可访问
后续文章:
- CentOS8下安装Supervisior并为ASP.NET Core站点配置监控
- Asp.Net Core 3.1在CentOS8下采用Podman进行容器化部署
参考文章:
- 微软官方:使用 Nginx 在 Linux 上托管 ASP.NET Core
- Asp.Net Core 程序部署到Linux(centos)生产环境(一):普通部署


