Spring boot + mybatis 整合
Spring Boot 快速的搭建web开发环境,其内置tomcat,相对 SpringMVC,缩减了很多的配置,可以将更多的精力集中在业务上,将自己初识 Spring Boot 思路整理了一下。
开发环境工具: IDEA, maven
1. 新建 maven 的 web 工程,工程新建就不再赘述
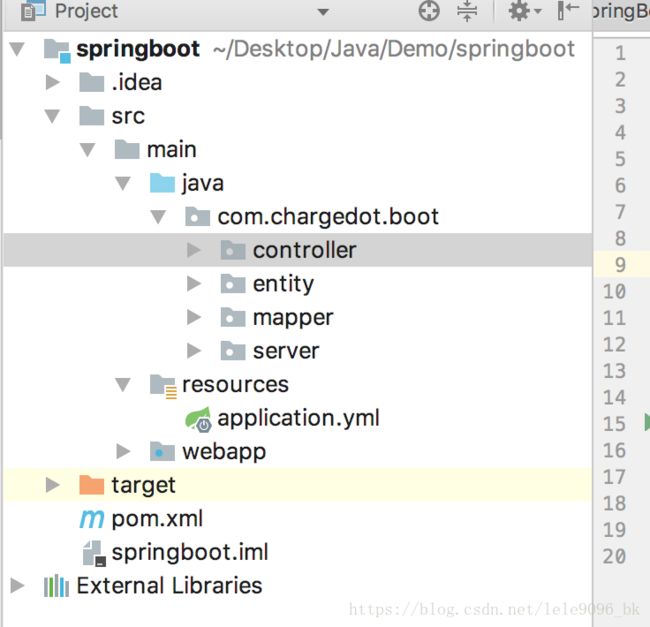
2. 在 src --> main 目录下新建 java resources 文件夹,与 webapp 文件夹在同一级,目录结构如下
3. 更改文件夹权限。java 给 Sources, resources 给 Resources
4. pom 文件添加依赖,pom.xml 配置如下
  4.0.0

  com.chargedot
  SpringBootDemo
  1.0-SNAPSHOT
  war

  SpringBootDemo Maven Webapp

  http://www.example.com


    UTF-8
    1.7
    1.7
    2.9.6
    3.2.8
    1.3.0
    1.2.17


    org.springframework.boot
    spring-boot-starter-parent
    1.4.3.RELEASE


            org.springframework.boot
            spring-boot-starter-data-jpa


            org.mybatis.spring.boot
            mybatis-spring-boot-starter
            1.3.1


            org.springframework.boot
            spring-boot-starter-web


            mysql
            mysql-connector-java
            runtime


            org.springframework.boot
            spring-boot-starter-test
            test


          org.springframework.boot
          spring-boot-starter-jdbc


          com.fasterxml.jackson.core
          jackson-core
          ${jackson.version}


          com.fasterxml.jackson.core
          jackson-databind
          ${jackson.version}


          com.fasterxml.jackson.core
          jackson-annotations
          ${jackson.version}


          com.fasterxml.jackson.datatype
          jackson-datatype-joda
          ${jackson.version}


          log4j
          log4j
          ${log4j.version}


    SpringBootDemo


              src/main/java

                  **/*.properties
                  **/*.xml

              false


          maven-clean-plugin
          3.0.0


          maven-resources-plugin
          3.0.2


          maven-compiler-plugin
          3.7.0


          maven-surefire-plugin
          2.20.1


          maven-war-plugin
          3.2.0


          maven-install-plugin
          2.5.2


          maven-deploy-plugin
          2.8.2
5. 配置 application.yml
spring:
    datasource:
      name: root
      url: jdbc:mysql://127.0.0.1:3306/sql_name?useUnicode=true&characterEncoding=utf-8
      username: root
      password: sql_password
      driver-class-name: com.mysql.jdbc.Driver
  #server port
server:
  port: 8080
6. 在 java 目录下新建包名,名称自己随意,目录结构如下
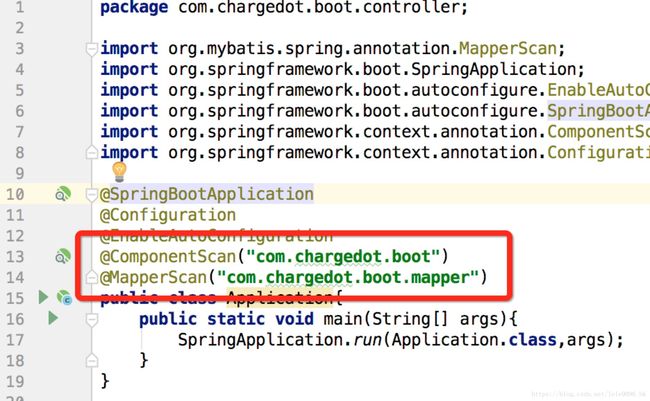
7.在 controller 下新建启动类 Application
package com.chargedot.boot.controller;

import org.mybatis.spring.annotation.MapperScan;
import org.springframework.boot.SpringApplication;
import org.springframework.boot.autoconfigure.EnableAutoConfiguration;
import org.springframework.boot.autoconfigure.SpringBootApplication;
import org.springframework.context.annotation.ComponentScan;
import org.springframework.context.annotation.Configuration;

@SpringBootApplication
@Configuration
@EnableAutoConfiguration
@ComponentScan("com.chargedot.boot")
@MapperScan("com.chargedot.boot.mapper")
public class Application{
    public static void main(String[] args){
        SpringApplication.run(Application.class,args);
    }
}
8. 新建控制器类 BootDemoController
package com.chargedot.boot.controller;

import org.springframework.beans.factory.annotation.Autowired;
import org.springframework.web.bind.annotation.RequestMapping;
import org.springframework.web.bind.annotation.RestController;

import java.util.List;

@RestController
public class BootDemoController {

    @RequestMapping("/testboot")
    public String home(){
        return "hello world";
    }
}
9. 在 application 类中启动 application类,单击 左侧 绿色三角箭头 debug 模式启动服务,使用的是 spring 内置的 tomcat 服务,端口为默认的 8080
10. 服务启动之后,在浏览器输入:http://localhost:8080/testboot 测试结果, 显示如下结果说明 Spring boot 已搭建成功
11. 集成整合 mybatis, mybatis 所需的jar包 在上面的 pom文件中已经导入了,mysql 数据库的连接配置也在上面的 applicaton.yml z中配置了,完整的配置文件目录如下
12. 添加 User 实体类
package com.chargedot.boot.entity;

import org.springframework.beans.factory.annotation.Value;
import org.springframework.stereotype.Component;

@Component
public class User {
    @Value("lisi")
    private String t_name;
    private int age = 2;

    public User(){}
    public User(String name,int age){
        this.t_name = name;
        this.age = age;
    }

    @Override
    public String toString() {
        return "User{" +
            "name='" + t_name + '\'' +
            ", age=" + age +
            '}';
    }

    public int getAge() {
        return age;
    }

    public void setAge(int age) {
        this.age = age;
    }

    public String getName() {
        return t_name;
    }

    public void setName(String name) {
        this.t_name = name;
    }

}
13. 编写 mapper
(1) UserMapper 接口
package com.chargedot.boot.mapper;

import com.chargedot.boot.entity.User;
import org.springframework.stereotype.Repository;

import java.util.List;

//@Repository
public interface UserMapper {
    int insertUser(User user);
    List selectAllUser();
}
(2)UserMapper.xml ( mysql 语句)
INSERT INTO t_user (t_name,age)
VALUES
(#{t_name},#{age})
14. 增加 server 层
(1) UserService 接口
package com.chargedot.boot.server;

import com.chargedot.boot.entity.User;

import java.util.List;

public interface UserService {
    int addUser(User user);
    List findAllUser();
}
(2) UserServiceImpl
package com.chargedot.boot.server;

import com.chargedot.boot.entity.User;
import com.chargedot.boot.mapper.UserMapper;
import org.springframework.beans.factory.annotation.Autowired;
import org.springframework.stereotype.Service;
import java.util.List;

@Service
public class UserServiceImpl implements UserService{
    @Autowired
    private UserMapper userMapper;

    @Override
    public int addUser(User user) {
        return userMapper.insertUser(user);
    }

    @Override
    public List findAllUser() {
        return userMapper.selectAllUser();
    }
}
15. 编写 Controller
package com.chargedot.boot.controller;

import com.chargedot.boot.entity.User;
import com.chargedot.boot.server.UserServiceImpl;
import org.springframework.beans.factory.annotation.Autowired;
import org.springframework.web.bind.annotation.RequestMapping;
import org.springframework.web.bind.annotation.RestController;

import java.util.List;

@RestController
public class BootDemoController {
    @Autowired
    private UserServiceImpl userService;

    @Autowired
    private User user;

    @RequestMapping("/testboot")
    public String home(){
        return "hello world";
    }

    @RequestMapping("/getuser")
    public User getUser(){
        User user = new User("zhangsan",20);
        return user;
    }

    @RequestMapping("/adduser")
    public int addUser(){
       return userService.addUser(user);
    }

    @RequestMapping("/findAllUser")
    public List findAllUser(){
        return userService.findAllUser();
    }
}
16. 在浏览器中输入测试结果如下则整合成功:
新增: http://localhost:8080/adduser
查询所有:http://localhost:8080/findAllUser
17. 整合 mybatis 中遇到的报错问题,常见问题自行百度
1. 绑定无效 org.apache.ibatis.binding.BindingException: Invalid bound statement (not found):
解决办法:方式一: 在 pom.xml 中
              src/main/java

                  **/*.properties
                  **/*.xml

              false
方式二: 在项目编译的时候会把 java 文件夹下的 class 编译放到target 下的class下, 而 ***mapper.xml 资源文件不会自动编译找不到,所以无法绑定,此时可以不需要在 pom.xml 文件夹下添加
2. 报错: org.springframework.beans.factory.UnsatisfiedDependencyException:
网上找了很多的资料,但是也没能解决问题,最后是因为导入的 mybatis 依赖包引起的冲突
解决方法: 在 pom.xml 文件中
pom.xml 中只保留
    org.mybatis.spring.boot
    mybatis-spring-boot-starter
    1.3.1
这个,删掉 其它的 mybatis 的依赖
3. 报错: 扫描mapper 报错
解决方法:在 application 中不要漏了添加扫描注解
至此其它的一些小问题百度一下很多,spring boot + mybatis 简单的一个服务集成完成


