CODIS(release3.2.0)集群搭建
CODIS(release3.2.0)集群搭建
一、CODIS安装
【官方】安装方式
注:在Mac下测试需要独立安装autoconf (如何安装autoconf),可能需要关注一下版本。
二、简单集群搭建
1. CODIS集群架构
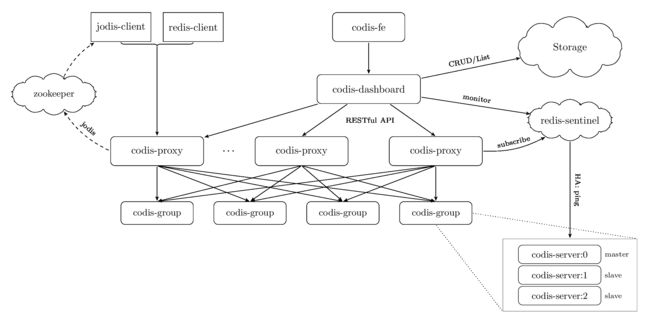
CODIS-FE是集群管理界面,CODIS-DASHBOARD是集群管理中心,Storage是外部存储(注册中心)例如FileSystem、ETCD、Zookeeper,redis-sentinel是redis类似的高可用机制支持自动主从切换(HA),CODIS-PROXY是底层CODIS-SERVER集群代理,CODIS-GROUP没有对应的组件是一个虚拟的节点机制通过槽位映射机制实现PROXY与SERVER的映射。官方给出了快速的集群搭建方法:【官方】官方快速搭建,大致分为以下几步:
- cd $GOPATH/src/github.com/CodisLabs/codis/admin
./admin/codis-dashboard-admin.sh start 启动CODIS-DASHBOARD 外部存储filesystem(/tmp/codis)./admin/codis-proxy-admin.sh start 启动CODIS-PROXY 并加入CODIS-DASHBOARD管理./admin/codis-server-admin.sh start 启动CODIS-SERVER./admin/codis-fe-admin.sh start 启动CODIS-FE,可以通过127.0.0.1:9090访问管理界面- 在CODIS-FE界面通过“NEW GROUP”新建一个CODIS-GROUP,然后通过按钮“Add Server”把CODIS-SERVER注册到CODIS-DASHBOARD,默认地址是127.0.0.1:6379,然后点击“rebalance all slots”自动给各个分组分配槽位。
这样就可以通过redis客户端连接指定的proxy,例如:/usr/local/redis/bin/redis-cli -p 19000,但是这样并没有搭建一个集群,因为只有单一的proxy,单一的server,没有多个分组,没有使用zookeeper,etcd没法使用jodis,needs,同时也没有启动涉及到主从同步操作,没有启动redid-sentinel,没有实现高可用。
三、CODIS集群搭建进阶(单机-多机类似)
第一步:启动Zookeeper (具体过程不赘述)
zk地址127.0.0.1:2181, 然后cd $GOPATH/src/github.com/CodisLabs/codis
第二步:启动CODIS-DASHBOARD
vim ./config/dashboard.toml 编辑配置文件| # Set Coordinator, only accept "zookeeper" & "etcd" coordinator_name = "zookeeper" coordinator_addr = "127.0.0.1:2181" # Set Codis Product {Name/Auth}. product_name = "codis-demo” #区分不同的集群,注册到zookeeper也是用这个区分 product_auth = ""# Set bind address for admin(rpc), tcp only. admin_addr = "0.0.0.0:18080” #用于dashboard与codas-proxy,codis-server进行tcp通信 |
nohup ./bin/codis-dashboard --ncpu=4 --config=./config/dashboard.toml --log=./log/dashboard.log --log-level=WARN &第三步:启动CODIS-FE
nohup ./bin/codis-fe --ncpu=4 --log=./log/fe.log --log-level=WARN --zookeeper=127.0.0.1:2181 --listen=127.0.0.1:8080 &注:--zookeeper=后面接zookeeper连接地址,—listen=是fe的界面登入地址此处为http://127.0.0.1:8080
第四步:启动CODIS-PROXY
vim ./config/proxy.toml,vim ./config/proxy2.toml编辑配置文件 (只列举必修项,其他采用默认,等需要时在研究)
| # Set Codis Product {Name/Auth}. product_name = "codis-demo” #同codis-dashboard中配置 product_auth = ""# Set bind address for admin(rpc), tcp only. admin_addr = "0.0.0.0:11080” #用于和codis-dashboard进行tcp通信同步信息 # Set bind address for proxy, proto_type can be "tcp", "tcp4", "tcp6", "unix" or "unixpacket". proto_type = "tcp4" proxy_addr = "0.0.0.0:19000” #用于redis客户端连接,支持redis协议,端口唯一 # Set jodis address & session timeout. jodis_name = “zookeeper” #用于jodis从zookeeper获取集群proxy信息,目前只支持zookeeper,etcd jodis_addr = "127.0.0.1:2181” jodis_timeout = 10jodis_compatible = false |
| # Set Codis Product {Name/Auth}. product_name = "codis-demo” #同codis-dashboard中配置 product_auth = ""# Set bind address for admin(rpc), tcp only. admin_addr = "0.0.0.0:11081” #用于和codis-dashboard进行tcp通信同步信息 # Set bind address for proxy, proto_type can be "tcp", "tcp4", "tcp6", "unix" or "unixpacket". proto_type = "tcp4" proxy_addr = "0.0.0.0:19001” #用于redis客户端连接,支持redis协议,端口唯一 # Set jodis address & session timeout. jodis_name = “zookeeper” #用于jodis从zookeeper获取集群proxy信息,目前只支持zookeeper,etcd jodis_addr = "127.0.0.1:2181” jodis_timeout = 10jodis_compatible = false |
nohup ./bin/codis-proxy --ncpu=4 --config=./config/proxy.toml --log=./log/proxy.log --log-level=WARN &
nohup ./bin/codis-proxy --ncpu=4 --config=./config/proxy2.toml  --log=./log/proxy.log --log-level=WARN &
以上操作启动了两个codis-proxy,但是它们还是游离的,没有加入codis-dashboard管理,也没有与任何codis-server建立联系,可以通过下面的方法加入codas-dashboard(codis-proxy是通过codis-dashboard来获取codis-server相关的信息,大致是客户端向proxy发起请求,proxy通过slotId=crc32(key)%1024来获取槽位,从而知道groupId,确定分组之后就知道需要连接的master server):
./bin/codis-admin --dashboard=127.0.0.1:18080 --create-proxy -x 127.0.0.1:11080
./bin/codis-admin --dashboard=127.0.0.1:18080 --create-proxy -x 127.0.0.1:11081
第五步:启动CODIS-SERVER
vim ./config/redis.conf (还有redis_6380.conf redis_6579.conf redis_6580.conf redis_6679.conf redis_6680.conf redis_6879.conf redis_6880.conf),需要修改的有:| pidfile /var/run/redis_6379.pid port 6379 logfile /var/log/redis_6379.log dbfilename dump_6379.rdb |
| 执行: ./bin/codis-server ./config/redis.conf ./bin/codis-server ./config/redis_6380.conf …... |
| group1:6379 主 6380 从 group2:6579 主 6580 从 group3:6679 主 6680 从 group4:6879 主 6880 从 |
第六步:创建CODIS-GROUP
./bin/codis-admin --dashboard=127.0.0.1:18080 --create-group --gid=1         #新建group 1  相当于fe页面“NEW GROUP”按钮
./bin/codis-admin --dashboard=127.0.0.1:18080 --group-add     --gid=1   --addr=127.0.0.1:6379   #把server127.0.0.1:6379加入集群,
相当于fe页面的"Add Server “按钮,其他server以此类推。
第七步:主从同步
./bin/codis-admin  --dashboard=127.0.0.1:18080 --sync-action --create --addr=127.0.0.1:6379  相当于fe页面的”SYNC"按钮
./bin/codis-admin  --dashboard=127.0.0.1:18080 --sync-action --create --addr=127.0.0.1:6380  #所有server都要执行
以上命令实现group1:6379 主  6380 从    同步,自动选取第一个为master,其他为slave,其他组同样执行上述命令
第八步:GROUP自动槽位分配
./bin/codis-admin  --dashboard=127.0.0.1:18080 --rebalance --confirm  相当于fe页面“Rebalance All Slots”按钮
注:也可以定制化的分配槽位./bin/codis-admin  --dashboard=127.0.0.1:18080 --slot-action --create-range --beg=0 --end=300   --gid=1
第八步:启动CODIS-SERVER sentinel服务
vim ./config/sentinel.conf (and vim ./config/sentinel2.conf)| sentinel monitor mymaster 127.0.0.1 6379 2 sentinel down-after-milliseconds mymaster 10000 sentinel failover-timeout mymaster 180000 sentinel parallel-syncs mymaster 5
sentinel monitor mymaster2 127.0.0.1 6579 2 sentinel down-after-milliseconds mymaster2 10000 sentinel failover-timeout mymaster2 180000 sentinel parallel-syncs mymaster2 5
sentinel monitor mymaster3 127.0.0.1 6679 2 sentinel down-after-milliseconds mymaster3 10000 sentinel failover-timeout mymaster3 180000 sentinel parallel-syncs mymaster3 5
sentinel monitor mymaster4 127.0.0.1 6879 2 sentinel down-after-milliseconds mymaster4 10000 sentinel failover-timeout mymaster4 180000 sentinel parallel-syncs mymaster4 5 |
| 两个文件不同配置: port 26379 port 26579 |
然后启动服务:
nohup ./bin/codis-server ./config/sentinel.conf --sentinel &
nohup ./bin/codis-server ./config/sentinel2.conf --sentinel &
然后关联集群:(同fe页面“Add Sentinel”按钮)
./bin/codis-admin  --dashboard=127.0.0.1:18080 --sentinel-add   --addr=127.0.0.1:26379
./bin/codis-admin  --dashboard=127.0.0.1:18080 --sentinel-add   --addr=127.0.0.1:26579
然后执行sync操作:(同fe页面”SYNC"按钮)
./bin/codis-admin  --dashboard=127.0.0.1:18080 --sentinel-resync
三、JODIS连接集群
JedisResourcePool jedisPool = RoundRobinJedisPool.create()
                .curatorClient("127.0.0.1:2181", 30000).zkProxyDir("/jodis/codis-demo").build();
        try (Jedis jedis = jedisPool.getResource()) {
            jedis.set("foo", "bar");
            String value = jedis.get("foo");
            System.out.println(value);
        }
Codis 安装命令集合:https://github.com/CodisLabs/codis/blob/release3.2/cmd/admin/main.go