Java多线程拾遗(一)——重新简单认识线程
前言
针对Java多线程,其实一直都些零散的学习,面试中多线程也是经常被问到的一块,这次还真想认证的总结好这个,实在不想在这块栽跟头了。这次根据《Java 高并发编程详解》一书进行学习和总结。
先来个简单实例
@Slf4j
public class StepIn {

    public static void main(String[] args) {
    	//启动一个线程
        new Thread(){
            @Override
            public void run() {
                enjoyMusic();
            }
        }.start();
        browseNews();
    }

    private static void browseNews(){
        while(true){
            log.info("Uh-hh,the good news.");
            sleep(1);
        }
    }

    private static void enjoyMusic(){
        while(true){
            log.info("Uh-hh,the nice music.");
            sleep(1);
        }
    }

    private static void sleep(int seconds){
        try {
            TimeUnit.SECONDS.sleep(seconds);
        } catch (InterruptedException e) {
            e.printStackTrace();
        }
    }
}
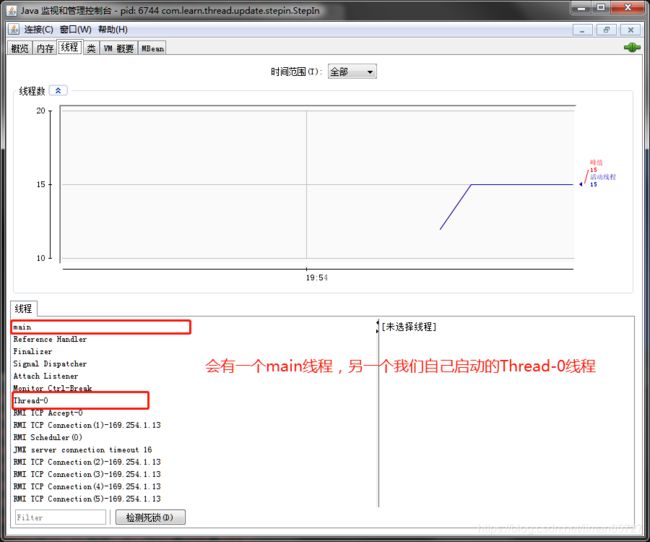
运行起来之后,利用JConsole连接到指定的JVM进程,查看结果如下
可以很正常的看到会有一个main线程和自己启动的Thread-0线程,还有其他的一些守护线程(什么是守护线程后续会详谈)。每一个线程都有自己的局部变量表,程序计数器,以及生命周期。
线程的生命周期
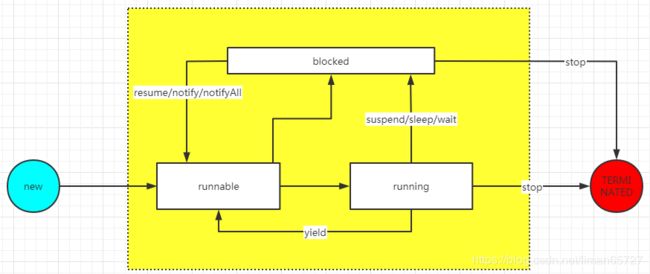
线程执行了Thread的start方法就代表该线程已经开始执行了么?线程的生命周期大体可以分为如下5个主要的阶段,具体如下图所示
一个线程的生命周期大体可以分为5个主要的阶段:NEW,RUNNABLE,RUNNING,BLOCKED,TERMINATED。
NEW状态
当通过new Thread()创建一个Thread对象的时候,并没有做线程启动的操作,这个时候线程并不处于执行状态,因为没有调用start启动线程,线程这个时候只能为NEW状态。
RUNNABLE状态
线程对象进入RUNNABLE状态必须调用start方法,此时才是真正地在JVM中创建了一个线程,线程启动之后并不能立即执行,必须得到CPU选中,如果被CPU选中,则会进入Running状态。
顺便说一下,线程无法从RUNNABLE状态直接进入TERMINATED状态。
RUNNING状态
CPU选中了该线程,该线程才真正进入到了运行状态,此时它才能真正的执行自己的代码逻辑,一个在RUNNING状态的线程,线程可能发送如下转换
由RUNNING直接进入TERMINATED状态,比如调用stop方法(虽然不建议使用)
由RUNNING状态进入BLOCKED状态,比如调用sleep或者wait方法,或者进行某个阻塞的IO状态,获取某个锁资源,
由RUNNING状态进入RUNNABLE状态,比如CPU的调度器轮询使该线程放弃执行,或由于主动调用了yield方法,放弃CPU的执行权。
BLOCKED状态
由RUNNING进入到BLOCKED的状态我们已经介绍过了。BLOCKED状态切换成其他状态的可能如下:
1、直接进入TERMINATED状态,比如调用stop方法
2、直接进入RUNNABLE状态,线程阻塞的操作结束,比如读取到了想要的字节,或者完成了指定时间的休眠,或者获取到了某个锁资源,或者在阻塞过程中被打断(比如其他线程调用interrupt方法)。
TERMINATED状态
这是一个线程的最终状态,该状态不会有任何切换。线程运行出错,或者JVM Crash都会导致所有线程直接进入该状态
为什么要有Runnable接口
谈到有几种方式创建线程,我们的第一反应都是两种(其实还有其他的)——继承Thread类,实现Runnable接口。但是,为啥会有两种方式,为啥不直接实现一个Runnable接口就完事了?
其实有两个原因:其中一个是如果一个类已经继承了某个类,再想继承Thread类就很难了,所以有了一个Runnable接口,但是还有另外一个原因,这个原因需要从下面一段程序说起,这个我们后面会讨论。
这里先看看start方法中的源码
/**
 * Causes this thread to begin execution; the Java Virtual Machine
 * calls the run method of this thread.
 *
 * The result is that two threads are running concurrently: the
 * current thread (which returns from the call to the
 * start method) and the other thread (which executes its
 * run method).
 *
 * It is never legal to start a thread more than once.
 * In particular, a thread may not be restarted once it has completed
 * execution.
 *
 * @exception  IllegalThreadStateException  if the thread was already
 *               started.
 * @see        #run()
 * @see        #stop()
 */
public synchronized void start() {
    /**
     * This method is not invoked for the main method thread or "system"
     * group threads created/set up by the VM. Any new functionality added
     * to this method in the future may have to also be added to the VM.
     *
     * A zero status value corresponds to state "NEW".
     */
    if (threadStatus != 0)
        throw new IllegalThreadStateException();

    /* Notify the group that this thread is about to be started
     * so that it can be added to the group's list of threads
     * and the group's unstarted count can be decremented. */
    group.add(this);

    boolean started = false;
    try {
        start0();
        started = true;
    } finally {
        try {
            if (!started) {
                group.threadStartFailed(this);
            }
        } catch (Throwable ignore) {
            /* do nothing. If start0 threw a Throwable then
              it will be passed up the call stack */
        }
    }
}

private native void start0();
可以看出,start源码是比较简单的,核心无非就是调用了一个start0()的本地方法。但是我们继承Thread的时候,复写的是run方法,而不是start方法?其实从注释中可以看到这一点:Causes this thread to begin execution; the Java Virtual Machine calls the run method of this thread.这句话的翻译就是在开始执行这个线程时,JVM将会调用该线程的run方法,换言之,run 方法是被JNI方法start0() 调用的(这一点和模板方法模式有点像),仔细阅读start的源码将会总结出如下几点。
1、Thread被new之后,Thread内部的threadStatus为0,这个时候只表示线程被初始化,并没有启动
2、不能两次启动线程,否则会出现IllegalThreadStateException。
3、group.add(this);线程启动之后会被加入一个线程组中。
4、线程已经结束(即线程运行结束)或者启动,threadStatus不为0,是不能再次启动的。
从模板方法说起
来一个简单的模板方法的实例
有一个抽象类
@Slf4j
public abstract class AbstractTemplate {

    //具体的实现交给子类
    public abstract String sayHello(String name);

    public void printHelloMessage(String name){
        log.info("print hello message : {}",sayHello(name));
    }

}
两个实现类
public class TemplateOne extends AbstractTemplate {
    public String sayHello(String name) {
        return "中文的问候方法:你好"+name;
    }
}
public class TemplateTwo extends AbstractTemplate {
    public String sayHello(String name) {
        return "English say Hello : "+name;
    }
}
运行类
public class TemplateTest {
    public static void main(String[] args) {
        AbstractTemplate template = new TemplateOne();
        template.printHelloMessage("liman");

        AbstractTemplate templateTwo = new TemplateTwo();
        templateTwo.printHelloMessage("liman");
    }
}
运行结果:

其实这个比较简单,无法就是真正的逻辑交给子类去是实现,然后在通过父类调用具体的方法的时候,会自动调用到子类的实现逻辑,这其实充分利用了多态的特点。
继承Thread与实现Runnable接口
现在回到我们之前的问题,这两者有何区别,除了方便继承之外还有没有其他值得考量的地方?这个我们先从Thread类中的run方法来看看
@Override
public void run() {
    //如果构造Thread的时候传递了Runnable接口,则会调用Runnable接口对应的run方法
    if (target != null) {
        target.run();
    }
    //如果没有传递一个实现了Runnable接口的实例,则需要自己复写run方法
}
在看看Thread其中的一个构造函数
public Thread(Runnable target) {
    init(null, target, "Thread-" + nextThreadNum(), 0);
}
可以看到这里的Thread的构造方法接受一个Runnable参数。
之前流传着一种说法——问:创建线程有几种方式,有些人答:两种,一种是实现Runnable接口,另一种是继承Thread类。至少现在看来,这句话还是有些肤浅的。前面的start方法中我们看到,run只是一个模板方法,本地方法start0中回去调用这个对应子类的run方法。其实这两种方式都是殊途同归。从实质上看,创建线程只有一种方式就是构造Thread类,创建线程执行单元的方式有两种,一种是重写Thread的run方法,另一种是实现Runnable接口的run方法,第二种方法将Runnab实例作为Thread的构造参数。
继承Thread
@Slf4j
public class TicketWindow extends Thread {

    private final String name;
    private static final int MAX = 500;
    private static int index = 1; //用static修饰

    public TicketWindow(String name){
        this.name = name;
    }

    @Override
    public void run() {
        while(index<=MAX){
            log.info("柜台名称:{},当前编号:{}",name,index++);
        }
    }

    public static void main(String[] args) {
        TicketWindow ticketWindow0 = new TicketWindow("一号叫号机");
        TicketWindow ticketWindow1 = new TicketWindow("二号叫号机");
        TicketWindow ticketWindow2 = new TicketWindow("三号叫号机");
        TicketWindow ticketWindow3 = new TicketWindow("四号叫号机");
        TicketWindow ticketWindow4 = new TicketWindow("五号叫号机");
        ticketWindow0.start();
        ticketWindow1.start();
        ticketWindow2.start();
        ticketWindow3.start();
        ticketWindow4.start();
    }
}
这种情况下会存在差别,如果index用static修饰,才在一定程度上避免了一个号被多个TicketWindow消费的情况,如果去掉了static修饰,则会出现多个TicketWindow打印同一个index值的情况。
实现runnable接口
@Slf4j
public class TicketWindowRunnable implements Runnable {

    private final String name;
    private static final int MAX = 500;
    private int index = 1;//未用static修饰

    public TicketWindowRunnable(String name){
        this.name = name;
    }

    public void run() {
        while(index<=MAX){
            log.info("柜台名称:{},当前编号:{}",name,index++);
        }
    }
}
实现Runnable接口之后就会好得多,index不需要static修饰就能在一定程度上做到index共享,这做到了业务数据和业务操作的分离。但是index的值如果过大同样还是会存在线程安全的问题。

