Tenserflow安装
安装
安装Anaconda
The open-source Anaconda Distribution is the easiest way to perform Python/R data science and machine learning on Linux, Windows, and Mac OS X. With over 19 million users worldwide, it is the industry standard for developing, testing, and training on a single machine. – from the official web of Anaconda.
从官网下载Anaconda,安装过程中Advanced Options中两个选项都勾选。安装以后在命令窗口中输入“conda --version”如果能输出conda 4.7.12字样,Anaconda就安装成功了。
配置镜像源
打开Anaconda Prompt,然后输入下面两个命令:
conda config --add channels https://mirrors.tuna.tsinghua.edu.cn/anaconda/pkgs/free/
conda config --set show_channel_urls yes
指定从清华镜像下载tensorflow
anaconda中创建tensorflow环境并激活
Anaconda Prompt中输入:
conda create -n tensorflow
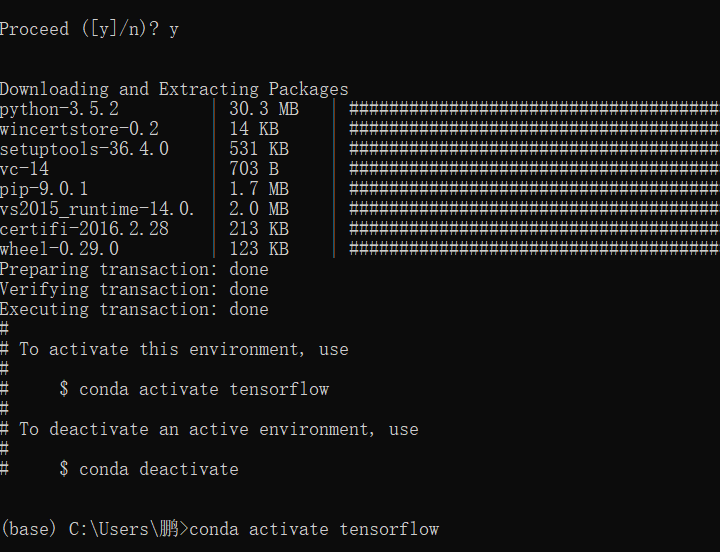
然后等待,提示Proceed时输入y,之后提示需要激活之后输入conda activate tensorflow:
安装CPU版本tensorflow
Anaconda Prompt中敲(这步我没有验证):
conda install tensorflow
安装GPU版本tensorflow
Anaconda Prompt中敲(这步我没有验证):
conda install tensorflow-gpu
安装gpu版本的tensorflow的时候,anaconda会自动关联CUDA和cuDNN。无需手动安装
示例程序:
import os
os.environ['TF_CPP_MIN_LOG_LEVEL'] = '2'
import tensorflow as tf
tf.compat.v1.disable_eager_execution() # 保证sess.run()能够正常运行
a = tf.constant([1.0, 2.0, 3.0], shape = [3], name = 'a')
b = tf.constant([1.0, 2.0, 3.0], shape = [3], name = 'b')
c = a + b
sess = tf.compat.v1.Session(config = tf.compat.v1.ConfigProto(log_device_placement=True))
print(sess.run(c))
安装CUDA(不需要)
为了使用GPU进行计算,需要先安装CUDA,网址:
https://developer.nvidia.com/cuda-downloads?target_os=Windows&target_arch=x86_64&target_version=10&target_type=exelocal
下载正确版本安装即可
安装cuDNN(不需要)
官方下载地址:https://developer.nvidia.com/cudnn
实际我操作的时候遇到了些困难,所以求助其他下载方式。
CSDN上下载地址:
https://pan.baidu.com/s/1o8mc4YI
解压后:
复制 cudnn\bin\cudnn64_5.dll 到 NVIDIA GPU Computing Toolkit\CUDA\v8.0\bin
复制 cudnn\include\cudnn.h到NVIDIA GPU Computing Toolkit\CUDA\v8.0\include
复制 cudnn\lib\x64\cudnn.lib到NVIDIA GPU Computing Toolkit\CUDA\v8.0\lib\x64
并把NVIDIA GPU Computing Toolkit\CUDA\v8.0\bin添加到环境变量
遇到的问题:
1,在cmd下进入python,导入tensorflow会显示找不到模块,原因是anaconda默认是base(root)这个环境;我们是新建的tensorflow环境安装的tensorflow,需要从Anaconda Prompt进入,且切换到正确的环境:
conda activate tensorflow/tensorflow-gpu
2, 运行的时候import tensorflow报错:
FutureWarning: Passing (type, 1) or ‘1type’ as a synonym of type is deprecated; in a future version of numpy, it will be understood as (type, (1,)) / ‘(1,)type’._np_quint8 = np.dtype([(“quint8”, np.uint8, 1)])
把dtypes.py中的np.dtype([(“quint8”, np.uint8, 1)])修改为np.dtype([(“quint8”, np.uint8, (1,))])就完美解决了
3,如果觉得打印的log太多,特别是GPU版本会有很多log,可以在py文件开头加上告警等级设置:
import os
os.environ['TF_CPP_MIN_LOG_LEVEL'] = '2'
4,tensorflow 2.x版本和1.x版本语法有很多不一样,比如1.x版本的tf.Session在2.x版本必须这样:tf.compat.v1.Session;为了保证sess.run()能够正常运行2.x版本文件开头需要调用:tf.compat.v1.disable_eager_execution()