Tensorflow Object Detection Apl 和 OpenVINO工作套件部署学习笔记
将Anaconda默认地址下载成清华大学开源软件包
conda config --add channels https://mirrors.tuna.tsinghua.edu.cdu.cn/anaconda/pkgs/free/
conda config --add channels https://mirrors.tuna.tsinghua.edu.cdu.cn/anaconda/pkgs/main/
conda config --set show_channel_urls yes
试过 但是好像没有什么用!
pip install -i https://pypi.tuna.tsinghua.edu.cn/simple   (直接使用这个命令加上你要下载的库就好了)
任何的运行文件在我发的文件中,对应位置都能找的到
这里是从书本P95开始记录的!!!!!
训练步骤:
1.下载预训练的模型(利用迁移学习)这里我下载的是ssd_inception_v2_coco_2018_01_28
2.创建tf_train文件包含子文件models(official,research)scripts(preprocessing(generate_tfrecord.py,xml_to_csv.py)workpaces(create_directories.py))
文件讲解:models是网上下载的r1.13.0版本目标检测文件(tensorflow官网的开源文件)
scripts里面有2个py文件是将xml转换成csv格式在转换成record格式(这两个py文件在文件夹里面有)
workpaces存放所有训练的程序和图片,运行create_directories.py一键创建文件夹(一定要先放了models文件再运行create_directories.py!!!!!)
xml转换成csv格式
3.运行create_directories.py创建文件夹步骤:1.在E:\tf_train\workspaces(输入cmd)2.进行虚拟环境,3.运行create_directories.py并设置名称 下面是代码!
conda activate tf_gpu
python create_directories.py -n hear_tail (后面的hear_tail 为你文件夹的名称)4.将one_command_train.py放进training文件夹内
5.将下载的预训练模型放进pre_trained_model文件夹内(ssd_inception_v2_coco_2018_01_28)
6.准备数据集:train放入你所有的训练的数据集(jpg,xml)test放入你所要测试的照片格式是(命名如下:1.jpg。2.jpg…)eval是放入预测数据集(jpg,xml)
7.训练模型:E:\tf_train\workspaces\hear_tail(输出cmd)2.进行虚拟环境3.运行one_command_train.py并设置steps,batch_size(超参)
steps代表训练测试次数 batch_size代表一次带多少张照片训练。两个参数可以自行设计。batch_size太大容易报OOM错误,调低batch_size就好了
conda activate tf_gpu

python training\one_command_train.py --steps 10000 --batch_size 6
训练结束!
8.评估模型
更改E:\tf_train\workspaces\hear_tail\training\ssd_inception_v2_coco.config第176num_examples改成你eval照片的个数。(为啥我输入了20,但tfboard上只能看10张照片,不懂!)
在文件夹E:\tf_train\workspaces\hear_tail 打开cmd 并安下面代码操作。
conda activate tf_gpu  (进入虚拟环境)

python eval.py --logtostderr --checkpoint_dir=training --eval_dir=evaluation --pipeline_config_path=training\ssd_inception_v2_coco.config  (评估模型,并且)

tensorboard --logdir=evaluation\   #查看图片
9.导出训练好模型冻结图
将export_inference_graph.py文件移动至E:\tf_train\workspaces\hear_tail(打开cmd)
conda activate tf_gpu

python export_inference_graph.py --input_type image_tensor --pipeline_config_path training\ssd_inception_v2_coco.config --trained_checkpoint_prefix training\model.ckpt-10000 --output_directory trained_frozen_models\hera_tail_model  #model.ckpt(你steps的值!)最后是你的文件名
运行之后trained_frozen_models文件底下就会有.pb文件
10.用训练好的冻结图做目标检测
复制object_detection_example_2.py文件到E:\tf_train\workspaces\hear_tail目录下并更改object_detection_example_2.py下几个位置,参照书本P94页
MODEL_NAME = r'trained_frozen_models\hera_tail_model'   #25行  模型位置
PATH_TO_FROZEN_GRAPH = MODEL_NAME + '/frozen_inference_graph.pb'  #26行 PB文件位置
PATH_TO_LABELS = os.path.join('annotations', 'label_map.pbtxt')   #27行
# ## 从单张图片中检测对象子程序#
 ## 图片名称:1.jpg, 2.jpg,。。。存放在#
 ##
PATH_TO_IMAGES_DIR = 'images/test'      #55行 测试图片位置
TEST_IMAGE_PATHS = [os.path.join(PATH_TO_IMAGES_DIR,'{0:d}.jpg'.format(i)) for i in range(1,10)] #56行循环读取文件名
改完后保存移动到E:\tf_train\workspaces\hear_tail(输入cmd)
python object_detection_example_2.py这里一直到。。。。。(往下翻)仅供参考哈!
训练
导出训练
python xml_to_csv.py -i D:\tf_train\workspaces\hear_tail\images\train -o  D:\tf_train\workspaces\hear_tail\annotations\train_labels.csv

python xml_to_csv.py -i D:\tf_train\workspaces\hear_tail\images\eval -o D:\tf_train\workspaces\hear_tail\annotations\eval_labels.csv
csv转成成TFrecord
(tf_gpu) D:\tf_train\scripts\preprocessing>python generate_tfrecord.py --label0=head --label1=tail --csv_input=D:\tf_train\workspaces\hear_tail\annotations\train_labels.csv --output_path=D:\tf_train\workspaces\hear_tail\annotations\train.tfrecord --img_path=D:\tf_train\workspaces\hear_tail\images\train

(tf_gpu) D:\tf_train\scripts\preprocessing>python generate_tfrecord.py --label0=head --label1=tail --csv_input=D:\tf_train\workspaces\hear_tail\annotations\eval_labels.csv --output_path=D:\tf_train\workspaces\hear_tail\annotations\eval.tfrecord --img_path=D:\tf_train\workspaces\hear_tail\images\eval
训练代码
(tf_gpu) D:\tf_train\workspaces\hear_tail>python train.py --logtostderr --train_dir=training\ --pipeline_config_path=training\ssd_inception_v2_coco.configtensorboard可视化 在E:\tf_train\workspaces\hear_tail 打开cmd
conda activate tf_gpu
tensorboard --logdir=training\
一直到这里。。。。。。。。。。。。(都是没使用一键创建文件夹和训练的步骤,不全。或者跑demo的程序)
第四章优化并部署模型!!!!
1.下载OpenVINO(建议下c盘!!!!)
https://software.intel.com/en-us/openvino-toolkit/choose-download/free-download-windows
注册,windows,默认安装就好(大于等于2019R3)
2.下载Cmake (C/C++程序编译流程配置工具。用他来进行范例程序,演示程序)
https://cmake.org/
Windows win64-x64安装程序:cmake-3.17.1-win64-x64.msi !!版本(大于等于3.14就好)
3.安装Microsoft Visual Studio 2017
https://visualstudio.microsoft.com/zh-hans/vs/older-downloads/

https://download.01.org/opencv/
4.创建环境变量
名字:HDDL_INSTALL_DIR
路径:C:\Program Files (x86)\IntelSWTools\openvino_2019.3.334\inference_engine\external\hddl
名字:IE_DIR
路径:C:\Program Files (x86)\IntelSWTools\openvino_2019.3.334\deployment_tools\inference_engine
名字:OPENCV_DIR
路径:C:\Program Files (x86)\IntelSWTools\openvino_2019.3.334\opencv
在path创建
1.%IE_DIR%\bin\intel64\Release
2.%IE_DIR%\bin\intel64\Debug
3.%OPENCV_DIR%\lib
4.%OPENCV_DIR%\bin
5.%HDDL_INSTALL_DIR%\bin
5.deployment_tools\demo>demo_benchmark_app.bat 是用于批处理演示程序的,测试出不同AI加速处理硬件的运行时间,延时和吞吐量
C:\Program Files (x86)\IntelSWTools\openvino_2019.3.334\deployment_tools\demo 在此位置,打开cmd,进入虚拟环境。(这里是OpenVINO默认下载的地方)
conda activate tf_gpu
demo_benchmark_app.bat -d cpu  #会下载模型,但我的squeezenet1.1模型下载不成功,所以测试失败,不过不影响,只要下面一步可以实施就好了
demo_benchmark_app.bat -d gpu  #
测试完上面后继续运行demo_security_barrier_camera.bat
demo_security_barrier_camera.bat -d GPU
demo_security_barrier_camera.bat -d GPU #看看模型在GPU和CPU的运行情况。
6.编译和运行Inference Engine范例和演示程序。
进入文件C:\Program Files (x86)\IntelSWTools\openvino_2019.3.334\inference_engine\samples>(cmd)
build_samples_msvc.bat #运行。(我出现了非常多的警告,但没有错误,继续)C:\Users\HASEE\Documents\Intel\OpenVINO\inference_engine_samples_build\intel64\Release 编译后的程序位置
(1)使用vs2017打开C:\Users\HASEE\Documents\Intel\OpenVINO\inference_engine_samples_build/Samples.sln
(2)选中右边的ALL_BUILD生成Debug模式下的Samples可执行文件和相关库。
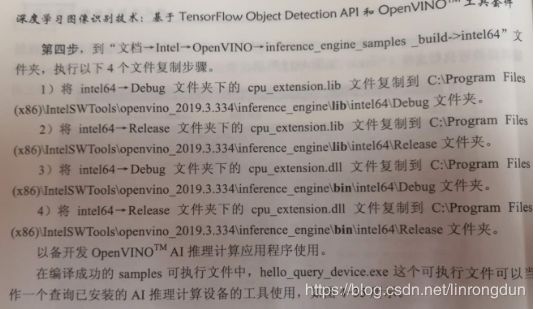
(3)将C:\Users\HASEE\Documents\Intel\OpenVINO\inference_engine_samples_build\intel64\Debug的cpu_extension.dll和cpu_extension.lib复制到。。(下图,并执行程序查看已安装的AI推理计算设备的工具使用!)一定要分清楚lib和dll!!!!!!!
7.PB转换成IR文件
在C:\Program Files (x86)\IntelSWTools\openvino_2019.3.334\deployment_tools\model_optimizer\mo_tf.py将训练好的PB文件转换成IR文件
python mo_tf.py --input_model=E:\tf_train\workspaces\hear_tail\trained_frozen_models\hera_tail_model\frozen_inference_graph.pb --tensorflow_use_custom_operations_config="C:\Program Files (x86)\IntelSWTools\openvino_2019.3.334\deployment_tools\model_optimizer\extensions\front\tf\ssd_v2_support.json" --tensorflow_object_detection_api_pipeline_config=E:\tf_train\workspaces\hear_tail\trained_frozen_models\hera_tail_model\pipeline.config --reverse_input_channels --data_type=FP16 --output_dir=E:\tf_train\workspaces\hear_tail\IR_model --model_name=cats_dogs_detetor白果项目mobileNet生成IR文件
由于不使用目标检测,所以不需要加入json和config
python mo_tf.py --input_model=E:\tf_train\workspaces\hear_tail\trained_frozen_models\hera_tail_model\MobileNet_model.pb --reverse_input_channels --input_shape=[1,224,224,3] --data_type=FP16 --output_dir=E:\tf_train\workspaces\hear_tail\IR_mobileNet --model_name=cats_dogs_detetor–input_model:输入TensorFlow模型
–tensorflow_use_custom_operations_config:描述转换规则的子图
–tensorflow_object_detection_api_pipeline_config:输入TF冻结图
–data_type=FP16:转换数据类型为FP16.
–reverse_input_channels:将读取的图片RGB转换成BGR的形式
–output_dir:指定IR模型的保存路径
–model_name:指定IR模型的文件名称。
8.可以在OpenVINO范例程序测试IR模型
在文件夹:C:\Users\HASEE\Documents\Intel\OpenVINO\inference_engine_samples_build\intel64\Release运行cmd。
object_detection_sample_ssd.exe -d CPU -i E:\tf_train\workspaces\hear_tail\images\test\2.jpg -m E:\tf_train\workspaces\hear_tail\IR_model\frozen_inference_graph.xml运行之后会在Release下出现out_0.bmp图片则算运行成功!
用OpenVINO演示程序测试IR模型。
python mo_tf.py --input_model=E:\tf_train\workspaces\hear_tail\pre_trained_model\ssd_inception_v2_coco_2018_01_28\frozen_inference_graph.pb --tensorflow_use_custom_operations_config="C:\Program Files (x86)\IntelSWTools\openvino_2019.3.334\deployment_tools\model_optimizer\extensions\front\tf\ssd_v2_support.json" --tensorflow_object_detection_api_pipeline=E:\tf_train\workspaces\hear_tail\pre_trained_model\ssd_inception_v2_coco_2018_01_28\pipeline.config --reverse_input_channels --data_type=FP16 --output_dir=E:\tf_train\workspaces\hear_tail\pre_trained_model\ssd_inception_v2_coco_2018_01_28 --model_name=ssd_inception_v2_coco演示程序测试IR模型
(tf_gpu) C:\Users\HASEE\Documents\Intel\OpenVINO\omz_demos_build\intel64\Release>object_detection_demo_ssd_async.exe -d CPU -i cam -m E:\tf_train\workspaces\hear_tail\pre_trained_model\ssd_inception_v2_coco_2018_01_28\ssd_inception_v2_coco.xml -t 0.6编写OpenVINO应用程序
各个文件的作用
C:\Program Files (x86)\IntelSWTools\openvino_2019.3.334\deployment_tools\inference_engine\include
\Inference Engine.hpp
调用了Inference Engine的类丶接口函数,所需要包含的所有头文件和一些有用的工具函数,在应用程序中,只需要执行Inference Engine.hpp即可
C:\Program Files (x86)\IntelSWTools\openvino_2019.3.334\deployment_tools\inference_engine\lib\intel64\Debug\inference_engined.lib:
用于Debug模式的Inference Engine静态库,里面包括调用Inference Engine动态库的二进制接口和一些其他库的二进制代码
C:\Program Files (x86)\IntelSWTools\openvino_2019.3.334\deployment_tools\inference_engine\lib\intel64\Release\inference_engined.lib:
用于Release模式的Inference Engine静态库,里面包括调用Inference Engine动态库的二进制接口和一些其他库的二进制代码。这些库在链接的时候被链接器链入用户应用程序。
C:\Program Files (x86)\IntelSWTools\openvino_2019.3.334\deployment_tools\inference_engine\bin\intel64\Debug\inference_engined.dll:用于Debug模式的Inference Engine动态库,需要和用户程序(exe)一起部署,在用户程序运行时加载。
C:\Program Files (x86)\IntelSWTools\openvino_2019.3.334\deployment_tools\inference_engine\bin\intel64\Release\inference_engined.dll:
用于Release模式的Inference Engine动态库,需要和用户程序(exe)一起部署,在用户程序运行时加载。
Inference Engine:CNNNetReader:用于读入IR文件。
Inference Engine:CNNNetwork:用于配置的网络信息以及输入输出。
Inference Engine:Core:用于创建IE核心对象并建立对象于AI硬件的关联。
Inference Engine:ExecutableNetwork:用于载入模型,并将图像数据传入模型。
Inference Engine:InferRequest:用于执行推理计算,并获得输出。
第一步:查看输入输出张量
(1)进入C:\Program Files (x86)\IntelSWTools\openvino_2019.3.334\deployment_tools\model_optimizer\mo\utils(进入cmd和虚拟环境)
(2)参考pb文件张量
python summarize_graph.py --input_model E:\tf_train\workspaces\hear_tail\trained_frozen_models\hera_tail_model\frozen_inference_graph.pb运行之后可以看到一个输入张量:image_tensor,类型uint8,形状(-1,-1,-1,3):4个输出张量:detection_boxes
detection_scores
detection_classes
num_detections
重头戏:OpenVINO推理计算C++范例
1.设置环境变量和VS项目属性。
看书
python范例和C++的AI推理计算应用程序
1.导入库,配置推理计算设备,IR文件路径,图片路径,阈值和标签
2.载入硬件插件
3.读取IR文件
4.配置网络输入输出
5.载入模型到AI推理计算设备中
6.创建Infer Request
7.准备输入数据
8.执行推理计算
9.处理输出
2.测试各种硬件如batch_size,执行硬件,同步/异步等
C:\Users\HASEE\Documents\Intel\OpenVINO\inference_engine_samples_build\intel64\Release>文件位置
benchmark_app.exe -i E:\tf_train\workspaces\hear_tail\images\test -m E:\tf_train\workspaces\hear_tail\IR_model\frozen_inference_graph.xml -d GPU -b 1b=batch_size:一次推理计算处理的图像帧数。
最后输出4个值
Count: 1872 iterations
Duration: 60188.89 ms
Latency: 129.43 ms
Throughput: 31.10 FPS
主要看
Latency(响应时间):完成一次推理计算请求推理时间
Throughput(吞吐量):在单位时间内能完成的推理计算次数或者处理图像的帧数大小。