《从零开始搭建游戏服务器》项目发布到Linux环境
前言:
之前我们提及了如何使用Maven来创建、管理和打包项目,也简单过了一遍Linux中搭建Java开发环境的步骤,现在我们就开始将我们之前开发的项目demo发布到Linux环境下,并让它正常运行起来。
发布思路:
- 使用Maven将项目打包为.jar
- 将项目的.jar和项目所有依赖的jar包都复制到Linux下
- 创建项目启动脚本来启动项目
准备工作:
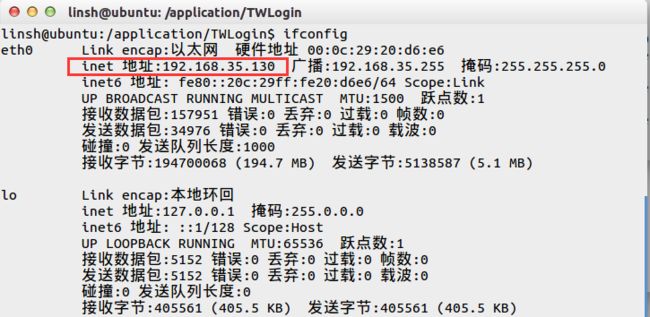
    private static final String IP = "192.168.35.130";
    private static final int PORT = 8088;
Maven打包项目:
在之前的篇幅中我们已经讲解了Maven的相关常识,这里我们一开始没有使用Maven来创建项目,而是使用Eclipse创建了一个Java Application,这里要使用Maven来管理已创建好的Eclipse工程,步骤如下:
Eclipse安装Maven插件:
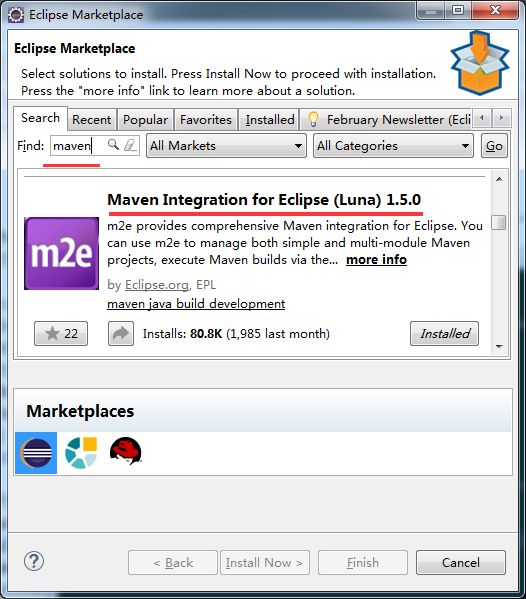
在Eclipse中点击Help->Eclipse Marketplace,搜索maven在搜索结果列表中找到Maven Integration for Eclipse插件,假如未安装则点击Install进行安装,已安装但非最新版本可以点击Update,已经安装且为最新版本显示Installed:
普通Eclipse项目Maven适配:
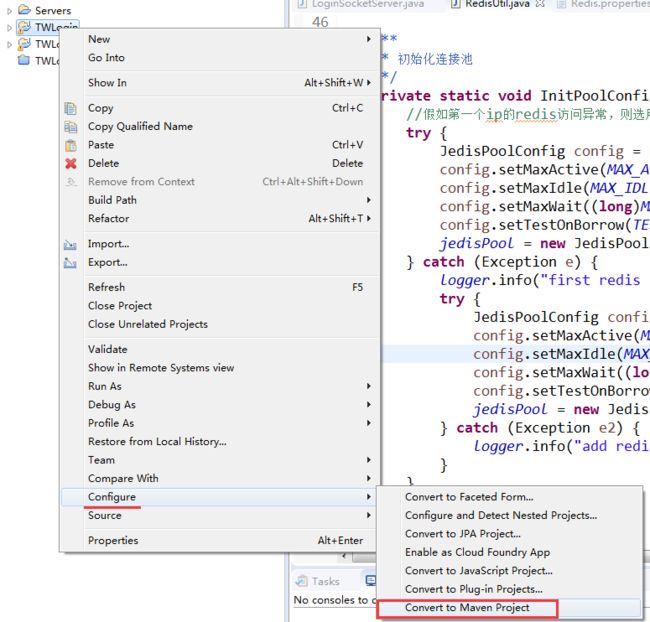
在Eclipse选中项目根目录,右键Configure->Convert To Maven Project:
在弹窗中输入Group Id(包名,一般是域名反写)、Artifact Id(工程名称)和Version:

操作完成之后,在项目下面多出了一个pom.xml文件<project xmlns="http://maven.apache.org/POM/4.0.0" xmlns:xsi="http://www.w3.org/2001/XMLSchema-instance" xsi:schemaLocation="http://maven.apache.org/POM/4.0.0 http://maven.apache.org/xsd/maven-4.0.0.xsd"> <modelVersion>4.0.0modelVersion> <groupId>com.tw.logingroupId> <artifactId>TWLoginartifactId> <version>0.0.1-SNAPSHOTversion> <build> <sourceDirectory>srcsourceDirectory> <resources> <resource> <directory>srcdirectory> <excludes> <exclude>**/*.javaexclude> excludes> resource> resources> <plugins> <plugin> <artifactId>maven-compiler-pluginartifactId> <version>3.5.1version> <configuration> <source>1.8source> <target>1.8target> configuration> plugin> plugins> build> project>项目依赖于其他项目:
可以打开pom.xml的Dependencies页签,通过Add进行添加,添加时输入可以通过输入GroupId和ArtifactId进行搜索:
例如:我们项目中使用了Netty来搭建网络层开发,所以要将其jar包添加到Dependencies中:
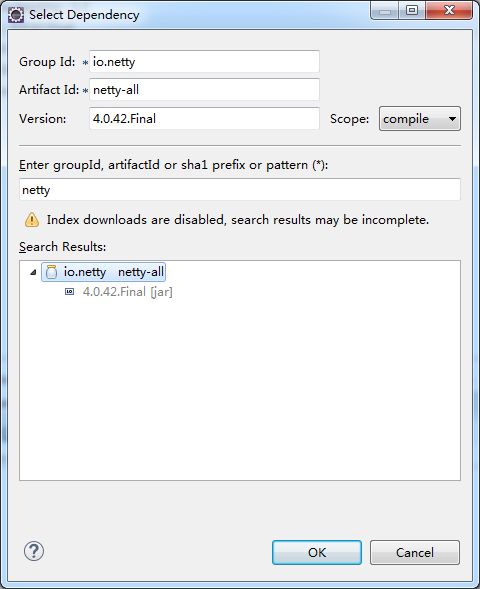
需要将本地/lib文件夹中的.jar一一添加到Dependencies:

或者是选中pom.xml右键Maven->Add Dependency也可以进入到添加依赖的窗口。也可以在pom.xml中直接添加... <dependencies> <dependency> <groupId>commons-logginggroupId> <artifactId>commons-loggingartifactId> <version>1.2version> dependency> <dependency> <groupId>io.nettygroupId> <artifactId>netty-allartifactId> <version>4.0.42.Finalversion> dependency> <dependency> <groupId>com.google.protobufgroupId> <artifactId>protobuf-javaartifactId> <version>2.5.0version> dependency> <dependency> <groupId>redis.clientsgroupId> <artifactId>jedisartifactId> <version>2.1.0version> dependency> <dependency> <groupId>commons-poolgroupId> <artifactId>commons-poolartifactId> <version>1.6version> dependency> dependencies>项目打包:
通常通过命令行窗口和Maven指令来进行打包,但这是我们可以直接在Eclipse中进行打包简化打包流程,Jave Application工程会被打包成.jar包,而Jave Web工程则打包成.war包,这里我们要将Java Application打包成一个可执行程序的jar包,需要提前考虑三个步骤:- 配置文件需要打进jar包;
- 需要制定程序的main入口类;
- 所有依赖的第三方库也要打进jar包。
满足以上三个条件的话,我们就能使用
java -jar xxx.jar来执行我们的程序了,为了满足这个目的,我们通常需要借助一些辅助于Maven的打包插件,常见的有maven-assembly-plugin和maven-shade-plugin,但是使用maven-assembly-plugin的话会把所有需要打到包里的文件全部打成一个.jar包,而且假如第三方配置文件于本地配置文件存在重名时,会出现直接覆盖的bug,所以这里我们还是选用maven-shade-plugin插件来打包。- 修改
pom.xml,首先引入maven-shade-plugin,需要在...
<groupId>org.apache.maven.pluginsgroupId>
<artifactId>maven-shade-pluginartifactId>
<version>1.4version>
在同等级位置添加入口类和并制定打包插件(其中
shade maven-shade-plugin):<executions> <execution> <phase>packagephase> <goals> <goal>shadegoal> goals> <configuration> <transformers> <transformer implementation="org.apache.maven.plugins.shade.resource.ManifestResourceTransformer"> <mainClass>com.tw.login.LoginSocketServermainClass> transformer> transformers> configuration> execution> executions>- 方法一:在Eclipse中选中项目的
pom.xml文件,右键Run As->Maven Clean,假如清理成功,target文件夹中的编译生成文件都被清除掉:
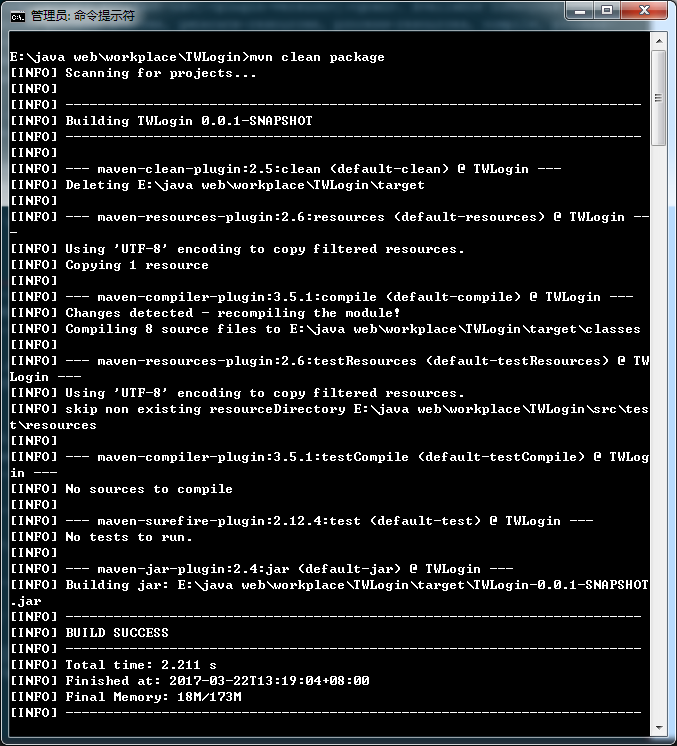
[INFO] Scanning for projects...
[INFO]
[INFO] ------------------------------------------------------------------------
[INFO] Building TWLogin 0.0.1-SNAPSHOT
[INFO] ------------------------------------------------------------------------
[INFO]
[INFO] --- maven-clean-plugin:2.5:clean (default-clean) @ TWLogin ---
[INFO] Deleting E:\java web\workplace\TWLogin\target
[INFO] ------------------------------------------------------------------------
[INFO] BUILD SUCCESS
[INFO] ------------------------------------------------------------------------
[INFO] Total time: 0.293 s
[INFO] Finished at: 2017-03-24T13:09:58+08:00
[INFO] Final Memory: 7M/153M
[INFO] ------------------------------------------------------------------------
然后执行打包指令:选中项目的
pom.xml文件,右键Run As->Maven Build:假如报错:
[ERROR] No goals have been specified for this build. You must specify a valid lifecycle phase or a goal in the format: or : [: ]: . Available lifecycle phases are: validate, initialize, generate-sources, process-sources, generate-resources, process-resources, compile, process-classes, generate-test-sources, process-test-sources, generate-test-resources, process-test-resources, test-compile, process-test-classes, test, prepare-package, package, pre-integration-test, integration-test, post-integration-test, verify, install, deploy, pre-clean, clean, post-clean, pre-site, site, post-site, site-deploy. -> [Help 1] [ERROR] [ERROR] To see the full stack trace of the errors, re-run Maven with the -e switch. [ERROR] Re-run Maven using the -X switch to enable full debug logging. [ERROR] [ERROR] For more information about the errors and possible solutions, please read the following articles: [ERROR] [Help 1] http://cwiki.apache.org/confluence/display/MAVEN/NoGoalSpecifiedException 在
pom.xml文件compile [ERROR] COMPILATION ERROR : [INFO] ------------------------------------------------------------- [ERROR] No compiler is provided in this environment. Perhaps you are running on a JRE rather than a JDK? [INFO] 1 error [INFO] ------------------------------------------------------------- [INFO] ------------------------------------------------------------------------ [INFO] BUILD FAILURE [INFO] ------------------------------------------------------------------------ [INFO] Total time: 0.594 s [INFO] Finished at: 2017-03-24T14:06:13+08:00 [INFO] Final Memory: 10M/153M [INFO] ------------------------------------------------------------------------ [ERROR] Failed to execute goal org.apache.maven.plugins:maven-compiler-plugin:3.1:compile (default-compile) on project TWLogin: Compilation failure [ERROR] No compiler is provided in this environment. Perhaps you are running on a JRE rather than a JDK? [ERROR] -> [Help 1]解决方案是:在Eclipse选中项目,
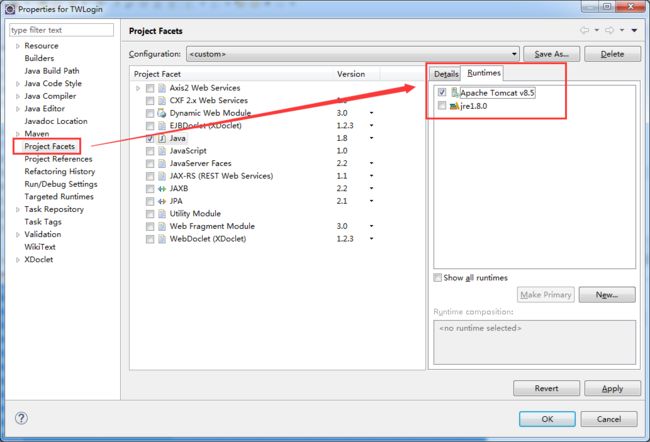
右键->Properties->Project Facets,勾选Apache Tomcat,因为Eclipse中Maven打包依赖Tomcat服务:
正确的输出结果如下:
[INFO] Scanning for projects...
[INFO]
[INFO] ------------------------------------------------------------------------
[INFO] Building TWLogin 0.0.1-SNAPSHOT
[INFO] ------------------------------------------------------------------------
[INFO]
[INFO] --- maven-resources-plugin:2.6:resources (default-resources) @ TWLogin ---
[WARNING] Using platform encoding (UTF-8 actually) to copy filtered resources, i.e. build is platform dependent!
[INFO] Copying 1 resource
[INFO]
[INFO] --- maven-compiler-plugin:3.5.1:compile (default-compile) @ TWLogin ---
[INFO] Nothing to compile - all classes are up to date
[INFO] ------------------------------------------------------------------------
[INFO] BUILD SUCCESS
[INFO] ------------------------------------------------------------------------
[INFO] Total time: 1.801 s
[INFO] Finished at: 2017-03-22T13:07:50+08:00
[INFO] Final Memory: 10M/217M
[INFO] ------------------------------------------------------------------------
假如出现编码的警告,要解决这个警告,只需在
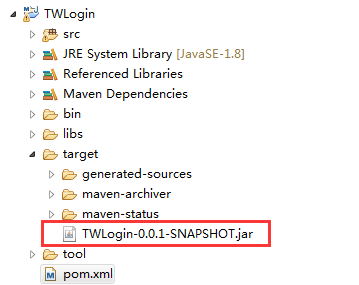
pom.xml的<properties> <project.build.sourceEncoding>UTF-8project.build.sourceEncoding> properties>打包成功后,在项目的target目录下会生成对应Version版本的.jar包,例如这里我的输出包为:
TWLogin-0.0.1-SNAPSHOT.jar,这就是我们要用来放到Linux服务器中运行的源码包:
Linux下安装Maven:
- 到Maven官网下载最新的Maven安装包,这里我下载的是:apache-maven-3.3.9-bin.tar.gz
通过终端解压安装包到
/usr/local目录下:sudo tar -xzf /mnt/Windows/apache-maven-3.3.9-bin.tar.gz -C /usr/local/jvm修改用户变量配置文件
~/.bashrc和系统环境配置文件/etc/profile,都是在文件最后插入Maven的配置信息:#Set maven environment MAVEN_HOME=/usr/local/jvm/apache-maven-3.3.9 export MAVEN_HOME export PATH=${PATH}:${MAVEN_HOME}/bin使用
source .bashrc和source /etc/profile使修改配置文件内容立即生效,使用mvn -v测试安装是否成功,如果成功,则显示当前安装的Maven的版本信息:linsh@ubuntu:~$ mvn -v Apache Maven 3.3.9 (bb52d8502b132ec0a5a3f4c09453c07478323dc5; 2015-11-10T08:41:47-08:00) Maven home: /usr/local/jvm/apache-maven-3.3.9 Java version: 1.8.0_121, vendor: Oracle Corporation Java home: /usr/local/jvm/jdk1.8.0_121/jre Default locale: zh_CN, platform encoding: UTF-8 OS name: "linux", version: "4.2.0-27-generic", arch: "amd64", family: "unix" linsh@ubuntu:~$
在Linux中运行项目:
我们将之前打包得到的
TWLogin-0.0.1-SNAPSHOT.jar复制到Linux中,新建一个目录作为项目总目录application,然后再为每个项目创建一个子目录,这里我们以我们的项目名称来创建子目录,将项目文件复制到此目录下:sudo mkdir /application sudo mkdir /application/TWLogin sudo cp -r /mnt/Windows/TWLogin /application/TWLogin测试运行项目:
直接进到项目目录/application/TWLogin中,使用运行指令java -jar TWLogin-0.0.1-SNAPSHOT.jar执行程序,然后再在Eclipse中启动客户端代码,尝试连接服务器并发送数据,假如运行正常,情况如下:linsh@ubuntu:/application/TWLogin$ java -jar TWLogin-0.0.1-SNAPSHOT.jar 三月 21, 2017 10:07:42 上午 com.tw.login.LoginSocketServer main 信息: 开始启动Socket服务器... 三月 21, 2017 10:07:42 上午 com.tw.login.LoginSocketServer run 信息: Socket服务器已启动完成 三月 21, 2017 10:07:54 上午 com.tw.login.LoginSocketServer channelRead 信息: 数据内容:UserName=linshuhe,Password=123456注:
假如你也跟我一样出现这个错误:TWLogin-0.0.1-SNAPSHOT.jar中没有主清单属性,那么恭喜你跟我一样犯了个低级错误,忘了在使用maven打包项目之前,在pom.xml中添加项目的入口函数main的相关路径信息,解决方案就是在pom.xml的中添加以下内容:<transformers> <transformer implementation="org.apache.maven.plugins.shade.resource.ManifestResourceTransformer"> <mainClass>com.tw.login.server.LoginSocketServermainClass> transformer> transformers>此处
com.tw.login.server.LoginSocketServer脚本中的main函数即使本应用入口函数。创建启动脚本:
我们为了避免每次运行项目都敲一遍启动项目所需的指令,通常会将指令封装成一个启动脚本,在Windows系统下我们通常使用.bat的批处理脚本来进行批处理,把很多命令放在此文件中,当然也能作为一些应用程序的启动脚本,而在Linux系统中,使用shell脚本来实现同等的效果,Shell脚本是Linux的一种文本文件,这里我们就来编辑一下启动脚本start.sh的内容:#!bin/sh echo 如果不能正常运行,请安装JDK 1.8版 java -jar TWLogin-0.0.1-SNAPSHOT.jar执行启动脚本:
启动脚本通常放到与可执行.jar文件同级的目录下,在终端中定位到脚本所在的目录,执行:sh start.sh
