图像处理之底片效果、黑白效果、浮雕效果
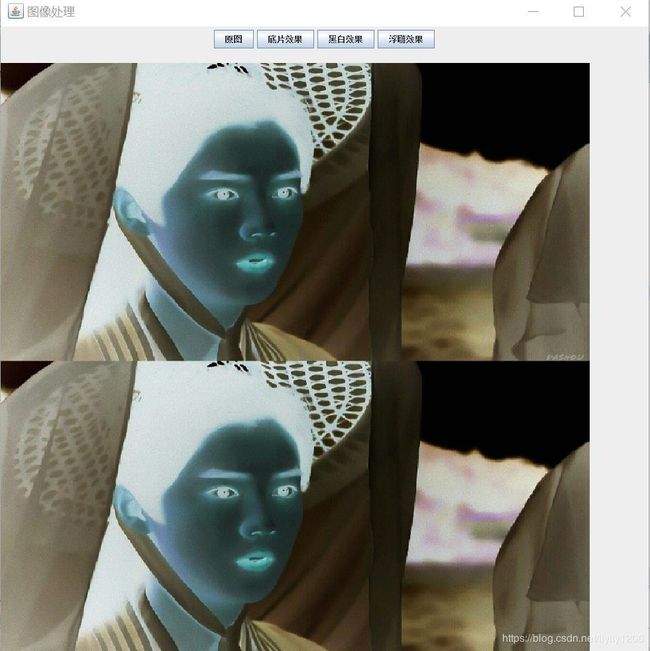
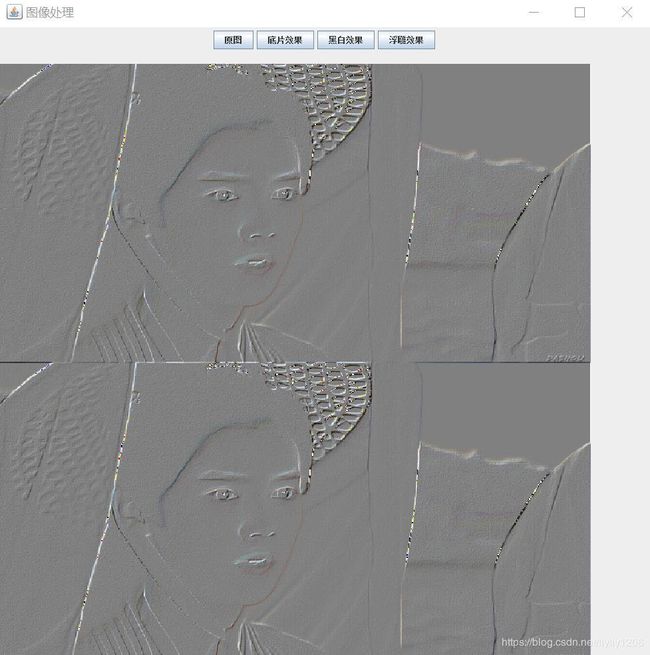
今天讲一讲图像处理的基本操作。我们要达到的目的是,将原图变为底片效果、黑白效果以及浮雕效果。
在讲具体操作之前,先讲几个概念。
ARGB:这是一种色彩模式,分别对应——Alpha(图像通道),Red,Green,Blue
像素点:是最小的图像单元,每个像素点都有一个明确的位置和被分配的色彩数值,而这个位置和颜色就决定该图像所呈现出来的样子.每个像素点都有自己的ARGB。
我们首先新建一个窗体界面,添加上对应的按钮。

接着,从磁盘上读取一个图片存入image中,这个就是原图。当你点击“原图”按钮时,画笔就会把你存的那张图在窗体上绘出来。如果再点击其他按钮,需要给新建的缓冲区图片对象赋值,赋的值为后面定义的新方法的返回值,是一个图片。如下程序:
public void actionPerformed(ActionEvent e) {

		if (e.getActionCommand().equals("原图")) {
			// 从磁盘上读取一个图片存入image中
			try {
				image = ImageIO.read(new FileInputStream("C:\\Users\\LLY\\Pictures\\Saved Pictures\\1.jpg"));
			} catch (FileNotFoundException e1) {
				e1.printStackTrace();
			} catch (IOException e1) {
				e1.printStackTrace();
			}
			g.drawImage(image, 0, 100, 900, 900, null);
		} else if (e.getActionCommand().equals("底片效果")) {
			BufferedImage img = method1(image);
			g.drawImage(img, 0, 100, 900, 900, null);
		} else if (e.getActionCommand().equals("黑白效果")) {
			BufferedImage img2 = method2(image);
			g.drawImage(img2, 0, 100, 900, 900, null);
		} else if (e.getActionCommand().equals("浮雕效果")) {
			BufferedImage img3 = method3(image);
			g.drawImage(img3, 0, 100, 900, 900, null);
		}
	}
由上可得,要新写三个方法。写方法的步骤如下:首先获得图片的每个像素点,用一个数组存起来。然后遍历每一个像素点,这里虽然是一维数组,但因为窗体有长和宽,所以需要加双重循环。遍历之后,获得了每个像素点的位置和。之后根据效果的不同,对R、G、B进行不同的处理。再根据新的A、R、G、B的值组成一个新的像素点。每个像素点都被更新了之后,在缓冲区绘制新图片
具体处理方法如下:
针对底片效果:R=255-R;
G=255-G;
B=255-B;
针对黑白效果:取R、G、B的平均值,代替原来的R、G、B
针对浮雕效果:获得该像素点的下一个像素点的NR、NG、NB
R = R - NR + 128;
G = G - NG + 128;
B = B - NB + 128;
代码如下:
public BufferedImage method1(BufferedImage image) {
		int w = image.getWidth();
		int h = image.getHeight();
		// 获得图片的每个像素点
		int[] data = image.getRGB(0, 0, w, h, null, 0, w);
		for (int i = 0; i < h; i++) {
			for (int j = 0; j < w; j++) {
				// 然后将每一个像素点的A、R、G、B分别获取到
				int c = data[j + i * w];
				int A = c >> 24 & 0xFF;
				int R = c >> 16 & 0xFF;
				int G = c >> 8 & 0xFF;
				int B = c >> 0 & 0xFF;

				R = 255 - R;
				G = 255 - G;
				B = 255 - B;

				// 根据新的A、R、G、B的值组成一个像素点
				data[j + i * w] = (A << 24) | (R << 16) | (G << 8) | (B << 0);
			}
		}
		// 创建缓冲区图片对象
		BufferedImage img = new BufferedImage(w, h, BufferedImage.TYPE_INT_ARGB);
		// 将所有的像素点生成图片
		img.setRGB(0, 0, w, h, data, 0, w);
		return img;
	}

	public BufferedImage method2(BufferedImage image) {
		int w = image.getWidth();
		int h = image.getHeight();
		int[] data = image.getRGB(0, 0, w, h, null, 0, w);
		for (int i = 0; i < h; i++) {
			for (int j = 0; j < w; j++) {
				int c = data[j + i * w];
				int A = c >> 24 & 0xFF;
				int R = c >> 16 & 0xFF;
				int G = c >> 8 & 0xFF;
				int B = c >> 0 & 0xFF;
				int avg = (R + G + B) / 3;

				data[j + i * w] = (A << 24) | (avg << 16) | (avg << 8) | (avg << 0);
			}
		}
		//  创建缓冲区图片对象
		BufferedImage img2 = new BufferedImage(w, h, BufferedImage.TYPE_INT_ARGB);

		//  将所有的像素点生成图片
		img2.setRGB(0, 0, w, h, data, 0, w);
		return img2;
	}

	public BufferedImage method3(BufferedImage image) {
		int w = image.getWidth();
		int h = image.getHeight();
		// 获取图片的每一个像素点
		int[] data = image.getRGB(0, 0, w, h, null, 0, w);
		for (int i = 0; i < h - 1; i++) {
			for (int j = 0; j < w - 1; j++) {
				// 然后将每一个像素点的A、R、G、B分别获取到
				int c = data[j + i * w];
				int A = c >> 24 & 0xFF;
				int R = c >> 16 & 0xFF;
				int G = c >> 8 & 0xFF;
				int B = c >> 0 & 0xFF;

				int nc = data[(j + 1) + (i + 1) * w];
				int NA = nc >> 24 & 0xFF;
				int NR = nc >> 16 & 0xFF;
				int NG = nc >> 8 & 0xFF;
				int NB = nc >> 0 & 0xFF;

				R = R - NR + 128;
				G = G - NG + 128;
				B = B - NB + 128;

				// 根据新的A、R、G、B的值组成一个像素点
				data[j + i * w] = (A << 24) | (R << 16) | (G << 8) | (B << 0);
			}
		}

		// 创建缓冲区图片对象
		BufferedImage img3 = new BufferedImage(w, h, BufferedImage.TYPE_INT_ARGB);
		// 将所有的像素点生成图片
		img3.setRGB(0, 0, w, h, data, 0, w);
		return img3;
	}


