Phoenix创建二级索引
为什么需要Secondary Index
对于HBase而言,如果想精确地定位到某行记录,唯一的办法是通过rowkey来查询。如果不通过rowkey来查找数据,就必须逐行地比较每一列的值,即全表扫瞄。对于较大的表,全表扫瞄的代价是不可接受的。
但是,很多情况下,需要从多个角度查询数据。例如,在定位某个人的时候,可以通过姓名、身份证号、学籍号等不同的角度来查询,要想把这么多角度的数据都放到rowkey中几乎不可能(业务的灵活性不允许,对rowkey长度的要求也不允许)。
所以,需要secondary index来完成这件事。secondary index的原理很简单,但是如果自己维护的话则会麻烦一些。现在,Phoenix已经提供了对HBase secondary index的支持,下面将说明这样用Phoenix来在HBase中创建二级索引。
配置HBase以支持Secondary Index
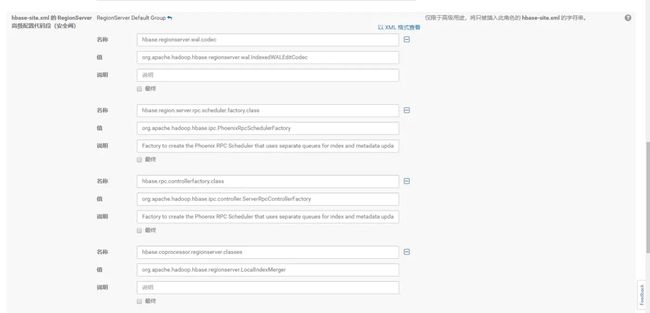
在每一个RegionServer的hbase-site.xml中加入如下的属性:
  hbase.regionserver.wal.codec
  org.apache.hadoop.hbase.regionserver.wal.IndexedWALEditCodec


  hbase.region.server.rpc.scheduler.factory.class
  org.apache.hadoop.hbase.ipc.PhoenixRpcSchedulerFactory
  Factory to create the Phoenix RPC Scheduler that uses separate queues for index and metadata updates


  hbase.rpc.controllerfactory.class
  org.apache.hadoop.hbase.ipc.controller.ServerRpcControllerFactory
  Factory to create the Phoenix RPC Scheduler that uses separate queues for index and metadata updates


  hbase.coprocessor.regionserver.classes
  org.apache.hadoop.hbase.regionserver.LocalIndexMerger
在每一个Master的hbase-site.xml中加入如下的属性:
  hbase.master.loadbalancer.class
  org.apache.phoenix.hbase.index.balancer.IndexLoadBalancer


  hbase.coprocessor.master.classes
  org.apache.phoenix.hbase.index.master.IndexMasterObserver
Global Indexing v.s. Local Indexing
Global Indexing
Global indexing targets read heavy, low write uses cases. With global indexes, all the performance penalties for indexes occur at write time. We intercept the data table updates on write (DELETE, UPSERT VALUES and UPSERT SELECT), build the index update and then sent any necessary updates to all interested index tables. At read time, Phoenix will select the index table to use that will produce the fastest query time and directly scan it just like any other HBase table. By default, unless hinted, an index will not be used for a query that references a column that isn’t part of the index.
Local Indexing
Local indexing targets write heavy, space constrained use cases. Just like with global indexes, Phoenix will automatically select whether or not to use a local index at query-time. With local indexes, index data and table data co-reside on same server preventing any network overhead during writes. Local indexes can be used even when the query isn’t fully covered (i.e. Phoenix automatically retrieve the columns not in the index through point gets against the data table). Unlike global indexes, all local indexes of a table are stored in a single, separate shared table. At read time when the local index is used, every region must be examined for the data as the exact region location of index data cannot be predetermined. Thus some overhead occurs at read-time.
翻译
Global Indexing
Global indexing,全局索引,适用于读多写少的业务场景。使用Global indexing在写数据的时候开销很大,因为所有对数据表的更新操作(DELETE, UPSERT VALUES and UPSERT SELECT),都会引起索引表的更新,而索引表是分布在不同的数据节点上的,跨节点的数据传输带来了较大的性能消耗。在读数据的时候Phoenix会选择索引表来降低查询消耗的时间。在默认情况下如果想查询的字段不是索引字段的话索引表不会被使用,也就是说不会带来查询速度的提升。
Local Indexing
Local indexing,本地索引,适用于写操作频繁以及空间受限制的场景。与Global indexing一样,Phoenix会自动判定在进行查询的时候是否使用索引。使用Local indexing时,索引数据和数据表的数据存放在相同的服务器中,这样避免了在写操作的时候往不同服务器的索引表中写索引带来的额外开销。使用Local indexing的时候即使查询的字段不是索引字段索引表也会被使用,这会带来查询速度的提升,这点跟Global indexing不同。对于Local Indexing,一个数据表的所有索引数据都存储在一个单一的独立的可共享的表中。
Immutable index And Mutable index
immutable index
immutable index,不可变索引,适用于数据只增加不更新并且按照时间先后顺序存储(time-series data)的场景,如保存日志数据或者事件数据等。不可变索引的存储方式是write one,append only。当在Phoenix使用create table语句时指定IMMUTABLE_ROWS = true表示该表上创建的索引将被设置为不可变索引。Phoenix默认情况下如果在create table时不指定IMMUTABLE_ROW = true时,表示该表为mutable。不可变索引分为Global immutable index和Local immutable index两种。
mutable index
mutable index,可变索引,适用于数据有增删改的场景。Phoenix默认情况创建的索引都是可变索引,除非在create table的时候显式地指定IMMUTABLE_ROWS = true。可变索引同样分为Global immutable index和Local immutable index两种。
特别注意】
如果使用的是CDH部署的HBase,需要在Cloudera Manager管理页面里面的HBase“配置”页面里的hbase-site.xml项增加上述配置,并在管理页面里面重启HBase才能使得配置生效。
image
master
regenServer
5. 测试案例
5.1 测试案例1
HBase 1000w数据
users_test表
users_test表
【Global Indexing】
在没有创建二级索引之前查询特定USER_NAME的用户信息耗时大约16s左右。
image
在USER_NAME列上面创建二级索引:
create index USERS_TEST_IDX0 on "users_test ("info".USER_NAME)
创建二级索引后查询特定USER_NAME的用户名称耗时为ms级别
image
【说明】 可以通过explain命令来查看查询是否用到二级索引
image
【注意】 如果在select条件里面选择了其他的列,如USER_NO,因为该列没有存在于索引表,因此查询不会走索引表。
image
如果想在select USER_NAME,USER_NO查询仍然走索引,必须创建如下索引:
- 方式一,采取INCLUDE(index cover,即索引覆盖)的方式:
create index USERS_TEST_IDX1 on "users_test"("info".USER_NAME) INCLUDE("info".USER_NO)
索引覆盖其实就是将INCLUDE里面包含的列都存储到索引表里面,当检索的时候就可以从索引表里直接带回这些列值。要特别注意索引列和索引覆盖列的区别,索引列在索引表里面是以rowkey的形式存在,多个索引列以某个约定的字节分割然后一起存储在rowkey里面,也就是说当索引列有很多个的时候,rowkey的长度也相应会变长,大小取决于索引列值的大小。而索引覆盖列,是存储在索引表的列族中。
- 方式二,采取多列索引:
create index USERS_TEST_IDX2 on "users_test"("info".USER_NAME, "info".USER_NO)
【说明】
多列索引在满足前缀式的情况才会用到,如创建了A,B,C顺序的多列索引,当在where条件指定A条件、A B条件或者A B C条件均会走索引,但是 B C条件则无法走索引。
【Local Indexing】
在users_test表创建local index类型的二级索引:
create local index USERS_TEST_LOCAL_IDX ON "users_test"("info".USER_NAME)
与Global Indexing不同的是,如果select子句里面带有除了索引列(USER_NAME)以外的列,仍然可以走索引表。
image
image
【说明】
创建Local Indexing时候指定的索引名称会与实际创建在Hbase里面的表名称不一致,这应该是Phoenix做了映射的关系,而且对于同一个Hbase里面的table创建多个Local Indexing,索引表在Hbse list命令查询的时候也只有一个。
5.2 测试案例2
HBase 1e数据
ammeter_test表
image
image
【Global Indexing】
create index AMMETER_TEST_IDX
 on AMMETER_TEST ("info"."ammeter_no1", "info"."ammeter_no2") include("info"."ammeter_price");
(1) 条件查询包含rowkey
> explain select * from AMMETER_TEST where "info"."ammeter_no1" = '11000000005281' AND "ammeter_no2" = '11000000001004' and ROW = '11000002310462'
> select * from AMMETER_TEST where "info"."ammeter_no1" = '11000000005281' AND "ammeter_no2" = '11000000001004' and ROW = '11000002310462'
image
image
(2) 条件查询不包含rowkey但满足二级索引查找条件
> explain select ROW,"ammeter_price" from AMMETER_TEST where "info"."ammeter_no1" = '11000000005281' and "ammeter_no2" = '11000000001004'
> select ROW,"ammeter_price" from AMMETER_TEST where "info"."ammeter_no1" = '11000000005281' and "ammeter_no2" = '11000000001004' LIMIT 5
image
image
【分析】
- 对于包含rowkey的条件查询,Phoenix会启用服务器端过滤器快速筛选匹配的行并返回,亿级数据也能达到毫秒级别响应。
- 对于没有包含rowkey的条件查询,如果条件满足Phoenix二级索引查找,Phoenix会查二级索引表并快速返回记录。
6. 同步创建索引与异步创建索引
前面所讲的创建索引为同步创建索引,当执行create index的时候,索引表会直接与源数据表进行同步。但是,有时候我们的源表数据量很大,同步创建索引会抛出异常。异常信息大致如下所示:
15/12/11 14:20:08 WARN client.ScannerCallable: Ignore, probably already closed
org.apache.hadoop.hbase.UnknownScannerException: org.apache.hadoop.hbase.UnknownScannerException: Name: 37, already closed?
at org.apache.hadoop.hbase.regionserver.RSRpcServices.scan(RSRpcServices.java:2092)
at org.apache.hadoop.hbase.protobuf.generated.ClientProtos$ClientService$2.callBlockingMethod(ClientProtos.java:31443)
at org.apache.hadoop.hbase.ipc.RpcServer.call(RpcServer.java:2035)
at org.apache.hadoop.hbase.ipc.CallRunner.run(CallRunner.java:107)
at org.apache.hadoop.hbase.ipc.RpcExecutor.consumerLoop(RpcExecutor.java:130)
at org.apache.hadoop.hbase.ipc.RpcExecutor$1.run(RpcExecutor.java:107)
at java.lang.Thread.run(Thread.java:745)
at sun.reflect.GeneratedConstructorAccessor13.newInstance(Unknown Source)
at sun.reflect.DelegatingConstructorAccessorImpl.newInstance(DelegatingConstructorAccessorImpl.java:45)
at java.lang.reflect.Constructor.newInstance(Constructor.java:526)
at org.apache.hadoop.ipc.RemoteException.instantiateException(RemoteException.java:106)
at org.apache.hadoop.ipc.RemoteException.unwrapRemoteException(RemoteException.java:95)
at org.apache.hadoop.hbase.protobuf.ProtobufUtil.getRemoteException(ProtobufUtil.java:313)
at org.apache.hadoop.hbase.client.ScannerCallable.close(ScannerCallable.java:329)
at org.apache.hadoop.hbase.client.ScannerCallable.call(ScannerCallable.java:184)
at org.apache.hadoop.hbase.client.ScannerCallableWithReplicas.call(ScannerCallableWithReplicas.java:136)
at org.apache.hadoop.hbase.client.ScannerCallableWithReplicas.call(ScannerCallableWithReplicas.java:56)
at org.apache.hadoop.hbase.client.RpcRetryingCaller.callWithoutRetries(RpcRetryingCaller.java:200)
at org.apache.hadoop.hbase.client.ClientScanner.call(ClientScanner.java:288)
at org.apache.hadoop.hbase.client.ClientScanner.close(ClientScanner.java:507)
at org.apache.phoenix.iterate.ScanningResultIterator.close(ScanningResultIterator.java:49)
at org.apache.phoenix.iterate.TableResultIterator.close(TableResultIterator.java:95)
at org.apache.phoenix.jdbc.PhoenixResultSet.close(PhoenixResultSet.java:162)
at org.apache.phoenix.compile.UpsertCompiler.upsertSelect(UpsertCompiler.java:199)
at org.apache.phoenix.compile.UpsertCompiler.access$000(UpsertCompiler.java:114)
at org.apache.phoenix.compile.UpsertCompiler$UpsertingParallelIteratorFactory.mutate(UpsertCompiler.java:229)
at org.apache.phoenix.compile.MutatingParallelIteratorFactory.newIterator(MutatingParallelIteratorFactory.java:62)
at org.apache.phoenix.iterate.ParallelIterators$1.call(ParallelIterators.java:109)
at org.apache.phoenix.iterate.ParallelIterators$1.call(ParallelIterators.java:100)
at java.util.concurrent.FutureTask.run(FutureTask.java:262)
at org.apache.phoenix.job.JobManager$InstrumentedJobFutureTask.run(JobManager.java:183)
at java.util.concurrent.ThreadPoolExecutor.runWorker(ThreadPoolExecutor.java:1145)
at java.util.concurrent.ThreadPoolExecutor$Worker.run(ThreadPoolExecutor.java:615)
at java.lang.Thread.run(Thread.java:745)
Caused by: org.apache.hadoop.hbase.ipc.RemoteWithExtrasException(org.apache.hadoop.hbase.UnknownScannerException): org.apache.hadoop.hbase.UnknownScannerException: Name: 37, already closed?
at org.apache.hadoop.hbase.regionserver.RSRpcServices.scan(RSRpcServices.java:2092)
at org.apache.hadoop.hbase.protobuf.generated.ClientProtos$ClientService$2.callBlockingMethod(ClientProtos.java:31443)
at org.apache.hadoop.hbase.ipc.RpcServer.call(RpcServer.java:2035)
at org.apache.hadoop.hbase.ipc.CallRunner.run(CallRunner.java:107)
at org.apache.hadoop.hbase.ipc.RpcExecutor.consumerLoop(RpcExecutor.java:130)
at org.apache.hadoop.hbase.ipc.RpcExecutor$1.run(RpcExecutor.java:107)
at java.lang.Thread.run(Thread.java:745)
at org.apache.hadoop.hbase.ipc.RpcClientImpl.call(RpcClientImpl.java:1199)
at org.apache.hadoop.hbase.ipc.AbstractRpcClient.callBlockingMethod(AbstractRpcClient.java:216)
at org.apache.hadoop.hbase.ipc.AbstractRpcClient$BlockingRpcChannelImplementation.callBlockingMethod(AbstractRpcClient.java:300)
at org.apache.hadoop.hbase.protobuf.generated.ClientProtos$ClientService$BlockingStub.scan(ClientProtos.java:31889)
at org.apache.hadoop.hbase.client.ScannerCallable.close(ScannerCallable.java:327)
... 20 more
这个时候,我们可以采用异步创建索引,方式如下:
CREATE INDEX async_index ON my_schema.my_table (v) ASYNC
通过create index的时候指定 ASYNC 关键字来指定异步创建索引。执行这个命令之后并不会引起索引表与源表的直接同步。这个时候查询并不会使用这个索引表。那么索引数据的导入还需要采用phoenix提供的索引同步工具类 IndexTool , 这是一个mapreduce工具类,使用方式如下:
${HBASE_HOME}/bin/hbase org.apache.phoenix.mapreduce.index.IndexTool
  --schema MY_SCHEMA --data-table MY_TABLE --index-table ASYNC_IDX
  --output-path ASYNC_IDX_HFILES
当mapreduce任务执行结束,这个索引表才会变成可用。
7. 参考
(1) 可变索引与不可变索引
(2) Globaling Indexing
(3) Local Indexing
(4) 配置二级索引及测试
(5) Phoenix官网文档
Examples
为已有的Phoenix表创建secondary index
首先,在Phoenix中创建一个salted table。
create table EXAMPLE (my_pk varchar(50) not null, M.C0 varchar(50), M.C1 varchar(50), M.C2 varchar(50), M.C3 varchar(50), M.C4 varchar(50), M.C5 varchar(50), M.C6 varchar(50), M.C7 varchar(50),M.C8 varchar(50), M.C9 varchar(50) constraint pk primary key (my_pk)) salt_buckets=10;
这里创建的表名为EXAMPLE,有10个列(列名为{M.C0, M.C1, ···, M.C9})。
然后,再将一个CSV文件中的数据通过Bulkload的方式导入到该表中。
该CSV文件中有1000万条记录,在HDFS中的路径为/user/tao/xt-data/data-10m.csv,则导入的命令为
HADOOP_CLASSPATH=$(hbase classpath) hadoop jar phoenix-4.3.1-client.jar org.apache.phoenix.mapreduce.CsvBulkLoadTool -libjars 3rdlibs/commons-csv-1.0.jar,3rdlibs/joda-time-2.7.jar --table EXAMPLE --input /user/tao/xt-data/data-10m.csv
由于导入的过程用到了一些其他的类,所以需要通过-libjars 3rdlibs/commons-csv-1.0.jar,3rdlibs/joda-time-2.7.jar来将相关的Jar包传给这个MapReduce任务。另外,Bulk CSV Data Loading中提到的方法,要求对于Phoenix 4.0+的版本,指定 HADOOP_CLASSPATH=$(hbase mapredcp),但是通过实践,发现这样不行,应该用HADOOP_CLASSPATH=$(hbase classpath)。
在为表EXAMPLE创建secondary index之前,先看看查询一条数据所需的时间:
这里写图片描述
可以看到,对名为M.C0的列进行按值查询需要7秒多。
现在,为表EXAMPLE的列M.C0创建Index,如下:
create index my_index on example (m.c0);
此时,查看HBase,会发现其中多了一个名为MY_INDEX的表。而从Phoenix中则看不到该表。
在为EXAMPLE创建了index之后,我们再来进行查询。
这里写图片描述
这次,查询时间从7秒多降到了0.097秒。
确保Query使用Index
By default, a global index will not be used unless all of the columns referenced in the query are contained in the index.
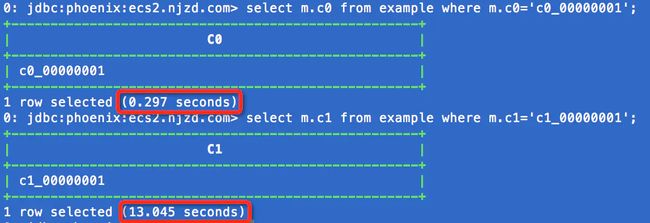
在上例中,由于我们只对M.C0创建了索引,所以如果查询项中包含其他列的话(主键MY_PK除外),是不会使用index的。此外,如果查询项不包含其他列,但是条件查询语句中包含了其他列(主键MY_PK除外),也会引发全表扫瞄。如下:
这里写图片描述
要让一个查询使用index,有三种方式:
1. 创建 convered index;
2. 在查询中提示其使用index;
3. 创建 local index
#方式1 - Covered Index
What is a Covered Index?
Using Covering Index to Improve Query Performance
如果在某次查询中,查询项或者查询条件中包含除被索引列之外的列(主键MY_PK除外)。默认情况下,该查询会触发full table scan,但是使用covered index则可以避免全表扫描。
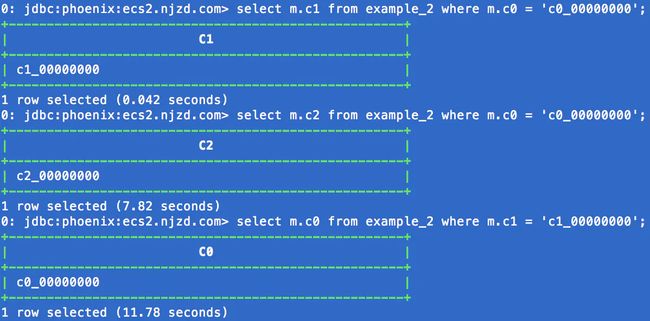
例如,我们按照EXAMPLE的方式创建了另一张表EXAMPLE_2,表中的数据和表的schema与EXAMPLE都是相同的,不同之处在于EXAMPLE_2对其M.C1这一列创建了covered index。
create index my_index_2 on example_2 (m.c0) include (m.c1);
现在,如果查询项中不包含除M.C0和M.C1之外的列,而且查询条件不包含除M.C0之外的列,则可以确保该查询使用Index,如下:
这里写图片描述
#方式2 - Hint
在select和column_name之间加上/*+ Index(<表名> ,如下:
这里写图片描述
This will cause each data row to be retrieved when the index is traversed to find the missing M.C1 column value. This hint should only be used if you know that the index has good selective (i.e. a small number of table rows have a value of ‘c0_00000000’ in this example), as otherwise you’ll get better performance by the default behavior of doing a full table scan
#方式3 - Local Index
Unlike global indexes, local indexes will use an index even when all columns referenced in the query are not contained in the index. This is done by default for local indexes because we know that the table and index data coreside on the same region server thus ensuring the lookup is local.
对于HBase 0.98.6的版本,似乎不支持创建local index,如下:
这里写图片描述
其他方面
Functional Index
Another useful feature that was introduced in the 4.3 release is functional indexes. Functional indexes allow you to create an index not just on columns, but on an arbitrary expressions. Then when a query uses that expression, the index may be used to retrieve the results instead of the data table. For example, you could create an index on UPPER(FIRST_NAME||' '||LAST_NAME) to allow you to do case insensitive searches on the combined first name and last name of a person.
Phoenix supports two types of indexing techniques: global and local indexing. Each are useful in different scenarios and have their own failure profiles and performance characteristics.
下面为表EXAMPLE创建一个Functional Index,如下:
create index index_upper_c2 on example (upper(m.c2)) include m.c2
这里,我们实际上为表
EXAMPLE又创建了一个名为INDEX_UPPER_C2的Index。也就是说,可以为同一张表创建多个Index。
这里写图片描述
Index 排序
create index my_index on example (M.C1 desc, M.C0) include (M.C2);
删除Index
drop index `index-name` on `table-name`
索引表属性
create table和create index都可以将一些属性传递给对应的HBase表,例如:
CREATE INDEX my_index ON my_table (v2 DESC, v1) INCLUDE (v3)
    SALT_BUCKETS=10, DATA_BLOCK_ENCODING='NONE';
对于global indexes,如果primary table是salted table,则index会自动地成为salted index。对于local indexes,则不允许指定salt_buckets。
Immutable Indexing
For a table in which the data is only written once and never updated in-place, certain optimizations may be made to reduce the write-time overhead for incremental maintenance. This is common with time-series data such as log or event data, where once a row is written, it will never be updated. To take advantage of these optimizations, declare your table as immutable by adding the IMMUTABLE_ROWS=true property to your DDL statement:
CREATE TABLE my_table (k VARCHAR PRIMARY KEY, v VARCHAR) IMMUTABLE_ROWS=true;
All indexes on a table declared with IMMUTABLE_ROWS=true are considered immutable (note that by default, tables are considered mutable). For global immutable indexes, the index is maintained entirely on the client-side with the index table being generated as change to the data table occur. Local immutable indexes, on the other hand, are maintained on the server-side. Note that no safeguards are in-place to enforce that a table declared as immutable doesn’t actually mutate data (as that would negate the performance gain achieved). If that was to occur, the index would no longer be in sync with the table.
如果创建的表是immutable table,如下:
create table my_tablek(VARCHAR PRIMARY KEY, v VARCHAR) IMMUTABLE_ROWS=true
那么,为该表创建的所有index都是immutable indexes。
可以将一个已有的immutable table转变为mutable table,可以通过如下命令:
alter table my_table set IMMUTABLE_ROWS=false
问题
#1 能不能为多个column建立index(在同一个index table中)?
例如,如下命令似乎是可以对两个column创建index:
create index my_idx on example(m.c0, m.c1)
但是,似乎只有列m.c0的真正具有索引,列m.c1似乎没有索引:
这里写图片描述
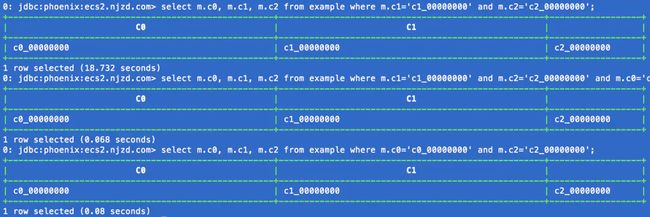
答案是:可以为多个column创建索引,但是在查询时要按照索引列的顺序来查询。例如,为M.C0、M.C1和M.C2建立索引:
create index idx on example (m.c0, m.c1, m.c2)
在查询时,可以同时根据将这3列作为条件,且顺序不限。但是,第一列必须是M.C0。
这里写图片描述
这是因为:当为多列建立索引时,rowkey实际上是这些column的组合,并且是按照它们的先后顺序的组合。
这里写图片描述
如果查询时第一列不是M.C0,那么就要进行full scan,速度会很慢。而如果查询的第一列是M.C0,就可以直接将满足关于M.C0的数据记录找出来。即使后面还有没有被索引的列,也可以很快得到结果,因为满足关于M.C0的结果集已经不大了(如果是这种情况的话),对其再进行一次查询不会是full scan。
这里写图片描述
#2 Bulkload的数据的index能不能自动同步?
维护Index的原理:当对data table执行写入操作时,delete、upsert values和upsert select会被捕获,并据此来更新data table所对应的index。
We intercept the data table updates on write (DELETE, UPSERT VALUES and UPSERT SELECT), build the index update and then sent any necessary updates to all interested index tables
当以bulkload的方式来将数据导入到data table时,会绕开HBase的常规写入路径(client –> buffer –> memstore –> HLog –> StoreFile –> HFile),直接生成最终的HFiles。对于bulkload,对data table的更新能不能被捕获,进而自动维护相应index呢?我们来验证。
首先建立一个空的data table:
create table EXAMPLE (PK varchar primary key, M.C0 varchar, M.C1 varchar, M.C2 varchar, M.C3 varchar, M.C4 varchar, M.C5 varchar, M.C6 varchar, M.C7 varchar, M.C8 varchar, M.C9 varchar) salt_buckets = 20
再为其创建2个index:
create index IDX_C0 on EXAMPLE(M.C0);
create index IDX_C1 on EXAMPLE(M.C1);
现在用MapReduce将一个包含了1亿行记录的CSV文件bulkload到数据表EXAMPLE中去:
sudo -u hbase HADOOP_CLASSPATH=$(hbase classpath) hadoop jar phoenix-4.3.1-client.jar org.apache.phoenix.mapreduce.CsvBulkLoadTool -libjars 3rdlibs/commons-csv-1.0.jar,3rdlibs/joda-time-2.7.jar --table EXAMPLE --input /user/tao/data/data-100m.csv
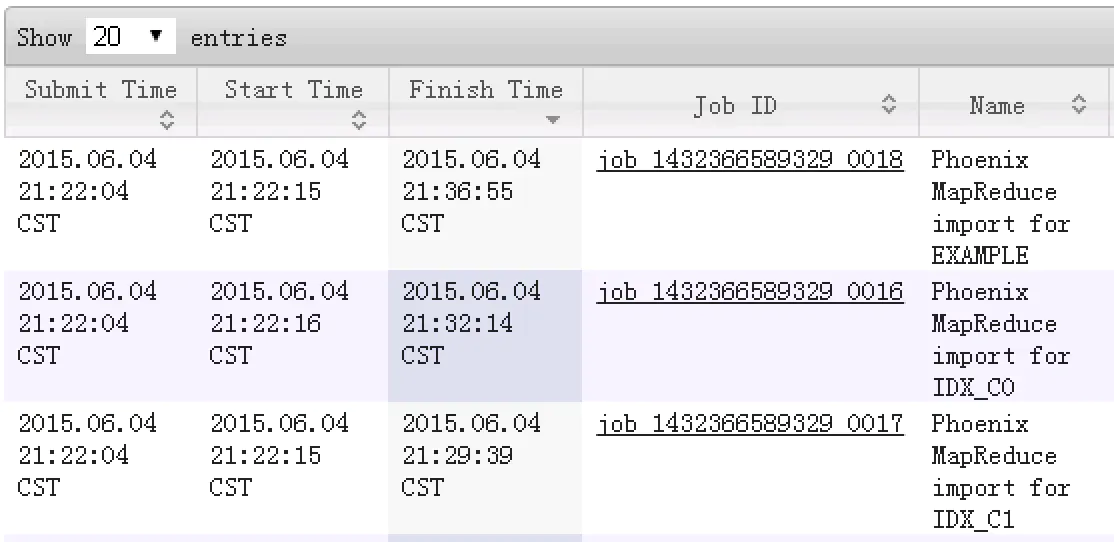
从输出来看,一共启动了3个MR任务,分别针对数据表EXAMPLE、索引表IDX_C0和索引表IDX_C1,如下:
这里写图片描述
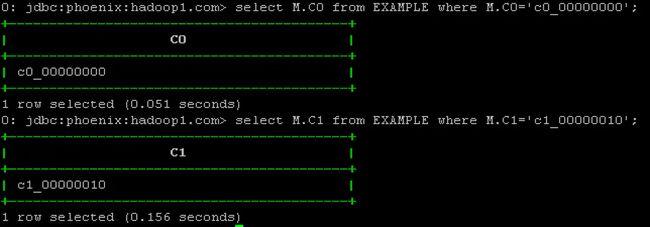
现在,再看看查询时间:
这里写图片描述
所以,一旦index创建之后,不论是否使用bulkload来更新data table,都会保证index的自动更新。


