云台部署与管理/Docker容器/基本命令操作
一.Docker 概述
1.什么是容器?(超轻量级的虚拟化)
容器技术已经成为应用程序封装和交付的核心技术
• 容器技术的核心有以下几个内核技术组成:
– Cgroups(Control Groups)-资源管理
– NameSpace-进程隔离
– SELinux安全*
• 由于是在物理机上实施隔离,启动一个容器,可以像启动一个进程一样快速
2.什么是docker?
Docker是完整的一套容器管理系统
Docker提供了一组命令,让用户更加方便直接的使用容器技术,而不需要过多关心底层的内核技术
3.docker特性
Docker优点:
相比于传统的虚拟化技术,容器更加简洁高效
• 传统虚拟机需要给每个VM安装操作系统
• 容器使用的共享公共库和程序

Docker缺点:
容器的隔离性没有虚拟化强
共用Linux内核,安全性有先天缺陷
SELinux难以驾驭
监控容器和容器排错是挑战
二.部署Docker
安装前准备:
需要64位操作系统
• 至少RHEL6.5以上的版本,强烈推荐RHEL7
• 关闭防火墙(不是必须,熟悉docker的情况以下)
环境准备:
虚拟机2台:4G内存,20G硬盘以上
192.168.1.30
192.168.1.31
2.1安装docker
真机挂载yum源
  ]# mkdir /var/ftp/rhelosp
   ]# ls /linux-soft/04/openstack/
   ]# mount /linux-soft/04/openstack/RHEL7-extras.iso /var/ftp/rhelosp/
   ]#vim /etc/fstab
/linux-soft/04/openstack/RHEL7-extras.iso /var/ftp/rhelosp iso9660 defaults 0 0
在2台虚拟机中配置yum源
]# vim /etc/yum.repos.d/local.repo
[docker]
name=CentOS rhel osp
baseurl="ftp://192.168.1.254/rhelosp"
enabled=1
gpgcheck=0
软件包安装
]# yum -y  install docker
]# systemctl restart docker
]# systemctl enable docker
三.Docker镜像
3.1基本概念
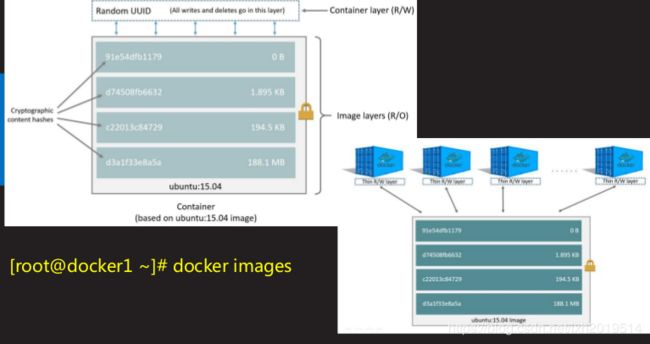
什么是镜像?
]# docker imagers //查看镜像
在Docker中容器是基于镜像启动的
• 镜像是启动容器的核心
• 镜像采用分层设计
• 使用快照的COW技术,确保底层数据不丢失


Docker hub镜像仓库
https://hub.docker.com
Docker官方提供公共镜像的超仓库(registry)
]# docker search busybox             //查看镜像
]# docker search centos
]# docker search nginx
3.2镜像操作
下载,上传镜像
]# docker search busybox                //查看镜像
]# docker help pull             //查看镜像下载帮助格式
Usage:	docker pull [OPTIONS] NAME[:TAG|@DIGEST]

]# docker pull docker.io/busybox     //下载镜像(从镜像仓库中下载镜像镜像下载)
]# docker images          //查看镜像
导入,导出镜像
]# docker images
REPOSITORY          TAG                 IMAGE ID            CREATED             SIZE
docker.io/busybox   latest              64f5d945efcc        4 weeks ago         1.199 MB

**导出镜像(将本地镜像导出为tar文件)
   ]#Docker save -o 备份名 镜像名:标签
   ]# docker save -o busyboox.tar docker.io/busybox:latest
   ]# ls

**导入镜像(通过tar包文件导入镜像)**
]# scp busyboox.tar [email protected]:/root/
docker02 ~]# ls
docker02 ~]# docker load -i busyboox.tar
docker02 ~]# docker images
导入镜像(多个镜像一起导入)
docker01 ~]# for i in docker/*.tar
      >do
     >docker load -i ${i}
     >done
docker01 ~]# docker images

docker02 ~]# for i in docker/*.tar;do docker load -i ${i};done
启动镜像
启动centos镜像生成一个容器
]#docker 子命令 参数 镜像名称:标签 启动命令
]#docker  run    -it    docker.io/centos:latest  /bin/bash
772f3ca15f75 /]# ls
开启另一个终端(查看容器信息)
 docker01 ~]# docker run -it docker.io/centos /bin/bash
    772f3ca15f75 /]# ifconfig
    bash: ifconfig: command not found
    772f3ca15f75 /]# yum
    bash: ifconfig: command not found
    772f3ca15f75 / ]#yum provides ifconfig
772f3ca15f75 /]# vi yum.repol
[docker]
name=docker
baseurl=ftp://192.168.1.254/rhelosp
enabled=1
gpgckeck=0
772f3ca15f75 /]# yum -y install net-tools-2.0-0.24.20131004git.el7.x86_64
772f3ca15f75 /]# ifconfig
772f3ca15f75 /]# hostname
772f3ca15f75
772f3ca15f75 /]# cat /etc/passwd
772f3ca15f75 /]# exit

]#pstree -p
docker01 ~]# docker ps
四.Docker基本命令
镜像常用命令列表
• 命令列表
– docker images       //查看镜像列表
– docker history        //查看镜像制作历史
– docker inspect       //查看镜像底层信息
– docker pull            //下载镜像
– docker push          //上传镜像
– docker rmi            //删除本地镜像
– docker save          //镜像另存为tar包
– docker load           //使用tar包导入镜像
– docker search         //搜索镜像
– docker tag            //修改镜像名称和标签(不能和现有的名称和标签重复)
查看镜像列表:]# docker images
– 镜像仓库名称
– 镜像标签
– 镜像ID
– 创建时间
– 大小
]# docker history docker.io/centos       //查看镜像历史
]# docker inspect docker.io/centos        //查看镜像底层信息
]# docker rmi docker.io/centos            //删除本地镜像
保存本地镜像另存为tar文件:
 ]# docker save docker.io/busybox:latest -o  busybox.tar
 ]# docker load -i busybox.tar                    //使用tar包文件导入镜像
 ]# docker tag docker.io/centos:latest cen:v1     //重命名镜像名称(复制)
容器常用命令
命令列表
– docker run      //运行容器
– docker ps       //查看容器列表
– docker stop      //关闭容器
– docker start      //启动容器
– docker restart     //重启容器
– docker attach|exec   //进入容器
– docker inspect     //查看容器底层信息
– docker top       //查看容器进程列表
– docker rm        //删除容器
使用镜像启动容器**
]# docker  run  -it  docker.io/centos:latest  bash
bbb51ac87b08 /]#exit
]# docker run  -itd  docker.io/centos:latest bash    //后台运行
258dccab2077037536c5605c1ec4eb5c6f99854fb5e3a5056419185a33365424

]#ps aux | grep :nginx
]#curl 192.168.1.30:80/
列出容器列表
– docker ps   查看正在运行的容器
– docker ps -a  查看所有容器列表
– docker ps -aq  仅显示容器id
管理容器
– docker stop   关闭容器
– docker start   开启容器
– docker restart  重启容器
进入容器
– docker attach  进入容器,exit会导致容器关闭
– docker exec  进入容器,退出时不会关闭容器

]# docker ps -a
]# docker ps -aq
]# docker ps
]# docker start e6
]# docker stop e6
]# docker ps
]# docker restart e6
]# docker ps

]# docker ps -q
258dccab2077
e623764a3872

]# docker top e6
]# docker top 25
]# docker stop e6
]# docker stop 25
]# docker rm $(docker ps -aq)
]# docker ps -aq
练习:
2个容器,
起1个nginx容器
起1个centos 容器,起一个apache服务
要求,默认首页都改成"hello world."
]# cat /etc/yum.repos.d/local.repo                  //查看本地yum源
]# docker run -itd docker.io/centos /bin/bash      // 启动容器
]# docker attach 9a                      //进入容器
]# ifconfig
]# cd /etc/yum.repos.d/
]# ls
]# rm -f *
]# cat  >local.repo< [local_repo]
> name=CentOS-$releasever - Base
> baseurl="ftp://192.168.1.254/centos-1804"
> enabled=1
> gpgcheck=0
> EE
]# cd
或:
]# vi yum.repol
[httpd]
name=httpd
baseurl=ftp://192.168.1.254/Centos-1804
enabled=1
gpgckeck=0

]# yum provides ifconfig
]# yum -y install net-tools-2.0-0.24.20131004git.el7.x86_64
]#ifconfig
eth0: flags=4163  mtu 1500
inet 172.17.0.4  netmask 255.255.0.0  broadcast 0.0.0.0

]# yum -y install httpd (**或 apt-get install httpd** )
]# cat  /usr/lib/systemd/system/httpd.servic
[Service]
Type=notify
EnvironmentFile=/etc/sysconfig/httpd
ExecStart=/usr/sbin/httpd $OPTIONS -DFOREGROUND
ExecReload=/usr/sbin/httpd $OPTIONS -k graceful
ExecStop=/bin/kill -WINCH ${MAINPID}
``
]# cat /etc/sysconfig/httpd
]# /usr/sbin/httpd $OPTIONS -DFOREGROUND
]# cd /var/www/html/
]#ls
]# echo "hello world" >index.html
]# /usr/sbin/httpd $OPTIONS -DFOREGROUND (ctrl+p+q)
]# docker ps
]#docker inspect 243651b7d48a
]# curl 172.17.0.4
启动nginx容器
]# docker run -itd docker.io/nginx bash          //启动nginx容器
]# docker exec -it bd2 /bin/bash
bd2b4951fb7# cat /etc/debian_version
bd2b4951fb7/#  nginx -V
#dpkg -l | grep nginx             //查看nginx配置
bd2b4951fb7:/# dpkg -L nginx                    //查看包的安装路径
bd2b4951fb7:/# dpkg -L nginx | grep nginx.conf
bd2b4951fb7/# cat /etc/nginx/nginx.conf
7bd2b4951fb7:/# cat etc/nginx/conf.d/*.conf
7bd2b4951fb7:/# ls /etc/nginx/conf.d/
7bd2b4951fb7:/# cat /etc/nginx/conf.d/default.conf
7bd2b4951fb7:/# ls /usr/share/nginx/html
7bd2b4951fb7:# echo 'hello world !!!' > /usr/share/nginx/html/index.html
7bd2b4951fb7:/# /etc/init.d/nginx start
7bd2b4951fb7:/# [root@docker01 ~]#  (ctrl+pq)
]# docker ps
]# docker inspect 7bd2b4951fb7
]# curl http://172.17.0.2
hello world

]# docker exec -it 232444a1460a  bash
232444a1460a/# cat /usr/share/nginx/html/index.html
hello world
]# docker exec -it 232444a1460a  bash
232444a1460a/# cat /usr/share/nginx/html/index.html
hello world

]# docker rm $(docker stop $(docker ps -aq))
]# docker ps -aq