从servlet到springboot(17) springboot处理请求的过程
前面我们分析了springboot的启动,tomcat的源码,这一篇,我们将从tomcat的Acceptor开始,分析一个请求进入servlet的处理过程
首先定位到NioEndpoint中的内部类Acceptor的run方法中的
socket = NioEndpoint.this.serverSock.accept();这句话通过socket监听获取请求
然后找到AbstractProtocal中的ConnectionHandler#process。
这里面会把接收到的socket转化成request
找到state = processor.process(wrapper, status);这句话,通过调用procesor的process方法。在process方法中会调用
CoyoteAdapter#service方法进行适配这里会对Request和Response进行一些封装和转换
然后找到这句话
this.connector.getService().getContainer().getPipeline().getFirst().invoke(request, response);this.connector.getService()获取的是StandardService,从这个service中获取的Container,根据我们在15中介绍的Container体系,在Adapter中获取到的是顶层Container:StandardEngine。从StandardEngine中获取到Pipeline,再从Pipeline中获取到第一个Valve,这边就是StandardEngineValve.调用它的invoke方法
我们看StandardEngineValve的invoke方法
public final void invoke(Request request, Response response) throws IOException, ServletException {
    Host host = request.getHost();
    if (host == null) {
        response.sendError(400, sm.getString("standardEngine.noHost", new Object[]{request.getServerName()}));
    } else {
        if (request.isAsyncSupported()) {
            request.setAsyncSupported(host.getPipeline().isAsyncSupported());
        }

        host.getPipeline().getFirst().invoke(request, response);
    }
}
这里会从request中获取到Host类型的Container。这里的Host就是StandardHost,然后与上面一样的方式,调用StandardHostValve的invoke方法
public final void invoke(Request request, Response response) throws IOException, ServletException {
    Context context = request.getContext();
    if (context == null) {
        response.sendError(500, sm.getString("standardHost.noContext"));
    } else {
        if (request.isAsyncSupported()) {
            request.setAsyncSupported(context.getPipeline().isAsyncSupported());
        }

        boolean asyncAtStart = request.isAsync();
        boolean asyncDispatching = request.isAsyncDispatching();

        try {
            context.bind(Globals.IS_SECURITY_ENABLED, MY_CLASSLOADER);
            if (asyncAtStart || context.fireRequestInitEvent(request.getRequest())) {
                try {
                    if (asyncAtStart && !asyncDispatching) {
                        if (!response.isErrorReportRequired()) {
                            throw new IllegalStateException(sm.getString("standardHost.asyncStateError"));
                        }
                    } else {
                        context.getPipeline().getFirst().invoke(request, response);
。。。。。。。
这里面有异步处理请求相关的东西。关于这部分内容可以参考这篇文章
https://www.cnblogs.com/davenkin/p/async-servlet.html
同样还是context.getPipeline().getFirst().invoke(request, response);
最后我们进入StandardContextValve的invoke方法
直接看到一句类似的话
wrapper.getPipeline().getFirst().invoke(request, response);最终我们进入StandardWrapperValve的invoke方法
public final void invoke(Request request, Response response) throws IOException, ServletException {
  。。。。。
    StandardWrapper wrapper = (StandardWrapper)this.getContainer();
   。。。。。。
    ApplicationFilterChain filterChain = ApplicationFilterFactory.createFilterChain(request, wrapper, servlet);


                filterChain.doFilter(request.getRequest(), response.getResponse());
            。。。。
我们忽略一些废话,直接看关键性语句,首先获取到StandardWrapper,然后获取到Filter,然后调用filter拦截器链,关于filterChain.doFilter这个方法的调用,有点类似于我们在解析aop原理那一篇所提及的链式调用,通过filter中的doFilter方法,而在doFilter方法中又调用filterChina.doFilter,通过累加索引数字,最终调用到WSFitler的doFilter方法
public void doFilter(ServletRequest request, ServletResponse response, FilterChain chain) throws IOException, ServletException {
    if (this.sc.areEndpointsRegistered() && UpgradeUtil.isWebSocketUpgradeRequest(request, response)) {
        HttpServletRequest req = (HttpServletRequest)request;
        HttpServletResponse resp = (HttpServletResponse)response;
        String pathInfo = req.getPathInfo();
        String path;
        if (pathInfo == null) {
            path = req.getServletPath();
        } else {
            path = req.getServletPath() + pathInfo;
        }

        WsMappingResult mappingResult = this.sc.findMapping(path);
        if (mappingResult == null) {
            chain.doFilter(request, response);
        } else {
            UpgradeUtil.doUpgrade(this.sc, req, resp, mappingResult.getConfig(), mappingResult.getPathParams());
        }
    } else {
        chain.doFilter(request, response);
    }
}
这边会先走chain.doFilter(request, response);逻辑
而这段代码最终还是会重新走到ApplicationFilterChain#internalDoFilter,
private void internalDoFilter(ServletRequest request,
                              ServletResponse response)
    throws IOException, ServletException {

    // Call the next filter if there is one
    if (pos < n) {
        ApplicationFilterConfig filterConfig = filters[pos++];
        try {
            Filter filter = filterConfig.getFilter();

            if (request.isAsyncSupported() && "false".equalsIgnoreCase(
                    filterConfig.getFilterDef().getAsyncSupported())) {
                request.setAttribute(Globals.ASYNC_SUPPORTED_ATTR, Boolean.FALSE);
            }
            if( Globals.IS_SECURITY_ENABLED ) {
                final ServletRequest req = request;
                final ServletResponse res = response;
                Principal principal =
                    ((HttpServletRequest) req).getUserPrincipal();

                Object[] args = new Object[]{req, res, this};
                SecurityUtil.doAsPrivilege ("doFilter", filter, classType, args, principal);
            } else {
                filter.doFilter(request, response, this);
            }
        } catch (IOException | ServletException | RuntimeException e) {
            throw e;
        } catch (Throwable e) {
            e = ExceptionUtils.unwrapInvocationTargetException(e);
            ExceptionUtils.handleThrowable(e);
            throw new ServletException(sm.getString("filterChain.filter"), e);
        }
        return;
    }

    // We fell off the end of the chain -- call the servlet instance
    try {
        if (ApplicationDispatcher.WRAP_SAME_OBJECT) {
            lastServicedRequest.set(request);
            lastServicedResponse.set(response);
        }

        if (request.isAsyncSupported() && !servletSupportsAsync) {
            request.setAttribute(Globals.ASYNC_SUPPORTED_ATTR,
                    Boolean.FALSE);
        }
        // Use potentially wrapped request from this point
        if ((request instanceof HttpServletRequest) &&
                (response instanceof HttpServletResponse) &&
                Globals.IS_SECURITY_ENABLED ) {
            final ServletRequest req = request;
            final ServletResponse res = response;
            Principal principal =
                ((HttpServletRequest) req).getUserPrincipal();
            Object[] args = new Object[]{req, res};
            SecurityUtil.doAsPrivilege("service",
                                       servlet,
                                       classTypeUsedInService,
                                       args,
                                       principal);
        } else {
            servlet.service(request, response);
        }
由于此时pos=n。所以直接走else逻辑,servlet.service.
这里的servlet就是DispatcherServlet,也就是意味着请求正式进入Servlet中,所以我们接下去将分析request在servlet中的走向。
---------------------------------------------------------------
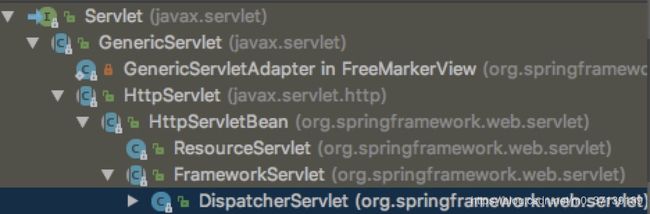
先看下Servlet的结构
public void init(ServletConfig config) throws ServletException;


public ServletConfig getServletConfig();


public void service(ServletRequest req, ServletResponse res)
        throws ServletException, IOException;


public String getServletInfo();


public void destroy();
其中init方法是在初始化的时候调用的,service是处理request请求的方法, getServletConfig()是获取servlet配置信息的方法
在springboot中,第一次发起请求调用首先会初始化DispatcherServlet,初始化首先会调用init方法,init方法的实现类在HttpServletBean中
首先这句话花会将servletConfig中的配置设置到PropertyValues中
PropertyValues pvs = new ServletConfigPropertyValues(getServletConfig(), this.requiredProperties);
BeanWrapper bw = PropertyAccessorFactory.forBeanPropertyAccess(this);
ResourceLoader resourceLoader = new ServletContextResourceLoader(getServletContext());
bw.registerCustomEditor(Resource.class, new ResourceEditor(resourceLoader, getEnvironment()));
initBeanWrapper(bw);
bw.setPropertyValues(pvs, true);
是一个赋值方法,关于BeanWrapper的用法可以参考https://blog.csdn.net/lz710117239/article/details/79502902
initServletBean是一个模板方法,在子类中实现,我们看FrameworkSevlet#initServletBean
这个方法的核心就是两句话
this.webApplicationContext = initWebApplicationContext();
initFrameworkServlet();
第一步初始化了一个WebApplicationContext
protected WebApplicationContext initWebApplicationContext() {
   WebApplicationContext rootContext =
         WebApplicationContextUtils.getWebApplicationContext(getServletContext());
   WebApplicationContext wac = null;

   if (this.webApplicationContext != null) {
      // A context instance was injected at construction time -> use it
      wac = this.webApplicationContext;
      if (wac instanceof ConfigurableWebApplicationContext) {
         ConfigurableWebApplicationContext cwac = (ConfigurableWebApplicationContext) wac;
         if (!cwac.isActive()) {
            // The context has not yet been refreshed -> provide services such as
            // setting the parent context, setting the application context id, etc
            if (cwac.getParent() == null) {
               // The context instance was injected without an explicit parent -> set
               // the root application context (if any; may be null) as the parent
               cwac.setParent(rootContext);
            }
            configureAndRefreshWebApplicationContext(cwac);
         }
      }
   }
   if (wac == null) {
      // No context instance was injected at construction time -> see if one
      // has been registered in the servlet context. If one exists, it is assumed
      // that the parent context (if any) has already been set and that the
      // user has performed any initialization such as setting the context id
      wac = findWebApplicationContext();
   }
   if (wac == null) {
      // No context instance is defined for this servlet -> create a local one
      wac = createWebApplicationContext(rootContext);
   }

   if (!this.refreshEventReceived) {
      // Either the context is not a ConfigurableApplicationContext with refresh
      // support or the context injected at construction time had already been
      // refreshed -> trigger initial onRefresh manually here.
      onRefresh(wac);
   }

   if (this.publishContext) {
      // Publish the context as a servlet context attribute.
      String attrName = getServletContextAttributeName();
      getServletContext().setAttribute(attrName, wac);
      if (this.logger.isDebugEnabled()) {
         this.logger.debug("Published WebApplicationContext of servlet '" + getServletName() +
               "' as ServletContext attribute with name [" + attrName + "]");
      }
   }

   return wac;
}
这一大串代码主要做了三件事:
1.获取到rootContext
2.调用onRefresh方法
3.把webApplicationContext设置到ServletContext中
onRefresh也是一个模板方法,我们看在DispatherServlet中的实现
protected void initStrategies(ApplicationContext context) {
   initMultipartResolver(context);
   initLocaleResolver(context);
   initThemeResolver(context);
   initHandlerMappings(context);
   initHandlerAdapters(context);
   initHandlerExceptionResolvers(context);
   initRequestToViewNameTranslator(context);
   initViewResolvers(context);
   initFlashMapManager(context);
}
可以发现这里是初始化了SpringMVC中的九大组件,这个后面再说
initFrameworkServlet();方法也是一个模板方法,但是什么都没做
我们回到Framework的service方法
@Override
protected void service(HttpServletRequest request, HttpServletResponse response)
      throws ServletException, IOException {

   HttpMethod httpMethod = HttpMethod.resolve(request.getMethod());
   if (HttpMethod.PATCH == httpMethod || httpMethod == null) {
      processRequest(request, response);
   }
   else {
      super.service(request, response);
   }
}
HttpMethod httpMethod = HttpMethod.resolve(request.getMethod());首先获取到当前request的类型,然后直接调用HttpServlet中的service方法
protected void service(HttpServletRequest req, HttpServletResponse resp)
    throws ServletException, IOException {

    String method = req.getMethod();

    if (method.equals(METHOD_GET)) {
        long lastModified = getLastModified(req);
        if (lastModified == -1) {
            // servlet doesn't support if-modified-since, no reason
            // to go through further expensive logic
            doGet(req, resp);
        } else {
            long ifModifiedSince;
            try {
                ifModifiedSince = req.getDateHeader(HEADER_IFMODSINCE);
            } catch (IllegalArgumentException iae) {
                // Invalid date header - proceed as if none was set
                ifModifiedSince = -1;
            }
            if (ifModifiedSince < (lastModified / 1000 * 1000)) {
                // If the servlet mod time is later, call doGet()
                // Round down to the nearest second for a proper compare
                // A ifModifiedSince of -1 will always be less
                maybeSetLastModified(resp, lastModified);
                doGet(req, resp);
            } else {
                resp.setStatus(HttpServletResponse.SC_NOT_MODIFIED);
            }
        }

    } else if (method.equals(METHOD_HEAD)) {
        long lastModified = getLastModified(req);
        maybeSetLastModified(resp, lastModified);
        doHead(req, resp);

    } else if (method.equals(METHOD_POST)) {
        doPost(req, resp);

    } else if (method.equals(METHOD_PUT)) {
        doPut(req, resp);

    } else if (method.equals(METHOD_DELETE)) {
        doDelete(req, resp);

    } else if (method.equals(METHOD_OPTIONS)) {
        doOptions(req,resp);

    } else if (method.equals(METHOD_TRACE)) {
        doTrace(req,resp);

    } else {
        //
        // Note that this means NO servlet supports whatever
        // method was requested, anywhere on this server.
        //

        String errMsg = lStrings.getString("http.method_not_implemented");
        Object[] errArgs = new Object[1];
        errArgs[0] = method;
        errMsg = MessageFormat.format(errMsg, errArgs);

        resp.sendError(HttpServletResponse.SC_NOT_IMPLEMENTED, errMsg);
    }
}
这个方法其实就是根据请求的不同类型来实现不同的路由方法
我们假定是get方法,直接调用frameworkServlet的doGet方法
 */
@Override
protected final void doGet(HttpServletRequest request, HttpServletResponse response)
      throws ServletException, IOException {

   processRequest(request, response);
}
进入processRequest方法
protected final void processRequest(HttpServletRequest request, HttpServletResponse response)
      throws ServletException, IOException {

   long startTime = System.currentTimeMillis();
   Throwable failureCause = null;

   LocaleContext previousLocaleContext = LocaleContextHolder.getLocaleContext();
   LocaleContext localeContext = buildLocaleContext(request);

   RequestAttributes previousAttributes = RequestContextHolder.getRequestAttributes();
   ServletRequestAttributes requestAttributes = buildRequestAttributes(request, response, previousAttributes);

   WebAsyncManager asyncManager = WebAsyncUtils.getAsyncManager(request);
   asyncManager.registerCallableInterceptor(FrameworkServlet.class.getName(), new RequestBindingInterceptor());

   initContextHolders(request, localeContext, requestAttributes);

   try {
      doService(request, response);
   }
   catch (ServletException ex) {
      failureCause = ex;
      throw ex;
   }
   catch (IOException ex) {
      failureCause = ex;
      throw ex;
   }
   catch (Throwable ex) {
      failureCause = ex;
      throw new NestedServletException("Request processing failed", ex);
   }

   finally {
      resetContextHolders(request, previousLocaleContext, previousAttributes);
      if (requestAttributes != null) {
         requestAttributes.requestCompleted();
      }

      if (logger.isDebugEnabled()) {
         if (failureCause != null) {
            this.logger.debug("Could not complete request", failureCause);
         }
         else {
            if (asyncManager.isConcurrentHandlingStarted()) {
               logger.debug("Leaving response open for concurrent processing");
            }
            else {
               this.logger.debug("Successfully completed request");
            }
         }
      }

      publishRequestHandledEvent(request, response, startTime, failureCause);
   }
}
这段代码主要做了四件事情
1.设置LocaleContext和RequestAt't'ributes
2.实际处理请求doService
3.在finally语句块中恢复LocaleContext和RequestAt't'ributes
4.发布请求处理完成事件
我们主要看doService这个核心方法
DispatcherServlet#doService
@Override
protected void doService(HttpServletRequest request, HttpServletResponse response) throws Exception {
   if (logger.isDebugEnabled()) {
      String resumed = WebAsyncUtils.getAsyncManager(request).hasConcurrentResult() ? " resumed" : "";
      logger.debug("DispatcherServlet with name '" + getServletName() + "'" + resumed +
            " processing " + request.getMethod() + " request for [" + getRequestUri(request) + "]");
   }

   // Keep a snapshot of the request attributes in case of an include,
   // to be able to restore the original attributes after the include.
   Map attributesSnapshot = null;
   if (WebUtils.isIncludeRequest(request)) {
      attributesSnapshot = new HashMap();
      Enumeration attrNames = request.getAttributeNames();
      while (attrNames.hasMoreElements()) {
         String attrName = (String) attrNames.nextElement();
         if (this.cleanupAfterInclude || attrName.startsWith(DEFAULT_STRATEGIES_PREFIX)) {
            attributesSnapshot.put(attrName, request.getAttribute(attrName));
         }
      }
   }

   // Make framework objects available to handlers and view objects.
   request.setAttribute(WEB_APPLICATION_CONTEXT_ATTRIBUTE, getWebApplicationContext());
   request.setAttribute(LOCALE_RESOLVER_ATTRIBUTE, this.localeResolver);
   request.setAttribute(THEME_RESOLVER_ATTRIBUTE, this.themeResolver);
   request.setAttribute(THEME_SOURCE_ATTRIBUTE, getThemeSource());

   FlashMap inputFlashMap = this.flashMapManager.retrieveAndUpdate(request, response);
   if (inputFlashMap != null) {
      request.setAttribute(INPUT_FLASH_MAP_ATTRIBUTE, Collections.unmodifiableMap(inputFlashMap));
   }
   request.setAttribute(OUTPUT_FLASH_MAP_ATTRIBUTE, new FlashMap());
   request.setAttribute(FLASH_MAP_MANAGER_ATTRIBUTE, this.flashMapManager);

   try {
      doDispatch(request, response);
   }
   finally {
      if (!WebAsyncUtils.getAsyncManager(request).isConcurrentHandlingStarted()) {
         // Restore the original attribute snapshot, in case of an include.
         if (attributesSnapshot != null) {
            restoreAttributesAfterInclude(request, attributesSnapshot);
         }
      }
   }
}
这个方法中主要做了两件事情,
1.给request设置一些属性
2.执行核心方法doDispatcher
前面一些组件设置我们会在后续章节中介绍,这里我们主要说一个东西FlashMap
FlashMap inputFlashMap = this.flashMapManager.retrieveAndUpdate(request, response); if (inputFlashMap != null) { request.setAttribute(INPUT_FLASH_MAP_ATTRIBUTE, Collections.unmodifiableMap(inputFlashMap)); } request.setAttribute(OUTPUT_FLASH_MAP_ATTRIBUTE, new FlashMap()); request.setAttribute(FLASH_MAP_MANAGER_ATTRIBUTE, this.flashMapManager);
这串话都是和这个组件息息相关的
这个组件主要用于Redirect的转发时传递参数。比如为了避免重复提交表单,可以在post请求后附加一个get请求。但是如果提交表单之后Redirect也需要前面post请求的参数,由于Redirect本身不能携带参数,只能放在url中,如果我们不想透露一些参数信息,那么就可以把参数放在FlashMap中。具体我们会在以后的springMVC组件系列文章中说明,这里我们简要说明下:inputFlashMap用于保存上次请求中转发过来的属性,outputFlashMap用于保存本次请求需要转发的属性,FlashMapManager用于管理它们。
这一篇已经比较长了,下一篇我们将分析doDispatcher方法