ansible入门搭建与使用
ansible 简介
ansible 是什么?
ansible是新出现的自动化运维工具,基于Python开发,集合了众多运维工具(puppet、chef、func、fabric)的优点,实现了批量系统配置、批量程序部署、批量运行命令等功能。
ansible是基于 paramiko 开发的,并且基于模块化工作,本身没有批量部署的能力。真正具有批量部署的是ansible所运行的模块,ansible只是提供一种框架。 ansible不需要在远程主机上安装client/agents,因为它们是基于ssh来和远
程主机通讯的。ansible目前已经已经被红帽官方收购,是自动化运维工具中大家认可度最高的,并且上手容易,学习简单。是每位运维工程师必须掌握的技能之一。
ansible 特点
- 部署简单,只需在主控端部署Ansible环境,被控端无需做任何操作;
- 默认使用SSH协议对设备进行管理;
- 有大量常规运维操作模块,可实现日常绝大部分操作;
- 配置简单、功能强大、扩展性强;
- 支持API及自定义模块,可通过Python轻松扩展;
- 通过Playbooks来定制强大的配置、状态管理;
- 轻量级,无需在客户端安装agent,更新时,只需在操作机上进行一次更新即可;
- 提供一个功能强大、操作性强的Web管理界面和REST API接口——AWX平台。
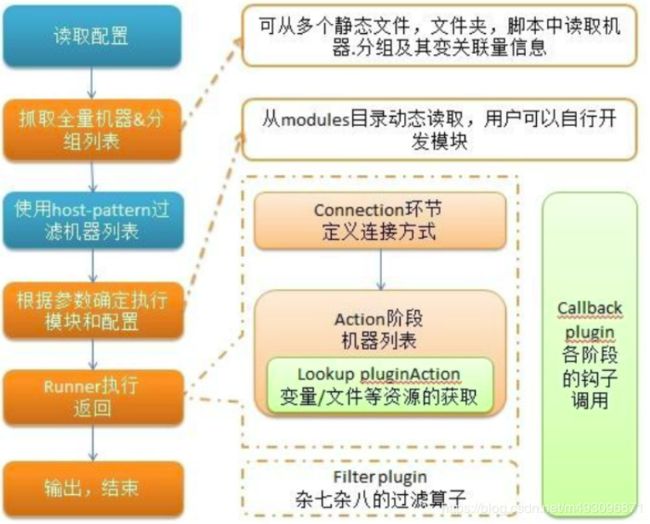
ansible 架构图

上图中我们看到的主要模块如下:
Ansible:Ansible核心程序。HostInventory:记录由Ansible管理的主机信息,包括端口、密码、ip等。Playbooks:“剧本”YAML格式文件,多个任务定义在一个文件中,定义主机需要调用哪些模块来完成的功能。CoreModules:核心模块,主要操作是通过调用核心模块来完成管理任务。CustomModules:自定义模块,完成核心模块无法完成的功能,支持多种语言。ConnectionPlugins:连接插件,Ansible和Host通信使用
ansible 任务执行
ansible 任务执行模式
Ansible 系统由控制主机对被管节点的操作方式可分为两类,即adhoc和playbook:
- ad-hoc模式(点对点模式)
使用单个模块,支持批量执行单条命令。ad-hoc 命令是一种可以快速输入的命令,而且不需要保存起来的命令。就相当于bash中的一句话shell。 - playbook模式(剧本模式)
是Ansible主要管理方式,也是Ansible功能强大的关键所在。playbook通过多个task集合完成一类功能,如Web服务的安装部署、数据库服务器的批量备份等。可以简单地把playbook理解为通过组合多条ad-hoc操作的配置文件。
ansible 执行流程
简单理解就是Ansible在运行时, 首先读取ansible.cfg中的配置, 根据规则获取Inventory中的管理主机列表, 并行的在这些主机中执行配置的任务, 最后等待执行返回的结果。
ansible 命令执行过程
- 加载自己的配置文件,默认
/etc/ansible/ansible.cfg; - 查找对应的主机配置文件,找到要执行的主机或者组;
- 加载自己对应的模块文件,如 command;
- 通过ansible将模块或命令生成对应的临时py文件(python脚本), 并将该文件传输至远程服务器;
- 对应执行用户的家目录的
.ansible/tmp/XXX/XXX.PY文件; - 给文件 +x 执行权限;
- 执行并返回结果;
- 删除临时py文件,
sleep 0退出;
ansible 程序结构
安装目录如下(yum安装):
配置文件目录:/etc/ansible/
执行文件目录:/usr/bin/
Lib库依赖目录:/usr/lib/pythonX.X/site-packages/ansible/
Help文档目录:/usr/share/doc/ansible-X.X.X/
Man文档目录:/usr/share/man/man1/
下面开始搭建
参考
![]()
docs.ansible.com/ansible/latest/index.html
有网可以直接
-
yum install python-pip -
pip install ansible -
yum install epel-release -y -
yum install ansible –y
server6 server7 172.25.11.6 7
用到的包(没有上网)
[root@server7 ansible]# ls
ansible-2.7.8-1.el7.noarch.rpm
ansible-tower-setup-bundle-3.4.2-1.el7.tar.gz
libtomcrypt-1.17-25.el7.x86_64.rpm
libtommath-0.42.0-5.el7.x86_64.rpm
python2-crypto-2.6.1-13.el7.x86_64.rpm
python2-jmespath-0.9.0-1.el7.noarch.rpm
python-httplib2-0.9.2-0.1.el7.noarch.rpm
python-keyczar-0.71c-2.el7.noarch.rpm
python-paramiko-2.1.1-0.9.el7.noarch.rpm
sshpass-1.06-1.el7.x86_64.rpm
首先免密
server6
ssh-keygen
ssh-copy-id server6
ssh-copy-id server7
[root@server6 ansible]# vim hosts
[root@server6 ansible]# pwd
/etc/ansible
[web]
server6
server7
可以不加组,也可以加组[web]
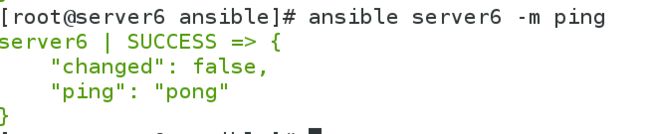
ansible server6 -m ping -k
ansible server6 -m ping
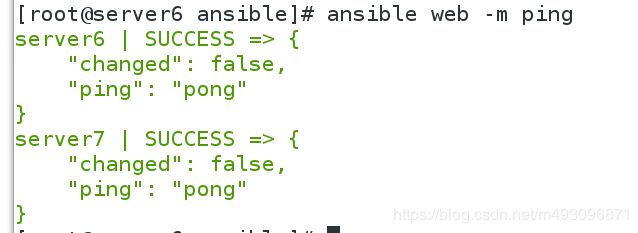
ansible web -m ping
[root@server6 ansible]# ansible-doc -l | wc -l
2080
查看模块
[root@server6 ansible]# ansible-doc -l | grep user
ansible-doc user
ansible all -m user -a "name=hzp password=westos"
vim /etc/sudoers
hzp ALL=(ALL) NOPASSWD: ALL
passwd hzp
ansible all -u hzp -b -a "poweroff" 超户关机
-b 后面不加 -m 默认使用命令
管理包
ansible server7 -u hzp -b -m yum -a "name=httpd state=present" 安装 absent 卸载
ansible server7 -u hzp -b -m service -a "name=httpd state=started" 启动
echo "server7">index.html
ansible server7 -u hzp -b -m copy -a "src=index.html dest=/var/www/html/index.html" 传文件
[root@server6 ansible]# ansible server7 -u hzp -b -m copy -a "src=index.html dest=/var/www/html/index.html"
server7 | CHANGED => {
"changed": true,
"checksum": "702e0fb680be3f872d7303aba17685857cff1b4c",
"dest": "/var/www/html/index.html",
"gid": 0,
"group": "root",
"md5sum": "3a5b667f24406804be6691d07a895d6b",
"mode": "0644",
"owner": "root",
"size": 8,
"src": "/home/hzp/.ansible/tmp/ansible-tmp-1553393471.46-185124283265500/source",
"state": "file",
"uid": 0
}
[root@server6 ansible]# curl server7
server7
制作软连接
ansible server7 -u hzp -b -m file -a "src=/etc/fstab dest=/temp/fstab state=link" 制作软连接
ansible server7 -u hzp -b -m file -a "dest=/temp/fstab state=absent" 删链接
ansible server7 -u hzp -b -m file -a "dest=/tmp/dir1/dir2 state=directory mode=755" 是第归创建的
并行特性
默认 -f 5 可以改为 -f 100
ansible server7 -u hzp -b -m file -a "dest=/tmp/dir1/dir2 state=directory mode=755" -f 5
创建数据库
ansible server7 -m yum -a "name=mariadb-server state=present"
ansible-doc mysql_user
ansible server7 -m service -a "name=mariadb state=started"
ansible server7 -m yum -a "name=MySQL-python state=present"
ansible server7 -m mysql_user -a "name=hzp password=westos priv=test.*:ALL state=present "

ansible web -m command -a 'ss -ntl'
server6 | CHANGED | rc=0 >>
State Recv-Q Send-Q Local Address:Port Peer Address:Port
LISTEN 0 128 *:22 *:*
LISTEN 0 100 127.0.0.1:25 *:*
LISTEN 0 128 :::22 :::*
LISTEN 0 100 ::1:25 :::*
[root@server6 httpd]# ansible web -m shell -a 'cat /etc/passwd |grep "root"'
server6 | CHANGED | rc=0 >>
root:x:0:0:root:/root:/bin/bash
operator:x:11:0:operator:/root:/sbin/nologin
yml创建httpd
mkdir playbooks/
cd
mkdir httpd
cd
vim httpd.yml
---
#httpd部署
- hosts: server7
remote_user: root
tasks:
- name: install httpd
yum: name=httpd state=present
- name: config httpd
copy: src=httpd.conf dest=/etc/httpd/conf/httpd.conf
notify: restart httpd
- name: start httpd
service: name=httpd state=started
handlers:
- name: restart httpd
service: name=httpd state=restarted
scp httpd.conf server6:/etc/ansible/playbook/httpd/
ansible-playbook httpd.yml --syntax-check 检测语法
ansible-playbook httpd.yml --list-host 查看操作主机数
ansible-playbook httpd.yml --list-task 罗列任务
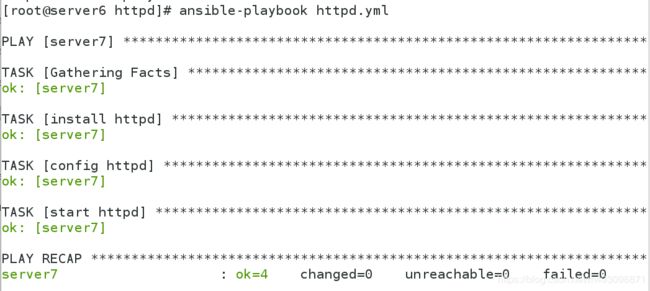
ansible-playbook httpd.yml 开始执行
ansible-playbook httpd.yml --start-at-task="start httpd" 执行其中一步
md5sum httpd.conf
将httpd.conf中的Listen改为8080 就会发生改变

[root@server6 httpd]# curl 172.25.11.7:8080
server7
j2
cp httpd.conf httpd.conf.j2
vim httpd.yml
---
#httpd部署
- hosts: server7
vars:
remote_user: root
tasks:
- name: install httpd
yum: name=httpd state=present
- name: config httpd
copy: src=httpd.conf dest=/etc/httpd/conf/httpd.conf
notify: restart httpd
- name: start httpd
service: name=httpd state=started
handlers:
- name: restart httpd
service: name=httpd state=restarted
查看操作
ansible server7 -m setup
ansible server7 -m setup -a "filter=ansible_all_ipv4_addresses"
不同版本配置
这里将server8 设置为rhel6
vim httpd.yml
---
#httpd部署
- hosts: all
vars:
http_port: 80
remote_user: root
tasks:
- name: install httpd
yum: name=httpd state=present
tags: install
- name: config httpd
copy: src=httpd.conf{{ ansible_distribution_major_version }}.j2 dest=/etc/httpd/conf/httpd.conf
notify: restart httpd
tags: config
- name: start httpd
service: name=httpd state=started
handlers:
- name: restart httpd
service: name=httpd state=restarted
vim /etc/ansible/hosts
[web]
server6
server8
[db]
server7
[all:vars]
http_host={{ ansible_all_ipv4_addresses[0] }}
mv /root/httpd.conf /etc/ansible/playbooks/httpd/httpd.conf6.j2
ansible-playbook httpd.yml

也可改为
httpd.yml

httpd.conf

也可以
- name: config httpd
template: src=httpd.conf.j2 dest=/etc/httpd/conf/httpd.conf
notify: restart httpd
when: ansible_distribution_major_version == "6"
tags: config
- name: config httpd
template: src=httpd.conf.j2 dest=/etc/httpd/conf/httpd.conf
notify: restart httpd
when: ansible_distribution_major_version == "7"
tags: config
问题解决:做好免密,解析
使用ROLE角色搭建mysql-zabbix
这里使用mariadb实验
/etc/ansible/roles
mkdir mariadb
cd
mkdir files tasks handlers vars templates meta defaults
meta:角色依赖关系 files 存放的文件 tasks 任务
handlers 触发器 vars 变量 tempaltes 模板
cd tasks
vim mail.yml 主入口文件
- name: install mariadb server
yum: name=mariadb-server,MySQL-python state=present
- name: config mariadb
copy: src=my.cnf dest=/etc/my.cnf
notify: restart mariadb
- name: start mariadb server
service: name=mariadb state=started
cd handlers
vim main.yml
- name: restart mariadb
service: name=mariadb state=restarted
[root@server6 files]# cp /etc/my.cnf .
[root@server6 files]# pwd
/etc/ansible/roles/mariadb/files
vim my.cnf
[mysqld]里面写入
character-set-server=utf-8
创建zabbix -role
cd roles
mkdir zabbix-server/{files,tasks,templates,vars} -p
cd file
vim zabbix.repo
[zabbix]
name=zabbix4.0
baseurl=file:///root/zabbix/4.0
gpgcheck=0
cd tasks
vim main.yml
- name: copy zabbix.repo
copy: src=zabbix.repo dest=/etc/yum.repos.d/zabbix.repo
- name: install zabbix-server
yum: name=zabbix-server,zabbix-agent state=present
notify: "init zabbix db"
- name: config zabbix server
copy: src=zabbix_server.conf dest=/etc/zabbix/zabbix_server.conf
notify: restart zabbix server
- name: start zabbix server
service: name={{ item }} state=started
with_items:
- zabbix-server
- zabbix-agent
触发器 handlers
vim /etc/ansible/roles/zabbix-server/handlers/main.yml
- name: create datbase
mysql_db: name=zabbix state=present
listen: "init zabbix db"
- name: create zabbix user
mysql_user: name=zabbix password=zabbix priv=zabbix.*:ALL state=present
listen: "init zabbix db"
- name: import create.sql.gz
mysql_db: name=zabbix state=import target=/usr/share/doc/zabbix-server-mysql-4.0.5/create.sql.gz
listen: "init zabbix db"
- name: restart zabbix server
service: name=zabbix-server state=restarted
server6 将zabbix_server.conf 放到 files里面
DBPassword=zabbix
vim /etc/ansible/zabbix-server.yml
---
#zabbix-server 部署
- hosts: server7
roles:
- mariadb
- zabbix-server
ansible-palybook zabbix-server.yml
这时返回server7
