springboot2.x集成websocket,实现服务端推送消息到客户端
使用websocket实现服务端推送消息到客户端
一、背景
现在很多web网站上都有站内消息通知,用于给用户及时推送站内信消息。大多数是在网页头部导航栏上带一个小铃铛图标,有新的消息时,铃铛会出现相应提示,用于提醒用户查看。例如下图:
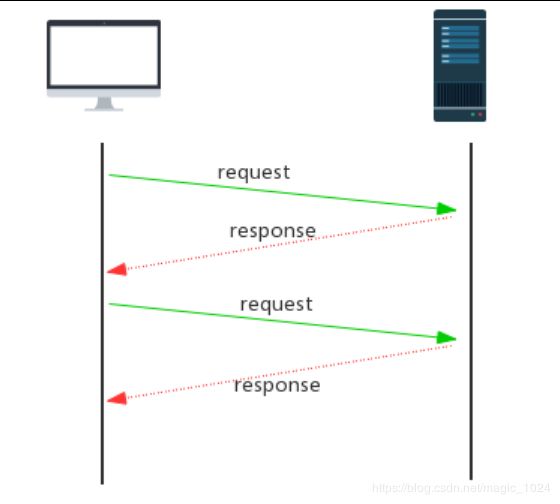
 我们都知道,web应用都是C/S模式,客户端通过浏览器发出一个请求,服务器端接收请求后进行处理并返回结果给客户端,客户端浏览器将信息呈现给用户。所以很容易想到的一种解决方式就是:
- Ajax轮询:客户端使用js写一个定时器setInterval(),以固定的时间间隔向服务器发起请求,查询是否有最新消息。
- 基于 Flash:AdobeFlash 通过自己的 Socket 实现数据交换,再利用 Flash 暴露出对应的接口给 js调用,从而实现实时传输,此方式比Ajax轮询要高效。但在移动互联网终端上对Flash 的支持并不好。现在已经基本不再使用。
而对于Ajax轮询方案,优点是实现起来简单,适用于对消息实时性要求不高,用户量小的场景下,缺点就是客户端给服务器带来很多无谓请求,浪费带宽,效率低下,做不到服务端的主动推送
二、websocket的出现
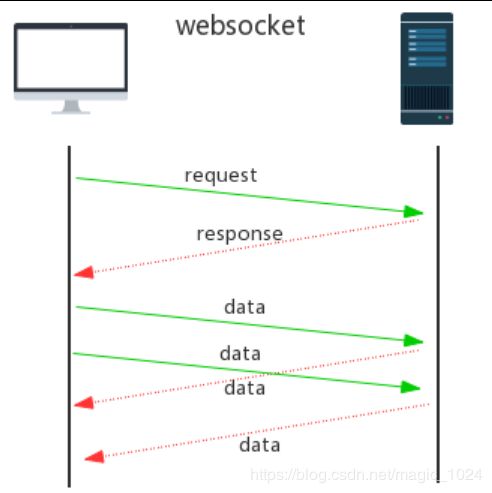
WebSocket 是 HTML5 开始提供的一种在单个 TCP 连接上进行全双工通讯的协议。
WebSocket 使客户端和服务器之间的数据交换变得更加简单,允许服务端主动向客户端推送数据。WebSocket API 中,浏览器和服务器只需要完成一次握手,两者之间就直接可以创建长连接,并进行双向数据传输。
三、springboot集成websocket
springboot集成websocket作为服务端,非常简单,以下以springboot 2.2.0版本为例:
1.引入maven依赖
   <dependency>
            <groupId>org.springframework.bootgroupId>
            <artifactId>spring-boot-starter-websocketartifactId>
    dependency>
2.创建webSocket配置类
package com.learn.demo.config;

import org.springframework.context.annotation.Bean;
import org.springframework.context.annotation.Configuration;
import org.springframework.web.socket.server.standard.ServerEndpointExporter;

@Configuration
public class WebSocketConfig {

    @Bean
    public ServerEndpointExporter serverEndpointExporter() {
        return new ServerEndpointExporter();
    }
}
3.创建webSocket端点
package com.learn.demo.ws;

import lombok.extern.slf4j.Slf4j;
import org.springframework.stereotype.Component;
import org.springframework.util.ObjectUtils;

import javax.websocket.*;
import javax.websocket.server.PathParam;
import javax.websocket.server.ServerEndpoint;
import java.util.Map;
import java.util.Set;
import java.util.concurrent.ConcurrentHashMap;

@Slf4j
@Component
@ServerEndpoint(value = "/testWebSocket/{id}")
public class WebSocketProcess {

    /*
     * 持有每个webSocket对象,以key-value存储到线程安全ConcurrentHashMap,
     */
    private static ConcurrentHashMap<Long, WebSocketProcess> concurrentHashMap = new ConcurrentHashMap<>(12);

    /**
     * 会话对象
     **/
    private Session session;


    /*
     * 客户端创建连接时触发
     * */
    @OnOpen
    public void onOpen(Session session, @PathParam("id") long id) {
        //每新建立一个连接,就把当前客户id为key,this为value存储到map中
        this.session = session;
        concurrentHashMap.put(id, this);
        log.info("Open a websocket. id={}", id);
    }

    /**
     * 客户端连接关闭时触发
     **/
    @OnClose
    public void onClose(Session session, @PathParam("id") long id) {
        //客户端连接关闭时,移除map中存储的键值对
        concurrentHashMap.remove(id);
        log.info("close a websocket, concurrentHashMap remove sessionId= {}", id);
    }

    /**
     * 接收到客户端消息时触发
     */
    @OnMessage
    public void onMessage(String message, @PathParam("id") String id) {
        log.info("receive a message from client id={},msg={}", id, message);
    }

    /**
     * 连接发生异常时候触发
     */
    @OnError
    public void onError(Session session, Throwable error) {
        log.error("Error while websocket. ", error);
    }

    /**
    * 发送消息到指定客户端
    *  @param id
    *  @param message
    * */
    public void sendMessage(long id, String message) throws Exception {
       //根据id,从map中获取存储的webSocket对象
        WebSocketProcess webSocketProcess = concurrentHashMap.get(id);
        if (!ObjectUtils.isEmpty(webSocketProcess)) {
            //当客户端是Open状态时,才能发送消息
            if (webSocketProcess.session.isOpen()) {
                webSocketProcess.session.getBasicRemote().sendText(message);
            } else {
                log.error("websocket session={} is closed ", id);
            }
        } else {
             log.error("websocket session={} is not exit ", id);
        }
    }

    /**
     * 发送消息到所有客户端
     *
     * */
    public void sendAllMessage(String msg) throws Exception {
        log.info("online client count={}", concurrentHashMap.size());
        Set<Map.Entry<Long, WebSocketProcess>> entries = concurrentHashMap.entrySet();
        for (Map.Entry<Long, WebSocketProcess> entry : entries) {
            Long cid = entry.getKey();
            WebSocketProcess webSocketProcess = entry.getValue();
            boolean sessionOpen = webSocketProcess.session.isOpen();
            if (sessionOpen) {
                webSocketProcess.session.getBasicRemote().sendText(msg);
            } else {
                log.info("cid={} is closed,ignore send text", cid);
            }
        }
    }

}
@ServerEndpoint(value = “/testWebSocket/{id}”)注解,声明并创建了webSocket端点,并且指明了请求路径为 “/testWebSocket/{id}”,id为客户端请求时携带的参数,用于服务端区分客户端使用。
4.创建controller,用于模拟服务端消息发送
package com.learn.demo.controller;

import com.learn.demo.ws.WebSocketProcess;
import org.springframework.beans.factory.annotation.Autowired;
import org.springframework.web.bind.annotation.PostMapping;
import org.springframework.web.bind.annotation.RequestMapping;
import org.springframework.web.bind.annotation.RequestParam;
import org.springframework.web.bind.annotation.RestController;

@RestController
@RequestMapping("/ws")
public class WebSocketController {

   /**
    *注入WebSocketProcess
    **/
    @Autowired
    private WebSocketProcess webSocketProcess;

    /**
     * 向指定客户端发消息
     * @param id
     * @param msg
     */
    @PostMapping(value = "sendMsgToClientById")
    public void sendMsgToClientById(@RequestParam long id, @RequestParam String text){
        try {
            webSocketProcess.sendMessage(id,text);
        } catch (Exception e) {
            e.printStackTrace();
        }
    }

   /**
     * 发消息到所有客户端
     * @param msg
     */
    @PostMapping(value = "sendMsgToAllClient")
    public void sendMsgToAllClient( @RequestParam String text){
        try {
            webSocketProcess.sendAllMessage(text);
        } catch (Exception e) {
            e.printStackTrace();
        }
    }

}
四、HTML客户端代码
HTML5 提供了对websocket的支持,并且提供了相关api,可以直接使用
1.WebSocket 创建
//url就是服务端的websocket端点路径, protocol 是可选的,指定了可接受的子协议
var Socket = new WebSocket(url, [protocol] );
2.WebSocket 事件
| 事件 | 事件处理程序 | 描述 |
|---|---|---|
| open | Socket.onopen | 连接建立时触发 |
| message | Socket.onmessage | 客户端接收服务端数据时触发 |
| error | Socket.onerror | 通信发生错误时触发 |
| close | Socket.onclose | 连接关闭时触发 |
3.WebSocket 方法
| 方法 | 描述 |
|---|---|
| Socket.send() | 使用连接发送数据 |
| Socket.close() | 关闭连接 |
以下是简单的例子,我们使用随机数,模拟客户端ID
<html>
<head>
<meta charset="UTF-8">
<title>websocket测试title>
<script src="http://code.jquery.com/jquery-2.1.1.min.js">script>
head>
<body>
<div id="content">div>
body>
<script type="text/javascript">
$(function(){
var ws;
//检测浏览器是否支持webSocket
if("WebSocket" in window){
$("#content").html("您的浏览器支持webSocket!");
//模拟产生clientID
let clientID = Math.ceil(Math.random()*100);
//创建 WebSocket 对象,注意请求路径!!!!
ws = new WebSocket("ws://127.0.0.1:8080/testWebSocket/"+clientID);
//与服务端建立连接时触发
ws.onopen = function(){
$("#content").append("与服务端建立连接建立成功!您的客户端ID="
+clientID+"");
//模拟发送数据到服务器
ws.send("你好服务端!我是客户端 "+clientID);
}
//接收到服务端消息时触发
ws.onmessage = function (evt) {
let received_msg = evt.data;
$("#content").append("接收到服务端消息:"
+received_msg+"");
};
//服务端关闭连接时触发
ws.onclose = function() {
console.error("连接已经关闭.....")
};
}else{
$("#content").html("您的浏览器不支持webSocket!");
}
})
script>
html>
五、模拟测试
1.首先启动服务端,springboot默认端口8080,观察是否有报错。
Tomcat started on port(s): 8080 (http) with context path ''
2019-11-10 16:31:35.496  INFO 16412 --- [  restartedMain] com.learn.demo.DemoApplication           : Started DemoApplication in 3.828 seconds (JVM running for 6.052)
2019-11-10 16:31:45.006  INFO 16412 --- [nio-8080-exec-1] o.a.c.c.C.[Tomcat].[localhost].[/]       : Initializing Spring DispatcherServlet 'dispatcherServlet'
2019-11-10 16:31:45.006  INFO 16412 --- [nio-8080-exec-1] o.s.web.servlet.DispatcherServlet        : Initializing Servlet 'dispatcherServlet'
2019-11-10 16:31:45.011  INFO 16412 --- [nio-8080-exec-1] o.s.web.servlet.DispatcherServlet        : Completed initialization in 5 ms
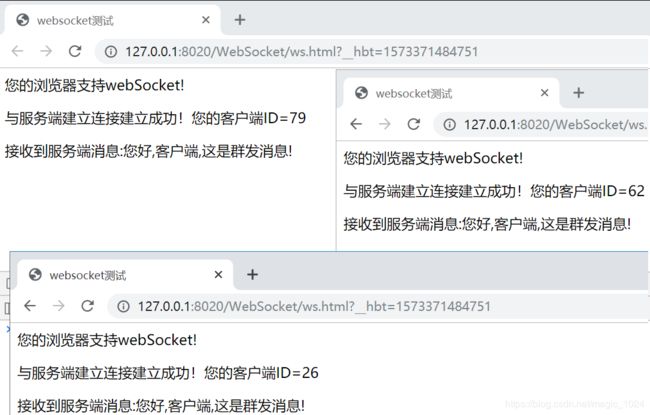
2.打开html界面,这里同时打开了三个界面做模拟使用
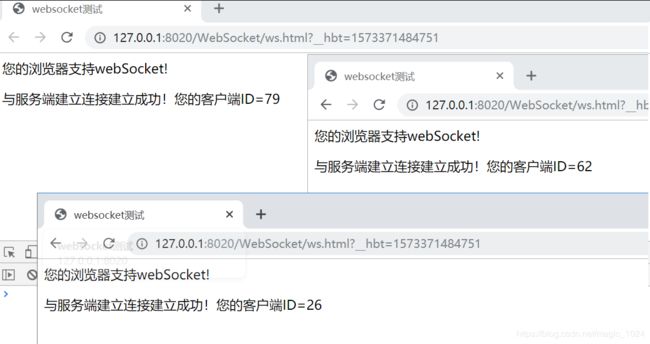 服务端可以看到日志,证明websocket连接已经成功建立
 [nio-8080-exec-1] com.learn.demo.ws.WebSocketProcess       : Open a websocket. id=26
2019-11-10 16:31:45.076  INFO 16412 --- [nio-8080-exec-1] com.learn.demo.ws.WebSocketProcess       : Receive a message from client id=26,msg=你好服务端!我是客户端 26
2019-11-10 16:31:46.338  INFO 16412 --- [nio-8080-exec-2] com.learn.demo.ws.WebSocketProcess       : Open a websocket. id=62
2019-11-10 16:31:46.338  INFO 16412 --- [nio-8080-exec-2] com.learn.demo.ws.WebSocketProcess       : Receive a message from client id=62,msg=你好服务端!我是客户端 62
2019-11-10 16:31:48.052  INFO 16412 --- [nio-8080-exec-3] com.learn.demo.ws.WebSocketProcess       : Open a websocket. id=79
2019-11-10 16:31:48.059  INFO 16412 --- [nio-8080-exec-4] com.learn.demo.ws.WebSocketProcess       : Receive a message from client id=79,msg=你好服务端!我是客户端 79
3.向所有客户端推送消息,这里使用postman做测试,请求服务端的sendMsgToAllClient接口
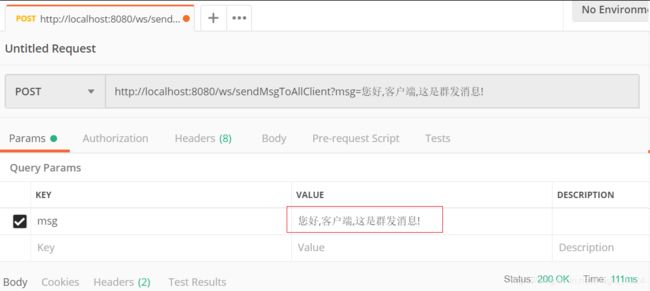 可以看到,刚刚打开的三个html界面上,都及时接受到了服务端发送的消息。
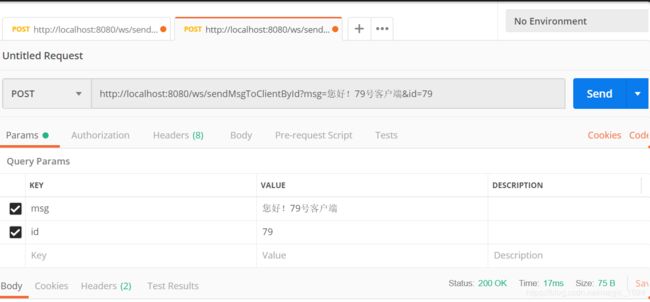
3.向指定客户端推送消息,请求服务端的sendMsgToClientById接口
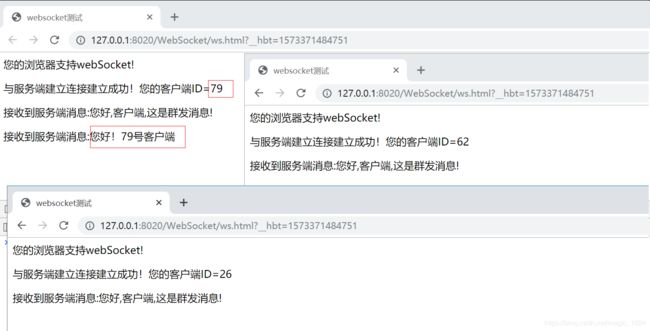
 可以看到客户端ID=79的,收到了我们的推送消息,其它的没变化。
六.总结
每项技术带来优点的同时,同时也会附带缺点,目前来看websocket的一些小问题:
- websocket链接断开后,不会主动重连,需要手动刷新网页或者自己实现断线重连机制
- 低版本浏览器对websocket支持不太好,如IE8
- 服务端持有了一个所有websocket对象的集合Map,用户在线量大的时候,占用内存大,当然这个可以优化代码
- websocket受网络波动影响较大,因为是长连接,网络差劲时,长连接会受影响
所以,具体看实际场景需求,选择合适方案。