iOS UICollectionView 使用详解
-
// 代码创建
所属controller要遵循三个协议:UICollectionViewDataSource,UICollectionViewDelegate,UICollectionViewDelegateFlowLayout
UICollectionViewFlowLayout *flowLayout = [[UICollectionViewFlowLayout alloc]init];
[flowLayout setItemSize:CGSizeMake(70, 100)];//设置cell的尺寸
[flowLayout setScrollDirection:UICollectionViewScrollDirectionVertical];//设置其布局方向
flowLayout.sectionInset = UIEdgeInsetsMake(5, 5, 5, 5);//设置其边界
//其布局很有意思,当你的cell设置大小后,一行多少个cell,由cell的宽度决定
_collectionView = [[UICollectionView alloc]initWithFrame:CGRectMake(0, 0, 320, self.view.frame.size.height)collectionViewLayout:flowLayout];
_collectionView.dataSource = self;
_collectionView.delegate = self;
_collectionView.backgroundColor = [UIColor clearColor];
[_collectionView registerClass:[BMCollectionCell class] forCellWithReuseIdentifier:CELL_ID];
[self.view addSubview:_collectionView];
[_collectionView release];
//collectionView的代理方法
#pragma mark - collectionView dataSource Or delegate
-(NSInteger)collectionView:(UICollectionView *)collectionView numberOfItemsInSection:(NSInteger)section
{
return 32;
}
-(NSInteger)numberOfSectionsInCollectionView:(UICollectionView *)collectionView
{
return 1;
}
-(UICollectionViewCell *)collectionView:(UICollectionView *)collectionView cellForItemAtIndexPath:(NSIndexPath *)indexPath
{
BMCollectionCell *cell = [collectionView dequeueReusableCellWithReuseIdentifier:CELL_IDforIndexPath:indexPath];
return cell;
}
-(void)collectionView:(UICollectionView *)collectionView didSelectItemAtIndexPath:(NSIndexPath *)indexPath
{
NSLog(@"%s",__FUNCTION__);
}
- //定义展示的UICollectionViewCell的个数
- -(NSInteger)collectionView:(UICollectionView *)collectionView numberOfItemsInSection:(NSInteger)section
- {
- return 30;
- }
- //定义展示的Section的个数
- -(NSInteger)numberOfSectionsInCollectionView:(UICollectionView *)collectionView
- {
- return 1;
- }
- //每个UICollectionView展示的内容
- -(UICollectionViewCell *)collectionView:(UICollectionView *)collectionView cellForItemAtIndexPath:(NSIndexPath *)indexPath
- {
- static NSString * CellIdentifier = @"GradientCell";
- UICollectionViewCell * cell = [collectionView dequeueReusableCellWithReuseIdentifier:CellIdentifier forIndexPath:indexPath];
- cell.backgroundColor = [UIColor colorWithRed:((10 * indexPath.row) / 255.0) green:((20 * indexPath.row)/255.0) blue:((30 * indexPath.row)/255.0) alpha:1.0f];
- return cell;
- }
- #pragma mark --UICollectionViewDelegateFlowLayout
- //定义每个UICollectionView 的大小
- - (CGSize)collectionView:(UICollectionView *)collectionView layout:(UICollectionViewLayout*)collectionViewLayout sizeForItemAtIndexPath:(NSIndexPath *)indexPath
- {
- return CGSizeMake(96, 100);
- }
- //定义每个UICollectionView 的 margin
- -(UIEdgeInsets)collectionView:(UICollectionView *)collectionView layout:(UICollectionViewLayout *)collectionViewLayout insetForSectionAtIndex:(NSInteger)section
- {
- return UIEdgeInsetsMake(5, 5, 5, 5);
- }
- #pragma mark --UICollectionViewDelegate
- //UICollectionView被选中时调用的方法
- -(void)collectionView:(UICollectionView *)collectionView didSelectItemAtIndexPath:(NSIndexPath *)indexPath
- {
- UICollectionViewCell * cell = (UICollectionViewCell *)[collectionView cellForItemAtIndexPath:indexPath];
- cell.backgroundColor = [UIColor whiteColor];
- }
- //返回这个UICollectionView是否可以被选择
- -(BOOL)collectionView:(UICollectionView *)collectionView shouldSelectItemAtIndexPath:(NSIndexPath *)indexPath
- {
- return YES;
- }
下面通过一个例子具体介绍下。(例子来自网络。但是是通过第三方获得的,无法取得链接。还望见谅。)
iOS CollectionView的出现是一大福利,再也不用用TableView来定义复杂的多栏表格了,用法与Table类似,只是Cell必须自己添加,无默认模式
由于CollectionView没有默认的Cell布局,所以一般还是自定义方便又快捷
一、自定义Cell
1、新建类CollectionCell继承自UICollectionViewCell
2、新建Xib,命名为CollectionCell.xib
a.选中CollectionCell.xib删掉默认的View,从控件中拖一个Collection View Cell(图3)到画布中,设置大小为95*116;
b.选中刚刚添加的Cell,更改类名为CollectionCell,如图4
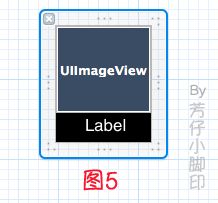
c.在CollectionCell.xib的CollectionCell中添加一个ImageView和一个Label(图5)
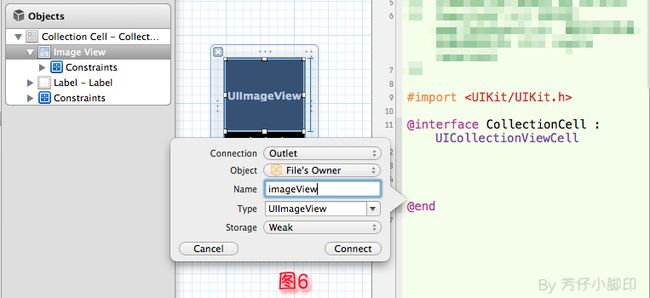
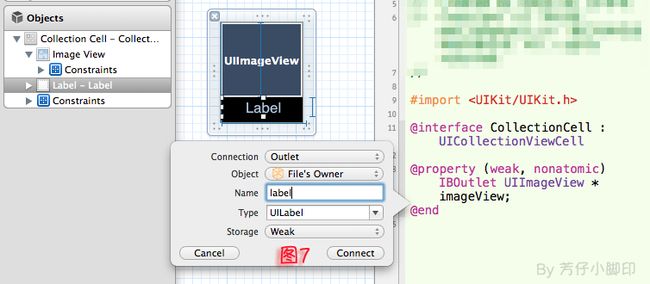
d.创建映射, 图6,图7
e.选中CollectionCell.m , 重写init方法
- - (id)initWithFrame:(CGRect)frame
- {
- self = [super initWithFrame:frame];
- if (self)
- {
- // 初始化时加载collectionCell.xib文件
- NSArray *arrayOfViews = [[NSBundle mainBundle] loadNibNamed:@"CollectionCell" owner:self options:nil];
- // 如果路径不存在,return nil
- if (arrayOfViews.count < 1)
- {
- return nil;
- }
- // 如果xib中view不属于UICollectionViewCell类,return nil
- if (![[arrayOfViews objectAtIndex:0] isKindOfClass:[UICollectionViewCell class]])
- {
- return nil;
- }
- // 加载nib
- self = [arrayOfViews objectAtIndex:0];
- }
- return self;
- }
f.选中CollectionCell.xib 修改其identifier为CollectionCell。
二、定义UICollectionView;
1、拖动一个Collection View到指定ViewController的View上
2、连线dataSource和delegate,并创建映射,命名为CollectionView
3、选中CollectionView的标尺,将Cell Size的Width和Height改成与自定义的Cell一样的95*116,图8
4、选中CollectionView的属性,可以修改其属性,比如是垂直滑动,还是水平滑动,选择Vertical或Horizontal
5、选中CollectionViewCell,修改Class,继承自CollectionCell
5、在ViewDidLoad方法中声明Cell的类,在ViewDidLoad方法中添加,此句不声明,将无法加载,程序崩溃
其中,CollectionCell是这个Cell的标识(之前几步已经定义过了。 )
- [self.collectionView registerClass:[CollectionCell class] forCellWithReuseIdentifier:@"CollectionCell"];
6、在ViewController.h中声明代理
- @interface ViewController : UIViewController
7、在.m文件中实现代理方法
- //每个section的item个数
- -(NSInteger)collectionView:(UICollectionView *)collectionView numberOfItemsInSection:(NSInteger)section
- {
- return 12;
- }
- -(UICollectionViewCell *)collectionView:(UICollectionView *)collectionView cellForItemAtIndexPath:(NSIndexPath *)indexPath
- {
- CollectionCell *cell = (CollectionCell *)[collectionView dequeueReusableCellWithReuseIdentifier:@"CollectionCell" forIndexPath:indexPath];
- //图片名称
- NSString *imageToLoad = [NSString stringWithFormat:@"%d.png", indexPath.row];
- //加载图片
- cell.imageView.image = [UIImage imageNamed:imageToLoad];
- //设置label文字
- cell.label.text = [NSString stringWithFormat:@"{%ld,%ld}",(long)indexPath.row,(long)indexPath.section];
- return cell;
- }
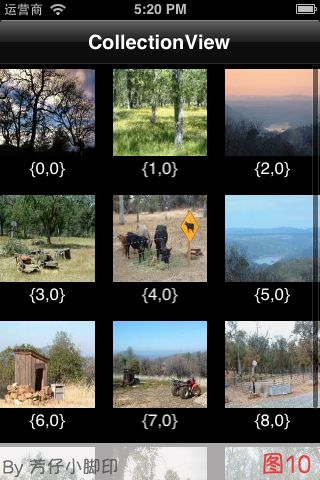
8 。效果如图10
点击某项后跳转事件与UITableView类似,实现代理方法
- -(void)collectionView:(UICollectionView *)collectionView didSelectItemAtIndexPath:(NSIndexPath *)indexPath
- 例子2
-
#import "RootViewController.h"
#import "CustomCollectionViewCell.h"

@interface RootViewController ()<UICollectionViewDelegate,UICollectionViewDataSource,UICollectionViewDelegateFlowLayout>

@property (nonatomic,retain)NSDictionary *itemDic; // 承载一个item上面显示的图片和文字
@property (nonatomic,retain)NSMutableArray *allDataArray; // 成方所有的item上显示的内容,其实就是盛放小字典
@end

@implementation RootViewController
- (NSMutableArray *)allDataArray{
    if (!_allDataArray) {
        _allDataArray = [[NSMutableArray alloc]init];
    }return _allDataArray;
}

- (void)viewDidLoad {
    [super viewDidLoad];
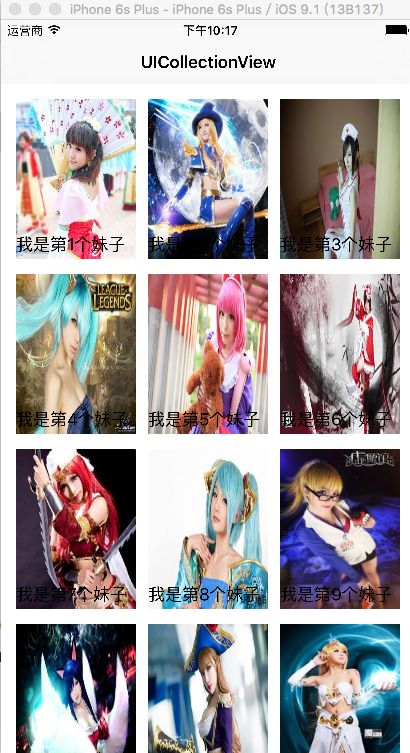
    for (int i = 1; i < 20; i++) {

        NSDictionary *itemDic = [[NSDictionary alloc] initWithObjectsAndKeys:
                                   [NSString stringWithFormat:@"%d.jpg",i],@"imageName",
                                   [NSString stringWithFormat:@"我是第%d个妹子",i] ,@"textLable",
                                   nil];
        [self.allDataArray addObject:itemDic];

    }

   self.navigationItem.title = @"github";
    // 由于初始化集合视图需要布局对象,所以我们才需要初始化布局对象,并且设置它的某些属性
     // 这个是系统提供的布局类,可以布局一些比较规则的布局。
    UICollectionViewFlowLayout *flowLayout = [[UICollectionViewFlowLayout alloc] init];
    // 设置每个item的大小,
    flowLayout.itemSize = CGSizeMake(120, 160);
//    flowLayout.itemSize = CGSizeMake(CGRectGetWidth(self.view.frame), CGRectGetHeight(self.view.frame));
    // 设置列的最小间距
    flowLayout.minimumInteritemSpacing = 10;
    // 设置最小行间距
    flowLayout.minimumLineSpacing = 15;
    // 设置布局的内边距
    flowLayout.sectionInset = UIEdgeInsetsMake(15, 15, 15, 15);
    // 滚动方向
    flowLayout.scrollDirection = UICollectionViewScrollDirectionVertical;
//    flowLayout.scrollDirection = UICollectionViewScrollDirectionHorizontal;

    UICollectionView *collectionView = [[UICollectionView alloc] initWithFrame:self.view.bounds collectionViewLayout:flowLayout];
      // 如果未设置背景颜色是黑色设置背景颜色
    collectionView.backgroundColor = [UIColor whiteColor];
    // 设置代理
    collectionView.delegate = self;
    collectionView.dataSource = self;
//    [collectionView registerClass:[UICollectionViewCell class] forCellWithReuseIdentifier:@"CELL"];
    [collectionView registerClass:[CustomCollectionViewCell class] forCellWithReuseIdentifier:@"CELL"];

    [self.view addSubview:collectionView];
}


// 返回分区数
- (NSInteger)numberOfSectionsInCollectionView:(UICollectionView *)collectionView{

    return 1;
}

// 每个分区多少个item
- (NSInteger )collectionView:(UICollectionView *)collectionView numberOfItemsInSection:(NSInteger)section{

    return _allDataArray.count;
}

- (UICollectionViewCell *)collectionView:(UICollectionView *)collectionView cellForItemAtIndexPath:(NSIndexPath *)indexPath{
//    UICollectionViewCell *cell = [collectionView dequeueReusableCellWithReuseIdentifier:@"CELL" forIndexPath:indexPath];
    CustomCollectionViewCell *cell = [collectionView dequeueReusableCellWithReuseIdentifier:@"CELL" forIndexPath:indexPath];
    // 取出每个item所需要的数据
    NSDictionary *dic = [_allDataArray objectAtIndex:indexPath.item];
    // 取出图片名称
    NSString *imageString = [dic objectForKey:@"imageName"];
    cell.imageView.image = [UIImage imageNamed:imageString];
    // 取出文字
    NSString *textString = [dic objectForKey:@"textLable"];
    cell.titleLabel.text = textString;
    cell.backgroundColor = [UIColor colorWithRed:arc4random()%256/256.0 green:arc4random()%256/256.0 blue:arc4random()%256/256.0 alpha:1];


    return cell;
}

// 点击图片的方法
- (void)collectionView:(UICollectionView *)collectionView didSelectItemAtIndexPath:(NSIndexPath *)indexPath{
    NSLog(@"我点击了%ld图片!!!",indexPath.item + 1);

}


- (void)didReceiveMemoryWarning {
    [super didReceiveMemoryWarning];
    // Dispose of any resources that can be recreated.
}

/*
#pragma mark - Navigation

// In a storyboard-based application, you will often want to do a little preparation before navigation
- (void)prepareForSegue:(UIStoryboardSegue *)segue sender:(id)sender {
    // Get the new view controller using [segue destinationViewController].
    // Pass the selected object to the new view controller.
}
*/

@end
CustomCollectionViewCell.h
#import@interface CustomCollectionViewCell : UICollectionViewCell @property (nonatomic,retain)UIImageView *imageView; // 显示图片 @property (nonatomic,retain)UILabel *titleLabel; // 显示文字 @end CustomCollectionViewCell.m
#import "CustomCollectionViewCell.h"

@implementation CustomCollectionViewCell
- (UIImageView *)imageView{
    if (!_imageView) {
        _imageView = [[UIImageView alloc] initWithFrame:self.viewForFirstBaselineLayout.bounds];
        [self.contentView addSubview:_imageView];
    }return _imageView;
}

- (UILabel *)titleLabel{
    if (!_titleLabel) {
        _titleLabel = [[UILabel alloc] initWithFrame:CGRectMake(0, CGRectGetHeight(self.bounds) - 30, CGRectGetWidth(self.bounds), 30)];
        [self.contentView addSubview:_titleLabel];
    }return _titleLabel;
}
@end
三、成品展


