Sign in to JiaGE
New to JiaGE?
1)前端页面使用的是vue框架,所以我们就用的组件更快的设计出页面(iview和element-ui),在vue中实现:
npm install element-ui -S
npm install iview -S

#main.js#
import Vue from 'vue'
import iView from 'iview';
import 'iview/dist/styles/iview.css';
import ElementUI from 'element-ui';
import 'element-ui/lib/theme-chalk/index.css';

Vue.use(ElementUI);
Vue.use(iView);
这样就可以在全局使用组件。
2)登录页面代码JiageLogin.vue。(vue的基本操作、路由跳转会在后面讲解):
Sign in to JiaGE
New to JiaGE?
Create an account.
1)在之前我们已经创建了一个超级用户,在进行之前,会遇到跨域的问题,安装django-cors-headers,解决跨域问题:
pip install django-cors-headers

#settings.py#
INSTALLED_APPS = [
	...,
    'corsheaders',
]

MIDDLEWARE = [
    'django.middleware.security.SecurityMiddleware',
    'django.contrib.sessions.middleware.SessionMiddleware',
    'corsheaders.middleware.CorsMiddleware', # 加入
    'django.middleware.common.CommonMiddleware',
    # 'django.middleware.csrf.CsrfViewMiddleware', # 注释掉这行
    '...',
]

CORS_ORIGIN_ALLOW_ALL = True
CORS_ALLOW_CREDENTIALS = True
2)在views.py编写登录验证:
from django.db.models import Q # 相当于or
from users.models import UserProfile

def check(username=None, password=None):
    try:
        user = UserProfile.objects.get(Q(username__exact=username) | Q(email__exact=username))
        # 用户可以用email和username进行登录,引用Q 相当于or
        if user.check_password(password):
            return user
        else:
            return False
    except Exception as e:
        return None
check()方法去验证用户名和密码是否匹配并返回对应值。
3)登录接口:
from django.http import JsonResponse

def user_login(request):
    username = request.POST.get('username', '')  # 前端返回的username
    password = request.POST.get('password', '') # 前端返回的password
    user = check(username=username, password=password) # 对username和password进行验证
    if user is not None:
        if user is not False:
            data = {'msg': '登录成功'}
            return JsonResponse({'result': data})
        else:
            data = {'msg': '密码错误'}
            return JsonResponse({'result': data})
    else:
        data = {'msg': '用户不存在'}
        return JsonResponse({'result': data})
4)配置url:
from users import views

urlpatterns = [
    ...,
    path('api/userLogin', views.user_login, name='userLogin'),
]
1)在src目录下新建requests文件夹,专门来调用异步访问的文件,requests/index.js文件:
import axios from 'axios' // 相当于js中的ajax
import { LoadingBar } from 'iview';
import qs from 'qs' // 处理数据以便传给后端

const isDev = process.env.NODE_ENV === 'development' // 判断是否为开发环境

// 定义变量ajax(相当于ajax等价于axios)
const ajax = axios.create({
    baseURL: isDev ? "http://192.168.1.65:8000" : "http://192.168.1.65:8000"
    				 // 前者:开发环境
    				 // 后者:非开发环境(因为没有部署到服务器,所以都设置为本地,django运行端口为8000)
})

// 设置拦截器(vue中的操作,异步操作请求前与请求后的响应)
ajax.interceptors.request.use((config) => {
    LoadingBar.start();
    return config
})

ajax.interceptors.response.use((resp) => {
    if (resp.status === 200) {
    	LoadingBar.finish();
        return resp.data
    }
})

// 定义登录方法
// 用户登录(需要传给后端一个headers)
export const userLogin = (username, password, headers) => {
    return ajax({
        url: '/api/userLogin',
        method: 'post', // post方法
        responseType: 'json', // json的格式
        // 对数据进行处理(否则后端接收不到)
        data: qs.stringify({ 'username': username, 'password': password }),
        headers: {
            'X-CSRFToken': headers
        }
    })
}
1)要使我们编写的方法能够在文件中调用,需要在main.js写以下代码:
import * as $http from './requests/index'; // 从index.js文件引入

Vue.prototype.$http = $http

// 对于一个vue脚手架项目来说,在main.js里使用Vue.prototype声明的变量,
// 实际上是为Vue对象添加了一个原型属性,而不是一个全局变量。但是如果这个原型属性的值是引用类型的,
// 我们就可以借此实现全局变量 。当你在main.js里声明了Vue.prototype.a = 1后,因为你的每一个vue组件都是一个Vue对象的实例
// 所以即使你没有在组件内部使用data(){return{……}}声明a,你依然可以在组件中通过this.a来访问
2)在vue中调用this.$http.userLogin()方法:
methods: {
    // post请求需要获取csrftoken,就是前面提到的headers
    getCookie(name) {
      var value = "; " + document.cookie;
      var parts = value.split("; " + name + "=");
      if (parts.length === 2)
        return parts
          .pop()
          .split(";")
          .shift();
    },
    // 用户登录
    handleSubmit(name) {
      this.$refs[name].validate(valid => {
        if (valid) {
          this.modal_loading = true;
          username = this.formInline.user;
          password = this.formInline.password;
          this.$http
            .userLogin(username, password, this.getCookie("csrftoken"))
            .then(resp => {
              console.log(resp); // 打印出来看看是否成功
            });
        }
      });
    }
  }
3)启动django服务和vue项目,运行以下命令:
先在settings.py中设置可访问域名:ALLOWED_HOSTS = ['*']
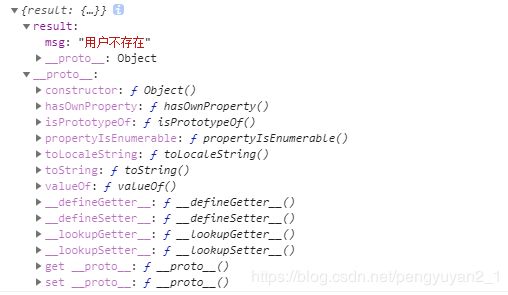
python manage.py runserver 0.0.0.0:8000(能够让在同一个局域网访问),接下来输入一个不存在的用户测试:


已经成功的返回我们需要的值,剩下的步骤就只需要在:
 this.$http.userLogin(username, password, this.getCookie("csrftoken"))
            .then(resp => {
              console.log(resp); // 打印出来看看是否成功
              // 进行验证操作 成功就能查看更多博客信息
            });