spring security 配置使用
spring security 配置使用
这篇文章仅限开发者已经会搭建spring+springMVC+hibernate框架的基础上
一、添加jar包
一般springSecurity的jar包下载最好是与自己spring版本一致
因为我用的spring相关jar包版本是4.2.4,所以我下载的springSecurity版本也是4.2.4-release
这里传授一下如何快速下载对应的springSecurity版本
http://repo.spring.io/libs-release-local/org/springframework/security/spring-security/3.2.3.RELEASE/spring-security-3.2.3.RELEASE-dist.zip
将3.2.3.release换成自己想要的版本就可以下载自己想要的版本
具体可以看这篇博客https://www.cnblogs.com/yjmyzz/p/3847364.html
下载完成将spring-security-config
spring-security-core
spring-security-web
spring-security-taglibs
四个jar包copy到项目的lib文件夹下面
二、配置springSecurity文件
这里直接贴上代码,在代码中一行一行讲述相关配置
xmlns:beans="http://www.springframework.org/schema/beans"
xmlns:xsi="http://www.w3.org/2001/XMLSchema-instance"
xsi:schemaLocation="http://www.springframework.org/schema/beans
http://www.springframework.org/schema/beans/spring-beans.xsd
http://www.springframework.org/schema/security
http://www.springframework.org/schema/security/spring-security.xsd">
authentication-failure-url='/login.jsp?error=true'
default-target-url="/index.jsp" />
/success.jsp
/login.jsp?error=true
class="org.springframework.beans.factory.config.PropertyPlaceholderConfigurer">
/WEB-INF/classes/cn/yjz/config/jdbc.properties
以上两个自定义类,我也简单贴出来
1、
public class LoginFilter extends UsernamePasswordAuthenticationFilter implements Serializable{
private static final long serialVersionUID = 488268309523329488L;
@Override
public Authentication attemptAuthentication(HttpServletRequest request,
HttpServletResponse response) throws AuthenticationException {
System.out.println("此处是做登录过滤");
return super.attemptAuthentication(request, response);
}
}
2、
public class LoginSuccessHandler extends SavedRequestAwareAuthenticationSuccessHandler implements Serializable{
private static final long serialVersionUID = 2215732280244695604L;
public LoginSuccessHandler() {
}
@Override
public void onAuthenticationSuccess(HttpServletRequest request,
HttpServletResponse response, Authentication authentication)
throws ServletException, IOException {
UserDetails userDetails = (UserDetails) authentication.getPrincipal();
System.out.println("成功登录之后的处理");
System.out.println(userDetails.getPassword() + "\n" + userDetails.getUsername() + "\n");
super.onAuthenticationSuccess(request, response, authentication);
}
}
三、web文件配置
在我的理解中,其实所有的其他配置最终都要走到web.xml
这里有关其他的配置我就不贴出来了以免混乱
SpringMVC
org.springframework.web.servlet.DispatcherServlet
contextConfigLocation
/WEB-INF/classes/cn/yjz/config/springMVC-servlet.xml,
/WEB-INF/classes/cn/yjz/config/springSecurity.xml
1
springSecurityFilterChain
org.springframework.web.filter.DelegatingFilterProxy
springSecurityFilterChain
/*
四、登录界面.jsp的编写
其他的timeout.jsp ,logout.jsp, index.jsp我就不建了,以上配置中这些文件只要在webroot文件夹下就可以生效。
登录界面
在登录界面的顶部添加
<%@ taglib uri="http://java.sun.com/jstl/core_rt" prefix="c"%>
启用c标签 另外不同的springSecurity版本不一样登录界面写法不同,所以在写之前上网看看对应版本的写法
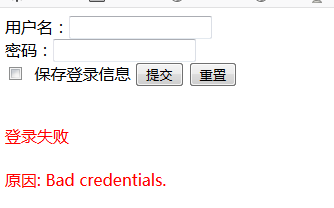
登录失败
原因:
这篇文章仅限开发者已经会搭建spring+springMVC+hibernate框架的基础上
一、添加jar包
一般springSecurity的jar包下载最好是与自己spring版本一致
因为我用的spring相关jar包版本是4.2.4,所以我下载的springSecurity版本也是4.2.4-release
这里传授一下如何快速下载对应的springSecurity版本
http://repo.spring.io/libs-release-local/org/springframework/security/spring-security/3.2.3.RELEASE/spring-security-3.2.3.RELEASE-dist.zip
将3.2.3.release换成自己想要的版本就可以下载自己想要的版本
具体可以看这篇博客https://www.cnblogs.com/yjmyzz/p/3847364.html
下载完成将spring-security-config
spring-security-core
spring-security-web
spring-security-taglibs
四个jar包copy到项目的lib文件夹下面
二、配置springSecurity文件
这里直接贴上代码,在代码中一行一行讲述相关配置
xmlns:xsi="http://www.w3.org/2001/XMLSchema-instance"
xsi:schemaLocation="http://www.springframework.org/schema/beans
http://www.springframework.org/schema/beans/spring-beans.xsd
http://www.springframework.org/schema/security
http://www.springframework.org/schema/security/spring-security.xsd">
default-target-url="/index.jsp" />
以上两个自定义类,我也简单贴出来
1、
public class LoginFilter extends UsernamePasswordAuthenticationFilter implements Serializable{
private static final long serialVersionUID = 488268309523329488L;
@Override
public Authentication attemptAuthentication(HttpServletRequest request,
HttpServletResponse response) throws AuthenticationException {
System.out.println("此处是做登录过滤");
return super.attemptAuthentication(request, response);
}
}
2、
public class LoginSuccessHandler extends SavedRequestAwareAuthenticationSuccessHandler implements Serializable{
private static final long serialVersionUID = 2215732280244695604L;
public LoginSuccessHandler() {
}
@Override
public void onAuthenticationSuccess(HttpServletRequest request,
HttpServletResponse response, Authentication authentication)
throws ServletException, IOException {
UserDetails userDetails = (UserDetails) authentication.getPrincipal();
System.out.println("成功登录之后的处理");
System.out.println(userDetails.getPassword() + "\n" + userDetails.getUsername() + "\n");
super.onAuthenticationSuccess(request, response, authentication);
}
}
三、web文件配置
在我的理解中,其实所有的其他配置最终都要走到web.xml
这里有关其他的配置我就不贴出来了以免混乱
org.springframework.web.servlet.DispatcherServlet
/WEB-INF/classes/cn/yjz/config/springSecurity.xml
四、登录界面.jsp的编写
其他的timeout.jsp ,logout.jsp, index.jsp我就不建了,以上配置中这些文件只要在webroot文件夹下就可以生效。
登录界面
在登录界面的顶部添加
<%@ taglib uri="http://java.sun.com/jstl/core_rt" prefix="c"%>
启用c标签 另外不同的springSecurity版本不一样登录界面写法不同,所以在写之前上网看看对应版本的写法
登录失败
原因:
这样的话就全部配置完成了,然而这只是简单的配置,我接下来是要使用springSecurity实现注册登录,权限控制。
下面是实现效果截图 失败
成功

