【opencv】神经网络识别数字
2017/5/5 应人要求,添加了数字加字母的识别,见链接
http://blog.csdn.net/qq_15947787/article/details/72850445
文本仅对0-9这十个文件夹中sample_mun_perclass个样本进行训练,直接通过API函数FindFirstFile和FindNextFile得到目录下文件,不需要对图片名编号
用了一下午时间去调这个代码,所以还有很多不完善的地方,以后有时间再去完善,比如:
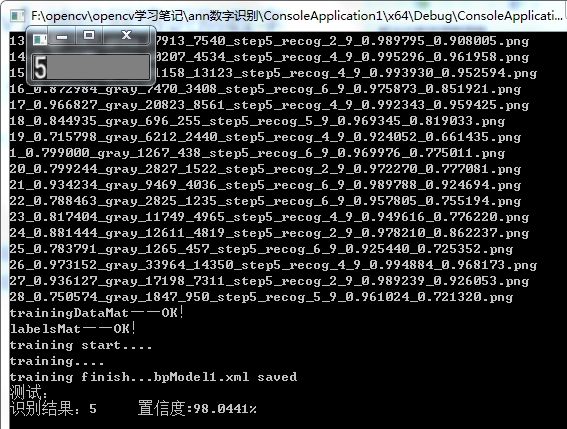
本文的测试图片仅仅是单张测试,如果要测试准确率,可以根据前面训练时批量读取图片的代码进行简单修改,即可进行批量测试。
参考链接:http://blog.csdn.net/qq_15947787/article/details/51384258
特征采用8*16的二值化图像构成的128维向量作为输入层,3层128维的隐藏层,10维的输出层。输出用{1,0,0,0,0,…0}{0,1,0,0,0,…0}{0,0,1,0,0,…0}……{0,0,0,0,0,…1}表示
测试图像来源:http://www.cnblogs.com/ronny/p/opencv_road_more_01.html
测试代码:
//opencv2.4.9 + vs2012 + 64位
#include //指定搜索目录和文件类型,如搜索d盘的音频文件可以是"D:\\*.mp3"
WIN32_FIND_DATA pNextInfo; //搜索得到的文件信息将储存在pNextInfo中;
hFile = FindFirstFile(lpFileName,&pNextInfo);//请注意是 &pNextInfo , 不是 pNextInfo;
if(hFile == INVALID_HANDLE_VALUE)
{
exit(-1);//搜索失败
}
//do-while循环读取
do
{
if(pNextInfo.cFileName[0] == '.')//过滤.和..
continue;
j++;//读取一张图
//wcout<
printf("%s\n",WcharToChar(pNextInfo.cFileName));
//对读入的图片进行处理
Mat srcImage = imread( perfileReadPath + "/" + temp + "/" + WcharToChar(pNextInfo.cFileName),CV_LOAD_IMAGE_GRAYSCALE);
Mat resizeImage;
Mat trainImage;
resize(srcImage,resizeImage,Size(image_cols,image_rows),(0,0),(0,0),CV_INTER_AREA);//使用象素关系重采样。当图像缩小时候,该方法可以避免波纹出现
threshold(resizeImage,trainImage,0,255,CV_THRESH_BINARY|CV_THRESH_OTSU);
for(int k = 0; k1 )][k] = (float)trainImage.data[k];
//trainingData[i*sample_mun_perclass+(j-1)][k] = (float)trainImage.at((int)k/8,(int)k%8);//(float)train_image.data[k];
//cout<(k/8,k%8)<
}
} while (FindNextFile(hFile,&pNextInfo) && j//如果设置读入的图片数量,则以设置的为准,如果图片不够,则读取文件夹下所有图片
}
// Set up training data Mat
Mat trainingDataMat(class_mun*sample_mun_perclass, image_rows*image_cols, CV_32FC1, trainingData);
cout<<"trainingDataMat——OK!"<// Set up label data
for(int i=0;i<=class_mun-1;++i)
{
for(int j=0;j<=sample_mun_perclass-1;++j)
{
for(int k = 0;kif(k==i)
labels[i*sample_mun_perclass + j][k] = 1;
else labels[i*sample_mun_perclass + j][k] = 0;
}
}
}
Mat labelsMat(class_mun*sample_mun_perclass, class_mun, CV_32FC1,labels);
cout<<"labelsMat:"<cout<cout<<"labelsMat——OK!"<//训练代码
cout<<"training start...."<// Set up BPNetwork's parameters
CvANN_MLP_TrainParams params;
params.train_method=CvANN_MLP_TrainParams::BACKPROP;
params.bp_dw_scale=0.001;
params.bp_moment_scale=0.1;
params.term_crit = cvTermCriteria(CV_TERMCRIT_ITER|CV_TERMCRIT_EPS,10000,0.0001); //设置结束条件
//params.train_method=CvANN_MLP_TrainParams::RPROP;
//params.rp_dw0 = 0.1;
//params.rp_dw_plus = 1.2;
//params.rp_dw_minus = 0.5;
//params.rp_dw_min = FLT_EPSILON;
//params.rp_dw_max = 50.;
//Setup the BPNetwork
Mat layerSizes=(Mat_<int>(1,5) << image_rows*image_cols,128,128,128,class_mun);
bp.create(layerSizes,CvANN_MLP::SIGMOID_SYM,1.0,1.0);//CvANN_MLP::SIGMOID_SYM
//CvANN_MLP::GAUSSIAN
//CvANN_MLP::IDENTITY
cout<<"training...."<"../bpcharModel.xml"); //save classifier
cout<<"training finish...bpModel1.xml saved "<//测试神经网络
cout<<"测试:"<"test.png",CV_LOAD_IMAGE_GRAYSCALE);
Mat test_temp;
resize(test_image,test_temp,Size(image_cols,image_rows),(0,0),(0,0),CV_INTER_AREA);//使用象素关系重采样。当图像缩小时候,该方法可以避免波纹出现
threshold(test_temp,test_temp,0,255,CV_THRESH_BINARY|CV_THRESH_OTSU);
Mat_<float>sampleMat(1,image_rows*image_cols);
for(int i = 0; ifloat>(0,i) = (float)test_temp.at(i/8,i%8);
}
Mat responseMat;
bp.predict(sampleMat,responseMat);
Point maxLoc;
double maxVal = 0;
minMaxLoc(responseMat,NULL,&maxVal,NULL,&maxLoc);
cout<<"识别结果:"<" 相似度:"<100<<"%"<"test_image",test_image);
waitKey(0);
return 0;
} 代码已打包上传:
http://download.csdn.net/detail/qq_15947787/9518680
5/13 优化trainingDataMat, labelsMat

