Okio 源码解析 : 一套精简高效的 I/O 库
个人博客:https://blog.N0tExpectErr0r.cn
小专栏:https://xiaozhuanlan.com/N0tExpectErr0r
从前面的 OkHttp 源码解析中我们可以知道,OkHttp 中的 I/O 都不是通过我们平时所使用的 IOStream 来实现,而是使用了 Okio 这个第三方库,那它与寻常的 IOStream 有什么区别呢?让我们来分析一下它的源码。
Okio 中有两个非常重要的接口——Sink 以及 Source,它们都继承了 Closeable,其中 Sink 对应了我们原来所使用的 OutputStream,而 Source 则对应了我们原来所使用的 InputStream。
Okio 的入口就是Okio 类,它是一个工厂类,可以通过它内部的一些 static 方法来创建 Sink、Source 等对象。
Sink
Sink 实际上只是一个接口,让我们看看 Sink 中有哪些方法:
public interface Sink extends Closeable, Flushable {
  void write(Buffer source, long byteCount) throws IOException;

  @Override void flush() throws IOException;

  Timeout timeout();

  @Override void close() throws IOException;
}
可以看到,它主要包含了 write、flush、timeout、close 这几个方法,我们可以通过 Okio.sink 方法基于 OutputStream 获取一个 Sink:
private static Sink sink(final OutputStream out, final Timeout timeout) {
  if (out == null) throw new IllegalArgumentException("out == null");
  if (timeout == null) throw new IllegalArgumentException("timeout == null");
  return new Sink() {
    @Override public void write(Buffer source, long byteCount) throws IOException {
      checkOffsetAndCount(source.size, 0, byteCount);
      while (byteCount > 0) {
        timeout.throwIfReached();
        Segment head = source.head;
        int toCopy = (int) Math.min(byteCount, head.limit - head.pos);
        out.write(head.data, head.pos, toCopy);
        head.pos += toCopy;
        byteCount -= toCopy;
        source.size -= toCopy;
        if (head.pos == head.limit) {
          source.head = head.pop();
          SegmentPool.recycle(head);
        }
      }
    }
    @Override public void flush() throws IOException {
      out.flush();
    }
    @Override public void close() throws IOException {
      out.close();
    }
    @Override public Timeout timeout() {
      return timeout;
    }
    @Override public String toString() {
      return "sink(" + out + ")";
    }
  };
}
这里构建并实现了一个 Sink 的匿名内部类并返回,主要实现了它的 write 方法,剩余方法都是简单地转调到 OutputStream 的对应方法。
在 write 方法中,首先进行了一些状态检验,这里貌似在 Timeout 类中实现了对超时的处理,我们稍后再分析。之后从 Buffer 中获取了一个 Segment,并从中取出数据,计算出写入的量后将其写入 Sink 所对应的 OutputStream。
Segment 采用了一种类似链表的形式进行连接,看来 Buffer 中维护了一个 Segment 链表,代表了数据的其中一段。这里将 Buffer 中的数据分段取出并写入了 OutputStream 中。
最后,通过 SegmentPool.recycle 方法对当前 Segment 进行回收。
从上面的代码中我们可以获取到如下信息:
Buffer其实就是内存中的一段数据的抽象,其中通过Segment以链表的形式保存用于存储数据。Segment存储数据采用了分段的存储方式,因此获取数据时需要分段从Segment中获取数据。- 有一个
SegmentPool池用于实现Segment的复用。 Segment的使用有点类似链表。
Source
Source 与 Sink 一样,也仅仅是一个接口:
public interface Source extends Closeable {
  long read(Buffer sink, long byteCount) throws IOException;

  Timeout timeout();

  @Override void close() throws IOException;
}
在 Okio 中可以通过 source 方法根据 InputStream 创建一个 Source:
private static Source source(final InputStream in, final Timeout timeout) {
    if (in == null) {
        throw new IllegalArgumentException("in == null");
    } else if (timeout == null) {
        throw new IllegalArgumentException("timeout == null");
    } else {
        return new Source() {
            public long read(Buffer sink, long byteCount) throws IOException {
                if (byteCount < 0L) {
                    throw new IllegalArgumentException("byteCount < 0: " + byteCount);
                } else if (byteCount == 0L) {
                    return 0L;
                } else {
                    try {
                        timeout.throwIfReached();
                        Segment tail = sink.writableSegment(1);
                        int maxToCopy = (int)Math.min(byteCount, (long)(8192 - tail.limit));
                        int bytesRead = in.read(tail.data, tail.limit, maxToCopy);
                        if (bytesRead == -1) {
                            return -1L;
                        } else {
                            tail.limit += bytesRead;
                            sink.size += (long)bytesRead;
                            return (long)bytesRead;
                        }
                    } catch (AssertionError var7) {
                        if (Okio.isAndroidGetsocknameError(var7)) {
                            throw new IOException(var7);
                        } else {
                            throw var7;
                        }
                    }
                }
            }
            public void close() throws IOException {
                in.close();
            }
            public Timeout timeout() {
                return timeout;
            }
            public String toString() {
                return "source(" + in + ")";
            }
        };
    }
}
这里构建并实现了 Source 的一个匿名内部类并返回,应该就是 Source 的默认实现了。
它除了 read 方法其他都只是简单地调用了 InputStream 的对应方法,我们重点看 read 方法:
首先它进行了一些相关的状态检测,之后通过 sink.writeableSegment 获取到了一个可以写入的 Segment。之后从 InputStream 中读取数据向 Segment 中写入,读取的大小被限制为了 8192 个字节。
Buffer
Buffer 在 Sink 及 Source 中都担任了一个十分重要的地位,它对应了我们内存中存储的数据,对这些数据进行了抽象。下面让我们对 Buffer 进行分析:
Buffer 虽然是我们内存中数据的抽象,但数据实际上并不是存储在 Buffer 中的,它在内部维护了一个 Segment 的循环链表,Segment 才是真正存储数据的地方。它通过 Segment 将数据分成了几段,通过链表进行连接。在 Buffer 内部封装了许多 I/O 操作,都是在对 Segment 中的数据进行处理。
为什么要使用 Segment 对数据进行分段存储而不直接存储整个数据呢?由于数据是分段存放的,这些段中的某一部分可能与另一个 Buffer 中的数据恰好是相同的,此时就体现出了 Segment 的灵活性,我们不需要将数据拷贝到另一个 Buffer 中,只需要将其 Segment 指向这个重复段的 Segment 即可。同时,对于一些如将数据从 Source 转移到 Sink 中这种情况,也不需要进行拷贝,只需要将链表指向我们的 Segment 即可,极大地提高了效率,同时节省了内存空间。
Segment
我们首先看一下存储数据的 Segment,它代表了数据中的一段,是一个双向的循环链表,主要有以下的参数:
final class Segment {
  	// Segment 存储数据的大小
	static final int SIZE = 8192;

	// 进行数据共享的最小字节数
	static final int SHARE_MINIMUM = 1024;

	// 存储数据的字节数组
	final byte[] data;

	// 用户读取数据的下一个起始位置
	int pos;

	// 可以被写入的下一个起始位置
	int limit;

	// 数据是否已被共享
	boolean shared;

	// 该字节数组是否属于该Segment
	boolean owner;

	// 链表指针
	Segment next;

	// 链表指针
	Segment prev;

	//...
}
可以看到,其中 pos 代表了下一次读取的起始位置,而 limit 代表了下一次写入的起始位置,我们可以根据它们两个值将整个 Segment 的空间分为如图的三段:
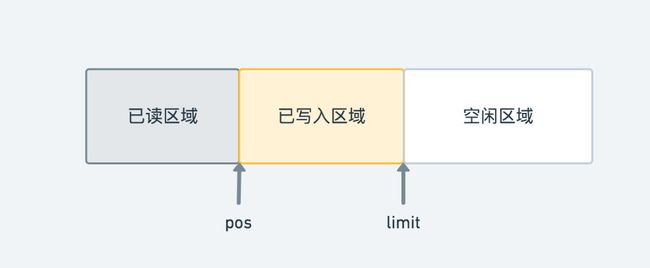
其中已读区域的数据我们以后都不会再用到,已写入区域的数据正在等待读取,而空闲区域还没有填入数据,可以进行写入。
共享机制
同时,Segment 还支持了对数据的共享,通过 shared 及 owner 字段分别表明了数据是否已被共享以及其是否属于当前 Segment。同时它提供了两种拷贝方式: sharedCopy 以及 unsharedCopy。
unsharedCopy 返回了一个新的 Segment,并将 data 数组通过 clone 方法拷贝到了新 Segment 中:
/** Returns a new segment that its own private copy of the underlying byte array. */
final Segment unsharedCopy() {
    return new Segment(data.clone(), pos, limit, false, true);
}
而 sharedCopy 同样返回了一个新的 Segment,但其 data 数组是与新 Segment 进行共享的:
/**
 * Returns a new segment that shares the underlying byte array with this. Adjusting pos and limit
 * are safe but writes are forbidden. This also marks the current segment as shared, which
 * prevents it from being pooled.
 */
final Segment sharedCopy() {
	shared = true;
	return new Segment(data, pos, limit, true, false);
}
同时通过注释我们可以看到,当数据共享后,为了保证安全性,禁止了写入操作。同时将被拷贝的 Segment 也标记为了 shared,从而防止其被回收。
这样的设计同样是为了减少拷贝,从而提高 I/O 的效率。
合并与分割
Segment 还支持了与前一个 Segment 的合并以及对自身的分割操作,从而使得使用者能够更灵活地操作。
合并操作会在当前 Segment 与它的前一个节点都没有超过其大小的一半时,将二者的数据进行合并,并将当前 Segment 进行回收,从而增大内存的利用效率:
/**
 * Call this when the tail and its predecessor may both be less than half
 * full. This will copy data so that segments can be recycled.
 */
public final void compact() {
	if (prev == this) throw new IllegalStateException();
	// 上一个节点的数据不是可以写入的(是共享数据),取消合并
	if (!prev.owner) return;
	// 计算当前节点与前一个节点的剩余空间
	int byteCount = limit - pos;
	int availableByteCount = SIZE - prev.limit + (prev.shared ? 0 : prev.pos);
	// 没有足够的写入空间时,不进行合并å
	if (byteCount > availableByteCount) return;
	// 进行合并,将当前节点数据写入前一节点
	writeTo(prev, byteCount);
	// 从链表中删除当前节点,并进行回收
	pop();
	SegmentPool.recycle(this);
}
而分割操作则会将 Segment 中的数据分割为 [pos, pos+byteCount) 及 [pos+byteCount, limit) 的两段:
public final Segment split(int byteCount) {
  if (byteCount <= 0 || byteCount > limit - pos) throw new IllegalArgumentException();
  Segment prefix;
  // We have two competing performance goals:
  //  - Avoid copying data. We accomplish this by sharing segments.
  //  - Avoid short shared segments. These are bad for performance because they are readonly and
  //    may lead to long chains of short segments.
  // To balance these goals we only share segments when the copy will be large.
  if (byteCount >= SHARE_MINIMUM) {
  	// 如果拷贝量大于1024字节,通过共享的形式
    prefix = sharedCopy();
  } else {
  	// 拷贝量低于1024字节,通过arrayCopy进行拷贝
    prefix = SegmentPool.take();
    System.arraycopy(data, pos, prefix.data, 0, byteCount);
  }
  // 对limit及pos进行修改
  prefix.limit = prefix.pos + byteCount;
  pos += byteCount;
  prev.push(prefix);
  return prefix;
}
这里首先对不同数据段的数据进行了处理,如果数据段大于了 1024 字节,则将数据通过共享交给了分割的前一个节点,两端 Segment 公用同一个 data 数组,否则通过拷贝的形式构建一个新的 Segment。
为什么这里需要对数据大小的不同采用不同的处理方式呢?我们可以看到上面的注释,里面给出了答案:首先,为了避免拷贝数据带来的性能开销,加入了共享 Segment 的功能。但是由于共享的数据是只读的,如果有很多很短的数据段的话,使用的表现并不会很好,因此只有当拷贝的数据量比较大时,才会进行 Segment 的共享。
之后,将二者的 pos 及 limit 都进行了设置。由于 pos 之前的部分及 limit 之后的部分都不会影响到我们正常的读取和写入,因此我们可以不用关心它们目前的状态,没必要再对它们进行一些如填充零之类的操作。
SegmentPool
同时,Okio 还使用了 SegmentPool 来实现一个对象池,从而避免 Segment 频繁地创建及销毁所带来的性能开销。
SegmentPool 的实现十分简单,它内部维护了一个单链表,用于存储被回收存在池中的 Segment,其最大容量被限制在了 64 k。
当需要 Segment 时,可以通过 take 方法来获取一个被回收的对象:
static Segment take() {
	synchronized (SegmentPool.class) {
		if (next != null) {
		  Segment result = next;
		  next = result.next;
		  result.next = null;
		  byteCount -= Segment.SIZE;
		  return result;
		}
	}
  return new Segment(); // Pool is empty. Don't zero-fill while holding a lock.
}
它会在单链表中找到一个空闲的 Segment 并初始化后返回。若当前链表中没有对象,则会创建一个新的 Segment。
当 Segment 使用完毕时,首先可以通过 Segment 的 pop 操作将其从链表中移除,之后可以调用 SegmentPool.recycle 方法对其进行回收:
static void recycle(Segment segment) {
	if (segment.next != null || segment.prev != null) throw new IllegalArgumentException();
	if (segment.shared) return; // This segment cannot be recycled.
	synchronized (SegmentPool.class) {
    	if (byteCount + Segment.SIZE > MAX_SIZE) return; // Pool is full.
    	byteCount += Segment.SIZE;
    	segment.next = next;
    	segment.pos = segment.limit = 0;
    	next = segment;
	}
}
回收 Segment 时,不会对只读的 Segment 进行回收,若 Segment 个数超过了上限,则不会对该 Segment 进行回收。
数据转移
Okio 与 java.io 有个很大的不同,体现在 Buffer 的数据转移上,我们可以通过其 copyTo 方法来完成数据的转移。之所以叫转移,因为它相对于复制来说,是有很大的数据提升的。例如我们可以看到两个 Buffer 之间的数据转移是如何进行的:
public final Buffer copyTo(Buffer out, long offset, long byteCount) {
  	if (out == null) throw new IllegalArgumentException("out == null");
  	checkOffsetAndCount(size, offset, byteCount);
  	if (byteCount == 0) return this;
  	out.size += byteCount;

	// 跳过不进行拷贝的 Segment
	Segment s = head;
	for (; offset >= (s.limit - s.pos); s = s.next) {
    	offset -= (s.limit - s.pos);
	}
	for (; byteCount > 0; s = s.next) {
		// 通过 sharedCopy 将数据拷贝到 copy 中
		Segment copy = s.sharedCopy();
		copy.pos += offset;
		copy.limit = Math.min(copy.pos + (int) byteCount, copy.limit);
		// 插入 Segment
		if (out.head == null) {
		  out.head = copy.next = copy.prev = copy;
		} else {
		  out.head.prev.push(copy);
		}
		byteCount -= copy.limit - copy.pos;
		offset = 0;
	}
	return this;
}
从上面的代码中可以看出,实际上这个过程是通过了 Segment 共享实现的,因此不需要进行拷贝,极大地提高了数据转移的效率。
BufferedSource
我们可以通过 Okio.buffer 方法对一个普通的 Source 进行包装,获取一个具有缓冲能力的 BufferSource,它是一个接口,定义了一系列读取的方法:
public interface BufferedSource extends Source, ReadableByteChannel {
	@Deprecated
	Buffer buffer();

	Buffer getBuffer();

	boolean exhausted() throws IOException;

	void require(long byteCount) throws IOException;

	boolean request(long byteCount) throws IOException;

	byte readByte() throws IOException;

	short readShort() throws IOException;

	short readShortLe() throws IOException;

	// ...一系列读取方法

	long indexOf(byte b, long fromIndex) throws IOException;

	long indexOf(byte b, long fromIndex, long toIndex) throws IOException;

	long indexOf(ByteString bytes) throws IOException;

	long indexOf(ByteString bytes, long fromIndex) throws IOException;

	long indexOfElement(ByteString targetBytes) throws IOException;

	long indexOfElement(ByteString targetBytes, long fromIndex) throws IOException;

	boolean rangeEquals(long offset, ByteString bytes) throws IOException;

	boolean rangeEquals(long offset, ByteString bytes, int bytesOffset, int byteCount)
	    throws IOException;

	BufferedSource peek();

	InputStream inputStream();
}
它主要有两个实现类:Buffer 与 RealBufferedSource。其中 RealBufferedSource 显然是我们通过 buffer 方法包装后得到的类,而 Buffer 实际上对 BufferSource 也进行了实现,通过一系列 read 方法可以从 Segment 中读取处对应的数据。而我们的 RealBufferedSource 则是 Source 的一个包装类,并且其维护了一个 Buffer,从而提高 Input 的效率。我们先分析其思路,再来讨论为什么这样能提高 Input 的效率。
我们可以首先看到 RealBufferedSource 的读取方法,这里以 readByteArray 方法举例:
@Override public byte[] readByteArray(long byteCount) throws IOException {
    require(byteCount);
    return buffer.readByteArray(byteCount);
}
这里首先调用了 require 方法,之后再从 buffer 中将数据读出,看来在 require 中将数据先读取到了 buffer 中。
我们看到 require 方法:
@Override public void require(long byteCount) throws IOException {
    if (!request(byteCount)) throw new EOFException();
}
它实际上转调到了 request 方法:
@Override public boolean request(long byteCount) throws IOException {
	if (byteCount < 0) throw new IllegalArgumentException("byteCount < 0: " + byteCount);
	if (closed) throw new IllegalStateException("closed");
	while (buffer.size < byteCount) {
		if (source.read(buffer, Segment.SIZE) == -1) return false;
	}
	return true;
}
request 方法中,不断地向 buffer 中读取,每次读取 Segment.SIZE 也就是 8192 个字节。也就是它读取的量是 byteCount 以 8192 字节向上取整。为什么它不刚好读取 byteCount 个字节,要读满 8192 个字节呢?
这就是一种预取思想,因为 I/O 操作往往是非常频繁的,如果进行了一次读取,那就很有可能还会进行下一次读取,因此我们预先把它下一次可能读取的部分一起读取出来,这样下次读取时,就不需要再对系统进行请求以获取数据了,可以直接从我们的 buffer 中拿到。这就是为什么说加入 buffer 提高了我们 I/O 的效率。
可能还有人会问,为什么这样能提高 I/O 效率呢,不都是读了一样的量么?这个就涉及到一些操作系统的知识了。在现代的操作系统中,我们的程序往往运行在用户态,而用户态实际上是没有进行 I/O 的权限的,因此往往都是向操作系统发起请求,切换到内核态,再进行 I/O,完成后再次回到用户态。这样的用户态及内核态的切换实际上是非常耗时的,并且这个过程中也伴随着拷贝。因此采用上面的 buffer 可以有效地减少我们的这种系统 I/O 调用,加快我们的效率。
BufferedSink
我们同样可以通过 Okio.buffer 方法对一个普通的 Sink 进行包装,从而获取一个带有 buffer 缓冲能力的 BufferedSink。BufferedSink 也是一个接口 ,内部定义了一系列写入的方法:
public interface BufferedSink extends Sink, WritableByteChannel {
	Buffer buffer();

	BufferedSink write(ByteString byteString) throws IOException;

	BufferedSink write(byte[] source) throws IOException;

	BufferedSink write(byte[] source, int offset, int byteCount) throws IOException;

	long writeAll(Source source) throws IOException;

	BufferedSink write(Source source, long byteCount) throws IOException;

	// ...一些对 write 的封装

	@Override void flush() throws IOException;

	BufferedSink emit() throws IOException;

	BufferedSink emitCompleteSegments() throws IOException;

	OutputStream outputStream();
}
BufferedSink 同样有两个实现类:Buffer 和 RealBufferedSink,我们可以先看到 RealBufferedSink,它是一个 Sink 的包装类,并且内部维护了一个 Buffer。
write
我们先看看其写入方法:
@Override public BufferedSink write(byte[] source, int offset, int byteCount) throws IOException {
	if (closed) throw new IllegalStateException("closed");
	buffer.write(source, offset, byteCount);
	return emitCompleteSegments();
}
这里拿了一个简单的写入 byte[] 的方法进行了举例,它首先将数据写入了 buffer 中,之后调用了 emitCompleteSegments 方法。可以看到这里并没有对 sink真正进行写入,那写入究竟是在哪里进行的呢?我们看看 emitCompleteSegments 方法中做了什么:
@Override public BufferedSink emitCompleteSegments() throws IOException {
	if (closed) throw new IllegalStateException("closed");
	long byteCount = buffer.completeSegmentByteCount();
	if (byteCount > 0) sink.write(buffer, byteCount);
	return this;
}
这里首先调用 buffer.completeSegmentByteCount 方法获取到了 buffer 中已写入但未被读取的部分字节数(只包括已经被写满了的 Segment 中的),之后调用 sink.write 将其写入到了 sink 中。
这里其实很奇怪,按道理来说 buffer 的作用是通过缓存来进行一些优化,但这个方法将数据写入 buffer 后,数据又立即被写入到了 sink 中。这样相比直接写入到 sink 中,反而会带来性能的损耗啊。这里为什么要这样做呢?
我看到这里时对这段也比较奇怪,但考虑到 Okio 的整体设计来说,应该是把 Buffer 当做了一个数据统一的中转站,将读写的优化统一放在了 Buffer 中进行,因此考虑到整体的一致性,将 RealBufferedSink 也采用了通过 Buffer 中转的方式编写,应该算是一种妥协吧。并且采用 Buffer 还有好处就是,一份数据既可以用于读也可以用于写。
flush
RealBufferedSink 还支持了 flush 操作,通过 flush 方法可以将缓冲区的所有数据写入 sink 中:
@Override public void flush() throws IOException {
	if (closed) throw new IllegalStateException("closed");
	if (buffer.size > 0) {
	  sink.write(buffer, buffer.size);
	}
	sink.flush();
}
emit
RealBufferedSink 还具有 emit 功能,分别是 emitCompleteSegments 方法及 emit 方法,前者是将所有已填满的 Segment 中已写入未读取的数据写入 sink,后者则是将 buffer 中所有已写入未读取数据写入 sink(类似 flush):
@Override public BufferedSink emitCompleteSegments() throws IOException {
	if (closed) throw new IllegalStateException("closed");
	long byteCount = buffer.completeSegmentByteCount();
	if (byteCount > 0) sink.write(buffer, byteCount);
	return this;
}

@Override public BufferedSink emit() throws IOException {
	if (closed) throw new IllegalStateException("closed");
	long byteCount = buffer.size();
	if (byteCount > 0) sink.write(buffer, byteCount);
	return this;
}
Timeout 超时机制
Okio 中通过 Timeout 类实现了 Sink 与 Source 的超时机制,在 Sink 的写入与 Source 的读取时对超时进行判断,如果超时则中断写入等操作。其中对于包装了普通 InputStream / OutputStream 的使用了普通的 Timeout,而对于对 Socket 进行了包装的则使用 AsyncTimeout。
Timeout
我们先对普通的 Timeout 进行研究,Timeout 中主要有两个值,timeout 与 deadline ,分别代表了 wait 的最大等待时间与完成某个工作的超时时间。
deadline
对于 deadline,我们可以通过 deadline 方法进行设定:
/** Set a deadline of now plus {@code duration} time. */
public final Timeout deadline(long duration, TimeUnit unit) {
	if (duration <= 0) throw new IllegalArgumentException("duration <= 0: " + duration);
	if (unit == null) throw new IllegalArgumentException("unit == null");
	return deadlineNanoTime(System.nanoTime() + unit.toNanos(duration));
}
之后,在每个需要检查超时的地方需要调用该 Timeout 的 throwIfReached 方法(如 Sink 的 write 方法):
public void throwIfReached() throws IOException {
	if (Thread.interrupted()) {
	  Thread.currentThread().interrupt(); // Retain interrupted status.
	  throw new InterruptedIOException("interrupted");
	}
	if (hasDeadline && deadlineNanoTime - System.nanoTime() <= 0) {
	  throw new InterruptedIOException("deadline reached");
	}
}
这里很简单,就是进行时间的校验,若达到了设定的时间,则抛出异常从而中断后续操作。
timeout
同时,Timeout 还实现了对 monitor 进行 wait 的超时机制,通过 waitUntilNotified 方法可以等待 monitor 被 notify,若等待的过程超过了 Timeout 所设定的时间或当前线程被中断,则会抛出异常,从而避免一直进行等待。并且,该方法需要在 synchronized 代码块中调用,以保证线程安全。
在我们构造了一个 Timeout 后,可以使用 timeout 方法对其 wait 超时时间进行设定:
public Timeout timeout(long timeout, TimeUnit unit) {
	if (timeout < 0) throw new IllegalArgumentException("timeout < 0: " + timeout);
	if (unit == null) throw new IllegalArgumentException("unit == null");
	this.timeoutNanos = unit.toNanos(timeout);
	return this;
}
这里主要是将 timeoutNanos 设置为了对应的值。接着我们看到 waitUntilNotified 方法:
/**
 * Waits on {@code monitor} until it is notified. Throws {@link InterruptedIOException} if either
 * the thread is interrupted or if this timeout elapses before {@code monitor} is notified. The
 * caller must be synchronized on {@code monitor}.
 */
public final void waitUntilNotified(Object monitor) throws InterruptedIOException {
	try {
		boolean hasDeadline = hasDeadline();
		long timeoutNanos = timeoutNanos();
		// 没有 timeout 的设定的话,直接调用 monitor 的 wait 方法
		if (!hasDeadline && timeoutNanos == 0L) {
			monitor.wait(); // There is no timeout: wait forever.
			return;
		}
		// 计算我们要 wait 的时间
		long waitNanos;
		long start = System.nanoTime();
		// 下面主要就是等待 timeout 与 deadline 中最小的那个
		if (hasDeadline && timeoutNanos != 0) {
			long deadlineNanos = deadlineNanoTime() - start;
			waitNanos = Math.min(timeoutNanos, deadlineNanos);
		} else if (hasDeadline) {
			waitNanos = deadlineNanoTime() - start;
		} else {
			waitNanos = timeoutNanos;
		}
		// wait 相应时间
		long elapsedNanos = 0L;
		if (waitNanos > 0L) {
			long waitMillis = waitNanos / 1000000L;
			monitor.wait(waitMillis, (int) (waitNanos - waitMillis * 1000000L));
			elapsedNanos = System.nanoTime() - start;
		}
		// 如果还没有 notify,则抛出异常
		if (elapsedNanos >= waitNanos) {
			throw new InterruptedIOException("timeout");
		}
	} catch (InterruptedException e) {
		// 线程如果在这个过程中被 interrupt,则抛出异常
		Thread.currentThread().interrupt();
		throw new InterruptedIOException("interrupted");
	}
}
AsyncTimeout
AsyncTimeout 是 Timeout 的子类,接下来我们看看 AsyncTimeout 是如何对 Socket 中的超时进行处理的。
首先可以看到 AsyncTimeout 中保存了一个 head 及一个 next 引用,显然这里是有一个链表存储的 AsyncTimeout 队列的:
// AsyncTimeout 队列的头部
static @Nullable AsyncTimeout head;
// 当前节点是否在队列中
private boolean inQueue;
// 下一个节点
private @Nullable AsyncTimeout next;
这里感觉与 MessageQueue 有点相似,猜测 AsyncTimeout 会根据超时的时间按序存储在队列中。
并且从 AsyncTimeout 的 JavaDoc 中可以看到,它需要使用者在异步的事件开始时调用 enter 方法,结束时调用 exit 方法。同时它在背后开辟了一个线程对超时进行定时检查。
enter & exit
让我们先看到 enter 方法:
public final void enter() {
	if (inQueue) throw new IllegalStateException("Unbalanced enter/exit");
	long timeoutNanos = timeoutNanos();
	boolean hasDeadline = hasDeadline
	// 时间到了就不加入队列了
	if (timeoutNanos == 0 && !hasDeadline) {
		return;
	}
	inQueue = true;
	// 开启线程对超时进行检查
	scheduleTimeout(this, timeoutNanos, hasDeadline);
}
上面主要是将其 inQueue 设置为了 true,之后调用 scheduleTimeout 方法对超时进行定时检查。我们暂时先不关注 scheduleTimeout 的具体实现。
接着我们看到 exit 方法:
/** Returns true if the timeout occurred. */
public final boolean exit() {
  if (!inQueue) return false;
  inQueue = false;
  return cancelScheduledTimeout(this);
}
这里也非常简单,就是将 inQueue 设置为了 false,并调用 cancelScheduledTimeout 方法停止前面的定时校验线程。
scheduleTimeout
我们接下来看看这个定时校验的具体实现,我们先看到 scheduleTimeout 方法:
private static synchronized void scheduleTimeout(
	  AsyncTimeout node, long timeoutNanos, boolean hasDeadline) {
	// 如果队列中还没有节点,构造一个头节点并启动 Watchdog
	if (head == null) {
		head = new AsyncTimeout();
		new Watchdog().start();
	}
	long now = System.nanoTime();
	// 计算具体超时时间,主要是取 timeout 与 deadline 的最小值
	if (timeoutNanos != 0 && hasDeadline) {
		// Compute the earliest event; either timeout or deadline. Because nanoTime can wrap around,
		// Math.min() is undefined for absolute values, but meaningful for relative ones.
		node.timeoutAt = now + Math.min(timeoutNanos, node.deadlineNanoTime() - now);
	} else if (timeoutNanos != 0) {
		node.timeoutAt = now + timeoutNanos;
	} else if (hasDeadline) {
	 	node.timeoutAt = node.deadlineNanoTime();
	} else {
		throw new AssertionError();
	}
	long remainingNanos = node.remainingNanos(now);
	// 按剩余时间从小到大插入到队列中
	for (AsyncTimeout prev = head; true; prev = prev.next) {
		if (prev.next == null || remainingNanos < prev.next.remainingNanos(now)) {
			node.next = prev.next;
			prev.next = node;
			if (prev == head) {
				// 插入在队列头部,进行 notify
				AsyncTimeout.class.notify();
			}
			break;
		}
	}
}
上面的逻辑主要分为以下几步:
- 若队列中还没有节点,构造一个头节点并且启动
Watchdog,Watchdog是一个Thread的子类,也就是我们的定时扫描线程。 - 计算该
Timeout的超时时间,取了timeout与deadline的最小值 - 将该
timeout按剩余时间从小到大的顺序插入队列中 - 若插入的位置是队列的头部,则进行
notify(这里还无法了解到意图,我们可以往后看看)
cancelScheduledTimeout
接着我们看看 cancelScheduledTimeout 做了些什么:
private static synchronized boolean cancelScheduledTimeout(AsyncTimeout node) {
	// Remove the node from the linked list.
	for (AsyncTimeout prev = head; prev != null; prev = prev.next) {
		if (prev.next == node) {
			prev.next = node.next;
			node.next = null;
			return false;
		}
	}
	// The node wasn't found in the linked list: it must have timed out!
	return true;
}
这里很简单,就是将该 AsyncTimeout 从队列中移除,若返回 true,则代表超时已经发生,若返回 false,则代表超时还未发生,该 Timeout 被移除。这个返回值同样反映到了我们的 exit 方法返回值中。
Watchdog
接着我们看看 Watchdog 究竟是如何对超时进行检测的:
private static final class Watchdog extends Thread {
	public void run() {
		while (true) {
			try {
				AsyncTimeout timedOut;
				synchronized (AsyncTimeout.class) {
					timedOut = awaitTimeout();
					// 找不到要 interrupt 的节点,继续寻找
					if (timedOut == null) continue;
					// 队列已空,停止线程
					if (timedOut == head) {
						head = null;
						return;
					}
				}
				// 调用 timeout 方法通知超时
				timedOut.timedOut();
			} catch (InterruptedException ignored) {
			}
		}
	}
}
Wachdog 中不断调用 awaitTimeout 方法尝试获取一个可以停止的 Timeout,之后调用了其 timeOut 方法通知外部已超时。
awaitTimeout
我们可以看看 awaitTimeout 做了什么:
static @Nullable AsyncTimeout awaitTimeout() throws InterruptedException {
	AsyncTimeout node = head.next;
	// 队列为空,wait 直到有新的节点加入
	if (node == null) {
		long startNanos = System.nanoTime();
		AsyncTimeout.class.wait(IDLE_TIMEOUT_MILLIS);
		return head.next == null && (System.nanoTime() - startNanos) >= IDLE_TIMEOUT_NANOS
		    ? head  // The idle timeout elapsed.
		    : null; // The situation has changed.
	}
	long waitNanos = node.remainingNanos(System.nanoTime());
	// 计算该节点需要 wait 的时间
	if (waitNanos > 0) {
		// wait 对应的时间
		long waitMillis = waitNanos / 1000000L;
		waitNanos -= (waitMillis * 1000000L);
		AsyncTimeout.class.wait(waitMillis, (int) waitNanos);
		return null;
	}
	// wait 过后已超时,将其移出队列
	head.next = node.next;
	node.next = null;
	return node;
}
这里主要有以下几步:
- 如果队列为空,
wait直到有新的节点加入队列 - 计算节点需要
wait的时间并wait对应时间 - 时间到后,说明该节点超时,将其移出队列
通过这里的代码,我们就知道为什么前面在链表头部加入节点时需要进行一次 notify 了,主要有两个目的:
- 若队列中没有元素,可以通过
notify通知此处有新元素加入队列。 - 由于插入在头部,说明其比后面的节点的需要等待时间更少,因此需要停止前一次
wait来计算该新的Timeout所需要的等待时间,并对其进行超时处理。
这里的处理和 Android 中 MessageQueue 的设计还是有异曲同工之妙的,我们可以学习一波。
sink & source
AsyncTimeout 还实现了 sink 及 source 方法来实现了支持 AsyncTimeout 超时机制的 Sink 及 Source,主要是通过在其各种操作前后分别调用 enter 及 exit。下面以 Sink 为例:
public final Sink sink(final Sink sink) {
  return new Sink() {
    @Override public void write(Buffer source, long byteCount) throws IOException {
      checkOffsetAndCount(source.size, 0, byteCount);
      while (byteCount > 0L) {
        // Count how many bytes to write. This loop guarantees we split on a segment boundary.
        long toWrite = 0L;
        for (Segment s = source.head; toWrite < TIMEOUT_WRITE_SIZE; s = s.next) {
          int segmentSize = s.limit - s.pos;
          toWrite += segmentSize;
          if (toWrite >= byteCount) {
            toWrite = byteCount;
            break;
          }
        }
        // Emit one write. Only this section is subject to the timeout.
        boolean throwOnTimeout = false;
        enter();
        try {
          sink.write(source, toWrite);
          byteCount -= toWrite;
          throwOnTimeout = true;
        } catch (IOException e) {
          throw exit(e);
        } finally {
          exit(throwOnTimeout);
        }
      }
    }
    @Override public void flush() throws IOException {
      boolean throwOnTimeout = false;
      enter();
      try {
        sink.flush();
        throwOnTimeout = true;
      } catch (IOException e) {
        throw exit(e);
      } finally {
        exit(throwOnTimeout);
      }
    }
    @Override public void close() throws IOException {
      boolean throwOnTimeout = false;
      enter();
      try {
        sink.close();
        throwOnTimeout = true;
      } catch (IOException e) {
        throw exit(e);
      } finally {
        exit(throwOnTimeout);
      }
    }
    @Override public Timeout timeout() {
      return AsyncTimeout.this;
    }
    @Override public String toString() {
      return "AsyncTimeout.sink(" + sink + ")";
    }
}
比较简单,这里就不做太多解释了。
总结
Okio 是一套基于 java.io 进行了一系列优化的十分优秀的 I/O 库,它通过引入了 Segment 机制大大降低了数据迁移的成本,减少了拷贝的次数,并且对 java.io 繁琐的体系进行了简化,使得整个库更易于使用。在 Okio 中还实现了很多有其它功能的 Source 及 Sink,感兴趣的读者可以自行翻阅一下源码。同时各位可以去回顾一下前面的 OkHttp 源码解析中,OkHttp 是如何使用 Okio 进行 Socket 的数据写入及读取的。