freeswitch部署及网关调试
freeswitch部署及网关调试
目录
freeswitch部署及网关调试... - 1 -
一、freeswitch部署... - 3 -
(一)基础部署... - 3 -
(二)根据实际情况需求的部署配置... - 4 -
1、freeswitch开启支持音频和视频... - 4 -
2、配置联通/电信双线... - 5 -
3、防掉线... - 5 -
4、默认号码及说明... - 5 -
5、配置文件说明... - 6 -
6、添加一个新的SIP账号... - 6 -
7、freeswitch用作软电话... - 6 -
8、配置SIP网关拨打外部电话... - 7 -
9、从某一分机上呼出... - 7 -
10、呼入电话处理。... - 8 -
11、测试freeswitch视频会议... - 8 -
12、freeswitch中的语音识别... - 9 -
13、在 FreeSWITCH 中使用 google translate 进行文本语音转换... - 9 -
二、Freeswitch配置... - 9 -
1、基础配置... - 9 -
2、拨号规则配置... - 10 -
3、NAT穿透配置... - 13 -
(一)、freeswitch帮助终端穿越NAT解决方案... - 13 -
(二)、freeswitch处于NAT后面的解决方案... - 13 -
(三)其他NAT穿透相关设置... - 14 -
三、网关配置... - 16 -
1、修改本地网络... - 16 -
2、修改登陆密码... - 17 -
3、SIP服务器配置... - 18 -
4、添加端口或端口组... - 18 -
5、配置IP中继... - 21 -
6、路由参数配置... - 21 -
7、配置IPàTel路由... - 21 -
8、配置IPàTel被叫号码变更... - 22 -
9、保存完配置之后重启,并将网关接入本地网络... - 22 -
一、freeswitch部署
(一)基础部署
1、数据库部署
⑴、安装MariaDB
安装命令
yum -y install mariadb mariadb-server
yum install mysql-connector-odbc
安装完成MariaDB,首先启动MariaDB
systemctl start mariadb
设置开机启动
systemctl enable mariadb
接下来进行MariaDB的相关简单配置
mysql_secure_installation
首先是设置密码,会提示先输入密码
Enter current password for root (enter for none):<–初次运行直接回车
设置密码
Set root password? [Y/n] <– 是否设置root用户密码,输入y并回车或直接回车
New password: <– 设置root用户的密码
Re-enter new password: <– 再输入一次你设置的密码
其他配置
Remove anonymous users? [Y/n] <– 是否删除匿名用户,回车
Disallow root login remotely? [Y/n] <–是否禁止root远程登录,回车,
Remove test database and access to it? [Y/n] <– 是否删除test数据库,回车
Reload privilege tables now? [Y/n] <– 是否重新加载权限表,回车
初始化MariaDB完成,接下来测试登录
mysql -uroot -ppassword
完成。
⑵、配置MariaDB的字符集
文件/etc/my.cnf
vi /etc/my.cnf
在[mysqld]标签下添加
init_connect='SET collation_connection = utf8_unicode_ci'
init_connect='SET NAMES utf8'
character-set-server=utf8
collation-server=utf8_unicode_ci
skip-character-set-client-handshake
文件/etc/my.cnf.d/client.cnf
vi /etc/my.cnf.d/client.cnf
在[client]中添加
default-character-set=utf8
文件/etc/my.cnf.d/mysql-clients.cnf
vi /etc/my.cnf.d/mysql-clients.cnf
在[mysql]中添加
default-character-set=utf8
全部配置完成,重启mariadb
systemctl restart mariadb
之后进入MariaDB查看字符集
mysql> show variables like "%character%";show variables like "%collation%";
显示为
+--------------------------+----------------------------+
| Variable_name | Value |
+--------------------------+----------------------------+
| character_set_client | utf8 |
| character_set_connection | utf8 |
| character_set_database | utf8 |
| character_set_filesystem | binary |
| character_set_results | utf8 |
| character_set_server | utf8 |
| character_set_system | utf8 |
| character_sets_dir | /usr/share/mysql/charsets/ |
+--------------------------+----------------------------+
8 rows in set (0.00 sec)
+----------------------+-----------------+
| Variable_name | Value |
+----------------------+-----------------+
| collation_connection | utf8_unicode_ci |
| collation_database | utf8_unicode_ci |
| collation_server | utf8_unicode_ci |
+----------------------+-----------------+
3 rows in set (0.00 sec)
字符集配置完成。
⑶、添加用户,设置权限
创建用户命令
mysql>create user lwz@localhost identified by '123456';
直接创建用户并授权的命令
mysql>grant all on *.* to lwz@localhost indentified by '123456';
授予外网登陆权限
mysql>grant all privileges on *.* to lwz@'%' identified by '123456';
授予权限并且可以授权
mysql>grant all privileges on *.* to lwz@'localhost' identified by '123456' with grant option;
简单的用户和权限配置基本就这样了。
其中只授予部分权限把 其中 all privileges或者all改为select,insert,update,delete,create,drop,index,alter,grant,references,reload,shutdown,process,file其中一部分。
登录数据库创建新库
[root@VM_56_176_centos ~]# mysql -ulwz -p
Enter password:
Welcome to the MariaDB monitor. Commands end with ; or \g.
Your MariaDB connection id is 79
Server version: 5.5.56-MariaDB MariaDB Server
Copyright (c) 2000, 2017, Oracle, MariaDB Corporation Ab and others.
Type 'help;' or '\h' for help. Type '\c' to clear the current input statement.
MariaDB [(none)]> create database fsdb;
Query OK, 1 row affected (0.00 sec)
MariaDB [(none)]> show databases;
+--------------------+
| Database |
+--------------------+
| information_schema |
| fsdb |
| mysql |
| performance_schema |
+--------------------+
5 rows in set (0.00 sec)
MariaDB [(none)]>
修改odbc.ini文件,如果没有可以创建,内容如下:
[root@VM_56_176_centos ~]# vim /etc/odbc.ini
[freeswitch]
Description=MySQL freeswitch database
Trace = On
TraceFile = stderr
Driver=MySQL
SERVER =localhost
PORT =3306
DATABASE = fsdb
USER = lwz
PASSWORD = 123456
CHARSET = UTF8
OPTION = 3
MULTI_STATEMENTS = 67108864
Threading = 0
MaxLongVarcharSize=65536
查看odbc状态
[root@VM_56_176_centos ~]# odbcinst -q -s
[freeswitch]
[root@VM_56_176_centos ~]# odbcinst -q -d
[PostgreSQL]
[MySQL]
[root@VM_56_176_centos ~]# odbcinst -j
unixODBC 2.3.1
DRIVERS............: /etc/odbcinst.ini
SYSTEM DATA SOURCES: /etc/odbc.ini
FILE DATA SOURCES..: /etc/ODBCDataSources
USER DATA SOURCES..: /etc/odbc.ini
SQLULEN Size.......: 8
SQLLEN Size........: 8
SQLSETPOSIROW Size.: 8
[root@VM_56_176_centos ~]#
检查dsn连接状态
[root@VM_56_176_centos ~]# isql -v freeswitch
+---------------------------------------+
| Connected! |
| |
| sql-statement |
| help [tablename] |
| quit |
| |
+---------------------------------------+
SQL>
2、安装前准备
a.安装git:
[root@acs ~]# yum install -y git
b.安装epel-yum源:
[root@acs ~]# yum -y install epel-release
c.安装freeswitch自己的yum源(因为epel中的libyuv-devel版本低,无法正常编译mod_fsv):
[root@acs ~]# rpm -Uvh http://files.freeswitch.org/freeswitch-release-1-6.noarch.rpm
获取http://files.freeswitch.org/freeswitch-release-1-6.noarch.rpm
准备中... ################################# [100%]
正在升级/安装...
1:freeswitch-release-1-6 ################################# [100%]
[root@acs ~]#
d.安装编译环境
[root@acs ~]# yum -y install git gcc-c++ autoconf automake libtool wget python ncurses-devel zlib-devel libjpeg-devel openssl-devel e2fsprogs-devel sqlite-devel libcurl-devel pcre-devel speex-devel ldns-devel libedit-devel libxml2-devel yasm
e.安装各种库和头文件:
[root@acs ~]# yum -y install libyuv-devel opus-devel libvpx-devel libvpx2* libdb4* libidn-devel unbound-devel libuuid-devel lua-devel libsndfile-devel
2、获取源码
[root@acs ~]# cd /usr/local/src
[root@acs src]# git clone -b v1.6 https://freeswitch.org/stash/scm/fs/freeswitch.git
3、安装
[root@acs src]# cd /usr/local/src/freeswitch
#注意:我们要添加新的模块到freeswitch,所以要编辑模块的配置文件。到modules.conf中将所需要的模块去掉注释(mod_format_cdr,mod_xml_curl)
[root@acs freeswitch]# ./bootstrap.sh
#配置制定安装路径
[root@acs freeswitch]# ./configure --prefix=/usr/local/freeswitch --with-openssl --enable-core-odbc-support
#编译和编译安装
[root@acs freeswitch]# make && make install
#安装语音包(语音包的安装时向下兼容安装的,如果不用cd音质可以不装,但是装了cd音质,普通音质的语音包也会被安装。)
[root@acs freeswitch]# make sounds-install
#安装等待音乐包(同上)
[root@acs freeswitch]# make moh-install
到此完成安装
4、初始化配置
a.到vars.xml文件中将默认密码修改一下,否则不安全,而且终端中也会出现警告。另外为了防止默认端口被扫描,还可以修改下默认的端口号!
修改配置文件/usr/local/freeswitch/conf/vars.xml如下:
[root@acs ~]# vim /usr/local/freeswitch/etc/freeswitch/vars.xml
b.取消对IPv6的支持(除非需要ipv6否则请取消):
[root@acs ~]# cd /usr/local/freeswitch/etc/freeswitch/sip_profiles
执行下面的操作:
[root@acs sip_profiles]# mv internal-ipv6.xml internal-ipv6.xml.removed
[root@acs sip_profiles]# mv external-ipv6.xml external-ipv6.xml.removed
对freeswitch和fs_cli命令建立软连接,并且启动freeswitch
[root@acs ~]# ln -s /usr/local/freeswitch/bin/freeswitch /usr/bin/freeswitch
[root@acs ~]# ln -s /usr/local/freeswitch/bin/fs_cli /usr/bin/fs_cli
配置freeswitch连接数据库
进入freeswitch的配置文件目录,查看需要配置dsn的文件,根据需求修改配置文件就可以
[root@VM_56_176_centos ~]# cd /usr/local/freeswitch/etc/freeswitch/
autoload_configs/ dialplan/ ivr_menus/ lang/ sip_profiles/ tls/
chatplan/ directory/ jingle_profiles/ mrcp_profiles/ skinny_profiles/
[root@VM_56_176_centos ~]# cd /usr/local/freeswitch/etc/freeswitch/
[root@VM_56_176_centos freeswitch]# grep -ir dsn
sip_profiles/internal.xml:
sip_profiles/internal.xml:
sip_profiles/internal.xml:
sip_profiles/internal-ipv6.xml.removed:
sip_profiles/internal-ipv6.xml.removed:
sip_profiles/external.xml:
jingle_profiles/server.xml:
jingle_profiles/server.xml:
mime.types:application/vnd.fdsn.mseed mseed
mime.types:application/vnd.fdsn.seed seed dataless
autoload_configs/cidlookup.conf.xml:
autoload_configs/db.conf.xml:
autoload_configs/switch.conf.xml:
autoload_configs/switch.conf.xml:
autoload_configs/switch.conf.xml:
autoload_configs/nibblebill.conf.xml:
autoload_configs/voicemail.conf.xml: -->
autoload_configs/lcr.conf.xml:
autoload_configs/lcr.conf.xml:
autoload_configs/callcenter.conf.xml:
autoload_configs/easyroute.conf.xml:
autoload_configs/directory.conf.xml:
skinny_profiles/internal.xml:
[root@VM_56_176_centos freeswitch]#
修改完配置环境后直接启动freeswitch,默认会自动连接数据库,查看数据库fsdb中是否存在所需要的表,不存在会自动创建。
注意:很多时候在启动freeswitch的时候会失败,日志中查看是创建channels表失败,原因是创建channels表的字段时,使用的字符类型为varchar,默认搜索引擎是MyISAM
报错信息如下:
ERROR 1118 (42000): Row size too large. The maximum row size for the used table type, not counting BLOBs, is 65535. You have to change some columns to TEXT or BLOBs
解决办法:把床脚channels表的字段类型VARCHAR换成text
CREATE TABLE channels (
uuid VARCHAR(256),
direction VARCHAR(32),
created VARCHAR(128),
created_epoch INTEGER,
name VARCHAR(1024),
state VARCHAR(64),
cid_name VARCHAR(1024),
cid_num VARCHAR(256),
ip_addr VARCHAR(256),
dest VARCHAR(1024),
application VARCHAR(128),
application_data VARCHAR(4096),
dialplan VARCHAR(128),
context VARCHAR(128),
read_codec VARCHAR(128),
read_rate VARCHAR(32),
read_bit_rate VARCHAR(32),
write_codec VARCHAR(128),
write_rate VARCHAR(32),
write_bit_rate VARCHAR(32),
secure VARCHAR(64),
hostname VARCHAR(256),
presence_id VARCHAR(4096),
presence_data VARCHAR(4096),
accountcode VARCHAR(256),
callstate VARCHAR(64),
callee_name VARCHAR(1024),
callee_num VARCHAR(256),
callee_direction VARCHAR(5),
call_uuid VARCHAR(256),
sent_callee_name VARCHAR(1024),
sent_callee_num VARCHAR(256),
initial_cid_name VARCHAR(1024),
initial_cid_num VARCHAR(256),
initial_ip_addr VARCHAR(256),
initial_dest VARCHAR(1024),
initial_dialplan VARCHAR(128),
initial_context VARCHAR(128)
);
换成
CREATE TABLE channels (
uuid text(256),
direction text(32),
created text(128),
created_epoch INTEGER,
name text(1024),
state text(64),
cid_name text(1024),
cid_num text(256),
ip_addr text(256),
dest text(1024),
application text(128),
application_data text(4096),
dialplan text(128),
context text(128),
read_codec text(128),
read_rate text(32),
read_bit_rate text(32),
write_codec text(128),
write_rate text(32),
write_bit_rate text(32),
secure text(64),
hostname text(256),
presence_id text(4096),
presence_data text(4096),
accountcode text(256),
callstate text(64),
callee_name text(1024),
callee_num text(256),
callee_direction text(5),
call_uuid text(256),
sent_callee_name text(1024),
sent_callee_num text(256),
initial_cid_name text(1024),
initial_cid_num text(256),
initial_ip_addr text(256),
initial_dest text(1024),
initial_dialplan text(128),
initial_context text(128)
);
直接在fsdb库中创建就可以。
启动freeswitch
#nc的意思是no console 也就是后台运行
[root@acs ~]# freeswitch -nc
停止freeswitch
[root@acs ~]# freeswitch -stop
#使用客户端对freeswitch进行管理
[root@acs ~]# fs_cli
注意:如果需要FreeSWITCH通过ODBC访问数据库(包括运行数据库或Lua脚本访问),需要提前安装好unixODBC和相应数据库的ODBC软件包(如:mysql-connector-odbc)
在configure时加上--enable-core-odbc-support 强制支持ODBC,如果没有这个参数可能会无法自动发现ODBC
(二)根据实际情况需求的部署配置
1、freeswitch开启支持音频和视频
默认只支持音频,为了支持视频,需要修稿配置文件vars.xml(258和259行)
[root@acs ~]# vim /usr/local/freeswitch/etc/freeswitch/vars.xml
#修改下面两行
#修改为
2、配置联通/电信双线
复制internal.xml为internal2.xml,修改internal2.xml里第一行的name为internal2,再将sip-ip和rtp-ip改为与internal里不同的那个公网ip,重启freeswitch即可。(用sofia status命令应该可以看到新建的internal2生效)
要使用智能域名解析,将vars.xml里的domain改为域名即可。
3、防掉线
在profile文件里修改nat-options-ping属性为true,大约每30秒FreeSwitch会发一个options包给客户端以保持连接。
4、默认号码及说明
------------------
号码 | 说明
----------------------
9664 | 保持音乐
9196 | echo,回音测试
9195 | echo,回音测试,延迟5秒
9197 | milliwatte extension,铃音生成
9198 | TGML 铃音生成示例
5000 | 示例IVR
4000 | 听取语音信箱
33xx | 电话会议,48K(其中xx可为00-99,下同)
32xx | 电话会议,32K
31xx | 电话会议,16K
30xx | 电话会议,8K
2000-2002 | 呼叫组
1000-1019 | 默认分机号
5、配置文件说明
文件 | 说明
---------------------------------------------------
vars.xml | 一些常用变量
dialplan/default.xml | 缺省的拨号计划
directory/default/*.xml | SIP用户,每用户一个文件
sip_profiles/internal.xml | 一个SIP profile,或称作一个SIP-UA,监听在本地IP及端口5060,一般供内网用户使用
sip_profiles/externa.xml | 另一个SIP-UA,用作外部连接,端口5080
autoload_configs/modules.conf.xml | 配置当FreeSWITCH启动时自动装载哪些模块
6、添加一个新的SIP账号
Freeswitch默认设置了20个用户(1000-1019),如果需要更多地用户,需要执行以下三个步骤:
- 在 etc/freeswitch /directory/default/ 增加一个用户配置文件
- 修改拨号计划(Dialplan)使其它用户可以呼叫到它
- 重新加载配置使其生效
如果想添加用户Jack,分机号是1234。只需要到etc/freeswitch/directory/default 目录下,将 1000.xml 拷贝到 1234.xml。打开1234.xml,将所有1000都改为1234。并把 effective_caller_id_name 的值改为 Jack,然后存盘退出。如:
接下来,打开 etc/freeswitch/dialplan/default.xml,找到 \ 一行,改为 \。熟悉正则表达式的人应该知道,“10[01][0-9]$”匹配被叫号码1000-1019。因此我们修改之后的表达式就多匹配了一个1234。FreeSWITCH使用Perl兼容的正则表达式(PCRE)。
现在,回到fs_cli,执行 reloadxml 命令或按快捷键F6,使新的配置生效
7、freeswitch用作软电话
8、配置SIP网关拨打外部电话
如果你在某个运营商拥有SIP账号,你就可以配置上拨打外部电话了。该SIP账号(或提供该账号的设备)在 FreeSWITCH 中称为SIP网关(Gateway)。添加一个网关只需要在 etc/freeswitch/sip_profiles/external/ 创建一个XML文件,名字可以随便起,如gw1.xml。
name="realm" value="SIP服务器地址,可以是IP或IP:端口号"/>
name="username" value="SIP用户名"/>
name="password" value="密码"/>
name="register" value="true" />
如果你的SIP网关还需要其它参数,可以参阅同目录下的 example.xml,但一般来说上述参数就够了。你可以重启 FreeSWITCH,或者执行以下命令使用之生效。
freeswitch@acs> sofia profile external rescan reloadxml
然后显示一下状态:
freeswitch@acs > sofia status
如果显示 gateway gw1 的状态是 REGED ,则表明正确的注册到了网关上。你可以先用命令试一下网关是否工作正常:
freeswitch@acs > originate sofia/gateway/gw1/xxxxxx &echo()
以上命令会通过网关 gw1 呼叫号码 xxxxxx(可能是你的手机号),被叫号码接听电话后,FreeSWITCH 会执行 echo() 程序,你应该能听到自己的回音
9、从某一分机上呼出
如果网关测试正常,你就可以配置从你的SIP软电话或portaudio呼出了。由于我们是把 FreeSWITCH 当作 PBX 用,我们需要选一个出局字冠。常见的 PBX 一般是内部拨小号,打外部电话就需要加拨 0 或先拨 9 。当然,这是你自己的交换机,你可以用任何你喜欢的数字(甚至是字母)。 继续修改拨号计划,创建新XML文件: etc/freeswitch /dialplan/default/call_out.xml
其中,(\d+)为正则表达式,匹配 0 后面的所有数字并存到变量 $1 中。然后通过 bridge 程序通过网关 gw1 打出该号码。当然,建立该XML后需要在Fs-Con中执行 reloadxml 使用之生效。
10、呼入电话处理。
如果你的 SIP 网关支持呼入,那么你需要知道呼入的 DID 。 DID的全称是 Direct Inbound Dial,即直接呼入。一般来说,呼入的 DID 就是你的 SIP 号码,如果你不知道,也没关系,后面你会学会如何得到。 编辑以下XML文件放到 etc/freeswitch /dialplan/public/my_did.xml
reloadxml 使之生效。上述配置会将来话直接转接到分机 1000 上
11、测试freeswitch视频会议
链接地址:http://www.dujinfang.com/2011/04/24/ce-shi-freeswitch-shi-pin-hui-yi.html
一直想测一直 FreeSWITCH 的视频会议功能,但以前只有两个支持 H263 的设备 (Huawei视频电话及一个 Xlite),未能好好体验。最近买了两个 XPT8886 视频电话及一个 Bria 软电话授权,总算是可以测试三方会议了。
首先,要在 sofia profile 中设置支持的视频编码,简单起见我直接在 vars.xml 中设置了:
首先将所有视频设备设成只支持 H263,让我所有支持视频的设备连接互拨,测试均正常。然后将所有电话打入默认的电话会议号码 3000 ,电话会议正常。经过研究源代码,发现流程是这样的:
- 每个会议里都有一个 video 线程
- 每个会议里会有一个标志,叫做 floor,一般来说,当前正在发言的人会拥有这个 floor
- 拥有 floor 的人的视频会广播到所有的终端上,包括它自己
如果在会议中,另一个人开始讲话,视频就会发生切换,但切换的画面会出现马赛克,而且有些慢,即使在局域网环境中也如此。
接下来测试 H264,由于我华为的设备不支持H264只好放到一边了。
全部打入 3000 以后发现 XPT8886 终端的视频不能正常显示,而 Bria 的则正常。百般测试无果只好查看源代码了,最后发现,在 mod_conference 的 1011 行左右,有一段检测 i-frame 的代码,对于 Bria 能检测通过,而 XPT8886 发出的 RTP 包无论如何都检测不通过,后来,直接将其改成 iframe = 1 ,视频功能正常。
} else if (vid_frame->codec->implementation->ianacode == 99) { /* h.264 */
iframe = (*((int16_t *) vid_frame->data) >> 5 == 0x11);
画质明显比 H263 好得多,切换也快得多。
在广域网的环境下测了一下,效果还不错。连接美国的 FreeSWITCH 服务器,发现视频质量很差,当然了,视频需要到美国绕一圈再回来,当然会大打折扣。准备哪天找个老外测一测,看看效果
12、freeswitch中的语音识别
链接地址:http://www.dujinfang.com/2010/09/07/ye-tan-freeswitch-zhong-yu-yin-shi-bie.html
13、在 FreeSWITCH 中使用 google translate 进行文本语音转换
链接地址:http://www.dujinfang.com/2010/10/28/zai-freeswitch-zhong-shi-yong-google-translate-jin-xing-wen-ben-yu-yin-zhuan-huan.html
二、Freeswitch配置
1、基础配置
修改配置文件
[root@acs ~]# vim /usr/local/freeswitch/etc/freeswitch/autoload_configs/event_socket.conf.xml
name="nat-map" value="false"/>
来源地址的ACL控制
[root@acs ~]# vim /usr/local/freeswitch/etc/freeswitch/autoload_configs/acl.conf.xml
name="lan" default="allow">
name="domains" default="deny">
2、拨号规则配置
[root@acs ~]# vim /usr/local/freeswitch/etc/freeswitch/dialplan/default.xml
xml version="1.0" encoding="utf-8"?>
呼出规则-->
3、NAT穿透配置
(一)、freeswitch帮助终端穿越NAT解决方案
- SIP穿越
Freeswitch默认使用acl来判断对方是否处于NAT环境中,配置如下
[root@acs ~]# vim /usr/local/freeswitch/etc/freeswitch/sip_profiles/internal.xml
name="apply-nat-acl" value="nat.auto"/>
nat.auto是一个ACL,包含了RFC1918规定的私网地址,并去掉了本地网络的地址。当SIP终端注册时,通过比较contact地址是否包含在此ACL中来判定该终端是否处于NAT背后,如果是那么它就把contact地址自动替换为SIP包的来源地址,后边的呼叫就可以正常抵达。
在实际工作当中,当局域网内架设另一个无法直接互通的子网时,信令无法正常抵达子网终端,那么就需要改为无论何种情况都使用SIP包的来源地址作为用户的contact地址。
- RTP穿越
NAT环境下SIP终端SDP信息中的IP地址是私网地址,因此freeswitch无法直接发送RTP包,而NAT设备基本都只允许内网主机曾经接触过的外网主机发送的UDP数据包进入。FreeSWITCH使用了一个名为RTP自动调整的特性,在SIP协商时给对方一个可用的公网RTP地址,然后等待客户端发送RTP包,一旦FreeSWITCH收到RTP包后,就可以根据对方发包的地址给它发RTP包了。此类情况发生时,Log中可看到类似信息:
[root@acs ~]# more /usr/local/freeswitch/var/log/freeswitch/freeswitch.log |grep switch_rtp.c
4451c6b1-d422-40e0-af5f-f2547362f474 2018-05-24 11:20:53.277797 [INFO] switch_rtp.c:7268 Auto Changing audio port from 192.168.1.198:44978 to 61.51.110.204:44978
71ec152b-a453-4e89-9b16-fc4ecf991d38 2018-05-24 11:20:53.497801 [DEBUG] switch_rtp.c:4137 Starting timer [soft] 160 bytes per 20ms
71ec152b-a453-4e89-9b16-fc4ecf991d38 2018-05-24 11:20:55.397813 [INFO] switch_rtp.c:7268 Auto Changing audio port from 192.168.1.101:8074 to 61.51.110.204:8074
注意:此办法存在安全性问题,如某黑客向随机的RTP端口发数据包,FreeSWITCH收到后将远端地址调整到黑客的IP和端口,进而RTP数据全部跑歪了。所以为了防止这个问题,FreeSWITCH规定这种端口调整只能在电话开始的时候进行,且仅支持一次调整。自动调整的功能默认是开启的,配置如下:
[root@acs ~]# vim /usr/local/freeswitch/etc/freeswitch/sip_profiles/internal.xml
name="disable-rtp-auto-adjust" value="false"/>
或者仅针对个别的呼叫来禁用自动调整,在呼叫时设置通道变量"rtp_auto_adjust=false"来禁止
(二)、freeswitch处于NAT后面的解决方案
1、如果路由支持uPnP或NAT-PMP协议
FreeSWITCH支持通过uPnP或NAT-PMP协议在路由器上“打洞”,打洞完成后就知道自己将要映射的外网地址了,前提是路由器支持uPnp功能并开通。Freeswitch配置如下:
[root@acs ~]# vim /usr/local/freeswitch/etc/freeswitch/sip_profiles/external.xml
FreeSWITCH检测到NAT以后,设置Profile的外网SIP和RTP的IP,通过命令可查询Ext-SIP-IP和Ext-RTP-IP的值,如下:
freeswitch@VM_56_176_centos> sofia status profile external
=================================================================================================
Name external
Domain Name N/A
Auto-NAT false
DBName sofia_reg_external
Pres Hosts
Dialplan XML
Context public
Challenge Realm auto_to
RTP-IP 10.163.56.176
Ext-RTP-IP 123.207.172.132
SIP-IP 10.163.56.176
Ext-SIP-IP 123.207.172.132
URL sip:[email protected]:5080
BIND-URL sip:[email protected]:5080;maddr=10.163.56.176;transport=udp,tcp
…………………………………………
2、手动设置,当路由不支持uPnP和NAT-PMP协议是,需要手动设置,freeswitch配置如下:
[root@acs ~]# vim /usr/local/freeswitch/etc/freeswitch/sip_profiles/external.xml
或者
[root@acs ~]# vim /usr/local/freeswitch/etc/freeswitch/sip_profiles/external.xml
(三)其他NAT穿透相关设置
1、开启rport功能(默认是开启的)
[root@acs ~]# vim /usr/local/freeswitch/etc/freeswitch/sip_profiles/internal.xml
2、针对没有rport功能的终端,在reg.xml中加入
[root@acs ~]#
- 检查acl参数,确定没有阻挡
注意:此处做ACL控制,目前是全部放开,一旦发现可疑的攻击服务器的IP地址就需要加入到deny中阻止。
[root@acs ~]# vim /usr/local/freeswitch/etc/freeswitch/autoload_configs/acl.conf.xml
- 检查路由上的IP的端口映射
- 检查freeswitch机器的安全策略,确认表中端口
| 端口 |
协议 |
用途 |
备注 |
| 1719 |
UDP |
H.323 Gatekeeper RAS port |
|
| 1720 |
TCP |
H.323 Call Signaling |
|
| 3478 |
UDP |
STUN service |
Used for NAT traversal |
| 3479 |
UDP |
STUN service |
Used for NAT traversal |
| 5002 |
TCP |
MLP protocol server |
|
| 5003 |
UDP |
Neighborhood service |
|
| 5060 |
UDP & TCP |
SIP UAS |
Used for SIP signaling (Standard SIP Port, for default Internal Profile) |
| 5070 |
UDP & TCP |
SIP UAS |
Used for SIP signaling (For default "NAT" Profile) |
| 5080 |
UDP & TCP |
SIP UAS |
Used for SIP signaling (For default "External" Profile) |
| 8021 |
TCP |
ESL |
Used for mod_event_socket * |
| 16384-32768 |
UDP |
RTP/ RTCP multimedia streaming |
Used for audio/video data in SIP and other protocols |
| 5066 |
TCP |
Websocket |
Used for WebRTC |
| 7443 |
TCP |
Websocket |
Used for WebRTC |
三、网关配置
本次使用16O口鼎信网关
首次连接网关,本地电脑需配置成192.168.11.0/24段的地址,网线直连本地电脑和网关设备,在浏览器中访问http://192.168.11.1
首次登陆的默认用户名admin密码admin
1、修改本地网络
修改本地网络,是网络连接到本地网络中。“网络à本地网络”
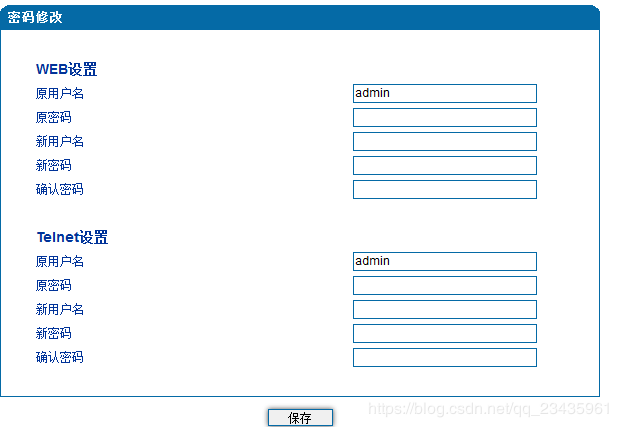
2、修改登陆密码
“安全设置à密码修改”,此处可以修改web登陆和telnet登陆的用户名和密码
3、SIP服务器配置
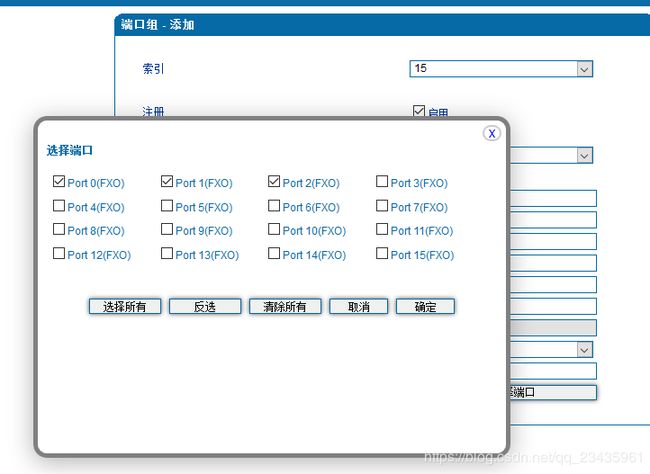
4、添加端口或端口组
把接电话的端口进行配置“端口”,也可以直接配置端口组“呼叫和路由à端口组”
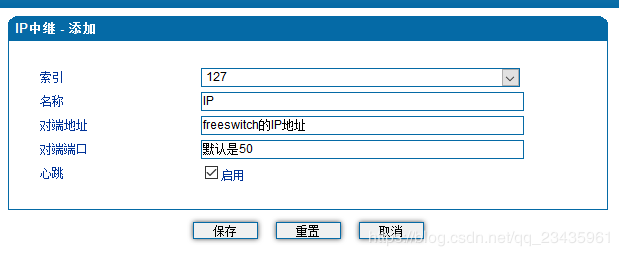
5、配置IP中继
“呼叫和路由àIP中继”
6、路由参数配置
7、配置IPàTel路由
本次是按端口配置的,这样每个坐席可固定座机电话号码
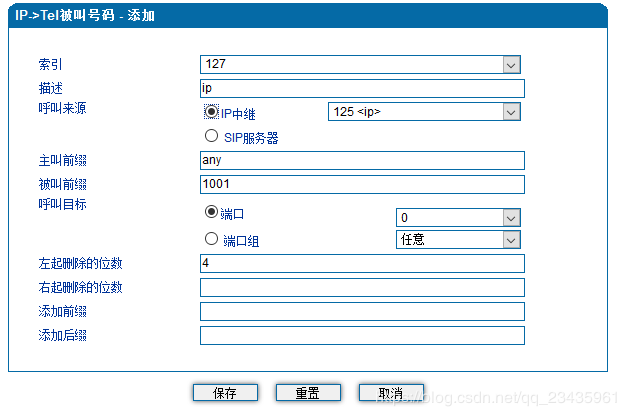
8、配置IPàTel被叫号码变更
9、保存完配置之后重启,并将网关接入本地网络
“工具à设备重启”
freeswitch拨号规则


