03.Spring Boot源码剖析:SpringApplication初始化 about spring-boot-1.5.10.RELEASE
在进行完源码的编译后,本节我们来看一下SpringApplication初始化过程
导入Spring Boot源码工程spring-boot

新建maven工程spring-boot-study-001
pom.xml文件如下:
  4.0.0
  com.kevin.springboot.study
  spring-boot-study-001
  0.0.1-SNAPSHOT

		org.springframework.boot
		spring-boot-starter-parent
		1.5.10.RELEASE


  jar


  	UTF-8
	UTF-8
	1.7

	1.2.8.RELEASE
	1.3.2

	5.1.45
	1.4.2

	1.1.0
	1.2.47


		org.springframework.boot
		spring-boot-starter


		org.springframework.boot
		spring-boot-starter-web


		org.springframework.boot
		spring-boot-starter-aop


		org.springframework.boot
		spring-boot-starter-jdbc


		mysql
		mysql-connector-java


		com.alibaba
		druid-spring-boot-starter
		${alibaba.druid.version}


		com.alibaba
		fastjson
		${alibaba.fastjson.version}


			    org.apache.maven.plugins
			    maven-compiler-plugin

			        1.7
			        1.7
			        UTF-8
新建Application.java文件
package com.kevin;

import org.springframework.boot.SpringApplication;
import org.springframework.boot.autoconfigure.SpringBootApplication;

@SpringBootApplication
public class Application {

	static {
		System.out.println("静态代码块");
	}

	{
		System.out.println("非静态代码块");
	}

	public Application(){
		System.out.println("无参构造函数");
	}

	public static void print(String content){
		System.out.println(content);
	}

	public static void main(String[] args) {
		print("Before springboot!");
		SpringApplication.run(Application.class, args);
		print("After springboot!");
	}

}
新建application.properties配置文件
server.port=8099
####################### MySQL #################################
spring.datasource.driver-class-name=com.mysql.jdbc.Driver
spring.datasource.url=jdbc\:mysql\://127.0.0.1\:3306/test?useUnicode\=true&characterEncoding\=UTF-8&zeroDateTimeBehavior\=convertToNull
spring.datasource.username=root
spring.datasource.password=root
#############################################################
spring.datasource.initialSize=1
spring.datasource.minIdle=5
spring.datasource.maxActive=10
spring.datasource.maxWait=60000
spring.datasource.timeBetweenEvictionRunsMillis=60000
spring.datasource.minEvictableIdleTimeMillis=300000
spring.datasource.validationQuery=select 1
spring.datasource.testWhileIdle=true
spring.datasource.testOnBorrow=false
spring.datasource.testOnReturn=false
spring.datasource.poolPreparedStatements=true
spring.datasource.maxPoolPreparedStatementPerConnectionSize=20
spring.datasource.filters=stat,wall,log4j
spring.datasource.connectionProperties=druid.stat.mergeSql=true;druid.stat.slowSqlMillis=5000
spring.datasource.useGlobalDataSourceStat=true
########################################################
spring.mvc.throw-exception-if-no-handler-found=true
spring.mvc.static-path-pattern=/*
spring.resources.static-locations=classpath:/static/
spring.thymeleaf.prefix=classpath:/templates/
spring.thymeleaf.suffix=.html
spring.thymeleaf.mode=LEGACYHTML5
spring.thymeleaf.encoding=UTF-8
spring.thymeleaf.cache=false
########################################################
log4j.rootCategory=DEBUG,stdout,DebugAppender,InfoAppender,ErrorAppender
log4j.debug=true
log4j.appender.stdout=org.apache.log4j.ConsoleAppender
log4j.appender.stdout.layout=org.apache.log4j.PatternLayout
log4j.appender.stdout.layout.ConversionPattern=[QC] %p [%t] %C.%M(%L) | %m%n
#logger input file
log4j.logger.DebugAppender.access=DEBUG
log4j.appender.DebugAppender=org.apache.log4j.DailyRollingFileAppender
log4j.appender.DebugAppender.File=../logs/a.log
log4j.appender.DebugAppender.layout=org.apache.log4j.PatternLayout
log4j.appender.DebugAppender.layout.ConversionPattern=%d-[TS] %p %t %c - %m%n

#logger input file
log4j.logger.InfoAppender.access=INFO
log4j.appender.InfoAppender=org.apache.log4j.DailyRollingFileAppender
log4j.appender.InfoAppender.File=../logs/b.log
log4j.appender.InfoAppender.layout=org.apache.log4j.PatternLayout
log4j.appender.InfoAppender.layout.ConversionPattern=%d-[TS] %p %t %c - %m%n

#error log input file
log4j.logger.ErrorAppender.access=ERROR
log4j.appender.ErrorAppender=org.apache.log4j.DailyRollingFileAppender
log4j.appender.ErrorAppender.File=../logs/c.log

log4j.appender.ErrorAppender.Append = true
log4j.appender.ErrorAppender.threshold = ERROR
log4j.appender.ErrorAppender.layout=org.apache.log4j.PatternLayout
log4j.appender.ErrorAppender.layout.ConversionPattern=%d{MM-dd HH:mm:ss.SSS} %c %-5p - %m%n

打个断点开始运行
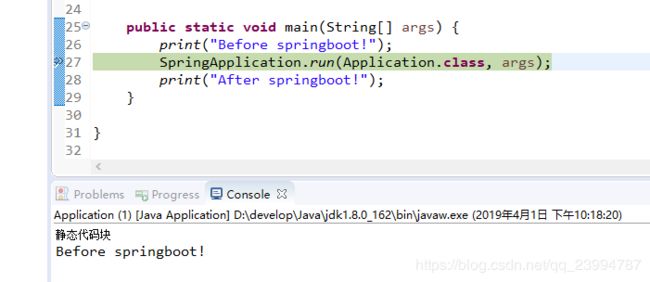
可以看到程序打印了静态代码块与Before springboot,我们F5跟进后,程序进入如下代码:
public static ConfigurableApplicationContext run(Object source, String... args) {
		return run(new Object[] { source }, args);
}
这个方法可用于使用默认设置从指定源运行@link springapplication。其中sources要加载的源。args通常从java main方法传递参数。继续跟进程序进入到可配置应用程序上下文方法。
public static ConfigurableApplicationContext run(Object[] sources, String[] args) {
		return new SpringApplication(sources).run(args);
}
静态助手,可使用默认设置和用户提供的参数从指定的源运行{@link SpringApplication}。继续F5

该方法会创建一个新的{@LinkSpringApplication}实例。应用程序上下文将从指定的源加载bean。实例可以在调用之前进行自定义。
	@SuppressWarnings({ "unchecked", "rawtypes" })
	private void initialize(Object[] sources) {
		if (sources != null && sources.length > 0) {
			this.sources.addAll(Arrays.asList(sources));
		}
		this.webEnvironment = deduceWebEnvironment();
		setInitializers((Collection) getSpringFactoriesInstances(
				ApplicationContextInitializer.class));
		setListeners((Collection) getSpringFactoriesInstances(ApplicationListener.class));
		this.mainApplicationClass = deduceMainApplicationClass();
	}
该方法涉及五步骤操作:
1.设置自定义源
2.演绎web环境

3.获取Spring工厂实例
4.设置应用程序监听器
5.推导主要应用类
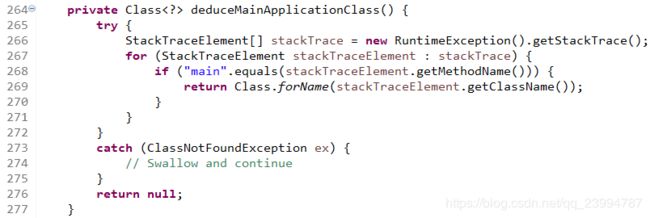
推导主要应用类是通过栈中加载的application包含的main的方法的类


执行完上述步骤后,继续F5程序进入方法run中
	public ConfigurableApplicationContext run(String... args) {
        //1.创建计时监控类
		StopWatch stopWatch = new StopWatch();
        //2.启动计时监控类
		stopWatch.start();
        //3.1初始化应用上下文
		ConfigurableApplicationContext context = null;
        //3.2初始化故障分析器
		FailureAnalyzers analyzers = null;
        //4.设置系统属性 `java.awt.headless` 的值,默认值为:true
		configureHeadlessProperty();
        //5.创建所有 Spring 运行监听器
		SpringApplicationRunListeners listeners = getRunListeners(args);
        //6.发布应用启动事件
		listeners.starting();
		try {
            //7.初始化默认应用参数类
			ApplicationArguments applicationArguments = new DefaultApplicationArguments(
					args);
            //8.根据运行监听器和应用参数来准备 Spring 环境
			ConfigurableEnvironment environment = prepareEnvironment(listeners,
					applicationArguments);
            //9.创建 Banner 打印类
			Banner printedBanner = printBanner(environment);
            //10.创建应用上下文
			context = createApplicationContext();
            //11.创建故障分析器
			analyzers = new FailureAnalyzers(context);
            //12.准备应用上下文
			prepareContext(context, environment, listeners, applicationArguments,
					printedBanner);
            //13.刷新应用上下文
			refreshContext(context);
            //14.应用上下文刷新后置处理
			afterRefresh(context, applicationArguments);
            //15.发布监听完成事件
			listeners.finished(context, null);
            //16.停止计时监控类
			stopWatch.stop();
            //17.打印启动日志
			if (this.logStartupInfo) {
				new StartupInfoLogger(this.mainApplicationClass)
						.logStarted(getApplicationLog(), stopWatch);
			}
            //18.返回content
			return context;
		}
		catch (Throwable ex) {
			handleRunFailure(context, listeners, analyzers, ex);
			throw new IllegalStateException(ex);
		}
	}
上边的方法会运行Spring应用程序,创建和刷新一个新的spring应用上下文,下面我们详细分解具体过程。
1.创建并启动计时监控类
StopWatch stopWatch = new StopWatch();
stopWatch.start();
其中StopWatch有start与stop两个关键方法,其源码如下:
        /**
	 * 默认启动任务
	 */
        public void start() throws IllegalStateException {
		start("");
	}

	/**
	 * 启动命名任务
	 */
	public void start(String taskName) throws IllegalStateException {
		if (this.running) {
			throw new IllegalStateException("Can't start StopWatch: it's already running");
		}
		this.running = true;
		this.currentTaskName = taskName;
        //获取当前系统毫秒数
		this.startTimeMillis = System.currentTimeMillis();
	}

	/**
	 * 停止命名任务
	 */
	public void stop() throws IllegalStateException {
		if (!this.running) {
			throw new IllegalStateException("Can't stop StopWatch: it's not running");
		}
        //运行时为当前系统毫秒数减去启动记录毫秒数
		long lastTime = System.currentTimeMillis() - this.startTimeMillis;
		this.totalTimeMillis += lastTime;
		this.lastTaskInfo = new TaskInfo(this.currentTaskName, lastTime);
		if (this.keepTaskList) {
			this.taskList.add(lastTaskInfo);
		}
		++this.taskCount;
		this.running = false;
		this.currentTaskName = null;
	}
从第2条注释stopWatch.start()到第16条注释stopWatch.stop()运行结束后,打印日志时通过如下方法获取计时器信息
	private StringBuilder getStartedMessage(StopWatch stopWatch) {
		StringBuilder message = new StringBuilder();
		message.append("Started ");
		message.append(getApplicationName());
		message.append(" in ");
		message.append(stopWatch.getTotalTimeSeconds());
		try {
			double uptime = ManagementFactory.getRuntimeMXBean().getUptime() / 1000.0;
			message.append(" seconds (JVM running for " + uptime + ")");
		}
		catch (Throwable ex) {
			// No JVM time available
		}
		return message;
	}
这个运行到最后的结果就是我们常见的日志最后一行:

2.初始化应用上下文和故障分析器
ConfigurableApplicationContext context = null;
FailureAnalyzers analyzers = null;
3.设置系统属性 java.awt.headless 的值
configureHeadlessProperty();
configureHeadlessProperty将headless值设置到java.awt.headless
设置该默认值为:true,Java.awt.headless = true 有什么作用?
对于一个 Java 服务器来说经常要处理一些图形元素,例如地图的创建或者图形和图表等。这些API基本上总是需要运行一个X-server以便能使用AWT(Abstract Window Toolkit,抽象窗口工具集)。然而运行一个不必要的 X-server 并不是一种好的管理方式。有时你甚至不能运行 X-server,因此最好的方案是运行 headless 服务器,来进行简单的图像处理。
参考:www.cnblogs.com/princessd8251/p/4000016.html
4.创建所有 Spring 运行监听器并发布应用启动事件
SpringApplicationRunListeners listeners = getRunListeners(args);
listeners.starting();
private SpringApplicationRunListeners getRunListeners(String[] args) {
Class[] types = new Class[] { SpringApplication.class, String[].class };
return new SpringApplicationRunListeners(logger, getSpringFactoriesInstances(
SpringApplicationRunListener.class, types, this, args));
}这个通过getSpringFactoriesInstances 方法来获取配置的监听器名称并实例化所有的类,其源码为:
	private  Collection getSpringFactoriesInstances(Class type) {
		return getSpringFactoriesInstances(type, new Class[] {});
	}

	private  Collection getSpringFactoriesInstances(Class type,
			Class[] parameterTypes, Object... args) {
		ClassLoader classLoader = Thread.currentThread().getContextClassLoader();
		// 使用名称并确保惟一以防止重复
		Set names = new LinkedHashSet(
				SpringFactoriesLoader.loadFactoryNames(type, classLoader));
		List instances = createSpringFactoriesInstances(type, parameterTypes,
				classLoader, args, names);
		AnnotationAwareOrderComparator.sort(instances);
		return instances;
} 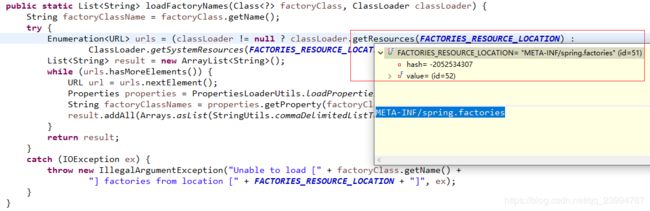
SpringApplicationRunListener 所有监听器配置在 spring-boot/META-INF/spring.factories 这个配置文件里面。

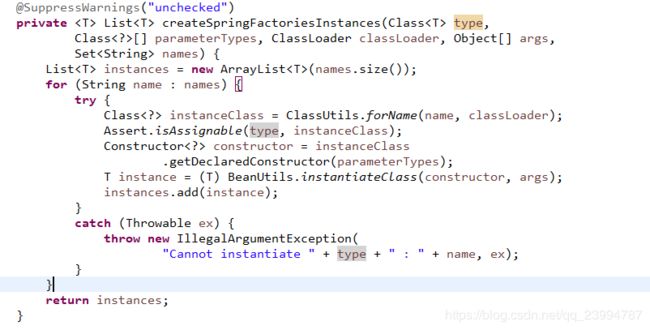
通过解析java源代码中的内部类名得到实例类,然后使用给定构造函数实例化类的方法。
	private final List listeners;

	SpringApplicationRunListeners(Log log,
			Collection listeners) {
		this.log = log;
		this.listeners = new ArrayList(listeners);
	}
得到监听集合后遍历启动
public void starting() {
		for (SpringApplicationRunListener listener : this.listeners) {
			listener.starting();
		}
}
事件发布运行侦听器EventPublishingRunListener实现了接口SpringApplicationRunListener的starting方法
	@Override
	@SuppressWarnings("deprecation")
	public void starting() {
		this.initialMulticaster
				.multicastEvent(new ApplicationStartedEvent(this.application, this.args));
	}
5.初始化默认应用参数类
ApplicationArguments applicationArguments = new DefaultApplicationArguments(args);DefaultApplicationArguments实现了ApplicationArguments应用参数接口
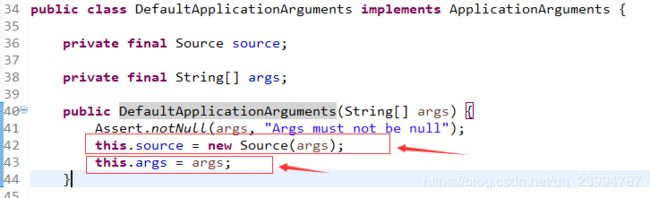
其中Source为DefaultApplicationArguments的一个私有内部类,该类继承了SimpleCommandLinePropertySource ,该类提供了字符串数组支持的命令行属性源实现。其源码为:
private static class Source extends SimpleCommandLinePropertySource {

		Source(String[] args) {
			super(args);
		}

		@Override
		public List getNonOptionArgs() {
			return super.getNonOptionArgs();
		}

		@Override
		public List getOptionValues(String name) {
			return super.getOptionValues(name);
		}

}
而SimpleCommandLinePropertySource 继承了类CommandLinePropertySource,该类是由命令行参数支持的{@link PropertySource}实现的抽象基类。
public class SimpleCommandLinePropertySource extends CommandLinePropertySource {

	/**
	 *创建一个新的单例属性源,它具有指定的命令行参数。
	 */
	public SimpleCommandLinePropertySource(String... args) {
		super(new SimpleCommandLineArgsParser().parse(args));
	}

	/**
	 * 创建一个新的单例属性源,它具有给定的名称,和指定的命令行参数。
	 */
	public SimpleCommandLinePropertySource(String name, String[] args) {
		super(name, new SimpleCommandLineArgsParser().parse(args));
	}
    .....
}
CommandLinePropertySource是一个抽象类,其继承了EnumerablePropertySource,EnumerablePropertySource实现能够询问其基础源对象以枚举所有可能的属性名称/值对。
public abstract class CommandLinePropertySource extends EnumerablePropertySource {

	/** 实例的默认名称 */
	public static final String COMMAND_LINE_PROPERTY_SOURCE_NAME = "commandLineArgs";

	/** 非选项参数的属性的默认名称 */
	public static final String DEFAULT_NON_OPTION_ARGS_PROPERTY_NAME = "nonOptionArgs";

	private String nonOptionArgsPropertyName = DEFAULT_NON_OPTION_ARGS_PROPERTY_NAME;


	/**
	 * 创建一个新的命令行属性源,其默认名称为commandLineArgs,并由给定的源对象支持。
	 */
	public CommandLinePropertySource(T source) {
		super(COMMAND_LINE_PROPERTY_SOURCE_NAME, source);
	}
    //......

}
EnumerablePropertySource也是一个抽象类,该类继承了PropertySource,PropertySource表示名称/值属性对的源的抽象基类。
public abstract class EnumerablePropertySource extends PropertySource {

	public EnumerablePropertySource(String name, T source) {
		super(name, source);
	}

	protected EnumerablePropertySource(String name) {
		super(name);
	}
    //....

}
public abstract class PropertySource {
protected final Log logger = LogFactory.getLog(getClass());
protected final String name;
protected final T source;
/**
* 使用给定的名称和源对象创建一个新的{@code PropertySource}。
*/
public PropertySource(String name, T source) {
Assert.hasText(name, "Property source name must contain at least one character");
Assert.notNull(source, "Property source must not be null");
this.name = name;
this.source = source;
}
/**
* 创建一个具有给定名称新实例作为底层源
*/
@SuppressWarnings("unchecked")
public PropertySource(String name) {
this(name, (T) new Object());
}
//.....
} 6.根据运行监听器和应用参数来准备 Spring 环境
ConfigurableEnvironment environment = prepareEnvironment(listeners, applicationArguments);6.1我们看一下环境准备器prepareEnvironment的源码
	private ConfigurableEnvironment prepareEnvironment(SpringApplicationRunListeners listeners,ApplicationArguments applicationArguments) {
		//1.获取或创建环境
		ConfigurableEnvironment environment = getOrCreateEnvironment();
		//2.配置环境
		configureEnvironment(environment, applicationArguments.getSourceArgs());
		//3.环境准备监听
		listeners.environmentPrepared(environment);
		if (!this.webEnvironment) {
			//4.将给定环境转换为标准环境。如果环境已经是一个标准环境,并且不是可配置的Web环境,则不执行转换,并且它将被不改变地返回。
			environment = new EnvironmentConverter(getClassLoader())
					.convertToStandardEnvironmentIfNecessary(environment);
		}
		return environment;
	}
首先我们看一下获取和和创建环境的源码
	private ConfigurableEnvironment getOrCreateEnvironment() {
        //如果环境已创建,则返回已创建的环境
		if (this.environment != null) {
			return this.environment;
		}
        //如果为web环境则创建servlet的启动环境
		if (this.webEnvironment) {
			return new StandardServletEnvironment();
		}
        //返回标准环境
		return new StandardEnvironment();
	}
其中StandardServletEnvironment的源码如下,其继承了类StandardEnvironment 并同时实现了接口ConfigurableWebEnvironment
public class StandardServletEnvironment extends StandardEnvironment implements ConfigurableWebEnvironment {

	/** servlet上下文init参数属性源名称 */
	public static final String SERVLET_CONTEXT_PROPERTY_SOURCE_NAME = "servletContextInitParams";

	/** Servlet配置init参数属性源名称 */
	public static final String SERVLET_CONFIG_PROPERTY_SOURCE_NAME = "servletConfigInitParams";

	/** JNDI属性源名称 */
	public static final String JNDI_PROPERTY_SOURCE_NAME = "jndiProperties";


	/**
	 * 使用超类提供的属性源以及适用于基于servlet的标准环境的属性源集进行自定义
	 *
	 */
	@Override
	protected void customizePropertySources(MutablePropertySources propertySources) {
		propertySources.addLast(new StubPropertySource(SERVLET_CONFIG_PROPERTY_SOURCE_NAME));
		propertySources.addLast(new StubPropertySource(SERVLET_CONTEXT_PROPERTY_SOURCE_NAME));
		if (JndiLocatorDelegate.isDefaultJndiEnvironmentAvailable()) {
			propertySources.addLast(new JndiPropertySource(JNDI_PROPERTY_SOURCE_NAME));
		}
		super.customizePropertySources(propertySources);
	}

    /**
    *初始化属性源
    */
	@Override
	public void initPropertySources(ServletContext servletContext, ServletConfig servletConfig) {
		WebApplicationContextUtils.initServletPropertySources(getPropertySources(), servletContext, servletConfig);
	}

}
其中StandardEnvironment的源码如下,其继承了类AbstractEnvironment,其源码如下:
public class StandardEnvironment extends AbstractEnvironment {

	/** 系统环境属性源名称 */
	public static final String SYSTEM_ENVIRONMENT_PROPERTY_SOURCE_NAME = "systemEnvironment";

	/** JVM系统属性源名称 */
	public static final String SYSTEM_PROPERTIES_PROPERTY_SOURCE_NAME = "systemProperties";


	/**
	 * 使用适用于任何标准Java环境的属性源集自定义
	 */
	@Override
	protected void customizePropertySources(MutablePropertySources propertySources) {
		propertySources.addLast(new MapPropertySource(SYSTEM_PROPERTIES_PROPERTY_SOURCE_NAME, getSystemProperties()));
		propertySources.addLast(new SystemEnvironmentPropertySource(SYSTEM_ENVIRONMENT_PROPERTY_SOURCE_NAME, getSystemEnvironment()));
	}

}
6.2 接下来环境配置器源码
	protected void configureEnvironment(ConfigurableEnvironment environment,
			String[] args) {
		configurePropertySources(environment, args);
		configureProfiles(environment, args);
	}
首先是配置属性源configurePropertySources:
	protected void configurePropertySources(ConfigurableEnvironment environment,String[] args) {
		MutablePropertySources sources = environment.getPropertySources();
		if (this.defaultProperties != null && !this.defaultProperties.isEmpty()) {
			sources.addLast(
					new MapPropertySource("defaultProperties", this.defaultProperties));
		}
		if (this.addCommandLineProperties && args.length > 0) {
			String name = CommandLinePropertySource.COMMAND_LINE_PROPERTY_SOURCE_NAME;
			if (sources.contains(name)) {
				PropertySource source = sources.get(name);
				CompositePropertySource composite = new CompositePropertySource(name);
				composite.addPropertySource(new SimpleCommandLinePropertySource( name + "-" + args.hashCode(), args));
				composite.addPropertySource(source);
				sources.replace(name, composite);
			}
			else {
				sources.addFirst(new SimpleCommandLinePropertySource(args));
			}
		}
	}
其次配置活动的配置文件
protected void configureProfiles(ConfigurableEnvironment environment, String[] args) {
		//确保初始化
		environment.getActiveProfiles();
		Set profiles = new LinkedHashSet(this.additionalProfiles);
		profiles.addAll(Arrays.asList(environment.getActiveProfiles()));
		environment.setActiveProfiles(profiles.toArray(new String[profiles.size()]));
}
7.获取banner对象及打印banner
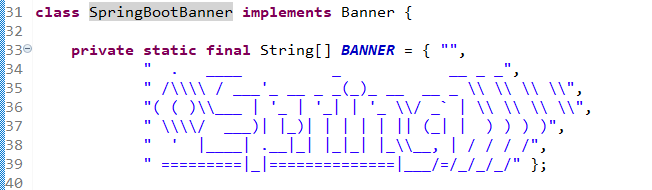
Banner printedBanner = printBanner(environment);我们来看一下程序是如何打印banner的
	private Banner printBanner(ConfigurableEnvironment environment) {
        //1.是否开启打印banner
		if (this.bannerMode == Banner.Mode.OFF) {
			return null;
		}
        //加载banner资源
		ResourceLoader resourceLoader = this.resourceLoader != null ? this.resourceLoader
				: new DefaultResourceLoader(getClassLoader());
        //实例化banner打印对象
		SpringApplicationBannerPrinter bannerPrinter = new SpringApplicationBannerPrinter(
				resourceLoader, this.banner);
        //日志输出
		if (this.bannerMode == Mode.LOG) {
			return bannerPrinter.print(environment, this.mainApplicationClass, logger);
		}
        //控制台输出
		return bannerPrinter.print(environment, this.mainApplicationClass, System.out);
	}
其中在加载banner资源的过程中,如果在resouces下配置了名为banner.txt的文件,则程序将会打印其里边的内容

,否则打印spring boot默认的banner内容
8.创建应用上下文
context = createApplicationContext();该方法的源码为:
/*
*  配置应用程序上下文
*  该方法根据不同的应用类型初始化不同的上下文应用类
*/
protected ConfigurableApplicationContext createApplicationContext() {
		Class contextClass = this.applicationContextClass;
		if (contextClass == null) {
			try {
                //如果为web环境则返回org.springframework.boot.context.embedded.AnnotationConfigEmbeddedWebApplicationContext
                //否则返回org.springframework.context.annotation.AnnotationConfigApplicationContext
				contextClass = Class.forName(this.webEnvironment ? DEFAULT_WEB_CONTEXT_CLASS : DEFAULT_CONTEXT_CLASS);
			}
			catch (ClassNotFoundException ex) {
				throw new IllegalStateException( "Unable create a default ApplicationContext, " + "please specify an ApplicationContextClass", ex);
			}
		}
                //使用类的无参构造函数实例化bean
		return (ConfigurableApplicationContext) BeanUtils.instantiate(contextClass);
}
9.初始化故障分析器
analyzers = new FailureAnalyzers(context);加载故障分析器中关键方法代码
        FailureAnalyzers(ConfigurableApplicationContext context, ClassLoader classLoader) {
		Assert.notNull(context, "Context must not be null");
		this.classLoader = (classLoader == null ? context.getClassLoader() : classLoader);
		this.analyzers = loadFailureAnalyzers(this.classLoader);
		prepareFailureAnalyzers(this.analyzers, context);
	}

	private List loadFailureAnalyzers(ClassLoader classLoader) {
		List analyzerNames = SpringFactoriesLoader.loadFactoryNames(FailureAnalyzer.class, classLoader);
		List analyzers = new ArrayList();
		for (String analyzerName : analyzerNames) {
			try {
				Constructor constructor = ClassUtils.forName(analyzerName, classLoader).getDeclaredConstructor();
				ReflectionUtils.makeAccessible(constructor);
				analyzers.add((FailureAnalyzer) constructor.newInstance());
			}
			catch (Throwable ex) {
				logger.trace("Failed to load " + analyzerName, ex);
			}
		}
		AnnotationAwareOrderComparator.sort(analyzers);
		return analyzers;
	}

	private void prepareFailureAnalyzers(List analyzers, ConfigurableApplicationContext context) {
		for (FailureAnalyzer analyzer : analyzers) {
			prepareAnalyzer(context, analyzer);
		}
	}

	private void prepareAnalyzer(ConfigurableApplicationContext context, FailureAnalyzer analyzer) {
		if (analyzer instanceof BeanFactoryAware) {
			((BeanFactoryAware) analyzer).setBeanFactory(context.getBeanFactory());
		}
	}
10.准备应用上下文
prepareContext(context, environment, listeners, applicationArguments,printedBanner);该方法的源码为:
private void prepareContext(ConfigurableApplicationContext context,ConfigurableEnvironment environment, SpringApplicationRunListeners listeners,ApplicationArguments applicationArguments,Banner printedBanner) {
//1.绑定环境到上下文
context.setEnvironment(environment);
//2.配置上下文的 bean 生成器及资源加载器
postProcessApplicationContext(context);
//3.为上下文应用所有初始化器
applyInitializers(context);
//4.触发所有 SpringApplicationRunListener 监听器的 contextPrepared 事件方法
listeners.contextPrepared(context);
//5.记录启动日志
if (this.logStartupInfo) {
logStartupInfo(context.getParent() == null);
logStartupProfileInfo(context);
}
//6.添加特定于引导的单例bean
context.getBeanFactory().registerSingleton("springApplicationArguments", applicationArguments);
if (printedBanner != null) {
context.getBeanFactory().registerSingleton("springBootBanner", printedBanner);
}
//7.加载所有资源
Set11.刷新应用上下文
refreshContext(context);该方法源码为:
private void refreshContext(ConfigurableApplicationContext context) {
        //刷新应用上下文
		refresh(context);
        //注册关闭钩子
		if (this.registerShutdownHook) {
			try {
				context.registerShutdownHook();
			}
			catch (AccessControlException ex) {
				// Not allowed in some environments.
			}
		}
}

protected void refresh(ApplicationContext applicationContext) {
		Assert.isInstanceOf(AbstractApplicationContext.class, applicationContext);
		((AbstractApplicationContext) applicationContext).refresh();
}

AbstractApplicationContext中refresh方法源码如下

public void refresh() throws BeansException, IllegalStateException {
		synchronized (this.startupShutdownMonitor) {
			// 准备此上下文以进行刷新
			prepareRefresh();

			// 告诉子类刷新内部bean工厂
			ConfigurableListableBeanFactory beanFactory = obtainFreshBeanFactory();

			// 准备bean工厂以在此上下文中使用。
			prepareBeanFactory(beanFactory);

			try {
				// 允许在上下文子类中对bean工厂进行后处理。
				postProcessBeanFactory(beanFactory);

				// 在上下文中调用注册为bean的工厂处理器。
				invokeBeanFactoryPostProcessors(beanFactory);

				// 注册拦截bean创建的bean处理器
				registerBeanPostProcessors(beanFactory);

				// 初始化此上下文的消息源
				initMessageSource();

				// 初始化此上下文的事件多播器
				initApplicationEventMulticaster();

				// 在特定的上下文子类中初始化其他特殊bean。
				onRefresh();

				// 检查监听器bean并注册它们。
				registerListeners();

				// 实例化所有剩余(非延迟初始化)单例。
				finishBeanFactoryInitialization(beanFactory);

				// 发布相应的事件
				finishRefresh();
			}

			catch (BeansException ex) {
				if (logger.isWarnEnabled()) {
					logger.warn("Exception encountered during context initialization - "+ "cancelling refresh attempt: " + ex);
				}

				// 销毁已创建的单例资源
				destroyBeans();

				// 重置'有效'标志。
				cancelRefresh(ex);

				// 向调用者传播异常.
				throw ex;
			}

			finally {
                //重置Spring核心中常见的内部缓存,因为我们可能不再需要单例bean的元数据了...
				resetCommonCaches();
			}
		}
}
12.应用上下文刷新后置处理
afterRefresh(context, applicationArguments);protected void afterRefresh(ConfigurableApplicationContext context, ApplicationArguments args) {
callRunners(context, args);
}private void callRunners(ApplicationContext context, ApplicationArguments args) {
List13.通知监听完成
listeners.finished(context, null);14.停止计时监控类
stopWatch.stop();15.打印启动日志
if (this.logStartupInfo) {
	new StartupInfoLogger(this.mainApplicationClass).logStarted(getApplicationLog(), stopWatch);
}
16.返回应用程序上下文
return context;以上就是SpringApplication的run方法启动全过程的粗略分析,希望能给大家提供一点参考和思路,也希望能给正在 Spring Boot 学习路上的朋友一点收获。