使用StringRedisTemplate保存的value前面有很多空格的坑
今天突然想着把旧RedisClient工具类更新一下,
因为旧写法获取环境配置用的是读取properties,不是读取环境的active,出过坑,出于装逼的想法就干脆把整个都重写吧,
使用更简洁的StringRedisTemplate去做,反正底层也是用的jedis,代码看起来也更简洁一些。
然后就开始写了,接好之后开始验证,工具类部分如下
@Component
public class RedisClient {


    private static StringRedisTemplate stringRedisTemplate;


    @Autowired
    public void setRedisTemplate(StringRedisTemplate stringRedisTemplate) {
        this.stringRedisTemplate = stringRedisTemplate;
    }


    public static void setString(final String key, final String value,
                                   final int expire) {
        stringRedisTemplate.opsForValue().set(key,value,expire);
    }

    public static String getString(final String key) {
        return stringRedisTemplate.opsForValue().get(key);
    }
}
由于RedisClient使用的地方很多,所以将stringRedisTemple注入static,这样子只要改工具类,引用的地方都不用改
===============================================================================================
接着在测试的时候刚好有一行代码是获取key,然后parseInt,然而代码缺报错
String string = RedisClient.getString("key");
int i = Integer.parseInt(string);
遂使用强大的debug调戏了一下,发现string就是"1",没毛病呀,于是开始怀疑自己对parseInt是不是理解的不到位,换了个Integer.vakyeOf 但是还是报错,debug如图
================================================================================================
先透露一下答案,答案是用错方法了,应该使用第一个set,而不是第二个
既然是这种用眼睛看不出来的问题,那就深度调试一下吧,将断点打在
opsForValue().set()的方法上,使用idea ctrl+alt+B可以看到执行方法在DefaultValueOperations#set
value被定位到this.rawValue()方法,代码如下
byte[] rawValue(Object value) {
    return this.valueSerializer() == null && value instanceof byte[] ? (byte[])((byte[])value) : this.valueSerializer().serialize(value);
}
继续往下跟,代码从RedisSerializer#serialize()到了StringRedisSerializer#serialize(),代码如下,也就是常规的getBytes没什么特别
public byte[] serialize(String string) {
    return string == null ? null : string.getBytes(this.charset);
}
断点跳出来,发现rawValue={49} 也就是1 没问题
接着断点到
RedisConnection#setRange() 实现类是DefaultStringRedisConnection#setRange()
没有错,来到这里,细心的观众可能已经发现了问题所在,但是想我这种最近眼睛有点疼的还是没发现问题!
由于使用的是集群所以接着代码来到了
JedisClusterConnection#setRange()->BinaryJedisCluster#setRange()->Jedis.setrange()
由此我们也可以知道,stringRedisTemplate底层使用的是jedis
接着代码来到了
BinaryJedis#setrange->BinaryClient#sendCommand
在sendCommand之前,代码基本上都是一路透传而已,没什么特殊的地方,到了BinaryClient开始特殊一点
public void setrange(byte[] key, long offset, byte[] value) {
    this.sendCommand(Command.SETRANGE, new byte[][]{key, Protocol.toByteArray(offset), value});
}
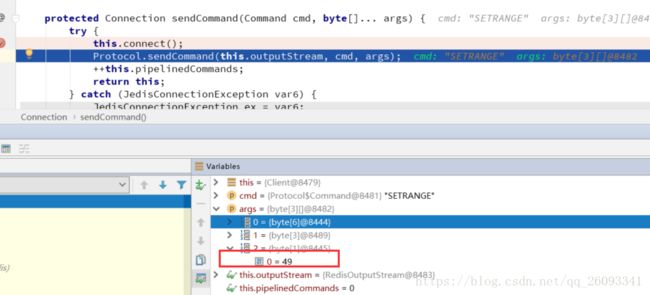
protected Connection sendCommand(Command cmd, byte[]... args) {
    try {
        this.connect();
        Protocol.sendCommand(this.outputStream, cmd, args);
        ++this.pipelinedCommands;
        return this;
    } catch (JedisConnectionException var6) {
        JedisConnectionException ex = var6;

        try {
            String errorMessage = Protocol.readErrorLineIfPossible(this.inputStream);
            if (errorMessage != null && errorMessage.length() > 0) {
                ex = new JedisConnectionException(errorMessage, ex.getCause());
            }
        } catch (Exception var5) {
            ;
        }

        this.broken = true;
        throw ex;
    }
}
开始获取JedisConnection,也就是到这里,"1"的byte数组还是对的
继续往下走,到了
Jedis.Connection#getIntegerReply()
-------------------------------------
public Long getIntegerReply() {
    this.flush();
    --this.pipelinedCommands;
    return (Long)this.readProtocolWithCheckingBroken();
}
-----------------------------------------------------------
protected void flush() {
    try {
        this.outputStream.flush();
    } catch (IOException var2) {
        this.broken = true;
        throw new JedisConnectionException(var2);
    }
}
-----------------------------------------------------------------------------------------
接着代码到了RedisOutPutStream#flush()
-----------------------------------------------------------------------------------------
public void flush() throws IOException {
    this.flushBuffer();
    this.out.flush();
}
-----------------------------------------------------------------------------------------
public void flush() throws IOException {
    this.flushBuffer();
    this.out.flush();
}
------------------------------------------------------------------------------------------
private void flushBuffer() throws IOException {
    if (this.count > 0) {
        this.out.write(this.buf, 0, this.count);
        this.count = 0;
    }

}
对socket这一套还记得的,可能知道,从建立连接到flush出去,代码到这里已经结束了,也就是问题出在buf这里,接下来由于代码太多,我就不多说了,其实就是buf前面被莫名奇妙的补了600个0
protected final byte[] buf;
然后这个时候我定睛一看,原来答案一早就告诉我了,一直用的是setrange,所以回到最初的
ValueOperations 看了一下set方法,分别有
void set(K var1, V var2);
void set(K var1, V var2, long var3, TimeUnit var5);
void set(K var1, V var2, long var3);
这里本身代码里面没有解释,差了一下官方文档,发现
我所使用的void set(K var1, V var2, long var3);意思是
将value从指定的位置开始覆盖原有的值。如果指定的开始位置大于字符串长度,先补空格在追加。
而一开始为什么我要用它呢?因为懒,懒的写个TimeUnit,以为默认是ms,谁知道spring会这么坑~
在这里我想说什么呢?不要学我的懒,更重要的是别学我的瞎!!!


