Spring Boot 实践之九 Spring Boot 缓存管理(默认缓存管理/缓存注解/Spring Boot整合Redis缓存实现/自定义Redis缓存序列化机制)
Spring Boot 实践之九 Spring Boot 缓存管理
缓存是分布式系统中的重要组件,主要解决数据库数据的高并发访问。在实际开发中,尤其是用户访问量较大的网站,用户对高频热点数据的访问非常频繁,为了提高服务器访问性能、减少数据库的压力、提高用户体验,使用缓存显得尤为重要。
本章将针对Spring Boot的缓存管理进行介绍,并完成与Redis缓存中间件的整合使用。
1 Spring Boot默认缓存管理
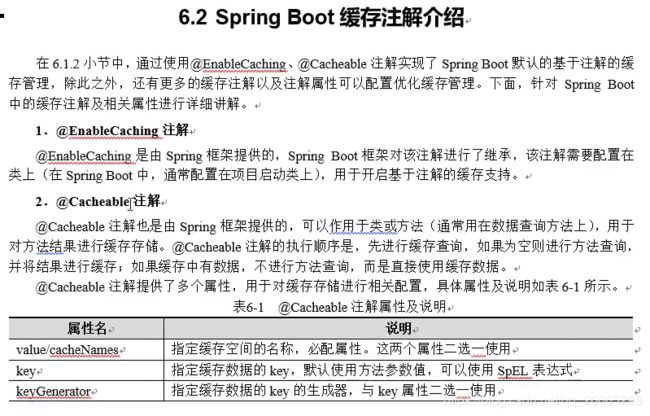
Spring Boot 管理缓存的枋心是将缓存应用于操作数据的方法中,从 而减速少操作数据的次数,同时不会对程序本身造成任何干扰。继承了Spring框架的缓存管理功能,通过使用@EnableCaching注解开启基于注解的缓存支持,Spring Boot可以启动缓存管理的自动化配置。下面我们将针对Spring Boot的默认缓存管理进行讲解。
1.1 基础环境搭建
使用缓存的主要目的是减小数据库数据的访问压力、提高用户体验。为此,这里我们结合数据库的访问操作对Spring Boot的缓存管理进行演示说明。
-
准备数据
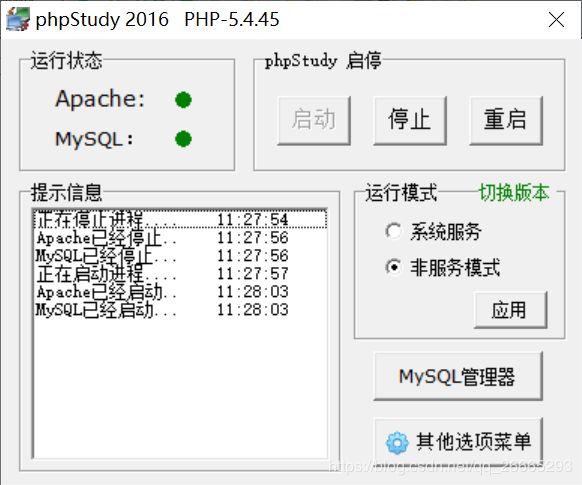
- 启动PHPSTUDY,利用我们之前创建好的MYSQL数据库
- 运行SQLyogl,查阅数据库及表数据是否正常。关于数据的创建和访问如有疑问请参考前面章节。如图:

-
创建项目
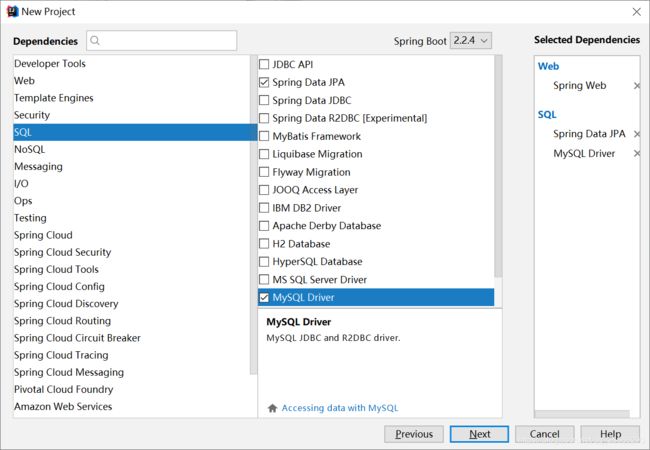
- 1)使用Spring Initializr方式创建一个Spring Boot项目chapter06,这里将Group设置为com.itheima, Artifact,在Dependencies依赖选择项中JPA依赖、MySQL依赖和Web依赖。依赖选择如图:
-
2)编写数据库表对应的实体类。在chapter06中创建名为com.itheima.domain的包,在该包下针对数据库表t_coment编写对应的实体类 Comment,并使用JPA相关注解配置映射关系。Comment.java内容如下:
package com.itheima.domain; import javax.persistence.*; //步骤2:添加@Entity注解,指定Comment类与数据库中哪张表映射 @Entity(name = "t_comment") public class Comment { //步骤1:创建与数据库对应的属性 @Id //表明映射对应的主键id @GeneratedValue(strategy = GenerationType.IDENTITY) //设置主键自增策略 private Integer id; private String content; private String author; @Column(name = "a_id") //因为名称不一样,指定aId映射的表字段名为a_id",如果 一致,可以不用此注解。 private Integer aId; //步骤3:按Alt+Insert键,选择所有变量生成相关的Getter and Setter方法 public Integer getId() { return id; } public void setId(Integer id) { this.id = id; } public String getContent() { return content; } public void setContent(String content) { this.content = content; } public String getAuthor() { return author; } public void setAuthor(String author) { this.author = author; } public Integer getaId() { return aId; } public void setaId(Integer aId) { this.aId = aId; } //步骤4:按Alt+Insert键,选择所有变量生成相关的toString()方法 @Override public String toString() { return "Comment{" + "id=" + id + ", content='" + content + '\'' + ", author='" + author + '\'' + ", aId=" + aId + '}'; } } -
3)编写数据库操作的Repository接口文件。
-
在chapter06中的com.itheima包下创建名为repository的包,并在该包下创建一个用于操作Commetn实体的Repository接口文件,CommentRepository.java文件内容如下:
package com.itheima.repository;

import com.itheima.domain.Comment;
import org.springframework.data.jpa.repository.JpaRepository;
import org.springframework.data.jpa.repository.Modifying;
import org.springframework.data.jpa.repository.Query;

//步骤1:声明是JpaRepository接口,操作的实体为Comment,主键的数据类型为Integer
public interface CommentRepository extends JpaRepository<Comment,Integer>{
    //加入@Modifying ,表明这是更新操作
    @Modifying
    //步骤3:根据修改方法的使用,利用JPA方法写数据库操作语句@Query
    @Query("update t_comment c set c.author = ?1 where id=?2")//1?表示该占位符等于下句话的第1个参数author,?2表示该占位符等于第2个参数id
    //步骤2:根据评论id修改评论作者author
    public int updateComment(String author,Integer id);
}
-
-
编写业务操作类Service文件,在com.itheima创建service的包,并在该包下创建一个用于Commnet相关业务操作的Service实体类,CommentService.java内容如下:
//业务操作类,实现查询、删除、更新操作 package com.itheima.service; import com.itheima.domain.Comment; import com.itheima.repository.CommentRepository; import org.hibernate.annotations.Cache; import org.springframework.beans.factory.annotation.Autowired; import org.springframework.cache.annotation.CacheEvict; import org.springframework.cache.annotation.CachePut; import org.springframework.cache.annotation.Cacheable; import org.springframework.stereotype.Service; import java.util.Optional; //步骤1:加入@Service注解,生成实例,存入容器中 @Service public class CommentService { //步骤3:注入@Autowired 注解:可以对实例对象commentRepository进行标注,让 spring 完成 bean 自动装配的工作 @Autowired //步骤2;引入CommentRepository类实例对象,用来完成后续的数据操作 private CommentRepository commentRepository; /* * 步骤id查询,返回Comment对象 * */ public Comment findById(Integer id){ Optional<Comment> byId = commentRepository.findById(id); if(byId.isPresent()){ //判断是否有值 return byId.get(); } return null;//没值返回空值 } /* * 步骤5:实现更新操作 * */ public int updateComment(Comment comment){//更新操作有无返回值均可 //updateComment为CommentRepository定义的方法,传递作者和id两个参数 int i = commentRepository.updateComment(comment.getAuthor(), comment.getId()); return i; } /* * 步骤6:实现删除操作 * */ public void deleteComment(Integer id){ commentRepository.deleteById(id); } } -
编写Web访问层Controll文件,在com.itheima创建包controller的包,并在该包下创建一个用于Comment访问的Controller实体类,CommentController.java内容如下:
//编写Web访问层,实现查询、更新、删除控制
package com.itheima.controller;

import com.itheima.domain.Comment;
import com.itheima.service.CommentService;
import org.springframework.beans.factory.annotation.Autowired;
import org.springframework.web.bind.annotation.GetMapping;
import org.springframework.web.bind.annotation.PathVariable;
import org.springframework.web.bind.annotation.RestController;

//步骤1:加入组合注解@RestController,相当于@Controller+@ResponseBody两个注解的结合
//@Controller 表明了这个类是一个控制器类。注入服务
//@ResponseBody 表示方法的返回值直接以指定的格式写入Http response body中,而不是解析为跳转路径
@RestController
public class CommentController {
    //步骤2:使用@Autowired对commentService进行标注,让 spring 完成 bean 自动装配的工作
    @Autowired
    private CommentService commentService;
    /*
     * 步骤3:实现查询控制
     * */
    @GetMapping("/get/{id}")//这里的id为路径访问传递过来的值
    public Comment findById(@PathVariable("id") Integer id){//@PathVariable*是spring3.0的一个新功能:接收请求路径中占位符的值
        Comment comment = commentService.findById(id);
        return comment;
    }

    /*
     * 步骤4:实现更新操作,需要接收两个参数
     * */
    @GetMapping("/update/{id}/{author}")
    public int updateComment(@PathVariable("id") int id,@PathVariable("author") String author){
        Comment comment = commentService.findById(id);
        comment.setAuthor(author);
        int i = commentService.updateComment(comment);
        return i;
    }

    /*
     * 步骤4:实现删除操作,需要接收id参数
     * */
    @GetMapping("/delete/{id}")
    public void deleteById(@PathVariable("id") Integer id){
        commentService.deleteComment(id);
    }
}
这里我们定义了一个CommentController评论管理控制类,使用注入的CommentService对象完成对Comment评论数据的查询、修改和删除操作。
-
编写配置文件
在项目全局配置文件application.properties中编写对应的数据库连接配置,内容如下:
#MySQL数据库连接配置,请根据自己的数据库配置修正端口,用户名和密码等参数 spring.datasource.url=jdbc:mysql://localhost:3306/springbootdata?serverTimezone=UTC spring.datasource.username=root spring.datasource.password=root #显示使用JPA进行数据库查询的SQL语句 spring.jpa.show-sql=true -
项目测试
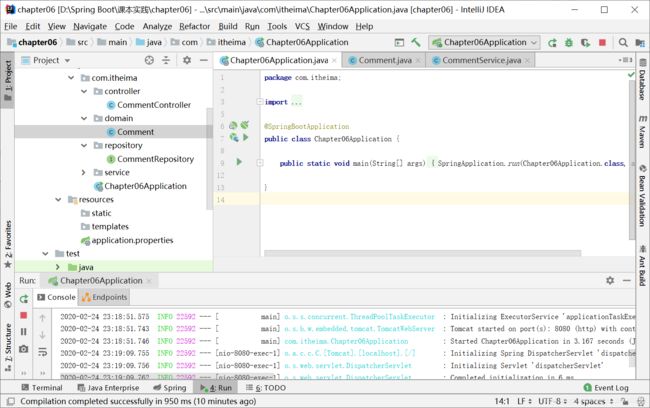
运行项目主程序Chapter06Application,正常调试项目启动程序 ,如图:
浏览器访问:http://localhost:8080/get/1,效果如图:

说明:在application.properties里面配置
server.servlet.encoding.charset=UTF-8
server.servlet.encoding.force=true
server.servlet.encoding.enabled=true
可解决部分浏览器访问乱码的问题
分析:http://localhost:8080/get/1会通过在CommentController的findById查询一个comment对象,并把它的响应反馈给前台。对该页面进行刷新,则控制台会访问数据库一次。多次刷新则多次访问。如图:

当用户增加,数据规模越来越大时,数据库的操作会直接影响用户的体验。此时,使用缓存往往是解决这一问题的非常好的一种手段。下一节我们来开启默认缓存
1.2 Spring Boot默认缓存体验
在前面搭建的Web应用基础上,开启Spring Boot默认支持的缓存
-
步骤1:在项目启用类前面使用添加@EnableCaching注解,开启Spring Boot默认缓存的管理
@EnableCaching -
步骤2:使用@Cacheable注解对数据操作方法进行缓存管理。这里,我们将@Cacheable注解标注在Service(业务)类CommentService的查询方法上。
//使用@Cacheable注解对数据操作方法进行缓存管理 @Cacheable(cacheNames = "comment") //把当前根据id查询的结果Comment对象存放在Spring Boot默认缓存中名为comment的名称空间(namespace)中,对应缓存的唯一标识默认为方法参数id的值 public Comment findById(Integer id){ -
步骤3,重启项目主程序类,并用浏览器访问网址http://localhost:8080/get/1,然后多次刷新,我们可以看到控制台显示如图:
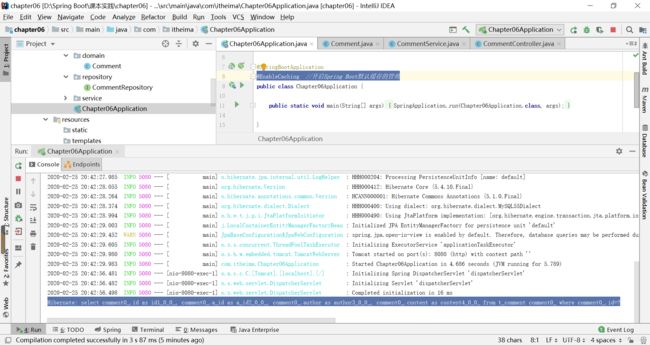
说明:后几次刷新查看的Web内容,默认访问的是缓存内容而不需要再次访问数据库。
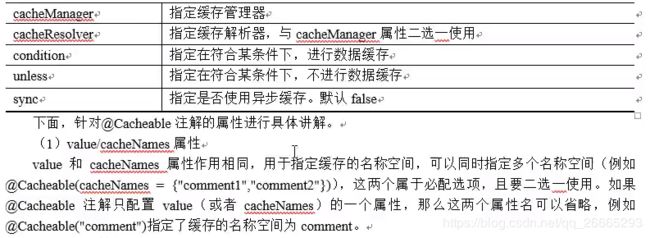
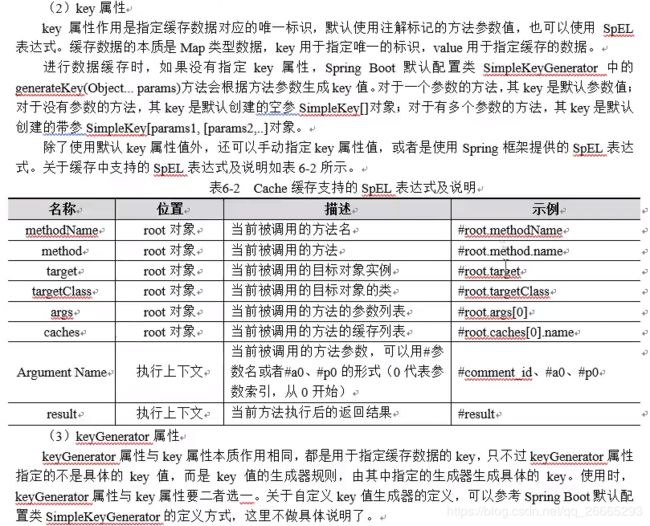
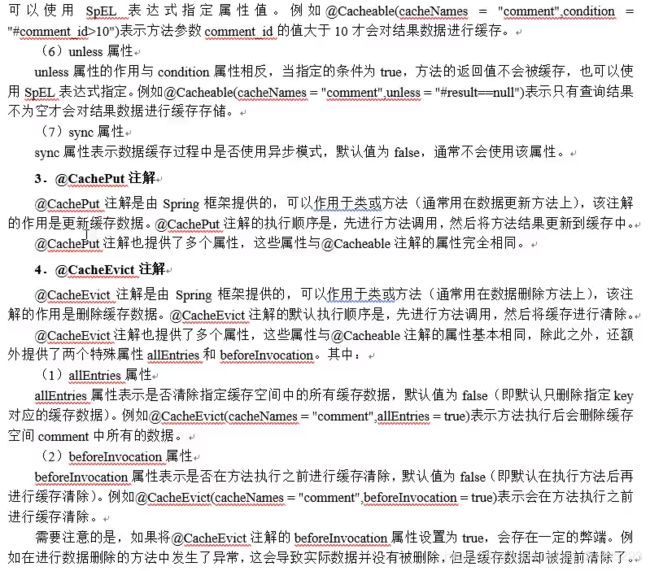
2 Spring Boot缓存注解介绍


3 Spring Boot整合Redis缓存实现
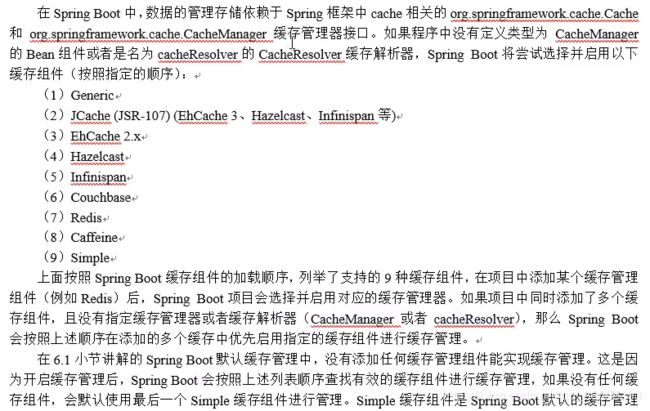
3.1 Spring Boot 支持的缓存组件

3.2 基于注解的Redis缓存实现
我们在前面第1小节Spring Boot默认缓存管理的基础上引入Redis缓存组件,使用基于注解的方式讲解Spring Boot整合Redis缓存的具体实现。
-
步骤1:在项目的pom.xml文件中添加Spring Data Redis依赖启动器。
<dependency> <groupId>org.springframework.bootgroupId> <artifactId>spring-boot-starter-data-redisartifactId> dependency> -
步骤2:Redis服务连接配置
- 1):开启Redis服务。进入之前使用的Redis-x64-3.2.100的文件包中,如图:

说明:redis-server.exe用于开启Redis服务,redies-cli.exe用于开启客户端工具。
-
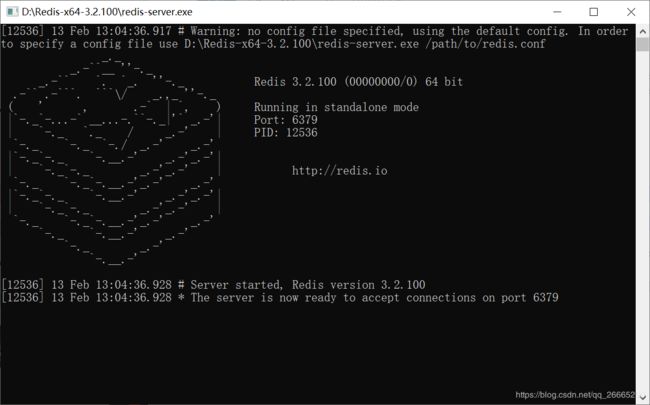
2):双击redis-server.exe指令开启Redis服务。效果如图所示:
-
3)使用一个Redis客户端可视化管理工具Redis Desktop Manager来连接Redis服务进行管理。安装后执行效果如图:

说明:name可自定义,Host为本机时,可写为127.0.0.1,端口默认为6379
-
单击OK,即可进入可视化界面。

-
4)在项目的全局配置文件中application.properties添加Redis服务的连接配置。
# Redis服务地址
spring.redis.host=127.0.0.1
# Redis服务器连接端口
spring.redis.port=6379
# Redis连接密码(默认为空)
spring.redis.password=
-
-
步骤3:使用@Cacheable、@CachePut、@CacheEvict注解定制缓存管理(参考:https://blog.csdn.net/u012240455/article/details/80844361 )。对CommentService类中的方法进行修改,修改后的内容如文件6-7所示。
//业务操作类,实现查询、删除、更新操作 package com.itheima.service; import com.itheima.domain.Comment; import com.itheima.repository.CommentRepository; import org.hibernate.annotations.Cache; import org.springframework.beans.factory.annotation.Autowired; import org.springframework.cache.annotation.CacheEvict; import org.springframework.cache.annotation.CachePut; import org.springframework.cache.annotation.Cacheable; import org.springframework.stereotype.Service; import org.springframework.transaction.annotation.Transactional; import java.util.Optional; //步骤1:加入@Service注解,生成实例,存入容器中 @Service public class CommentService { //步骤3:注入@Autowired 注解:可以对实例对象commentRepository进行标注,让 spring 完成 bean 自动装配的工作 @Autowired //步骤2;引入CommentRepository类实例对象,用来完成后续的数据操作 private CommentRepository commentRepository; /* * 步骤id查询,返回Comment对象 * */ //6.1.2 使用@Cacheable注解对数据操作方法进行缓存管理 @Cacheable(cacheNames = "comment",unless = "#result==null") //把当前根据id查询的结果Comment对象存放在Spring Boot默认缓存中名为comment的名称空间(namespace)中,对应缓存的唯一标识默认为方法参数id的值 。 public Comment findById(Integer id){ Optional<Comment> byId = commentRepository.findById(id); if(byId.isPresent()){ //判断是否有值 return byId.get(); } return null;//没值返回空值 } /* * 步骤5:实现更新操作 * */ @CachePut(cacheNames = "comment",key = "#result") public Comment updateComment(Comment comment){//更新操作有无返回值均可 //updateComment为CommentRepository定义的方法,传递作者和id两个参数 int i = commentRepository.updateComment(comment.getId(),comment.getAuthor()); return i; } /* * 步骤6:实现删除操作 * */ @CacheEvict(cacheNames = "comment") public void deleteComment(Integer id){ commentRepository.deleteById(id); } } -
步骤4:启动项目,通过浏览器访:“http://localhost:8080/get/1”,发现浏览器数据响应错误,同时控制台出现异常信息。提示信息要求对应Comment实体类必须实现序列化:DefaultSerializer requires a Serializable payload but received an object of type
-
步骤5:将缓存对象实现序列化:对Comment类进行改进:
public class Comment {修改为:
public class Comment implements Serializable {实现对实体类对象进行缓存存储时先实现序列化(一般基本数据类型不需要序列化)。
-
再次启动项目,运行基本注解的Redis缓存查询测试,测试效果如图:

多次刷新,可以从控制台看到,数据库只执行了一次SQL语句。

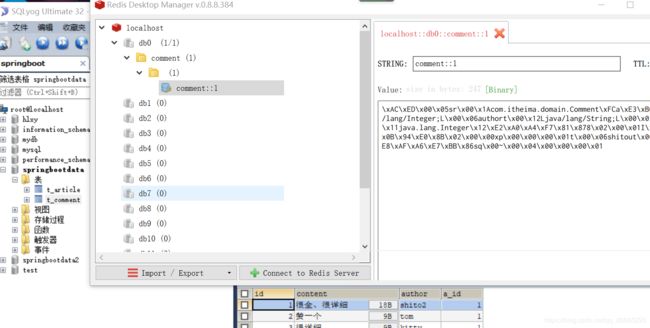
打开Redis客户端可视化管理工具Redis Desktop Manager连接本地启用的Redis服务,查看具体的数据缓存效果。如图:
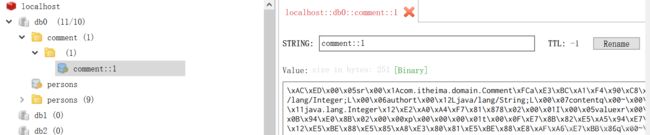
可以看出,执行findById()方法查询出的用户评论信息Comment正确 存储到了Redis缓存库中名为comment的名称空间下。其唯一标识key值 是以comment::1的字符串形式体现的,而value值 则是以经过JDK默认序列格式化后的HEX格式存储。
-
步骤6:实践更新操作:
-
1)在CommentService添加事务支持
@Transactional
public class CommentService {
访问http://localhost:8080/update/1/shitou效果如图:
-
并在控制台可以看到update语句执行:
Hibernate: update t_comment set author=? where id=?
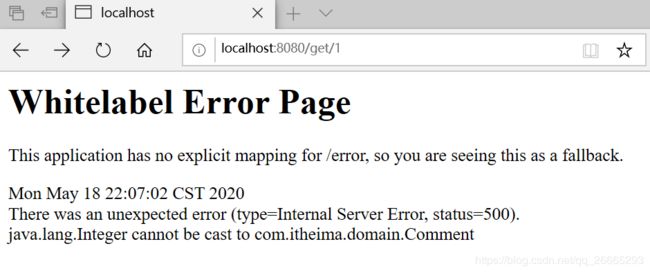
但想重新访问第1条记录时显示500错误
http://localhost:8080/get/1
-
2)这是更新访问返回结果为整形i值 ,整形不能转换为Comment存入缓存。修改CommentService的更新操作方法为:
-
@CachePut(cacheNames = "comment",key = "#result.id") public Comment updateComment(Comment comment){ int i = commentRepository.updateComment(comment.getAuthor(), comment.getId()); OptionalbyId = commentRepository.findById(comment.getId()); if(byId.isPresent()){ //判断是否有值 return byId.get(); } return null;//没值返回空值 } -
-
2)修改CommentController的更新操作方法及其返回值:
public Comment updateComment(@PathVariable("id") int id,@PathVariable("author") String author){ Comment comment = commentService.findById(id); comment.setAuthor(author); Comment comment1 = commentService.updateComment(comment); return comment1; } -
3)重启项目,并删除Redis中的comment,访问:http://localhost:8080/get/1,正常显示 。
-
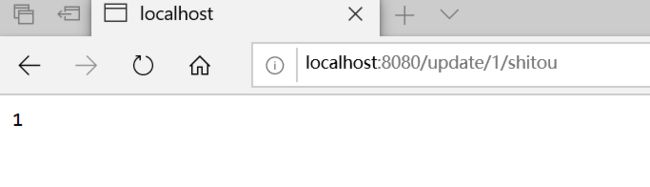
4)更新操作http://localhost:8080/update/1/shito2成功:
-
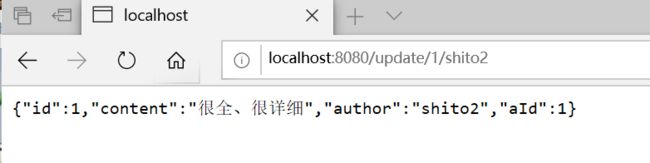
- 5)数据库和Redis均正常
- 步骤7:实践删除操作,可查看到数据库记录进行了删除,Redis和控制台等效果如图:

至此,使用实现基于注解的Redis缓存实现。
3.3 基于API的Redis缓存实现
Spring Boot 整合Redis缓存实现中,除了基于注解形式的Redis缓存实现外,还有一种开发中常用的方式-----基于API的Redis缓存实现。以下为具体实现过程。
-
步骤1:使用Redis API进行业务数据缓存管理,这里我们在service包下编写一个进行业务处理的类ApiCommentService,内容如下:
//基于API的Redis缓存实现 package com.itheima.service; import com.itheima.domain.Comment; import com.itheima.repository.CommentRepository; import org.springframework.beans.factory.annotation.Autowired; import org.springframework.data.redis.core.RedisTemplate; import org.springframework.stereotype.Service; import org.springframework.transaction.annotation.Transactional; import java.util.Optional; import java.util.concurrent.TimeUnit; @Service @Transactional//事务注解 public class ApiCommentService { @Autowired private CommentRepository commentRepository; @Autowired private RedisTemplate redisTemplate; /** * 查询方法:先从缓存中查询数据,需要前面有注入一个RedisTemplate */ public Comment findById(Integer id){ Object o = redisTemplate.opsForValue().get("comment_" + id); if(o!=null){ //缓存中有数据 return (Comment) o; }else{ //缓存中没有数据,就进入数据库根据id查询 Optional<Comment> byId = commentRepository.findById(id); if(byId.isPresent()){ //数据库中查到有数据,将查询结果进行缓存,并设置有效期为1天 Comment comment = byId.get(); redisTemplate.opsForValue().set("comment_"+id,comment,1, TimeUnit.DAYS); return comment; } return null; } } /** * 更新方法 */ public Comment updateComment(Comment comment){ //更新数据 commentRepository.updateComment(comment.getId(),comment.getAuthor()); //更新Redis缓存 redisTemplate.opsForValue().set("comment_"+comment.getId(),comment); return comment; } /** * 删除方法 */ public void deleteComment(Integer id){ //删除数据 commentRepository.deleteById(id); //缓存删除 redisTemplate.delete("comment_"+id); } } -
步骤2:编写web访问层Controller文件。这里可以直接复制CommentController.java,重命名为ApiCommentController.java,修改为以下内容:
//编写web访问层Controller文件 package com.itheima.controller; import com.itheima.domain.Comment; import com.itheima.service.ApiCommentService; import com.itheima.service.CommentService; import org.springframework.beans.factory.annotation.Autowired; import org.springframework.web.bind.annotation.GetMapping; import org.springframework.web.bind.annotation.PathVariable; import org.springframework.web.bind.annotation.RequestMapping; import org.springframework.web.bind.annotation.RestController; //步骤1:加入组合注解@RestController,相当于@Controller+@ResponseBody两个注解的结合 @RestController @RequestMapping("/api") //窄化请求路径 public class ApiCommentController { //步骤2:使用@Autowired对commentService进行标注,让 spring 完成 bean 自动装配的工作 @Autowired private CommentService commentService; @Autowired private ApiCommentService apiCommentService; /* * 步骤3:实现查询控制 * */ @GetMapping("/get/{id}")//这里的id为路径访问传递过来的值 public Comment findById(@PathVariable("id") Integer id){//@PathVariable*是spring3.0的一个新功能:接收请求路径中占位符的值 Comment comment = apiCommentService.findById(id); return comment; } /* * 步骤4:实现更新操作,需要接收两个参数 * */ @GetMapping("/update/{id}/{author}") public Comment updateComment(@PathVariable("id") int id,@PathVariable("author") String author){ Comment comment = apiCommentService.findById(id); comment.setAuthor(author); Comment comment1 = apiCommentService.updateComment(comment); return comment1; } /* * 步骤4:实现删除操作,需要接收id参数 * */ @GetMapping("/delete/{id}") public void deleteById(@PathVariable("id") Integer id){ apiCommentService.deleteComment(id); } } -
步骤3:基于API的Redis缓存实现的相关配置
1)基于API的Redis缓存实现不需要@EnableCaching注解开启,项目启动类的该注解可删除或注释(不处理也不影响)
2)单独使用API的Redis缓存同时需要在pom.xml文件中引入Redis依赖启动器,并在配置文件中进行Redis服务连接配置。(参考前面注解实现Redis缓存的设置)
-
步骤4:启动项目类进行如上一节的测试,注意访问路径均需要加设定的路径如:这里图跟上小节类似,不再截图。
1)查询:http://localhost:8080/api/get/4
2)更新:http://localhost:8080/api/update/2/shitou
3)删除:http://localhost:8080/api/delete/5
4 自定义Redis缓存序列化机制
缓存管理的实体类数据使用的是JDK序列化机制,不便于使用可视化管理工具进行查看和管理。接下来我们使用基于注解的Redis缓存实现和基于API的Redis缓存实现中的数据序列化机制进行介绍,并自定义JSON的数据序列化机制进行数据缓存管理。
4.1自定义RedisTemplate


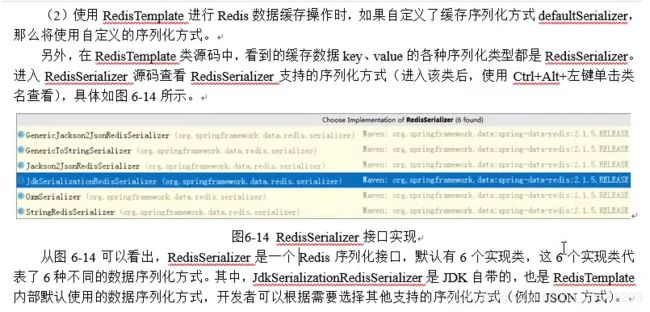
2.自定义Redis Template序列化机制
-
步骤1:项目中com.itheima下创建包config,在该包下创建一个类Redisconfig配置类。如图:

-
步骤2:编写Redisconfig配置类
package com.itheima.config; import com.fasterxml.jackson.annotation.JsonAutoDetect; import com.fasterxml.jackson.annotation.PropertyAccessor; import com.fasterxml.jackson.databind.ObjectMapper; import org.springframework.context.annotation.Bean; import org.springframework.context.annotation.Configuration; import org.springframework.data.redis.cache.RedisCacheConfiguration; import org.springframework.data.redis.cache.RedisCacheManager; import org.springframework.data.redis.connection.RedisConnectionFactory; import org.springframework.data.redis.core.RedisTemplate; import org.springframework.data.redis.serializer.Jackson2JsonRedisSerializer; import org.springframework.data.redis.serializer.RedisSerializationContext; import org.springframework.data.redis.serializer.RedisSerializer; import org.springframework.data.redis.serializer.StringRedisSerializer; import java.time.Duration; @Configuration //定义这是一个配置类 public class RedisConfig { @Bean public RedisTemplate<Object, Object> redisTemplate(RedisConnectionFactory redisConnectionFactory) { RedisTemplate<Object, Object> template = new RedisTemplate(); template.setConnectionFactory(redisConnectionFactory); // 使用JSON格式序列化对象,对缓存数据key和value进行转换 Jackson2JsonRedisSerializer jacksonSeial = new Jackson2JsonRedisSerializer(Object.class); // 解决查询缓存转换异常的问题 ObjectMapper om = new ObjectMapper(); om.setVisibility(PropertyAccessor.ALL, JsonAutoDetect.Visibility.ANY); om.enableDefaultTyping(ObjectMapper.DefaultTyping.NON_FINAL); jacksonSeial.setObjectMapper(om); // 设置RedisTemplate模板API的序列化方式为JSON template.setDefaultSerializer(jacksonSeial); return template; } } -
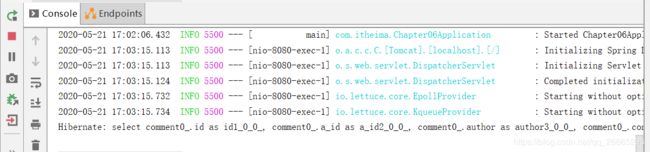
步骤3:启动项目,浏览器运行:http://localhost:8080/api/get/4,效果如图

-
步骤4:多次刷新,从控制台可以看到仅一次查询,说明缓存起了作业。
- 步骤5:查看缓存是不是以JSON格式存储。

4.2 自定义RedisCacheManager
自定义RedisTemplate对于基于注解的Redis缓存实现来说,是没有作用的。接下来,针对基于注解的Redis缓存机掉和自定义序列化方式的实现进行讲解。
在代码上对RedisCacheConfiguration按CTRL+左键,可以查看RedisCacheConfiguration源码,了解其缓存管理器RedisCacheManager和JdkSerializtionRedisSerializer序列化方式。
这里我们想使用自定义序列化方式的RedisCacheManager进行数据缓存操作。
步骤1:在上一小节创建的Redisconfig配置类中增加一个Bean组件cacheManager,示例代码如下:
 @Bean
    public RedisCacheManager cacheManager(RedisConnectionFactory redisConnectionFactory) {
        // 分别创建String和JSON格式序列化对象,对缓存数据key和value进行转换
        RedisSerializer<String> strSerializer = new StringRedisSerializer();
        Jackson2JsonRedisSerializer jacksonSeial =
                new Jackson2JsonRedisSerializer(Object.class);
        // 解决查询缓存转换异常的问题
        ObjectMapper om = new ObjectMapper();
        om.setVisibility(PropertyAccessor.ALL, JsonAutoDetect.Visibility.ANY);
        om.enableDefaultTyping(ObjectMapper.DefaultTyping.NON_FINAL);
        jacksonSeial.setObjectMapper(om);

// 定制缓存数据序列化方式及时效
    RedisCacheConfiguration config = RedisCacheConfiguration.defaultCacheConfig()
            .entryTtl(Duration.ofDays(1))
            .serializeKeysWith(RedisSerializationContext.SerializationPair.fromSerializer(strSerializer))
            .serializeValuesWith(RedisSerializationContext.SerializationPair.fromSerializer(jacksonSeial))
            .disableCachingNullValues();

    RedisCacheManager cacheManager = RedisCacheManager.builder(redisConnectionFactory).cacheDefaults(config).build();
    return cacheManager;
}

-
步骤2:使用自定义序列化机制的RedisCacheManager测试时,实体类可以不用实现序列化接口)。找到domain包下的Comment实体类,去掉 implements Serializable.
-
步骤3:重启项目,重新浏览器运行:http://localhost:8080/api/get/4,效果如图,
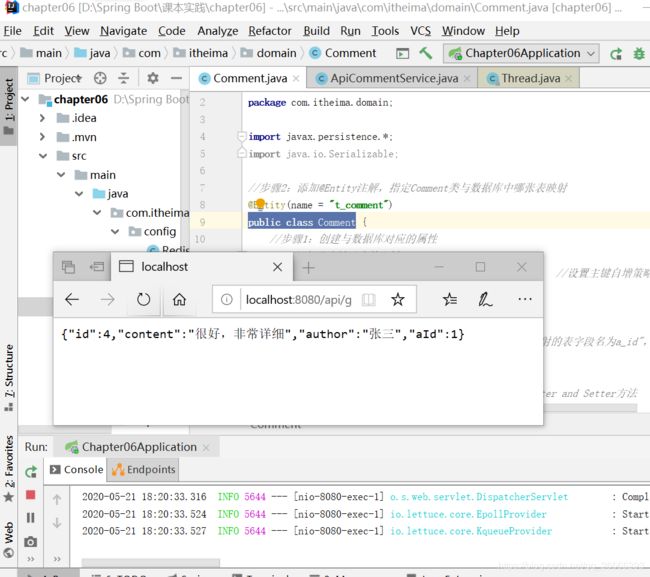
可以看出,访问正常,但控制台没有刷新查询语句,说明刚刚自定义的RedisCacheManager起了作用。