Selenium自动化测试学习笔记
文章目录
- 一、Selenium
- 1、简介
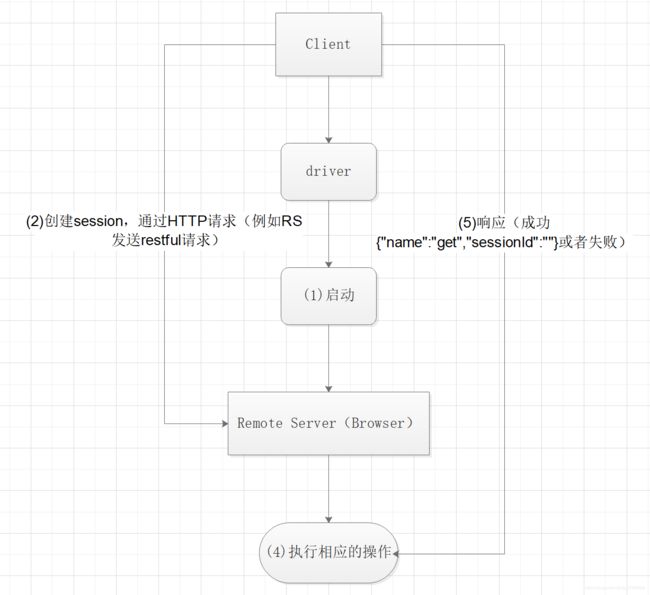
- 2、工作原理
- 二、Python代码
- 1、启动浏览器
- 2、让浏览器访问指定网址
- 3、确认访问页面
- 4、定位页面元素
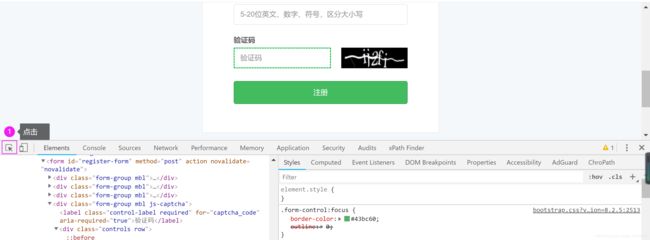
- (1)Chrome工具
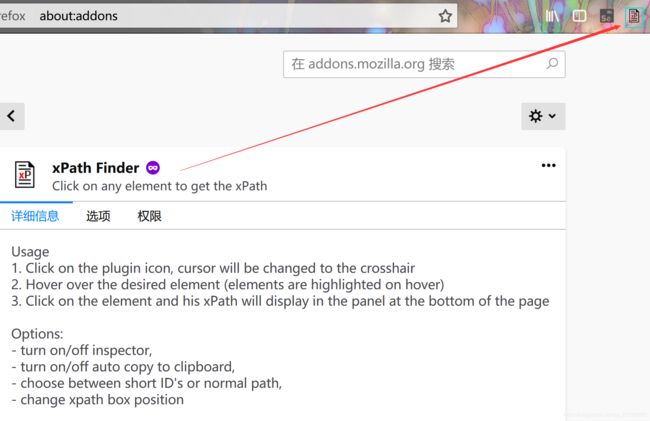
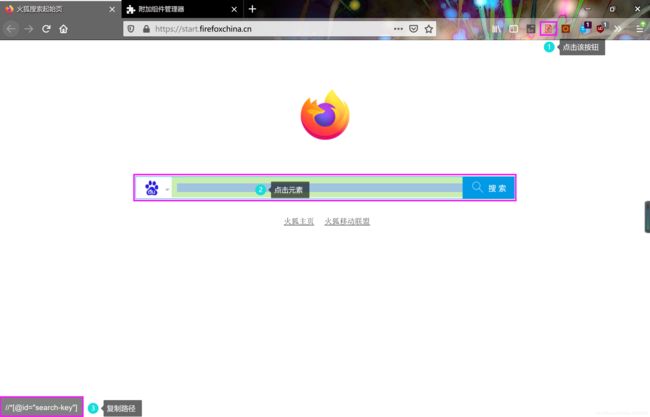
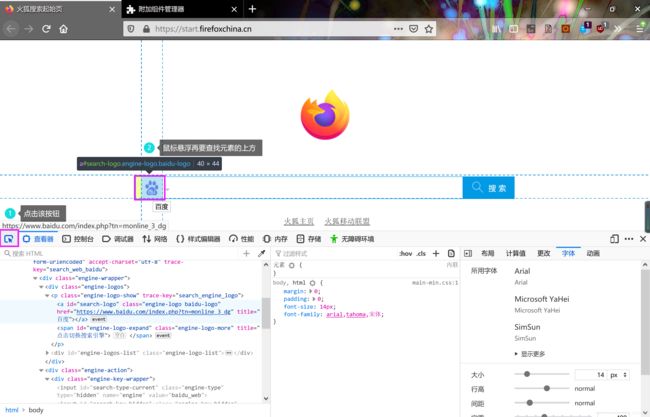
- (2)Firefox工具
- (3)IE也有类似的工具,就不在赘述了
- 5、代码实现操作Input
- (1)ID
- (2)xpath
- (3)Class_name
- (4)Name
- 7、判断元素是否存在
- 6、退出浏览器
- 7、关闭驱动
- 8、Input的输入与获取值
- 9、实现批量生成数据
- 10、裁剪并识别验证码
- (1)报错tile cannot extend outside image
- (2)因为crop内坐标必须是(左,上,右,下)
- (3)代码
- (3)解决因分辨率过大而裁剪失败
- 三、PO模型
- 1、Case层
- 2、Handle层
- 3、Business层
- 4、Page(Element)层
- 5、Base层
- 四、UnitTest框架
- 1、测试脚手架
- 2、测试用例
- 3、测试套件
- 4、测试运行器(test runner)
- 5、常用方法
- 6、装饰器
- 7、Test Suite+Runner
- 8、Test Suite 实现控制执行顺序
- 9、无法导入unittest.case中_Outcome
- 10、获取当前时间
- (1)获取时间
- (2)格式化时间
- (3)类型转换
- 11、数据驱动工具:DDT
- (1)missing * required positional arguments
- (2)unittest中addTest无效
- 11、关键字模型
- 12、Chrome浏览器报错
- 13、*args
- 14、**kwargs
- 三、行为驱动
- 1、BBD(Behavior Driven Development)
- 2、实例
- (1)三种匹配模式
- 四、行为驱动实战
- 1、实例
- 2、日志格式化
- (1)格式化示例
- (2)完整格式化示例
- (3)动态创建日志文件
- 五、Jenkins
- 1、简单使用
- 2、安装插件站点
- 3、连接:[Jenkins简单操作以及错误排查](https://blog.csdn.net/qq_27009225/article/details/104807816)
一、Selenium
1、简介
Selenium 是一个用于Web应用程序测试的工具。Selenium测试直接运行在浏览器中,就像真正的用户在操作一样。(百科)
2、工作原理
- client:写脚本的地方
- 浏览器解析脚本并执行,返回结果
- driver:
Chrome ——>ChromeDriver
Firefox ——>FirefoxDriver
IE ——>InternetExplorerDriver
二、Python代码
1、启动浏览器
先将对应的浏览器驱动放到Python的安装目录,或者可以直接放到系统变量中
driver = webdriver.Chrome()
# Chrome("C:\Program Files (x86)\Google\Chrome Beta\Application\chromedriver.exe");
driver = webdriver.Ie()
driver = webdriver.Edge()
driver = webdriver.Firefox()
2、让浏览器访问指定网址
driver.get("http://www.baidu.com/")
3、确认访问页面
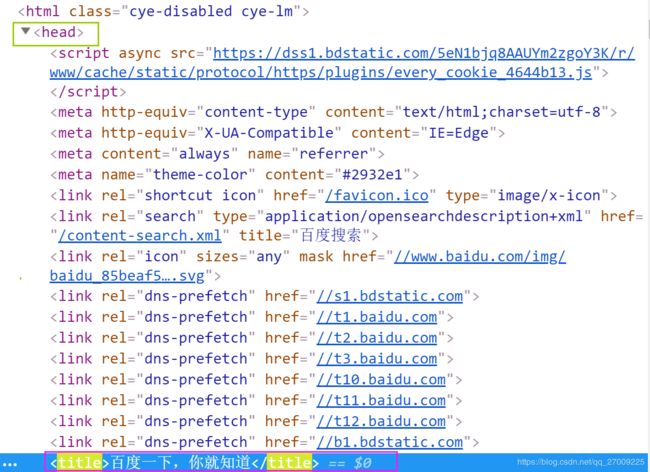
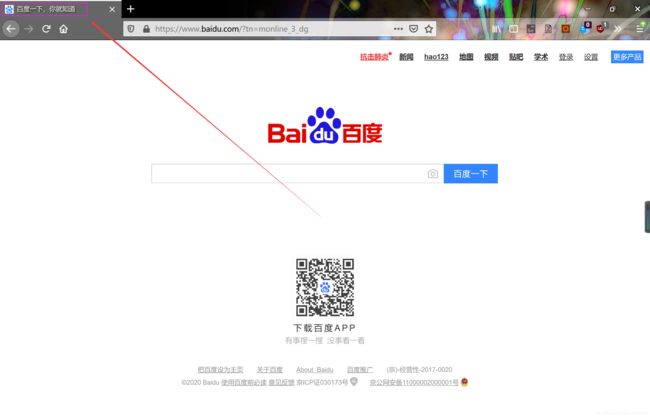
通过页面Title确认访问页面是否存在
from selenium.webdriver.support import expected_conditions as EC


print(EC.title_contains("百度一下"))
- 效果:出现内存地址说明存在该页面
4、定位页面元素
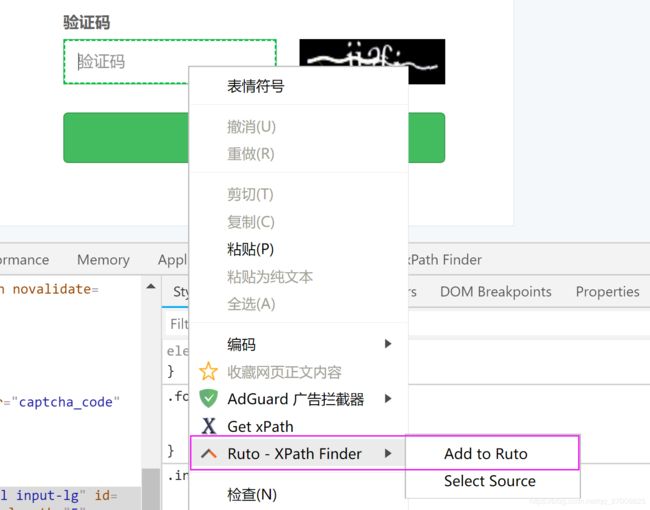
每个浏览器都有很好的插件供你使用,简单介绍几个
(1)Chrome工具
- Chrome的xpath工具(Chrome网上应用商店)
- ChroPath
- Ruto - XPath Finder
- Chrome自带工具
(2)Firefox工具
- Firefox的xpath工具
- 定位元素工具
(3)IE也有类似的工具,就不在赘述了
不管在那个浏览器元素的路径是一样的,所以用一个工具就可以了
5、代码实现操作Input
(1)ID
keys = driver.find_element_by_id(
    "kw").send_keys("西湖断桥")
(2)xpath
driver.find_element_by_xpath("//input[@id='kw']").send_keys("西湖断桥")
(3)Class_name
由于class很多用于应用CSS样式,所以可能会出现多个相同的class,这就需要多重定位
- 第一种:这种方式直接,但是有时候会出现查找元素失败的情况,导致你的脚本停止运行。个人觉得应该浏览器来不及解析造成的
driver.find_elements_by_class_name("controls")[1].find_element_by_class_name(
    "form-control").send_keys("qwes")
- 第二种
user_name_element_node = driver.find_elements_by_class_name("controls")[1]
user_name_element_node.find_element_by_class_name(
    "form-control").send_keys("qwes")
(4)Name
driver.find_element_by_name("wd").send_keys("西湖断桥")
Xpath和Id这两个方式是最常用最好用的,因为name、class_name一般在页面中会出现多个
7、判断元素是否存在
- 代码:webdriver等待1秒,查找CLASS_NAME为“s_ipt”的元素
from selenium.webdriver.support import expected_conditions as EC

locator=(By.CLASS_NAME,"s_ipt")
print(WebDriverWait(driver,1).until(EC.visibility_of_element_located(locator)))
- 效果
![]()
6、退出浏览器
driver.quit()
7、关闭驱动
没有这行代码是不影响程序运行的,但是你随着你调试脚本的次数增多,你的浏览器会越来越卡,电脑也会越来越卡。因为每次运行程序,都会运行一个Driver,它们会越来越多占用内存
driver.close()
8、Input的输入与获取值
driver = webdriver.Chrome()

time.sleep(1)
driver.get("http://www.baidu.com")
keyword = driver.find_element_by_id("kw")
keyword.send_keys("西湖醋鱼")
pre = keyword.get_attribute("value")
if pre == "西湖醋鱼":
    print("获取成功:", pre)
9、实现批量生成数据
for i in range(5):
   u_email = ''.join(random.sample('1234567890qazwsxedcrfv', 8)) + "@foxmail.com"
   print("第%d个数:%s" % (i, u_email))
10、裁剪并识别验证码
(1)报错tile cannot extend outside image
tile cannot extend outside image
(2)因为crop内坐标必须是(左,上,右,下)
im1 = ima.crop((left, top, right, bottom))
(3)代码
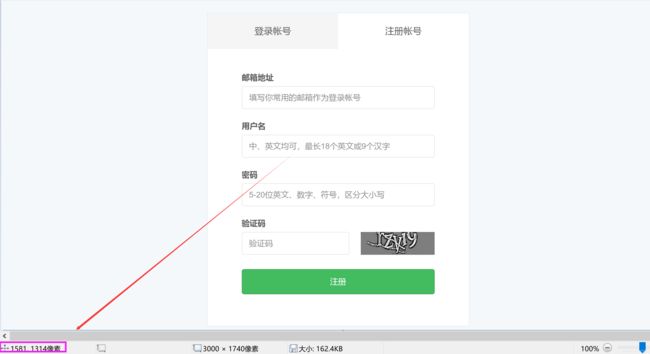
本来可以直接用location实现动态定位,无奈我的分辨率实在太大,系统会对浏览器进行缩放,我只能将driver.save_screenshot("D:/code.png)"截下来的图片放在“画图”中定位验证码的坐标,或者将坐标乘以放大倍数
	driver = webdriver.Chrome()
    driver.maximize_window()
    driver.get("http://www.5itest.cn/register?goto=http%3A//www.5itest.cn/")

    time.sleep(5)
    driver.save_screenshot("D:/Workspaces/Pworkspace/code.png")
    v_code = driver.find_element_by_id("getcode_num")
    time.sleep(2)

    print(v_code.location)  # {'x': 550, 'y': 524}
    left = v_code.location['x']
    top = v_code.location['y']
    print(v_code.size)  # {'height': 40, 'width': 129}
    right = v_code.size['width'] + left
    bottom = v_code.size['height'] + top
    ima = Image.open("D:/Workspaces/Pworkspace/code.png")
    im1 = ima.crop((1580, 1311, 1900, 1409)) # 方式一
    # im1 = ima.crop((left * 2.5, top * 2.5, right * 2.5, bottom * 2.5)) # 方式二
    im1.save("D:/Workspaces/Pworkspace/code1.png")

	image1=Image.open("D:/Workspaces/Pworkspace/code1.png")
    str1=pytesseract.image_to_string(image1)
    print(str1)
    driver.close()
(3)解决因分辨率过大而裁剪失败
1. 第一种:将driver.save_screenshot("D:/code.png)"截下来的图放在“画图”中,找所有裁剪图片的坐标。它会根据你鼠标在上面移动而显示像素坐标。
2. 第二种:元素的原始坐标乘以放大倍数
im1 = ima.crop((left*2.5, top*2.5, right*2.5, bottom*2.5))
三、PO模型
-
PO提供了一种业务流程与页面元素操作分离的模式,这使得测试代码变得更加清晰。
-
通过页面对象与用例分离,可以让我们更好的复用对象。
-
可复用的页面方法代码会变得更加优化。
-
更加有效的命名方式使得我们更加清晰的知道方法所操作的UI元素。
1、Case层
负责封装case,输入测试数据和断言判断。
2、Handle层
负责操作页面元素。
3、Business层
业务层,负责操作、组装Handle层,它是Case层与Handle层的桥梁。
4、Page(Element)层
负责获取获取页面元素,为Handle层服务的。
5、Base层
基础层,负责存放一些基础公共的代码,比如driver、findelement等
四、UnitTest框架
UnitTest是类似于Java中的JUint的Python单元测试框架,其支持测试自动化,配置共享和关机代码测试。支持将测试样例聚合到测试集中,并将测试与报告框架独立。
1、测试脚手架
test fixture 表示为了开展一项或多项测试所需要进行的准备工作,以及所有相关的清理操作。举个例子,这可能包含创建临时或代理的数据库、目录,再或者启动一个服务器进程。
2、测试用例
一个测试用例是一个独立的测试单元。它检查输入特定的数据时的响应。 unittest 提供一个基类: TestCase ,用于新建测试用例。
3、测试套件
test suite 是一系列的测试用例,或测试套件,或两者皆有。它用于归档需要一起执行的测试。(比如,此次我只执行某两个用例,则可以通过它来控制)
4、测试运行器(test runner)
test runner 是一个用于执行和输出测试结果的组件。这个运行器可能使用图形接口、文本接口,或返回一个特定的值表示运行测试的结果
5、常用方法
-
assertEqual() :检查预期的输出
-
assertTrue() 或 assertFalse() :验证一个条件
-
assertRaises() 来验证抛出了一个特定的异常
-
setUp() :对测试执行前的一些初始化操作
-
tearDown() :测试结束后的操作
-
unittest.main():执行所有用例
那到底是怎样执行的呢,不废话,上代码。
注意:所有方法名(用例)前必须有test
测试代码
# codeing = utf-8

import unittest


class FistUTest(unittest.TestCase):


    def setUp(self) -> None:
        print("这是前置条件")

    def tearDown(self) -> None:
        print("这是后置条件")

    @staticmethod
    def test_case01():
        print("测试用例1")

    @staticmethod
    def test_case02():
        print("测试用例2")


if __name__ == '__main__':
    # fut=FistUTest()
    unittest.main()
执行结果
这是前置条件
测试用例1
这是后置条件
这是前置条件
测试用例2
这是后置条件
..
----------------------------------------------------------------------
Ran 2 tests in 0.000s
6、装饰器
通过(5)中代码,可以看出 每执行一次case(用例) setUp()和earDown()都会执行一遍。那么我想讲最基本的初始化代码(比如driver)放到一个方法里,不会每次都执行,这时候就用到装饰器了。
# codeing = utf-8

import unittest


class FistUTest(unittest.TestCase):

    @classmethod
    def setUpClass(cls) -> None:
        print("执行所有用例前的初始化")

    @classmethod
    def tearDownClass(cls) -> None:
        print("执行所有用例后的结束操作")

    def setUp(self) -> None:
        print("这是前置条件")

    def tearDown(self) -> None:
        print("这是后置条件")

    @staticmethod
    def test_case01():
        print("测试用例1")

    @staticmethod
    def test_case02():
        print("测试用例2")


if __name__ == '__main__':
    # fut=FistUTest()
    unittest.main()
执行结果
执行所有用例前的初始化
--------------------
###########
这是前置条件
测试用例1
这是后置条件
###########
这是前置条件
测试用例2
这是后置条件
----------------------
执行所有用例后的结束操作
..
----------------------------------------------------------------------
Ran 2 tests in 0.000s

OK
7、Test Suite+Runner
指定执行用例01
if __name__ == '__main__':
    # fut=FistUTest()
    # unittest.main()
    t_u = unittest.TestSuite()
    t_u.addTest(FistUTest('test_case01'))
    unittest.TextTestRunner().run(t_u)
执行结果
----------------------------------------------------------------------
Ran 1 test in 0.000s

OK
执行所有用例前的初始化
--------------------
###########
这是前置条件
测试用例1
这是后置条件
----------------------
执行所有用例后的结束操作

Process finished with exit code 0
8、Test Suite 实现控制执行顺序
通过@unittest.skip()修饰器,跳过某条用例
# codeing = utf-8

import unittest


class FistUTest(unittest.TestCase):

    @classmethod
    def setUpClass(cls) -> None:
        print("执行所有用例前的初始化")
        print("--------------------")

    @classmethod
    def tearDownClass(cls) -> None:
        print("----------------------")
        print("执行所有用例后的结束操作")

    def setUp(self) -> None:
        print("###########")
        print("这是前置条件")

    def tearDown(self) -> None:
        print("这是后置条件")

    @staticmethod
    def test_case01():
        print("测试用例1")

    @staticmethod
    @unittest.skip("跳过此条")
    def test_case02():
        print("测试用例2")

    @staticmethod
    def test_case03():
        print("测试用例3")

    @staticmethod
    def test_case04():
        print("测试用例4")


if __name__ == '__main__':
    # fut=FistUTest()
    # unittest.main()
    t_u = unittest.TestSuite()
    t_u.addTest(FistUTest('test_case03'))
    t_u.addTest(FistUTest('test_case01'))
    t_u.addTest(FistUTest('test_case02'))
    t_u.addTest(FistUTest('test_case04'))

    unittest.TextTestRunner().run(t_u)
执行结果
----------------------------------------------------------------------
Ran 4 tests in 0.000s

OK (skipped=1)
执行所有用例前的初始化
--------------------
###########
这是前置条件
测试用例3
这是后置条件
###########
这是前置条件
测试用例1
这是后置条件
###########
这是前置条件
测试用例4
这是后置条件
----------------------
执行所有用例后的结束操作

Process finished with exit code 0
9、无法导入unittest.case中_Outcome
Cannot find reference '_Outcome' in 'case.pyi'
但是却能正常使用_outcome
    def tearDown(self) -> None:

        for method_name,error in self._outcome.errors:
            if error:
                case_name = self._testMethodName
                file_path = os.path.join("../report/"+case_name+".png")
                self.driver.save_screenshot(file_path)
        self.driver.close()
10、获取当前时间
(1)获取时间
curr_time = datetime.datetime.now() # 2019-07-06 14:55:56.873893 (2)格式化时间
time_str = curr_time.strftime("%Y-%m-%d %H:%M:%S")  # 2019-07-06

time_str = curr_time.strftime("%m/%d")  # 07/06
(3)类型转换
# datetime-->str

time_str = datetime.datetime.strftime(curr_time,'%Y-%m-%d %H:%M:%S')  # 2019-07-06 15:50:12

# str-->datetime

time_str = '2019-07-06 15:59:58'

curr_time = datetime.datetime.strptime(time_str,'%Y-%m-%d %H:%M:%S')
11、数据驱动工具:DDT
dd.ddt:
装饰类,也就是继承自TestCase的类。

ddt.data:
装饰测试方法。参数是一系列的值。

ddt.file_data:
装饰测试方法。参数是文件名。文件可以是json 或者 yaml类型。

注意,如果文件以”.yml”或者”.yaml”结尾,ddt会作为yaml类型处理,其他所有文件都会作为json文件处理。

如果文件中是列表,每个列表的值会作为测试用例参数,同时作为测试用例方法名后缀显示。

如果文件中是字典,字典的key会作为测试用例方法的后缀显示,字典的值会作为测试用例参数。

ddt.unpack:
传递的是复杂的数据结构时使用。比如使用元组或者列表,添加unpack之后,ddt会自动把元组或者列表对应到多个参数上。字典也可以这样处理。
(1)missing * required positional arguments
在使用DDT加载数据时,出现了这样的错误
TypeError: test_test() missing 2 required positional arguments: 'a' and 'b'
- 问题原因:是因为有
@staticmethod
    @staticmethod
    @ddt.data(["1", "2"], ["3", "4"])
    @ddt.unpack
    def test_test(a, b):
        # "别害羞啊~"
        print(a + b)
- 问题解决:去掉
@staticmethod即可,同时参数中加入self此时也不会提示Method 'test_test' may be 'static'
    @ddt.data(["1", "2"], ["3", "4"])
    @ddt.unpack
    def test_test(self, a, b):
        # "别害羞啊~"
        print(a + b)
@staticmethod 静态方法只是名义上归属类管理,但是不能使用类变量和实例变量,是类的工具包。放在函数前(该函数不传入self或者cls),所以不能访问类属性和实例属性
但是使用@ddt之后,下面这种管理case的方法就不行了
    ts = unittest.TestSuite()
    ts.addTest(DdtDataFirst("test_login_success"))
    unittest.TextTestRunner().run(ts)
path拼写不正确,按住Ctrl键找不到目录
report_html_path = "../report/testcase_report1.html"
(2)unittest中addTest无效
脚本运行时,永远是运行所有的case,同时html_f = open(report_html_path, "wb")这行代码也失效了,
- 运行环境:Pycharm
- 问题原因
它默认运行模式是unittest,此时需要将运行模式转换成普通模式。
- 问题解决
第一种
选择对应的名文件名
第二种:百度吧
11、关键字模型
容错性很低,不能从程序运行时正常退出
12、Chrome浏览器报错
原因是调用了driver.close() ,程序无法再定位页面元素
Message: invalid session id
问题解决
检查何处调用了driver.close()
13、*args
*args 用来将参数打包成tuple给函数体调用
14、**kwargs
**kwargs 打包关键字参数成dict给函数体调用
Python3参数顺序:必选参数、默认参数、可变参数、命名关键字参数和关键字参数。arg、*args、**kwargs三个参数的位置是固定的
三、行为驱动
1、BBD(Behavior Driven Development)
借鉴了敏捷和精益实践,让敏捷研发团队尽可能理解产品经理或业务人员的产品需求,并在软件研发过程中及时反馈和演示软件产品的研发状态,让产品经理或业务人员根据获得的产品研发信息及时对软件产品特性进行调整。
对于测试人员简单来说目的就是:像说话一样写用例
- Behave
- Python
- Selenium
- Pyhamcrest
pip3 install behave
pip3 install pyhamcrest
2、实例
- Given:假设
- When:当
- And:和
- Then:结果
[and]和[but]会被当做when/given/then的一部分来执行。
(1)三种匹配模式
- ‘parse’
- ‘cfparse’ 基于parse的扩展, 支持基数字段语法
- ‘re’ 支持在step中定义正则表达式,获取响应值
四、行为驱动实战
1、实例
import logging

logger = logging.getLogger()
logger.setLevel(logging.DEBUG)
# 控制台输出
consle = logging.StreamHandler()
logger.addHandler(consle)
logger.debug("test")
consle.close()
logger.removeHandler(consle)

# 文件输出
file_handle = logging.FileHandler('../log/logs/test.log')
logging.Formatter()
logger.addHandler(file_handle)
logger.debug("test")
file_handle.close()
logger.removeHandler(file_handle)
2、日志格式化
Ctrl+鼠标左键点击Formatter()查看格式化的代码,如下
    %(name)s            Name of the logger (logging channel)
    %(levelno)s         Numeric logging level for the message (DEBUG, INFO,
                        WARNING, ERROR, CRITICAL)
    %(levelname)s       Text logging level for the message ("DEBUG", "INFO",
                        "WARNING", "ERROR", "CRITICAL")
    %(pathname)s        Full pathname of the source file where the logging
                        call was issued (if available)
    %(filename)s        Filename portion of pathname
    %(module)s          Module (name portion of filename)
    %(lineno)d          Source line number where the logging call was issued
                        (if available)
    %(funcName)s        Function name
    %(created)f         Time when the LogRecord was created (time.time()
                        return value)
    %(asctime)s         Textual time when the LogRecord was created
    %(msecs)d           Millisecond portion of the creation time
    %(relativeCreated)d Time in milliseconds when the LogRecord was created,
                        relative to the time the logging module was loaded
                        (typically at application startup time)
    %(thread)d          Thread ID (if available)
    %(threadName)s      Thread name (if available)
    %(process)d         Process ID (if available)
    %(message)s         The result of record.getMessage(), computed just as
                        the record is emitted
(1)格式化示例
formatter = logging.Formatter(
    "%(asctime)s ----> 文件名: %(filename)s 模块: %(module)s 代码行数: %(lineno)d 方法名: %(funcName)s  级别:  %(levelno)s  名称:  %("
    "levelname)s ---> 错误信息:  %(message)s ")
file_handle.setFormatter(formatter)
此时,出现了新问题,就是输出中文乱码
2020-03-11 10:42:42,841 ----> register_log.py ģʽ�� register_log ���������� 21 �������� <module> ���� 10 ���ƣ� DEBUG ---> ������Ϣ�� test1234
(2)完整格式化示例
- 多数乱码都是由于文件编码的问题那么我在文件打开是就设置编码试试能不能解决乱码问题
- 之前:
file_handle = logging.FileHandler('../log/logs/test.log')- 优化:
file_handle = logging.FileHandler('../log/logs/test.log', encoding="UTF-8")
import logging

logger = logging.getLogger()
logger.setLevel(logging.DEBUG)

# 文件输出
file_handle = logging.FileHandler('../log/logs/test.log', encoding="UTF-8")
formatter = logging.Formatter(
    "%(asctime)s ----> 文件名: %(filename)s 模块: %(module)s 代码行数: %(lineno)d 方法名: %(funcName)s  级别:  %(levelno)s  名称:  %("
    "levelname)s ----> 错误信息:  %(message)s ")
file_handle.setFormatter(formatter)
logger.addHandler(file_handle)
logger.debug("test1234")
file_handle.close()
logger.removeHandler(file_handle)
效果
2020-03-11 10:47:03,752 ----> 文件名: register_log.py 模块: register_log 代码行数: 21 方法名: <module> 级别: 10 名称: DEBUG ----> 错误信息: test1234
(3)动态创建日志文件
base_dir = os.path.dirname(os.path.abspath(__file__))
dlog_dir = os.path.join(base_dir, 'logs')
log_file = datetime.datetime.now().strftime("%Y-%m-%d %H-%M") + ".log"
log_name = dlog_dir + "/" + log_file

print(log_name)
# 文件输出
file_handle = logging.FileHandler(log_name, encoding="UTF-8")
五、Jenkins
1、简单使用
- 启动:
java -jar jenkins.war - 退出:
http://localhost:8080/exit - 重启:
http://localhost:8080/restart - 刷新:
http://localhost:8080/reload
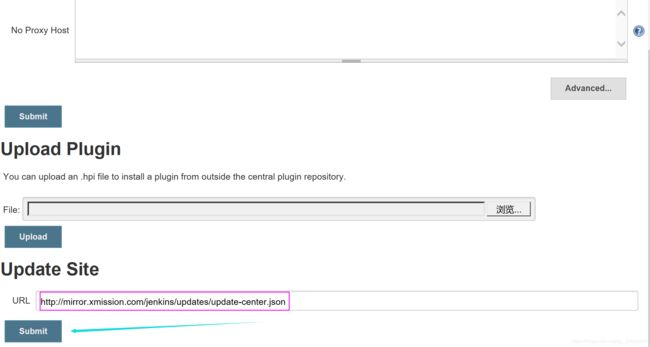
2、安装插件站点
1 http://mirror.xmission.com/jenkins/updates/update-center.json   # 推荐
2 http://mirrors.shu.edu.cn/jenkins/updates/current/update-center.json
3 https://mirrors.tuna.tsinghua.edu.cn/jenkins/updates/update-center.json
4 http://updates.jenkins.io/update-center.json
