手把手教你在ubuntu下搭建ffmpeg+sdl2开发环境
手把手教你在ubuntu下搭建ffmpeg+sdl2开发环境
一:ffmpeg 开发环境搭建
1:开发环境搭建
1.1:安装必要软件
apt-get install autoconf automake build-essential libass-dev libfreetype6-dev libtheora-dev libtool libvorbis-dev pkg-config texinfo zlib1g-dev unzip cmake yasm libx264-dev libmp3lame-dev libopus-dev
apt-get install autoconf automake build-essential libass-dev libfreetype6-dev libtheora-dev libtool libvorbis-dev pkg-config texinfo zlib1g-dev unzip cmake yasm libx264-dev libmp3lame-dev libopus-dev
sudo apt-get install -y autoconf automake build-essential git libass-dev libfreetype6-dev libsdl2-dev libtheora-dev libtool libva-dev libvdpau-dev libvorbis-dev libxcb1-dev libxcb-shm0-dev libxcb-xfixes0-dev pkg-config texinfo wget zlib1g-dev
sudo apt-get install -y autoconf automake build-essential git libass-dev libfreetype6-dev libsdl2-dev libtheora-dev libtool libva-dev libvdpau-dev libvorbis-dev libxcb1-dev libxcb-shm0-dev libxcb-xfixes0-dev pkg-config texinfo wget zlib1g-dev
sudo apt-get install git libtool build-essential pkg-config autoconf
sudo apt-get build-dep vlc
通过安装vlc的库 来解决大多数ffmpeg编译依赖库的问题,这样一次性安装的库相对比较多,
如果有不想这样做的,也可以去阅读ffmpeg从入门到精通,里面有很详细的自定义安装过程的指导
1.2:下载ffmpeg源码
git clone https://git.ffmpeg.org/ffmpeg.git ffmpeg
同样,从官网或者github上下载都是比较慢的,如果觉得更新比较慢的话,可以去码云上面clone一份,代码版本都差不多,可以找个最新的
1.3:编译配置
以下是configure的配置,也可以自定义,具体细节不赘述,可以参考ffmpeg从入门到精通里面的编译配置介绍
./configure --enable-fontconfig --enable-gpl --enable-libass --enable-libbluray --enable-libfreetype --enable-libmp3lame --enable-libspeex --enable-libx264 --enable-libx256 --enable-libfdk-aac --enable-version3 --cc=’‘ccache gcc’ --enable-nonfree --enable-videotoolbox --enable-audiotoolbox
–enable-shared --enable-static --enable-pthreads
./configure --enable-fontconfig --enable-gpl --enable-libass --enable-libbluray --enable-libfreetype --enable-libmp3lame --enable-libspeex --enable-libx264 --enable-libx256 --enable-libfdk-aac --enable-version3 --cc=''ccache gcc' --enable-nonfree --enable-videotoolbox --enable-audiotoolbox --enable-shared --enable-static --enable-pthreads
1.4:开始编译
make -j 8
或者make
1.5:开始安装ffmpeg
make install
1.6:检查编译结果
如下图所示,在所在的文件中都已经有对应的include和lib文件了
1.7:注意
1:编译配置中的 –enable-shared是很重要的,否则可能出现没有so库的问题
2:make是进行编译的命令,但是不会进行安装
3:make install是安装的命令,这个安装会将include拷贝到/usr/local/include文件夹下面
会将so库拷贝到/usr/local/lib下面,所以在编译的时候都是需要管理员权限的
2:开发环境校验
2.1:创建项目文件夹

如图所示,在文件夹中创建了bin,include,src,obj这样的文件夹
2.2:简单的测试代码
头文件定义ffmpeg_header.h
/*
 * ===========================================================================
 *
 *       Filename:  ffmpeg_header.h
 *    Description:
 *        Version:  1.0
 *        Created:
 *       Revision:  none
 *       Compiler:  gcc
 *         Author:   (),
 *        Company:
 *
 * ===========================================================================
 */

#ifndef __FFMPEG_HEADER_H__
#define __FFMPEG_HEADER_H__

#ifdef __cplusplus
extern "C"{
#endif

#include
#include
#include
#include
#include
#include


#ifdef __cplusplus
}
#endif


#endif
/*
 * ===========================================================================
 *
 *       Filename:  ffmpeg_test.c
 *    Description:
 *        Version:  1.0
 *        Created:
 *       Revision:  none
 *       Compiler:  gcc
 *         Author:   (),
 *        Company:
 *
 * ===========================================================================
 */
#include "ffmpeg_header.h"


int main(int argc,char* argv[]){
  av_register_all();
  printf("%s\n",avcodec_configuration());
  return 0;
}
2.3:编译命令配置
gcc -g -o bin/simple_test src/ffmpeg_test.c -I /usr/local/include/ -Iinclude -L /usr/local/lib/ -lavcodec -lavformat
gcc -g -o bin/simple_test src/ffmpeg_test.c -I /usr/local/include/ -Iinclude -L /usr/local/lib/ -lavcodec -lavformat
如命令所示:
在bin文件夹生成simple_test
-I 是头文件链接的意思。需要链接 /usr/local/include下的头文件和当前文件夹下include的头文件
-L 是链接库文件夹所在目录的意思 这里链接的是/usr/local/lib下面的libavformat.so等一些库
-lavcodec 是链接库的名称的意思
2.4:生成bin文件并且执行
二:SDL开发库的搭建和测试
1:关于sdl1库的安装和校验(头文件和链接库除外)
1.1:安装
sudo apt-get install libsdl1.2-dev libsdl-image1.2-dev libsdl-mixer1.2-dev libsdl-ttf2.0-dev libsdl-gfx1.2-dev
1.2:检验是否安装成功
sdl2-config --exec-prefix --version --cflag
2:关于sdl2库的安装和校验(头文件和链接库除外)
2.1:安装
sudo apt-get install libsdl2-2.0 libsdl2-dev libsdl2-mixer-dev libsdl2-image-dev libsdl2-ttf-dev libsdl2-gfx-dev
2.2:检验是否安装成功
sdl2-config --exec-prefix --version –cflag
3:注意:
此处安装的 库是没有头文件的,也就是说在没有头文件的基础上,只是系统运行时需要依赖的运行的库
在实际开发过程中没有头文件是不行的,所以就需要我们自己编译SDL2并且安装
三:SDL开发库的搭建和测试
1:下载SDL2源码
http://www.libsdl.org/download-2.0.php
去官网上下载source code源代码,这个源代码
2:编译SDL2
解压下载的文件,然后进入SDL解压文件目录
配置configure的可执行命令:sudo chmod +x configure
配置configure的参数命令:./configure --enable-static --enable-shared
或者 ./configure --enable-static --enable-shared --prefix=/home/用户名/SDL2-2.0.5_build
--prefix是指定目录的意思
编译:
		make
安装
		make install
3:查看是否安装成功
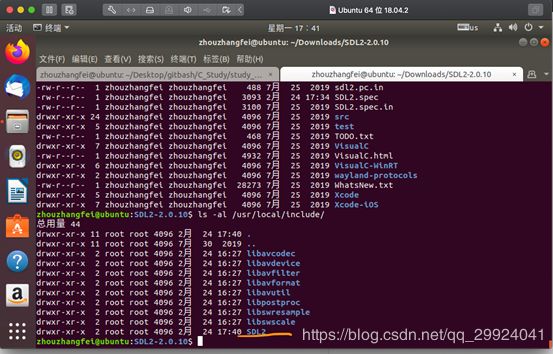
在/usr/local/lib下面查看so库是否安装成功
在/usr/local/include文件夹下面查看头文件是否能引用
4:测试SDL2的依赖性
4.1:修改上述ffmpeg测试案例中的代码,增加头文件导包
#include
4.2:修改main函数的代码,加入sdl部分函数
#include "ffmpeg_header.h"


int main(int argc,char* argv[]){
  av_register_all();
  printf("%s\n",avcodec_configuration());
  // 初始化SDL
      if((SDL_Init(SDL_INIT_VIDEO|SDL_INIT_AUDIO)== -1))
      {
         // 初始化失败,打出错误,注意SDL_GetError返回一个字符串,可读性很好,是不是?
         printf("Could not initialize SDL: %s.\n", SDL_GetError());
     }
     else
     {
         printf("SDL initialize ok!");
     }
     // 结束SDL
     SDL_Quit();
     getchar();
  return 0;
}
4.3 查看输出结果
如上所示,SDL initialize OK 此时说明sdl其实已经配置完毕,可以欢快的使用ffmpeg以及sdl头文件中的接口啦
为什么要出这两篇环境配置文章,最最主要的原因就是很多新手在入门的时候,连环境都不知道怎么搭,当然,楼主也遇到过这样的问题,所以在学习过程中遇到很多槛,往往一个槛就可能打败一个人
很多人可能学着学着就从入门到放弃了,楼主也在音视频的道路上不断被摩擦着,很痛苦。但愿这篇文章能给新入门的像楼主这样的小白鼠一些光明
喜欢文章的,帮忙点个关注!!!thank you


