Android中Activity的使用,简单实例讲解
众所周知,Activity组件是Andorid应用中最重要,最常见的应用组件!Android应用开发的一个重要组成部分就是开发Activity,下面我将会记录下Activity的开发!
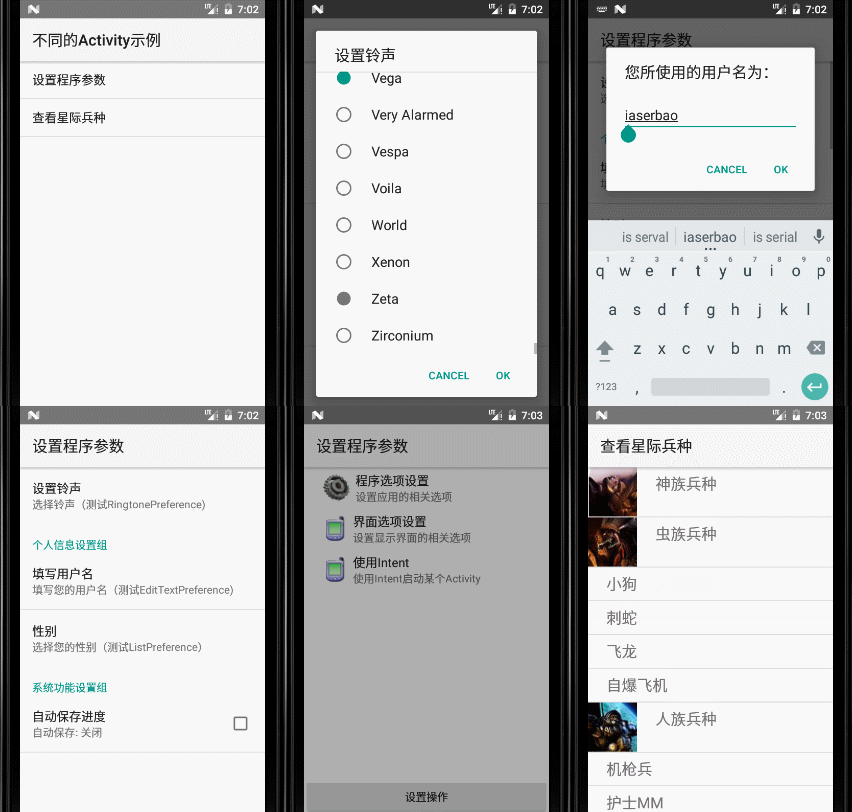
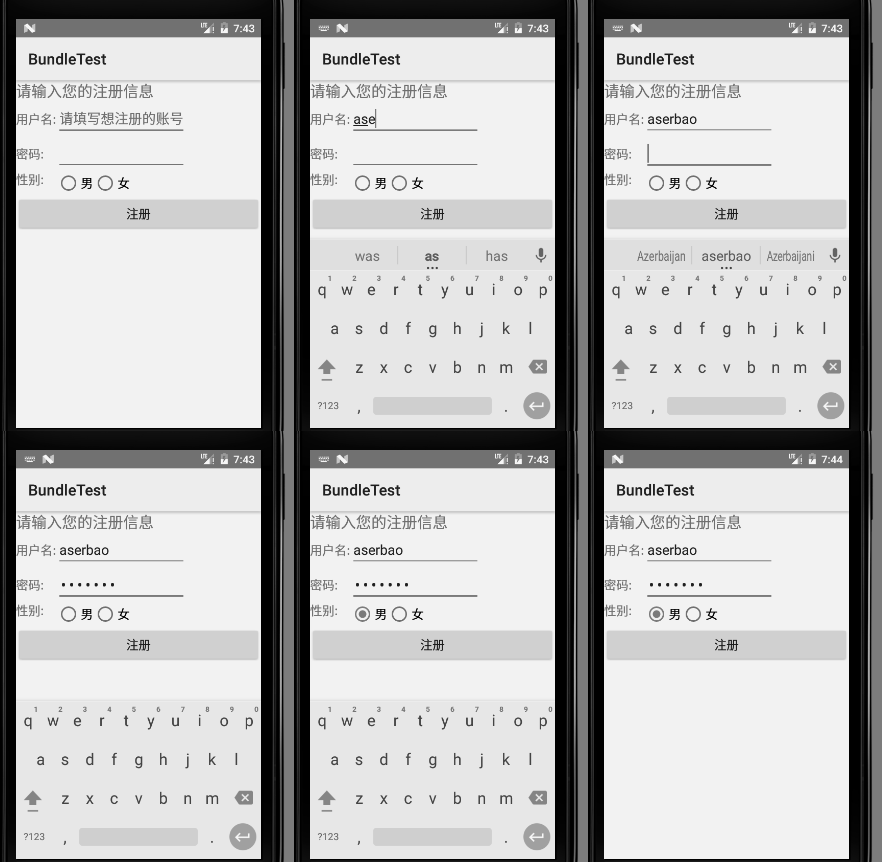
实例1图:

实例用第二个Activity处理注册信息

实例用第二个Activity让用户选择信息

-
-
- 结构图如下
- 启动关闭Activity
- Activity的四种加载模式
- 使用Bundle在Activity之间进行交互数据
- 实例用第二个Activity处理注册信息
- Activity代码
- mainxml
- 实例用第二个Activity让用户选择信息
- MainActivity代码
- SelectCityActivity代码
- 实例用第二个Activity处理注册信息
- 实例一
- 用LauncherActivity开发Activity的列表
-
- Activity代码
-
- 使用ExpandableListActvity实现可展开的Activity
-
- Activity代码
-
- PreferenceActivity结合PreferenceFragment实现参数设置界面
- 参数
- 使用方法
- PreferenceActivityTest代码
- preference_headersxml代码
- preferencesxml代码
- display_prefsxml代码
-
结构图如下:

启动、关闭Activity
启动Activity有如下两个方法:
1:startActivity(Intent intent):
2:startActivityForResult(Intent intent , int resquestCode):
关闭Activity有如下两种方法
1:finish();
2:finishActivity(int requestCode):结束指定的Activity;
Activity的四种加载模式
- standard:会在Task中启动多次Activity实例
- singleTop:当需要启动的Activity实例位于Task栈顶时,再次启动将不回创建新的Activity实例
- singleTask:在同一个Task内,若Activity不存在,则创建!若需要启动的Activity位于栈顶,则Task内无变化!若不位于栈顶,则将位于该Activity上的所有Activity移出Task,将目标Activity位于栈顶!
- singleInstance:无论从哪个Task中启动目标Activity,只会创建一个目标Activity实例,并且会使用一个全新的栈来加载该Activity实例。
分两种情况:
1.如果将要启动的Activity不存在,系统会先创建一个全新的Task,再创建木匾Activity实例,并将它加入新的Task栈顶
2.如果将要启动的Activity存在,无论他在哪个应用中,系统都会把该Activit所在的Task转到前台,从而使Activity显示出来!
使用Bundle在Activity之间进行交互数据
当一个Activity的时候,通常需要携带一部分数据,而携带数据的信使就是intent,因此我们需要把需要传递的数据放在Intent中:
Intent提供多个重载方法,如下:
1:putExtra(Bundle data);向Intent中放入数据
2:Bundle getExtra():从Intent中取出数据
3:putExtra(String name,Xxx value);向Intent中按key_value键值对的形式存入数据
4:getXXXExtra(String name):指定的key,取出数据注意:Intent的putExtra()方法使智能的,当该Intent中如果存在Bundle对象,则直接将需要存入的数据存入到该Bundle中,如果没有,则会自动创建一个Bundle来存放数据
实例:用第二个Activity处理注册信息
Activity代码:
public class MainActivity extends Activity
{
    @Override
    public void onCreate(Bundle savedInstanceState)
    {
        super.onCreate(savedInstanceState);
        setContentView(R.layout.main);
        Button bn = (Button) findViewById(R.id.bn);
        bn.setOnClickListener(new OnClickListener()
        {
            public void onClick(View v)
            {
                EditText name = (EditText)findViewById(R.id.name);
                EditText passwd = (EditText)findViewById(R.id.passwd);
                RadioButton male = (RadioButton) findViewById(R.id.male);
                String gender = male.isChecked() ? "男 " : "女";
                Person p = new Person(name.getText().toString(), passwd
                        .getText().toString(), gender);
                // 创建一个Bundle对象
                Bundle data = new Bundle();
                data.putSerializable("person", p);
                // 创建一个Intent
                Intent intent = new Intent(MainActivity.this,
                        ResultActivity.class);
                intent.putExtras(data);
                // 启动intent对应的Activity
                startActivity(intent);
            }
        });
    }
}
main.xml
<TableLayout xmlns:android="http://schemas.android.com/apk/res/android"
    android:layout_width="match_parent"
    android:layout_height="match_parent">
    <TextView
        android:layout_width="match_parent"
        android:layout_height="wrap_content"
        android:text="请输入您的注册信息"
        android:textSize="20sp"/>
    <TableRow>
        <TextView
            android:layout_width="match_parent"
            android:layout_height="wrap_content"
            android:text="用户名:"
            android:textSize="16sp"/>

        <EditText
            android:id="@+id/name"
            android:layout_width="match_parent"
            android:layout_height="wrap_content"
            android:hint="请填写想注册的账号"
            android:selectAllOnFocus="true"/>
    TableRow>
    <TableRow>
        <TextView
            android:layout_width="match_parent"
            android:layout_height="wrap_content"
            android:text="密码:"
            android:textSize="16sp"/>

        <EditText
            android:id="@+id/passwd"
            android:layout_width="match_parent"
            android:layout_height="wrap_content"
            android:password="true"
            android:selectAllOnFocus="true"/>
    TableRow>
    <TableRow>
        <TextView
            android:layout_width="match_parent"
            android:layout_height="wrap_content"
            android:text="性别:"
            android:textSize="16sp"/>

        <RadioGroup
            android:layout_width="match_parent"
            android:layout_height="wrap_content"
            android:orientation="horizontal">
            <RadioButton
                android:id="@+id/male"
                android:layout_width="wrap_content"
                android:layout_height="wrap_content"
                android:text="男"
                android:textSize="16sp"/>
            <RadioButton
                android:id="@+id/female"
                android:layout_width="wrap_content"
                android:layout_height="wrap_content"
                android:text="女"
                android:textSize="16sp"/>
        RadioGroup>
    TableRow>
    <Button
        android:id="@+id/bn"
        android:layout_width="wrap_content"
        android:layout_height="wrap_content"
        android:text="注册"
        android:textSize="16sp"/>
TableLayout>
实例:用第二个Activity让用户选择信息
MainActivity代码:
public class MainActivity extends Activity
{
    Button bn;
    EditText city;
    @Override
    public void onCreate(Bundle savedInstanceState)
    {
        super.onCreate(savedInstanceState);
        setContentView(R.layout.main);
        // 获取界面上的组件
        bn = (Button) findViewById(R.id.bn);
        city = (EditText) findViewById(R.id.city);
        // 为按钮绑定事件监听器
        bn.setOnClickListener(new OnClickListener()
        {
            @Override
            public void onClick(View source)
            {
                // 创建需要对应于目标Activity的Intent
                Intent intent = new Intent(MainActivity.this,
                        SelectCityActivity.class);
                // 启动指定Activity并等待返回的结果,其中0是请求码,用于标识该请求
                startActivityForResult(intent, 0);
            }
        });
    }
    // 重写该方法,该方法以回调的方式来获取指定Activity返回的结果
    @Override
    public void onActivityResult(int requestCode
            , int resultCode, Intent intent)
    {
        // 当requestCode、resultCode同时为0时,也就是处理特定的结果
        if (requestCode == 0 && resultCode == 0)
        {
            // 取出Intent里的Extras数据
            Bundle data = intent.getExtras();
            // 取出Bundle中的数据
            String resultCity = data.getString("city");
            // 修改city文本框的内容
            city.setText(resultCity);
        }
    }
}
SelectCityActivity代码:
public class SelectCityActivity extends ExpandableListActivity
{
    // 定义省份数组
    private String[] provinces = new String[]
        { "广东", "广西", "湖南"};
    private String[][] cities = new String[][]
        {
            { "广州", "深圳", "珠海", "中山" },
            { "桂林", "柳州", "南宁", "北海" },
            { "长沙", "岳阳" , "衡阳" , "株洲" }
        };
    public void onCreate(Bundle savedInstanceState)
    {
        super.onCreate(savedInstanceState);
        ExpandableListAdapter adapter = new BaseExpandableListAdapter()
        {
            // 获取指定组位置、指定子列表项处的子列表项数据
            @Override
            public Object getChild(int groupPosition, int childPosition)
            {
                return cities[groupPosition][childPosition];
            }
            @Override
            public long getChildId(int groupPosition, int childPosition)
            {
                return childPosition;
            }
            @Override
            public int getChildrenCount(int groupPosition)
            {
                return cities[groupPosition].length;
            }
            private TextView getTextView()
            {
                AbsListView.LayoutParams lp = new AbsListView.LayoutParams(
                        ViewGroup.LayoutParams.MATCH_PARENT, 64);
                TextView textView = new TextView(SelectCityActivity.this);
                textView.setLayoutParams(lp);
                textView.setGravity(Gravity.CENTER_VERTICAL | Gravity.LEFT);
                textView.setPadding(36, 0, 0, 0);
                textView.setTextSize(20);
                return textView;
            }
            // 该方法决定每个子选项的外观
            @Override
            public View getChildView(int groupPosition, int childPosition,
                boolean isLastChild, View convertView, ViewGroup parent)
            {
                TextView textView = getTextView();
                textView.setText(getChild(groupPosition, childPosition)
                        .toString());
                return textView;
            }
            // 获取指定组位置处的组数据
            @Override
            public Object getGroup(int groupPosition)
            {
                return provinces[groupPosition];
            }
            @Override
            public int getGroupCount()
            {
                return provinces.length;
            }
            @Override
            public long getGroupId(int groupPosition)
            {
                return groupPosition;
            }
            // 该方法决定每个组选项的外观
            @Override
            public View getGroupView(int groupPosition, boolean isExpanded,
                View convertView, ViewGroup parent)
            {
                LinearLayout ll = new LinearLayout(SelectCityActivity.this);
                ll.setOrientation(LinearLayout.HORIZONTAL);
                ImageView logo = new ImageView(SelectCityActivity.this);
                ll.addView(logo);
                TextView textView = getTextView();
                textView.setText(getGroup(groupPosition).toString());
                ll.addView(textView);
                return ll;
            }
            @Override
            public boolean isChildSelectable(int groupPosition,
                int childPosition)
            {
                return true;
            }
            @Override
            public boolean hasStableIds()
            {
                return true;
            }
        };
        // 设置该窗口显示列表
        setListAdapter(adapter);
        getExpandableListView().setOnChildClickListener(
            new OnChildClickListener()
            {
                @Override
                public boolean onChildClick(ExpandableListView parent,
                    View source, int groupPosition, int childPosition,
                                            long id)
                {
                    // 获取启动该Activity之前的Activity对应的Intent
                    Intent intent = getIntent();
                    intent.putExtra("city",
                            cities[groupPosition][childPosition]);
                    // 设置该SelectCityActivity的结果码,并设置结束之后退回的Activity
                    SelectCityActivity.this.setResult(0, intent);
                    // 结束SelectCityActivity。
                    SelectCityActivity.this.finish();
                    return false;
                }
            });
    }
}
实例一
用LauncherActivity开发Activity的列表
看结构图可以看出,LauncherActivity继承自ListActivity,因此本质上也是一个开发列表界面的Activity,这里就不做多陈述,直接上代码
Activity代码
public class MainActivity extends LauncherActivity
{
    //定义两个Activity的名称
    String[] names = {"设置程序参数" ,  "查看星际兵种"};
    //定义两个Activity对应的实现类
    Class[] clazzs = {PreferenceActivityTest.class
            , ExpandableListActivityTest.class};
    @Override
    public void onCreate(Bundle savedInstanceState)
    {
        super.onCreate(savedInstanceState);
        ArrayAdapter adapter = new ArrayAdapter(this,
                android.R.layout.simple_list_item_1 , names);
        // 设置该窗口显示的列表所需的Adapter
        setListAdapter(adapter);
    }
    //根据列表项返回指定Activity对应的Intent
    @Override
    public Intent intentForPosition(int position)
    {
        return new Intent(MainActivity.this , clazzs[position]);
    }
}
使用ExpandableListActvity实现可展开的Activity
ExpandableListActivity的用法和ExpandableView的用法基本相似,只要为该Activity传入一个ExpandableListAdapter对象即可,接下来ExpandableListActivity将会生成一个显示可展开列表窗口
Activity代码:
public class ExpandableListActivityTest extends ExpandableListActivity
{
    public void onCreate(Bundle savedInstanceState)
    {
        super.onCreate(savedInstanceState);
        ExpandableListAdapter adapter = new BaseExpandableListAdapter()
        {
            int[] logos = new int[]
                    {
                            R.drawable.p,
                            R.drawable.z,
                            R.drawable.t
                    };
            private String[] armTypes = new String[]
                    { "神族兵种", "虫族兵种", "人族兵种"};
            private String[][] arms = new String[][]
                    {
                            { "狂战士", "龙骑士", "黑暗圣堂", "电兵" },
                            { "小狗", "刺蛇", "飞龙", "自爆飞机" },
                            { "机枪兵", "护士MM" , "幽灵" }
                    };
            //获取指定组位置、指定子列表项处的子列表项数据
            @Override
            public Object getChild(int groupPosition, int childPosition)
            {
                return arms[groupPosition][childPosition];
            }
            @Override
            public long getChildId(int groupPosition, int childPosition)
            {
                return childPosition;
            }
            @Override
            public int getChildrenCount(int groupPosition)
            {
                return arms[groupPosition].length;
            }
            private TextView getTextView()
            {
                AbsListView.LayoutParams lp = new AbsListView.LayoutParams(
                        ViewGroup.LayoutParams.MATCH_PARENT, 64);
                TextView textView = new TextView(ExpandableListActivityTest.
                        this);
                textView.setLayoutParams(lp);
                textView.setGravity(Gravity.CENTER_VERTICAL | Gravity.LEFT);
                textView.setPadding(36, 0, 0, 0);
                textView.setTextSize(20);
                return textView;
            }
            //该方法决定每个子选项的外观
            @Override
            public View getChildView(int groupPosition, int childPosition,
                                     boolean isLastChild, View convertView, ViewGroup parent)
            {
                TextView textView = getTextView();
                textView.setText(getChild(groupPosition, childPosition).
                        toString());
                return textView;
            }
            //获取指定组位置处的组数据
            @Override
            public Object getGroup(int groupPosition)
            {
                return armTypes[groupPosition];
            }
            @Override
            public int getGroupCount()
            {
                return armTypes.length;
            }
            @Override
            public long getGroupId(int groupPosition)
            {
                return groupPosition;
            }
            //该方法决定每个组选项的外观
            @Override
            public View getGroupView(int groupPosition, boolean isExpanded,
                                     View convertView, ViewGroup parent)
            {
                LinearLayout ll = new LinearLayout(
                        ExpandableListActivityTest.this);
                ll.setOrientation(LinearLayout.HORIZONTAL);
                ImageView logo = new ImageView(
                        ExpandableListActivityTest.this);
                logo.setImageResource(logos[groupPosition]);
                ll.addView(logo);
                TextView textView = getTextView();
                textView.setText(getGroup(groupPosition).toString());
                ll.addView(textView);
                return ll;
            }
            @Override
            public boolean isChildSelectable(int groupPosition,
                                             int childPosition)
            {
                return true;
            }
            @Override
            public boolean hasStableIds()
            {
                return true;
            }
        };
        // 设置该窗口显示列表
        setListAdapter(adapter);
    }
}
PreferenceActivity结合PreferenceFragment实现参数设置界面
PreferenceActivity从名字就能看出其作用!用来设置参数时使用的!
在Android3.0之前,PreferenceActivity采用加载选项设置的布局文件。
其中PreferenceActivity只负责加载选项设置列表的布局文件,PreferenceFragment才负责加载选项设置的布局文件。
参数:
PreferenceCategory:用于对参数进行分组
CheckBoxPreference:复选框参数
EditTextPreference:文本框输入参数
ListPreference:列表框输入参数
MultiSelectListPreference:多选列表框输入参数
PreferenceCategory:参数组
Preference:仅供显示的参数
PreferenceScreen:根元素
RingtonePreference:系统铃声选择
SwitchPreference:开关输入参数
使用方法:
1.让Fragment继承自PreferenceFragment。
2.在onCreate(Bundle savedInstanceState)方法中调用addPreferenceFromResource(……)方法加载指定的布局文件。
PreferenceActivityTest代码:
public class PreferenceActivityTest extends PreferenceActivity
{
    @Override
    protected void onCreate(Bundle savedInstanceState)
    {
        super.onCreate(savedInstanceState);
        // 该方法用于为该界面设置一个标题按钮
        if (hasHeaders())
        {
            Button button = new Button(this);
            button.setText("设置操作");
            // 将该按钮添加到该界面上
            setListFooter(button);
        }
    }
    // 重写该该方法,负责加载页面布局文件
    @Override
    public void onBuildHeaders(List target)
    {
        // 加载选项设置列表的布局文件
        loadHeadersFromResource(R.xml.preference_headers, target);
    }
    // 重写该方法,验证各PreferenceFragment是否有效
    @Override
    public boolean isValidFragment(String fragmentName)
    {
        return true;
    }
    public static class Prefs1Fragment extends PreferenceFragment
    {
        @Override
        public void onCreate(Bundle savedInstanceState)
        {
            super.onCreate(savedInstanceState);
            addPreferencesFromResource(R.xml.preferences);
        }
    }
    public static class Prefs2Fragment extends PreferenceFragment
    {
        @Override
        public void onCreate(Bundle savedInstanceState)
        {
            super.onCreate(savedInstanceState);
            addPreferencesFromResource(R.xml.display_prefs);
            // 获取传入该Fragment的参数
            String website = getArguments().getString("website");
            Toast.makeText(getActivity()
                    , "网站域名是:" + website , Toast.LENGTH_LONG).show();
        }
    }
}
preference_headers.xml代码:
<preference-headers
    xmlns:android="http://schemas.android.com/apk/res/android">

    <header android:fragment=
                "org.crazyit.app.PreferenceActivityTest$Prefs1Fragment"
            android:icon="@drawable/ic_settings_applications"
            android:title="程序选项设置"
            android:summary="设置应用的相关选项" />

    <header android:fragment=
                "org.crazyit.app.PreferenceActivityTest$Prefs2Fragment"
            android:icon="@drawable/ic_settings_display"
            android:title="界面选项设置 "
            android:summary="设置显示界面的相关选项">

        <extra android:name="website"
               android:value="www.crazyit.org" />
    header>

    <header
        android:icon="@drawable/ic_settings_display"
        android:title="使用Intent"
        android:summary="使用Intent启动某个Activity">
        <intent android:action="android.intent.action.VIEW"
                android:data="http://weibo.com/aserbao?source=blog&is_all=1" />
    header>
preference-headers>
preferences.xml代码:
<PreferenceScreen
    xmlns:android="http://schemas.android.com/apk/res/android">

    <RingtonePreference
        android:ringtoneType="all"
        android:title="设置铃声"
        android:summary="选择铃声(测试RingtonePreference)"
        android:showDefault="true"
        android:key="ring_key"
        android:showSilent="true">
    RingtonePreference>
    <PreferenceCategory android:title="个人信息设置组">

        <EditTextPreference
            android:key="name"
            android:title="填写用户名"
            android:summary="填写您的用户名(测试EditTextPreference)"
            android:dialogTitle="您所使用的用户名为:" />

        <ListPreference
            android:key="gender"
            android:title="性别"
            android:summary="选择您的性别(测试ListPreference)"
            android:dialogTitle="ListPreference"
            android:entries="@array/gender_name_list"
            android:entryValues="@array/gender_value_list" />
    PreferenceCategory>
    <PreferenceCategory android:title="系统功能设置组 ">
        <CheckBoxPreference
            android:key="autoSave"
            android:title="自动保存进度"
            android:summaryOn="自动保存: 开启"
            android:summaryOff="自动保存: 关闭"
            android:defaultValue="true" />
    PreferenceCategory>
PreferenceScreen>
display_prefs.xml代码
<PreferenceScreen
    xmlns:android="http://schemas.android.com/apk/res/android">
<PreferenceCategory android:title="背景灯光组">

    <ListPreference
        android:key="light"
        android:title="灯光强度"
        android:summary="请选择灯光强度(测试ListPreference)"
        android:dialogTitle="请选择灯光强度"
        android:entries="@array/light_strength_list"
        android:entryValues="@array/light_value_list" />
PreferenceCategory>
<PreferenceCategory android:title="文字显示组 ">

    <SwitchPreference
        android:key="autoScroll"
        android:title="自动滚屏"
        android:summaryOn="自动滚屏: 开启"
        android:summaryOff="自动滚屏: 关闭"
        android:defaultValue="true" />
PreferenceCategory>
PreferenceScreen>