使用TLS加密Docker的API
在学习Docker 的时候,我们都知道通常使用Docker,是使用docker客户端通过本地的socket与本地的docker服务端交互。当我们想通过TCP端口将docker服务器开放到网络上,同时只有信任的客户端可以连接时,就需要通过创建密钥并且分发给信任的客户端来实现。
通过创建自签名的证书文件,并且运行Docker daemon时使用了–tls-verify命令行选项,则docker服务器开启了tls认证,只有有秘钥文件的客户端才能连接到此docker服务器上。只要用于服务器和客户端之间加密的秘钥安全,则docker服务器就会保持安全。docker machine也是使用的这种加密机制。
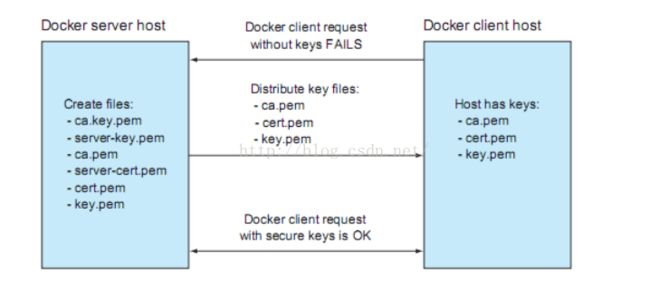
首先需要在服务器上创建密钥文件,然后将其分发给信任的客户端,持有密钥文件的客户端就可以连接到服务器上了,如下图所示:
下面就来看一下创建这些密钥的过程:
创建docker server的证书及相关key文件
创建证书及keys需要使用OpenSSL软件包,如果命令openssl存在,则已安装该软件包,下面使用它生成证书及相关key文件:
[yangdong@centos7 ~]$ sudo su
[sudo] password for yangdong:
[root@centos7 yangdong]# read -s PASSWORD
[root@centos7 yangdong]# read SERVER
centos7
[root@centos7 yangdong]# cd /etc/docker
[root@centos7 docker]# openssl genrsa -aes256 -passout pass:$PASSWORD \
> -out ca-key.pem 2048Generating RSA private key, 2048 bit long modulus
.............................................+++
...................................................................................................+++
e is 65537 (0x10001)
[root@centos7 docker]# openssl req -new -x509 -days 365 -key ca-key.pem -passin pass:$PASSWORD \
> -sha256 -out ca.pem -subj "/C=NL/ST=./L=./O=./CN=$SERVER"
上面的命令从键盘读入输入到PASSWORD变量和SERVER变量中,然后生成了ca-key.pem和ca.pem文件。
[root@centos7 docker]# openssl genrsa -out server-key.pem 2048
Generating RSA private key, 2048 bit long modulus
....................................................+++
.......+++
e is 65537 (0x10001)
[root@centos7 docker]# openssl req -subj "/CN=$SERVER" -new -key server-key.pem \
> -out server.csr
[root@centos7 docker]# openssl x509 -req -days 365 -in server.csr -CA ca.pem -CAkey ca-key.pem \
> -passin "pass:$PASSWORD" -CAcreateserial \
> -out server-cert.pem
Signature ok
subject=/CN=centos7
Getting CA Private Key
上面这组命令生成了server-key.pem和server.csr及server-cert.pem。
[root@centos7 docker]# openssl genrsa -out key.pem 2048
Generating RSA private key, 2048 bit long modulus
..............................+++
....................................................................................................................+++
e is 65537 (0x10001)
[root@centos7 docker]# openssl req -subj '/CN=client' -new -key key.pem \
> -out client.csr
[root@centos7 docker]# sh -c 'echo "extendedKeyUsage=clientAuth" > extfile.cnf'
[root@centos7 docker]# openssl x509 -req -days 365 -in client.csr -CA ca.pem -CAkey ca-key.pem \
> -passin "pass:$PASSWORD" -CAcreateserial -out cert.pem \
> -extfile extfile.cnf
Signature ok
subject=/CN=client
Getting CA Private Key
上面这组命令生成了key.pem及client.csr和cert.pem。最后更改相关文件的权限及移除无用的文件:
[root@centos7 docker]# chmod 0400 ca-key.pem key.pem server-key.pem
[root@centos7 docker]# chmod 0444 ca.pem server-cert.pem cert.pem
[root@centos7 docker]# rm client.csr server.csr
关于openssl命令的相关用法可以参考 相关博客 。
建立docker server
下面就需要使用前面生成的相关key文件来设置docker daemon,如果是Ubuntu需要修改/etc/default/docker文件中的DOCKER_OPTS参数;如果是CentOS7需要在文件/etc/systemd/system/docker.service修改启动的命令行参数,添加如下命令行选项:
--tlsverify \
--tlscacert=/etc/docker/ca.pem \
--tlscert=/etc/docker/server-cert.pem \
--tlskey=/etc/docker/server-key.pem \
-H tcp://0.0.0.0:2376
分发key文件到客户端
下一步需要将生成的key文件分发到信任的客户端。可以通过SCP命令将它们复制过去。需要拷贝的文件包括ca.pem,cert.pem和key.pem:
scp/etc/docker/ca.pem client:/etc/docker
scp/etc/docker/cert.pem client:/etc/docker
scp/etc/docker/key.pem client:/etc/docker
测试
为了简便,在同一台机器上测试。首先用docker客户端不加任何认证信息连接docker server,此种情况下应该会被拒绝:
[root@centos7 yangdong]# docker -H centos7:2376 infoGet http://centos7:2376/v1.23/info: malformed HTTP response "\x15\x03\x01\x00\x02\x02".
* Are you trying to connect to a TLS-enabled daemon without TLS?
然后再使用认证信息连接(需要注意-H参数应该使用生成证书时给定的SERVER值):
[root@centos7 yangdong]# docker --tlsverify --tlscacert=/etc/docker/ca.pem \
> --tlscert=/etc/docker/cert.pem --tlskey=/etc/docker/key.pem \
> -H centos7:2376 infoContainers: 18Running: 0Paused: 0Stopped: 18Images: 53Server Version: 1.11.2Storage Driver: devicemapper
...
可见,通过以上配置,docker daemon通过2376端口开放到网络上,拥有认证的客户端可以连接到此daemon上。
文章来源:Andy's Techblog
