1. SpringBoot学习笔记五:springBoot的单元测试
文章目录
- 1. SpringBoot学习笔记五:springBoot的单元测试
- 1.1. Eclipse创建Maven工程步骤:
- 1.2. 添加依赖
- 1.3. springBoot的高级测试
- 1.4. SpringBoot的个性化启动
- 1.4.1. 自定义banner
- 1.4.2. 打包生成更详细信息
- 1.5. SpringBoot的异常处理
- 1.5.1. 全局异常处理
- 1.5.2. 自定义异常和页面跳转
1.1. Eclipse创建Maven工程步骤:
- Eclipse关联Maven安装包,并配置Maven安装包的setting.xml
- 创建Maven工程:填写Group Id:域名+公司名,填写artifact Id:项目名,这两个是用于项目坐标定位的。
- 创建resource资源文件,在工程的src下添加resource文件,项目名–》右键–》properties–>source–>add File–>添加新建的resource为全局资源文件。
- 教程
1.2. 添加依赖
- springBoot依赖
<properties>
    <project.build.sourceEncoding>UTF-8project.build.sourceEncoding>
    <project.reporting.outputEncoding>UTF-8project.reporting.outputEncoding>
    <java.version>1.8java.version>
properties>
<parent>
    <groupId>org.springframework.bootgroupId>
    <artifactId>spring-boot-starter-parentartifactId>
    <version>2.2.2.RELEASEversion>
parent>

<dependencies>

    <dependency>
        <groupId>junitgroupId>
        <artifactId>junitartifactId>
        <version>4.12version>
        <scope>testscope>
    dependency>
    <dependency>
        <groupId>org.springframework.bootgroupId>
        <artifactId>spring-boot-starter-webartifactId>
    dependency>

    <dependency>
        <groupId>org.projectlombokgroupId>
        <artifactId>lombokartifactId>
        <optional>trueoptional>
    dependency>
    <dependency>
        <groupId>org.springframework.bootgroupId>
        <artifactId>spring-boot-starter-testartifactId>
        <scope>testscope>
    dependency>

    <dependency>
        <groupId>commons-logginggroupId>
        <artifactId>commons-loggingartifactId>
        <version>1.2version>
    dependency>

dependencies>
<build>
    <plugins>
        <plugin>
            <groupId>org.springframework.bootgroupId>
            <artifactId>spring-boot-maven-pluginartifactId>
        plugin>
    plugins>
build>
- 添加单元测试
@RunWith(SpringRunner.class)
@SpringBootTest(classes = {XdClassApplication.class})
public class SpringBootTestDemo {
@Test
public void testOne() {
System.out.println("hello!");
TestCase.assertEquals(1, 1);
}
@Test
public void testTwo() {
System.out.println("two");
}
@Before
public void testBefore() {
System.out.println("before");
}
@After
public void testAfter() {
System.out.println("after");
}
}
- 测试结果
before
hello!
after
before
two
after
1.3. springBoot的高级测试
1.3.1. 测试MVC接口
- @AutoConfigureMockMvc//自动帮我们配置mvc
@Autowired
private MockMvc mocMvc;
- perform:执行一个RequestBuilder请求,andException:添加ResultMatcher—>MockMvcResultMatchers验证规则,andReturn:最后返回相应的MvcResult–>Response
@RunWith(SpringRunner.class)
@SpringBootTest(classes = {XdClassApplication.class})
@AutoConfigureMockMvc
public class MockMvcTestDemo {
@Autowired
private MockMvc mocMvc;
@Test
public void apiTest()throws Exception{
MvcResult andReturn = mocMvc.perform(MockMvcRequestBuilders.get("/test/home"))
.andExpect(MockMvcResultMatchers.status().isOk()).andReturn();
int status = andReturn.getResponse().getStatus();
System.out.println(status);
}
}
1.4. SpringBoot的个性化启动
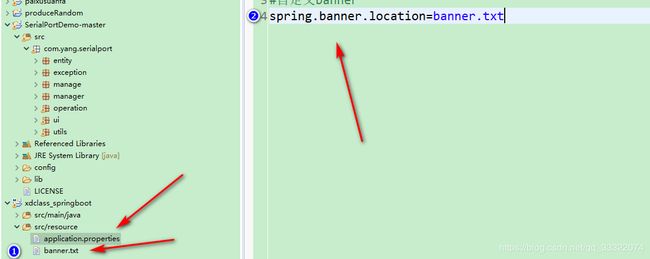
1.4.1. 自定义banner
- 在资源文件里面定义一个txt文件,然后在properties文件里面指定该文件。
1.4.2. 打包生成更详细信息
- java -jar xxxx.jar --debug
1.5. SpringBoot的异常处理
- 针对项目中的空指针异常,数组越界异常,除以0异常,等进行处理
1.5.1. 全局异常处理
- 自定义一个异常处理类,使用注解@RestControllerAdvice(请求建议)
- @ExceptionHandler(value = Exception.class)表明是全局异常Exception(所有的异常)
@RestControllerAdvice
public class CustomExHandler {
private static final Logger LOG=LoggerFactory.getLogger(CustomExHandler.class);
@ExceptionHandler(value = Exception.class)
Object handleException(Exception e,HttpServletRequest httpServletRequest) {
LOG.error("url:{},msg:{}",httpServletRequest.getRequestURL(),e.getMessage());
Map<String,Object> map=new HashMap<>();
map.put("code",100);
map.put("msg",e.getMessage());
map.put("url",httpServletRequest.getRequestURL());
return map;
}
}
1.5.2. 自定义异常和页面跳转
- 引入thymeleaf进行页面渲染
<dependency>
    <groupId>org.springframework.bootgroupId>
    <artifactId>spring-boot-starter-thymeleafartifactId>
dependency>
- 自定义异常类
public class MyException extends RuntimeException {
    private String code;
    private String msg;

    public MyException(String code,String msg) {
        this.code=code;
        this.msg=msg;
    }

    public String getCode() {
        return code;
    }

    public void setCode(String code) {
        this.code = code;
    }

    public String getMsg() {
        return msg;
    }

    public void setMsg(String msg) {
        this.msg = msg;
    }

}
- 模拟异常
@RequestMapping("/api/v1/myext")
public Object myext() {
    throw new MyException("500", "my ext异常");
}
- 异常处理
@ExceptionHandler(value = MyException.class)
Object handleMyException(MyException e) {
ModelAndView modelAndView=new ModelAndView();
modelAndView.setViewName("error.html");
modelAndView.addObject("msg",e.getMessage());
return modelAndView;
}
@ExceptionHandler(value = MyException.class)
Object handleMyException(MyException e,HttpServletRequest httpServletRequest) {
Map<String,Object> map=new HashMap<>();
map.put("code",e.getCode());
map.put("msg",e.getMessage());
map.put("url",httpServletRequest.getRequestURL());
return map;
}