白鹭引擎(egret,以下简称egret)中对锚点(anchorOffsetX,anchorOffsetY)的使用目的,基本是和CSS3属性中的transform-origin是一致的,大多是基于元素中心的旋转和放大。但使用方法上是有区别的,比如,egret的默认锚点在左上角,而transform-origin默认在元素中心。此外,egret这类工具(还有createjs,pixi等)本身是基于canvas/webgl的画布上进行绘制,如果使用chrome这些调试工具直接调试的话,元素信息无法被浏览器获取,必然给调试增加难度。
纸上得来终觉浅,绝知此事要躬行
1. 锚点的作用
我们以一根线段旋转90度为例:先绘制一根水平的直线,长度为100
protected startCreateScene(): void {
    this.drawOneLine();
}

protected drawOneLine(){
    let ns = new egret.Shape();

    ns.x = 100;
    ns.y = 100;

    ns.graphics.lineStyle(2,0xFF0000);
    ns.graphics.moveTo(0,0);
    ns.graphics.lineTo(100,0);

    this.addChild(ns);
}
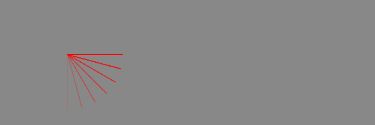
现在我们修改下代码,在默认锚点的情况下,旋转90度。为了方便观察,我给线段做了渐变处理,越靠近90度的线段颜色越浅:
protected startCreateScene(): void {
    this.drawLine(0);
}

protected drawLine(angle): void {
    let ns = new egret.Shape();

    ns.x = 100;
    ns.y = 100;

    ns.graphics.lineStyle(2,0xFF0000);
    ns.graphics.moveTo(0,0);
    ns.graphics.lineTo(100,0);
    ns.alpha = 1-(angle/90)*0.9;
    ns.rotation = angle;

    this.addChild(ns);

    if(angle < 90){
        this.drawLine(angle+15);
    }
}
从图片中我们可以观察到: 线段顺时针旋转了90度,中心点位于线段左边的端点
现在我们设置锚点,将中心点居中
protected startCreateScene(): void {
    this.drawLine(0);
    this.drawLineCenter(0);
}

protected drawLineCenter(angle): void {
    let ns = new egret.Shape();

    ns.x = 100;
    ns.y = 300;

    ns.anchorOffsetX = 50; // 设置锚点横坐标,位于线段中心

    ns.graphics.lineStyle(2,0x000000);
    ns.graphics.moveTo(0,0);
    ns.graphics.lineTo(100,0);
    ns.alpha = 1-(angle/90)*0.9;
    ns.rotation = angle;

    this.addChild(ns);

    if(angle < 90){
        this.drawLineCenter(angle+15);
    }
}
好了,锚点的示例到此为止。
接下来说这篇文章的关键,上图中,有一个不太正常的地方,即黑色线段往左偏移,这个对于刚接触锚点概念的同学来说,无疑是非常残忍的,说白了就是个坑。明明所有元素都放在其应该出现的位置上,并且实现了动效,所有的属性设置也都正确,怎么元素就偏了呢?我最初发生这种事(createjs里),很不理解,结果从最基础的图片素材开始,把尺寸和位置重新计算一遍,反复查看代码中一切有的没的的配置,最后一点点去掉所有页面中不相关的元素,才能发现是锚点惹的祸。
2. 锚点的正确打开方式
现在,我们仍然以长度100的水平线段为例,将锚点依次设置为0,50,100,观察这三根线段的情况,代码如下:
protected startCreateScene(): void {
    this.drawLineAnchor(100,100,0);
    this.drawLineAnchor(100,150,50);
    this.drawLineAnchor(100,200,100);
}

protected drawLineAnchor(x,y,anchorX):void{
    let ns = new egret.Shape();

    ns.x = x;
    ns.y = y;

    ns.anchorOffsetX = anchorX;

    ns.graphics.lineStyle(2,0x000000);
    ns.graphics.moveTo(0,0);
    ns.graphics.lineTo(100,0);
    this.addChild(ns);
}
从上图中可以很明显的看到锚点对于画面中真实绘制出线段的影响
即,有元素a,a在画面中实际的横坐标为
x',则x' = a.x - a.anchorOffsetX
关键代码实际在于moveTo那一行,比如,当元素根据属性被定位到x=100,y=100后,由于其左上角的锚点由于被设置为anchorOffsetX=50,anchorOffsetY=0的关系,当代码进行到moveTo时,会按照锚点的坐标向左偏移50位置开始绘制初始点。
所以,如果我们必须改变moveTo的初始点和重点,或者改变元素本身的x坐标,才能达到和原线段相同的位置:
protected startCreateScene(): void {
    this.drawLineAnchor(100, 100, 0);
    this.drawLineAnchorFixMove(100, 150, 50); // 修改起点终点
    this.drawLineAnchorFixX(100, 200, 100); // 修改x坐标
}

protected drawLineAnchor(){...} // 方法略

protected drawLineAnchorFixMove(x, y, anchorX): void {
    let ns = new egret.Shape();

    ns.x = x;
    ns.y = y;

    ns.anchorOffsetX = anchorX;

    ns.graphics.lineStyle(1, 0x000000);
    ns.graphics.moveTo(0 + anchorX, 0); // 修改线段起始点
    ns.graphics.lineTo(100 + anchorX, 0); // 修改线段终点
    this.addChild(ns);
}

protected drawLineAnchorFixX(x, y, anchorX): void {
    let ns = new egret.Shape();

    ns.x = x + anchorX; // 修改整个容器的横坐标
    ns.y = y;

    ns.anchorOffsetX = anchorX;

    ns.graphics.lineStyle(1, 0x000000);
    ns.graphics.moveTo(0, 0);
    ns.graphics.lineTo(100, 0);
    this.addChild(ns);
}
同理,我们可以得知如果修改了anchorOffsetY会发生怎样的变化,
有元素
a,a在画面中实际的横坐标为x',纵坐标为y',则
x' = a.x - a.anchorOffsetX
y' = a.y - a.anchorOffsetY
现在大家应该能理解设置锚点之后元素的具体位置了。总之当设置了锚点后,为了回到原位,最通用最简单的做法,就是将其x,y减去自己对应的anchorOffset属性。
以上。


