微信公众号发送客服消息(文本、图文)和模板消息
壹:客服消息
微信文档发送客服消息链接:https://api.weixin.qq.com/cgi-bin/message/custom/send?access_token=ACCESS_TOKEN
一.根据链接我们需要获取access_token,以下先介绍access_token的获取。
1)获取access_token的链接:https://api.weixin.qq.com/cgi-bin/token?grant_type=client_credential&appid=APPID&secret=APPSECRET
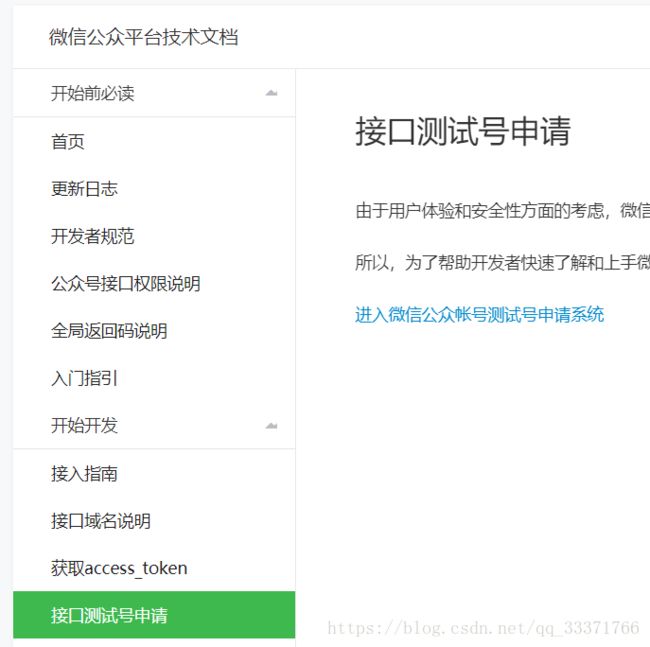
1.这里是基于微信公众号的,所以必须先得自己有一个公众号(没有则在微信文档里申请)。
2.由于获取access_token是需要网络请求,下面讲一下https的网络请求。
package com.cxb.accesstoken;
import java.security.cert.CertificateException;
import java.security.cert.X509Certificate;
import javax.net.ssl.X509TrustManager;
/**
 * @author ChenXb
 *
 * 2018年4月18日
 *             https的请求安全问题          这里只需要实现该接口即可
 */
public class MyX509TrustManager implements X509TrustManager{


@Override
public void checkClientTrusted(X509Certificate[] chain, String authType) throws CertificateException {
// TODO Auto-generated method stub

}


@Override
public void checkServerTrusted(X509Certificate[] chain, String authType) throws CertificateException {
// TODO Auto-generated method stub

}


@Override
public X509Certificate[] getAcceptedIssuers() {
// TODO Auto-generated method stub
return null;
}

}
package com.cxb.accesstoken;
import java.io.BufferedReader;
import java.io.IOException;
import java.io.InputStream;
import java.io.InputStreamReader;
import java.io.OutputStream;
import java.net.HttpURLConnection;
import java.net.MalformedURLException;
import java.net.URL;
import java.security.KeyManagementException;
import java.security.NoSuchAlgorithmException;
import java.security.NoSuchProviderException;
import javax.net.ssl.HttpsURLConnection;
import javax.net.ssl.SSLContext;
import javax.net.ssl.SSLSocketFactory;
import javax.net.ssl.TrustManager;
/**
 * @author ChenXb
 *
 *         2018年4月18日
 */
public class HttpUtil {
/**
 * httpsRequest https的请求方式
 *
 * @author 81046
 * @date 2018年4月18日下午3:55:14
 * @param Url
 * @param method
 * @param outStr
 * @return
 */
public static String httpsRequest(String Url, String method, String outStr) {
StringBuffer buffer = null;
try {
SSLContext sslContext = SSLContext.getInstance("SSL", "SunJSSE");
TrustManager[] tm = { new MyX509TrustManager() };
// 初始化
sslContext.init(null, tm, new java.security.SecureRandom());
// 获取sslSocketFactory对象
SSLSocketFactory ssf = sslContext.getSocketFactory();
// 建立连接
URL url = new URL(Url);
HttpsURLConnection conn = (HttpsURLConnection) url.openConnection();
conn.setRequestMethod(method);
// 设置当前实例使用sslSocketFactory
conn.setSSLSocketFactory(ssf);
conn.setDoOutput(true);
conn.connect();
// 先写入数据,再读取数据
if (outStr != null) {
OutputStream os = conn.getOutputStream();
os.write(outStr.getBytes("UTF-8"));
os.close();
}
// 读取服务端的内容
InputStream is = conn.getInputStream();
InputStreamReader isr = new InputStreamReader(is, "UTF-8");
BufferedReader br = new BufferedReader(isr);
buffer = new StringBuffer();
String line = null;
while ((line = br.readLine()) != null) {
buffer.append(line);
}
} catch (MalformedURLException e) {
e.printStackTrace();
} catch (IOException e) {
e.printStackTrace();
} catch (NoSuchAlgorithmException e) {
e.printStackTrace();
} catch (NoSuchProviderException e) {
e.printStackTrace();
} catch (KeyManagementException e) {
e.printStackTrace();
}
return buffer.toString();
}
/**
 * httpRequest http的请求方式
 *
 * @author 81046
 * @date 2018年4月18日下午3:54:45
 * @param Url
 * @return
 */
public static String httpRequest(String Url, String method) {
StringBuffer buffer = null;
try {
// 建立连接
URL url = new URL(Url);
HttpURLConnection conn = (HttpURLConnection) url.openConnection();
conn.setRequestMethod(method);
conn.setDoOutput(true);
conn.connect();
// 读取服务端的内容
InputStream is = conn.getInputStream();
InputStreamReader isr = new InputStreamReader(is, "UTF-8");
BufferedReader br = new BufferedReader(isr);
buffer = new StringBuffer();
String line = null;
while ((line = br.readLine()) != null) {
buffer.append(line);
}


} catch (MalformedURLException e) {
e.printStackTrace();
} catch (IOException e) {
e.printStackTrace();
}
return buffer.toString();
}


public static void main(String[] args) {
String url = "https://www.baidu.com";
String httpsRequest = httpsRequest(url, "GET", null);
System.out.println(httpsRequest);
}

}
3.上面简单实现了https的请求,下面则开始获取AccessToken。
package com.cxb.accesstoken;
/**
 * @author ChenXb
 *
 *         2018年4月18日   这个类只是为了将获取的accessToken转为对象而建
 */
public class AccessToken {

private String access_token;
private int expires_in;


public String getAccess_token() {
return access_token;
}


public void setAccess_token(String access_token) {
this.access_token = access_token;
}


public int getExpires_in() {
return expires_in;
}


public void setExpires_in(int expires_in) {
this.expires_in = expires_in;
}


@Override
public String toString() {
return "AccessToken [access_token=" + access_token + ", expires_in=" + expires_in + "]";
}

}
package com.cxb.accesstoken;
import com.google.gson.Gson;
/**
 * @author ChenXb
 *     这里是获取微信的accessToken
 * 2018年4月18日
 */
public class AccessTokenUtil {
public static String url="https://api.weixin.qq.com/cgi-bin/token?grant_type=client_credential&appid=APPID&secret=APPSECRET";

public static String getAccessToken(String APPID,String APPSECRET){
url=url.replaceAll("APPID", APPID).replaceAll("APPSECRET", APPSECRET);
String json = HttpUtil.httpsRequest(url,"GET",null);
Gson gson=new Gson();
AccessToken accessToken = gson.fromJson(json, AccessToken.class);
String access_token = accessToken.getAccess_token();
return access_token;
}

public static void main(String[] args) {
String accessToken = getAccessToken(Account.APPID, Account.APPSECRET);
System.out.println(accessToken);
}

}
package com.cxb.accesstoken;
/**
 * @author ChenXb
 *
 * 2018年4月18日
 */
public class Account {
//常量值,为了方便修改而不修改代码
public static final String APPID="wx92a6376d2c2a7172";
public static final String APPSECRET="11c56b1ecc4ebdd2da482dcd03f50368";
public static final String OPENID="oPZTov-EmzLWvIPT5Fao-1QU7-M8";
public static final String TEMPLETEID="fzpznIjhmHBlzSNy4mttsmOCW8qqJUIRvz5aKD8VADs";
}
4.以上则完成了accessToken的获取。接下来继续客服消息的实现。因为发送消息都是json数据,接下来将采用java对象来实现json数据的实现。
1)文本消息、图文消息实体类的实现
package com.cxb.wx;
/**
 * @author ChenXb
 *
 *         2018年4月18日
 *                    消息共有的基类
 */
public class Basebean {
private String touser;
private String msgtype;


public String getTouser() {
return touser;
}


public void setTouser(String touser) {
this.touser = touser;
}


public String getMsgtype() {
return msgtype;
}


public void setMsgtype(String msgtype) {
this.msgtype = msgtype;
}
}
package com.cxb.wx;
/**
 * @author ChenXb
 *
 * 2018年4月18日
 */
public class Text {
private String content;  //发送的文本内容


public String getContent() {
return content;
}


public void setContent(String content) {
this.content = content;
}


}
package com.cxb.wx;
/**
 * @author ChenXb
 *
 * 2018年4月18日
 */
public class TextMesage extends Basebean{

private Text text;


public Text getText() {
return text;
}


public void setText(Text text) {
this.text = text;
}


}
***这里是图文的实体类了 思路就是一层一层的解剖,建类,最终融合到一个类里边即可。
package com.cxb.wx;


/**
 * @author ChenXb
 *
 *         2018年4月18日    这里是真正的图文消息
 */
public class Articles {
private String title; //标题
private String description;  //描述
private String url;  //该图文的点击跳转链接
private String picurl;  //图片的URL


public String getTitle() {
return title;
}


public void setTitle(String title) {
this.title = title;
}


public String getDescription() {
return description;
}


public void setDescription(String description) {
this.description = description;
}


public String getUrl() {
return url;
}


public void setUrl(String url) {
this.url = url;
}


public String getPicurl() {
return picurl;
}


public void setPicurl(String picurl) {
this.picurl = picurl;
}
}
package com.cxb.wx;
import java.util.List;
/**
 * @author ChenXb
 *
 *         2018年4月18日
 */
public class Kfnews{
private List articles;


public List getArticles() {
return articles;
}


public void setArticles(List articles) {
this.articles = articles;
}


}
package com.cxb.wx;
/**
 * @author ChenXb
 *
 *         2018年4月18日   这里就把图文的内容包裹进来了    父类Basebean里面的包括了接收者的openid 和消息类型
 */
public class BaseNews extends Basebean{
private Kfnews news;


public Kfnews getNews() {
return news;
}


public void setNews(Kfnews news) {
this.news = news;
}
}
5.以上完成了文本和图文信息发送内容的实体类的包裹,接下来开始发送客服消息。
package com.cxb.wx;
import java.util.ArrayList;
import java.util.List;
import com.cxb.accesstoken.AccessTokenUtil;
import com.cxb.accesstoken.Account;
import com.cxb.accesstoken.HttpUtil;
import com.google.gson.Gson;
import net.sf.json.JSONObject;
/**
 * @author ChenXb
 *
 *         2018年4月18日
 */
public class SendKfMsgManager {
public static void main(String[] args) {
//发送文本消息
String text = getText();
System.out.println(text);
SendMsg(text);

//发送图文消息
String getkfnews = getkfnews(Account.OPENID);
System.out.println(getkfnews);
SendMsg(getkfnews);
}

/**
*          图文消息
* getkfnews
* @author 81046
* @date 2018年4月18日下午3:22:24
* @param openid
* @return
*/
public static String getkfnews(String openid) {
//先实例化图文内容
Articles art1 = new Articles();
art1.setDescription("假如没有热情世界上任何伟大的事业都不会成功那么给我们一个支点用热情去撼动无限的未来吧!");
art1.setPicurl("http://www.joffro.com/Activity/upload/sendImg.jpg");
art1.setTitle("商品防伪溯源大师");
art1.setUrl("http://www.baidu.com");

Articles art2 = new Articles();
art2.setDescription("传统习俗出门赏月、燃灯放焰、喜猜灯谜、共吃元宵、拉兔子灯等。此外,不少地方元宵节还增加了耍龙灯、耍狮子、踩高跷、划旱船、扭秧歌、打太平鼓等传统民俗表演。");
art2.setPicurl("http://www.joffro.com/Activity/upload/hello.jpg");
art2.setTitle("欢度元宵");
art2.setUrl("https://baike.baidu.com/item/%E5%85%83%E5%AE%B5%E8%8A%82/118213?fr=aladdin&fromid=19472310&fromtitle=%E5%85%83%E5%AE%B5");
List list = new ArrayList();
Kfnews news = new Kfnews();
list.add(art1);
list.add(art2);
news.setArticles(list);


BaseNews kfbean = new BaseNews();
kfbean.setMsgtype("news");
kfbean.setTouser(openid);
kfbean.setNews(news);
//对象转json 方式1
String jsonkfbean = JSONObject.fromObject(kfbean).toString();
System.out.println(jsonkfbean);
//方式2
Gson gson=new Gson();
String json = gson.toJson(kfbean);
System.out.println(json);
return json;
}

/**
* 文本消息
*/
public static String getText(){
TextMesage tm=new TextMesage();
Text t=new Text();
t.setContent("我曾经跨过山和大海,也穿过人山人海!");

tm.setText(t);
tm.setMsgtype("text");
tm.setTouser(Account.OPENID);

//将对象转为json
Gson gson=new Gson();
String json = gson.toJson(tm);
return json;
}

/**
* 发送消息的方法
*/
public static void SendMsg(String json){
//发送消息的url
String url="https://api.weixin.qq.com/cgi-bin/message/custom/send?access_token=ACCESS_TOKEN";
String accessToken = AccessTokenUtil.getAccessToken(Account.APPID, Account.APPSECRET);
url = url.replaceAll("ACCESS_TOKEN", accessToken);
String httpsRequest = HttpUtil.httpsRequest(url, "POST", json);
System.out.println("***httpsRequest>"+httpsRequest);
}

}
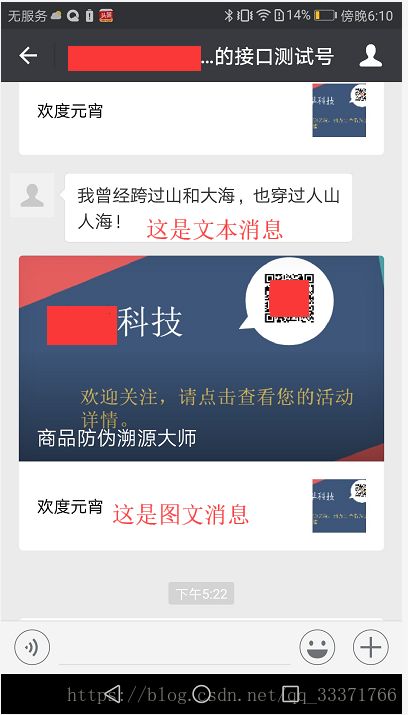
6.自此客服消息的文本和图文消息发送完毕。效果如图。
贰:模板消息,这里就简单一些了,上面的获取accessToken都是通用的。
package com.cxb.wx.Templete;
import com.cxb.accesstoken.AccessTokenUtil;
import com.cxb.accesstoken.Account;
import com.cxb.accesstoken.HttpUtil;
import com.google.gson.Gson;
/**
 * @author ChenXb
 *
 * 2018年4月18日
 */
public class TempleteMananger {
public static void main(String[] args) {
String data = getData();
System.out.println(data);
sendTemplete(data);

}


/**
* 发送模板消息
*/
public static void sendTemplete(String json){
//发送消息的url
String url="https://api.weixin.qq.com/cgi-bin/message/template/send?access_token=ACCESS_TOKEN";
String accessToken = AccessTokenUtil.getAccessToken(Account.APPID, Account.APPSECRET);
url = url.replaceAll("ACCESS_TOKEN", accessToken);
String httpsRequest = HttpUtil.httpsRequest(url, "POST", json);
System.out.println("***httpsRequest>"+httpsRequest);

}


/**
*        要发送的数据整理
* getData
* @author 81046
* @date 2018年4月18日下午5:17:38
* @return
*/
public static String getData(){
First first=new First();
first.setColor("#173177");
first.setValue("向您工资卡发放");

KeyWord1 keyWord1=new KeyWord1();
KeyWord2 keyWord2=new KeyWord2();
KeyWord3 keyWord3=new KeyWord3();
KeyWord4 keyWord4=new KeyWord4();
KeyWord5 keyWord5=new KeyWord5();

keyWord1.setColor("#173177");
keyWord1.setValue("100.00");

keyWord2.setColor("#173177");
keyWord2.setValue("200.00");

keyWord3.setColor("#173177");
keyWord3.setValue("300.00");

keyWord4.setColor("#173177");
keyWord4.setValue("400.00");

keyWord5.setColor("#173177");
keyWord5.setValue("500.00");


Remark remark=new Remark();
remark.setColor("#173177");
remark.setValue("详细情况请登录公司人事查询。");

Data data=new Data();
data.setFirst(first);
data.setKeyWord1(keyWord1);
data.setKeyWord2(keyWord2);
data.setKeyWord3(keyWord3);
data.setKeyWord4(keyWord4);
data.setKeyWord5(keyWord5);
data.setRemark(remark);


//由于是测试账号,所以以上数据都接收不到,这里只是做了实现。以上设计到的实体类下面加上。

Templete templete=new Templete();
templete.setData(data);
templete.setTemplate_id(Account.TEMPLETEID);
templete.setUrl("http://www.baidu.com");
templete.setTouser(Account.OPENID);


Gson gson=new Gson();
String json = gson.toJson(templete);
return json;
}
}
1.模板消息所涉及的实体类,(其实你使用json的拼接,这些实体类完全不用,看自己的需求了)
package com.cxb.wx.Templete;


/**
 * @author ChenXb
 *
 *         2018年4月18日   这是基类
 */
public class BaseTemplete {


private String value;


private String color;


public String getValue() {
return value;
}


public void setValue(String value) {
this.value = value;
}


public String getColor() {
return color;
}


public void setColor(String color) {
this.color = color;
}


}
package com.cxb.wx.Templete;


/**
 * @author ChenXb
 *
 * 2018年4月18日
 */
public class First extends BaseTemplete{


}
package com.cxb.wx.Templete;


/**
 * @author ChenXb
 *
 * 2018年4月18日
 */
public class KeyWord1 extends BaseTemplete{


}
//.......省略了KeyWord2 - KeyWord5
//KeyWord2 以及345和KeyWord1一样的,就不贴了。
package com.cxb.wx.Templete;


/**
 * @author ChenXb
 *
 * 2018年4月18日
 */
public class Remark extends BaseTemplete{


}
package com.cxb.wx.Templete;
/**
 * @author ChenXb
 *
 *         2018年4月18日     该类就是将keyword和remark整理在一起
 */
public class Data {
private First first;
private KeyWord1 keyWord1;
private KeyWord2 keyWord2;
private KeyWord3 keyWord3;
private KeyWord4 keyWord4;
private KeyWord5 keyWord5;
private Remark remark;


public First getFirst() {
return first;
}


public void setFirst(First first) {
this.first = first;
}


public KeyWord1 getKeyWord1() {
return keyWord1;
}


public void setKeyWord1(KeyWord1 keyWord1) {
this.keyWord1 = keyWord1;
}


public KeyWord2 getKeyWord2() {
return keyWord2;
}


public void setKeyWord2(KeyWord2 keyWord2) {
this.keyWord2 = keyWord2;
}


public KeyWord3 getKeyWord3() {
return keyWord3;
}


public void setKeyWord3(KeyWord3 keyWord3) {
this.keyWord3 = keyWord3;
}


public KeyWord4 getKeyWord4() {
return keyWord4;
}


public void setKeyWord4(KeyWord4 keyWord4) {
this.keyWord4 = keyWord4;
}


public KeyWord5 getKeyWord5() {
return keyWord5;
}


public void setKeyWord5(KeyWord5 keyWord5) {
this.keyWord5 = keyWord5;
}


public Remark getRemark() {
return remark;
}


public void setRemark(Remark remark) {
this.remark = remark;
}


}
package com.cxb.wx.Templete;
/**
 * @author ChenXb
 *                  https://api.weixin.qq.com/cgi-bin/message/template/send?access_token=ACCESS_TOKEN
 * 2018年4月18日
 */
public class Templete {
private String touser;  //接收者的openid
private String template_id;  //模板id
private String url;   //点击该模板的跳转链接
private Data data;  //上面整理的数据
public String getTouser() {
return touser;
}
public void setTouser(String touser) {
this.touser = touser;
}
public String getTemplate_id() {
return template_id;
}
public void setTemplate_id(String template_id) {
this.template_id = template_id;
}
public String getUrl() {
return url;
}
public void setUrl(String url) {
this.url = url;
}
public Data getData() {
return data;
}
public void setData(Data data) {
this.data = data;
}

}


