基于Servlet的学生管理系统
一、缘起
四个月前,我曾经写过一个基于JSP的学生管理系统《基于JSP的学生管理系统》,由于要交作业的关系 ,这一次我又带来了一个基于Servlet的学生管理系统,在原有的基础上新增了其他功能,后端使用了经典MVC分层架构,前端使用了一些比较新颖的框架,介系你没有van过的船新版本 。
二、使用到的技术
1.前端
- HTML5
- CSS3
- JQuery 3.2.1
- 组件库:BootStrap 4.1.0
- 表单校验:nice-validator 1.1.4
- Web应用框架:VUE
- 异步请求:AJAX
2.后端
- Servlet
3.使用到的工具包
- 连接数据库:mysql-connector-java 5.1.6
- 单元测试:junit 4.12
- MD5加密:commons-codec 1.10
- bean工具:commons-beanutils 1.9.3
- Google的JSON生成器:gson 2.3.1
4.数据库
- MySQL 5.7.10
4.本人电脑环境
- 操作系统:Windows10
- Java版本:1.8.0_172
- TomCat:8.5
- IDE:MyEclipse 2017 CI
- 浏览器:Google Chrome 69 和Firefox
三、项目相关
1.项目下载
项目已在GitHub上托管开源,请遵守MIT协议进行使用。我的GitHub
2.项目安装
详情请查看我项目GitHub下的ReadMe
3.在线体验
本项目已部署在我的服务器上,以供各位同学进行体验,若在体验过程发现有BUG,请务必在GitHub发出Issuse或者在下面评论留言,感谢您的反馈。在线体验
由于超级管理员能够删除其他管理员账号,故这里只能给出普通管理员账号供大家使用,超级管理员和普通管理员的差别是普通管理员少了一个管理员管理模块。
- 账号:李白
- 密码:test1234
请各位同学务必保持数据库整洁,在下线前务必删除体验新增的内容,以给接下来体验的人有个良好体验。
也由于我的服务器只是一个性能一般的学生服务器,没有啥防护能力,求各位黑客大大放小弟服务器一条生路,如果服务器出现异常,在线体验功能只能够下线了。
四、管理页面预览
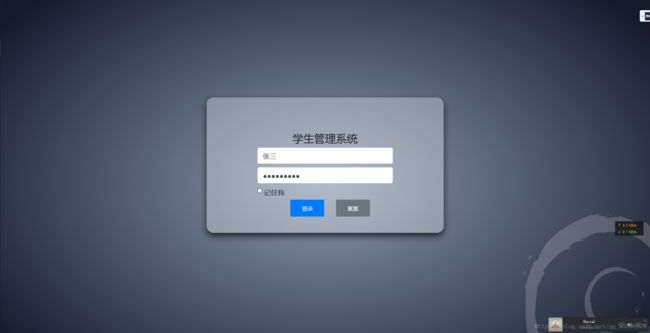
1.登录页面
2.主页面
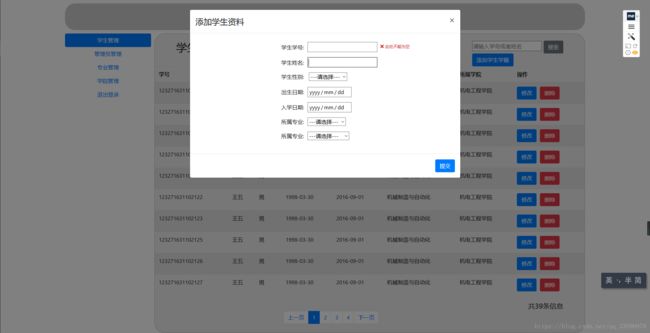
3.学生添加功能
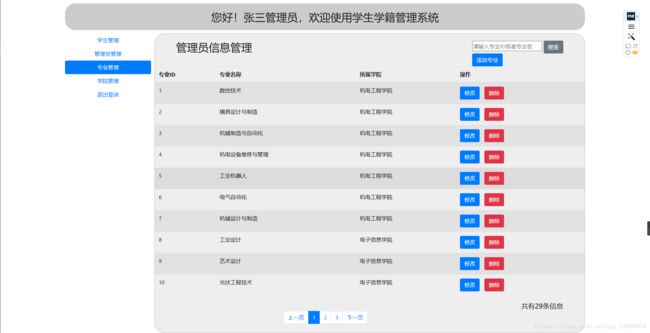
4.专业管理
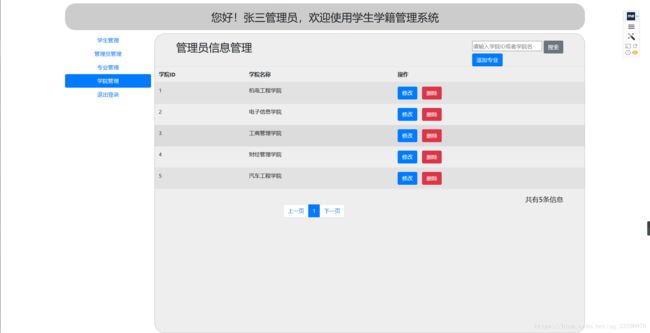
5.学院管理
五、项目实现功能亮点
- 本项目使用了
Ajax技术实现异步刷新,使一些固定的内容,如导航栏,顶部欢迎栏,不用每次跳转时重新刷新,减少了 渲染DOM时所需要的内存。 - 实现前后端分离,不再依赖服务器对
JSP渲染,减少了耦合。 - 前端使用了比较新颖的框架,如
VUE,组件库BootStrap等。 - 实现前端后端都具备数据校验,防止非法数据污染服务器。
- 实现下拉框二级联动,内容依据后台服务器内容进行加载。
六、项目结构
1.前端
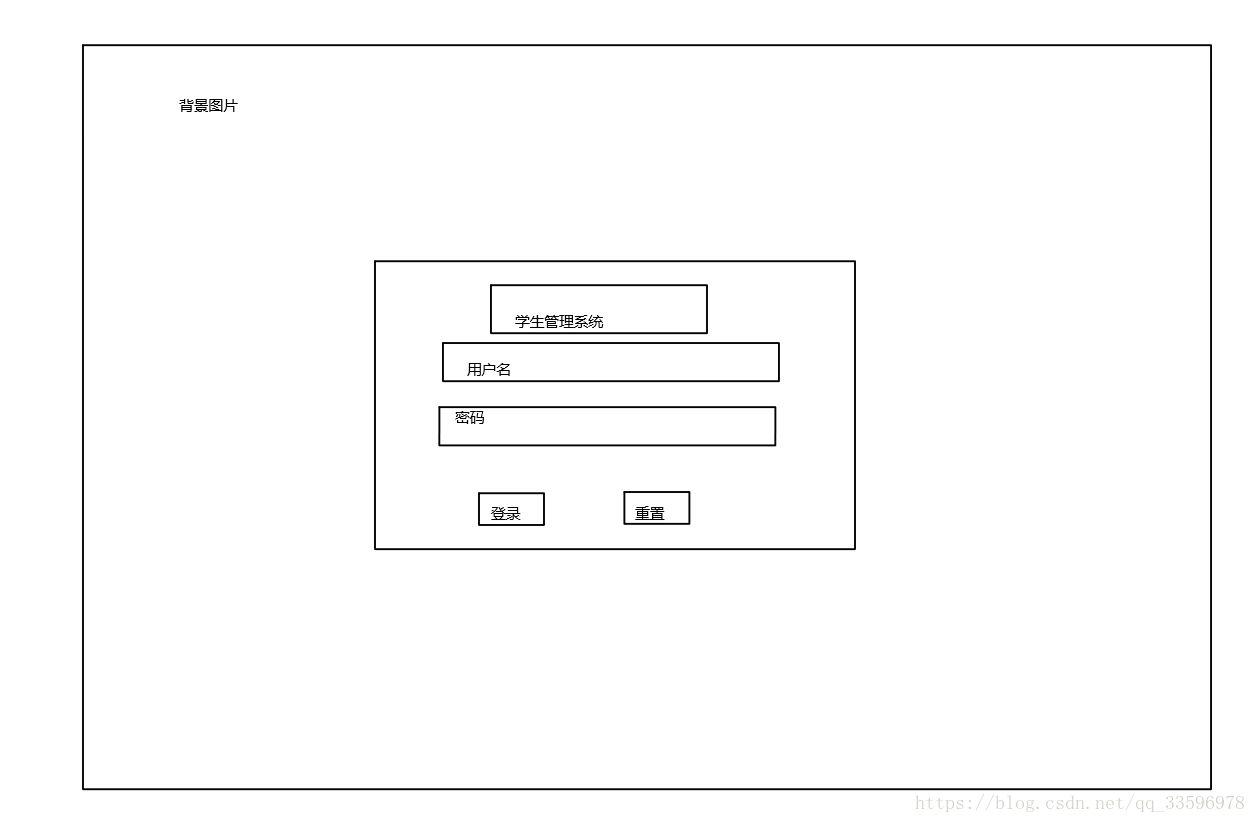
(1)登录页面布局
(2)主页面
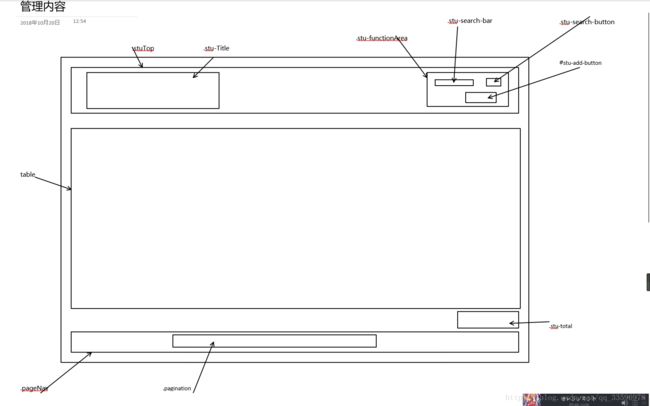
(3)内容管理
2.后端
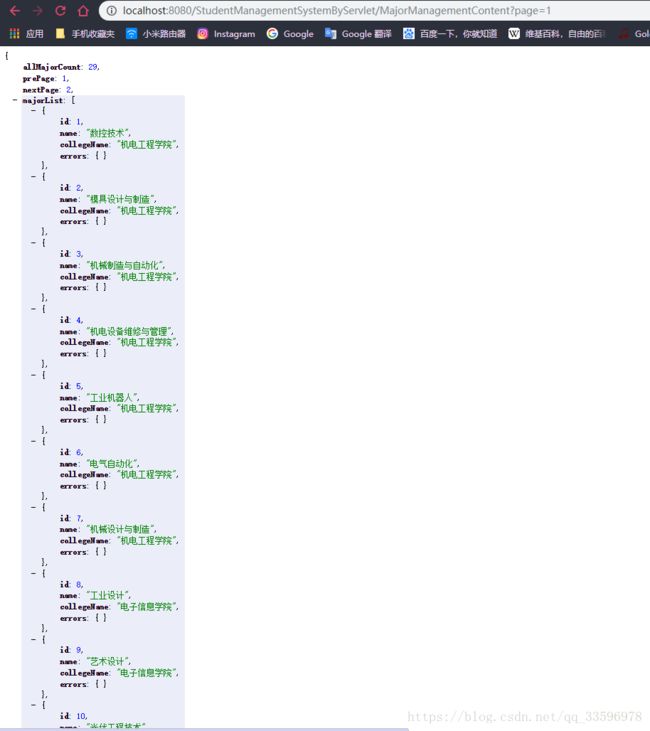
(1)后端接口
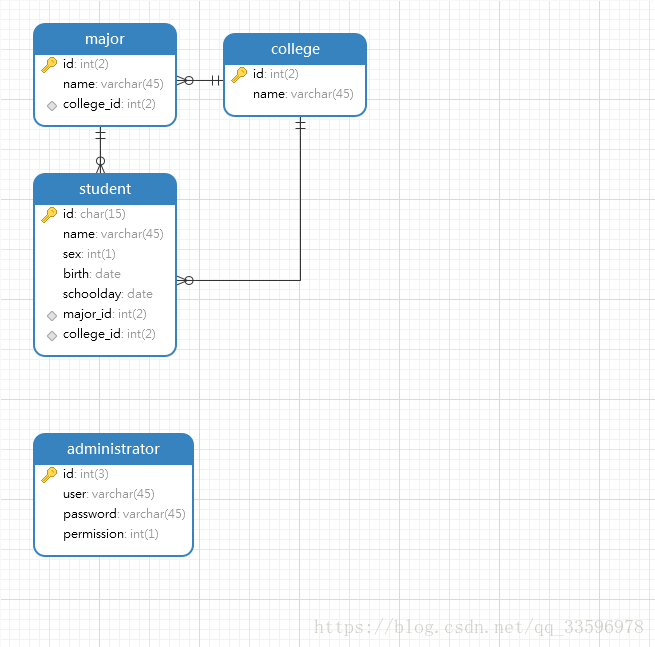
3.数据库E-R图
七、关键功能实现
1.如何实现Servlet返回JSON格式的数据?
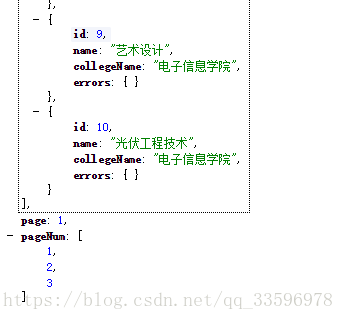
一般来说,Servlet并不像Spring那样有返回JSON数据的能力,所以我们只能依赖第三方的工具类,这里我推荐使用Google公司开发的GSON工具。它的用法很简单,只需要使用gson.toJson()方法即可,这个方法能够转换例如String字符串,List列表,Map键值对等,一般我们都会使用Map来进行存储,如以下步骤:
我们在MajorManagementServlet.java这个servlet中
package com.management.web.controller.major;

import java.io.IOException;
import java.io.PrintWriter;
import java.util.HashMap;
import java.util.List;
import java.util.Map;

import javax.servlet.ServletException;
import javax.servlet.annotation.WebServlet;
import javax.servlet.http.HttpServlet;
import javax.servlet.http.HttpServletRequest;
import javax.servlet.http.HttpServletResponse;
import javax.servlet.http.HttpSession;

import com.google.gson.Gson;
import com.management.entities.Major;
import com.management.service.MajorService;
import com.management.service.impl.MajorServiceImpl;
import com.management.utils.PageUtils;

/**
 * 展示全部专业
 *  需要传入参数:
 * 		request:
 * 			page(当前页)
 * @author CheungChingYin
 *
 */
@WebServlet("/MajorManagementContent")
public class MajorManagementServlet extends HttpServlet {
	private static final long serialVersionUID = 1L;

	protected void doGet(HttpServletRequest request, HttpServletResponse response) throws ServletException, IOException {

		HttpSession session = request.getSession();
		if (session.getAttribute("admin") == null) {
			response.sendRedirect(request.getContextPath() + "/Login");
			return;
		}
		request.setCharacterEncoding("UTF-8");
		if (session.getAttribute("admin") == null) {
			response.sendRedirect(request.getContextPath() + "/Login");
			return;
		}
		MajorService service = new MajorServiceImpl();
		List<Major> majorList = service.searchAllMajor();
		Integer listCount = majorList.size();
		if(request.getParameter("page") == null){
			return;
		}
		//分页功能
		Integer page = Integer.parseInt(request.getParameter("page"));
		Integer prePage = PageUtils.prePageHandler(page);
		Integer nextPage = PageUtils.nextPageHandler(page, listCount);
		Integer pages = PageUtils.pagesHandler(listCount);
		List<Integer> pageNum = PageUtils.pageHandler(page, listCount);
		if(page == pages){
			majorList = majorList.subList((page - 1) * 10, listCount);
		}else{
			majorList = majorList.subList((page - 1) * 10, page * 10);
		}
		response.setHeader("Content-Type", "application/json");
		response.setCharacterEncoding("UTF-8");
		PrintWriter out = response.getWriter();
		Gson gson = new Gson();
		Map<String,Object> map = new HashMap<String, Object>();
		map.put("majorList", majorList);
		map.put("allMajorCount", listCount);
		map.put("prePage", prePage);
		map.put("nextPage", nextPage);
		map.put("pageNum", pageNum);
		map.put("page", page);

		String res = gson.toJson(map);
		out.print(res);
	}

	protected void doPost(HttpServletRequest request, HttpServletResponse response) throws ServletException, IOException {
		// TODO Auto-generated method stub
		doGet(request, response);
	}

}
当中有这样一段语句
response.setHeader("Content-Type", "application/json");//设置响应头的内容类别为JSON,以便前端更好识别
response.setCharacterEncoding("UTF-8");//设置相应格式为UTF-8,防止输出中文乱码
PrintWriter out = response.getWriter();//获取response.getWriter(),方便最后把JSON内容输出
完成以上内容后,我们在使用了一个Map来填装了数据,然后通过String res = gson.toJson(map);来转换成JSON格式,最后使用out.print(res);
		Gson gson = new Gson();
		Map<String,Object> map = new HashMap<String, Object>();
		map.put("majorList", majorList);
		map.put("allMajorCount", listCount);
		map.put("prePage", prePage);
		map.put("nextPage", nextPage);
		map.put("pageNum", pageNum);
		map.put("page", page);

		String res = gson.toJson(map);
		out.print(res);
2.如何连接数据库?
总所周知,使用JDBC查询数据库,有一个很经典的模板如下
try {
			Class.forName(driverClass);
			connection = DriverManager.getConnection(url, user, password);
			statement = connection.createStatement();
			rs = statement.executeQuery(sql);
			rowSet = new CachedRowSetImpl();
			rowSet.populate(rs);

		} catch (ClassNotFoundException e) {
			e.printStackTrace();
		} catch (SQLException e) {
			e.printStackTrace();
		}finally {
			try {
				rs.close();
				statement.close();
				connection.close();
			} catch (SQLException e) {
				// TODO Auto-generated catch block
				e.printStackTrace();
			}

		}
可是我们需要频繁地查询数据库,如果每一次这样写不就会很累?俗话说得好:“不要重复造轮子”,轮子只需要造一次就够了,所以我们应该把它抽象出来,单独成为一个工具类MySQLConnectionUtils。
package com.management.utils;

import java.io.FileInputStream;
import java.io.FileNotFoundException;
import java.io.IOException;
import java.sql.Connection;
import java.sql.DriverManager;
import java.sql.ResultSet;
import java.sql.SQLException;
import java.sql.Statement;
import java.util.Properties;

import javax.sql.RowSet;
import javax.sql.rowset.CachedRowSet;

import com.sun.rowset.CachedRowSetImpl;

/**
 * 数据库连接工具
 * @author CheungChingYin
 *
 */
public class MySQLConnectionUtils {

	// 用于连接数据库的工具类
	public static CachedRowSetImpl mySQLResult(String sql) {
		String path = MySQLConnectionUtils.class.getClassLoader().getResource("db.properties").getPath();
		FileInputStream in = null;
		Properties properties = new Properties();

		try {
			in = new FileInputStream(path);
		} catch (FileNotFoundException e1) {
			e1.printStackTrace();
		}
		try {
			properties.load(in);
		} catch (IOException e1) {
			e1.printStackTrace();
		}

		String user = properties.getProperty("jdbc.user");
		String password = properties.getProperty("jdbc.password");
		String driverClass = properties.getProperty("jdbc.driverClass");
		String url = properties.getProperty("jdbc.jdbcUrl");
		Connection connection = null;
		Statement statement  = null;
		ResultSet rs = null;
		CachedRowSetImpl rowSet = null;

		try {
			Class.forName(driverClass);
			connection = DriverManager.getConnection(url, user, password);
			statement = connection.createStatement();
			rs = statement.executeQuery(sql);
			rowSet = new CachedRowSetImpl();
			rowSet.populate(rs);

		} catch (ClassNotFoundException e) {
			e.printStackTrace();
		} catch (SQLException e) {
			e.printStackTrace();
		}finally {
			try {
				rs.close();
				statement.close();
				connection.close();
			} catch (SQLException e) {
				// TODO Auto-generated catch block
				e.printStackTrace();
			}

		}

		return rowSet;
	}

	public static Connection mySQLConnection() {

		String path = MySQLConnectionUtils.class.getClassLoader().getResource("db.properties").getPath();
		FileInputStream in = null;
		Properties properties = new Properties();

		try {
			in = new FileInputStream(path);
		} catch (FileNotFoundException e1) {
			e1.printStackTrace();
		}
		try {
			properties.load(in);
		} catch (IOException e1) {
			e1.printStackTrace();
		}

		String user = properties.getProperty("jdbc.user");
		String password = properties.getProperty("jdbc.password");
		String driverClass = properties.getProperty("jdbc.driverClass");
		String url = properties.getProperty("jdbc.jdbcUrl");

		Connection connection = null;

		try {

			Class.forName(driverClass);
			connection = DriverManager.getConnection(url, user, password);

		} catch (ClassNotFoundException e) {
			e.printStackTrace();
		} catch (SQLException e) {
			e.printStackTrace();
		}
		return connection;
	}
}
db.properties相关内容
jdbc.user=root
jdbc.password=123456
jdbc.driverClass=com.mysql.jdbc.Driver
jdbc.jdbcUrl=jdbc\:mysql\://localhost\:3306/student?useUnicode\=true&characterEncoding\=utf-8
jdbc.initPoolSize=5
jdbc.maxPoolSize=10
由于我们会很频繁地调用这个类,所以我们就需要考虑让它成为一个静态方法,以便于我们每次调用的时候不需要创建一个对象然后再使用。使用properties文件把数据库的一些信息,如地址、数据库账户、数据库密码存储,以便日后项目迁移需要修改数据库信息。
在一开始,我的public static CachedRowSetImpl mySQLResult(String sql)方法的返回值类型是使用ResultSet的,如这样public static ResultSet mySQLResult(String sql),然后使用了一端时间后才发现,当发出一大堆数据库连接的时候,由于我没有关闭释放连接,就是在finally没有connection.close();,所以会造成数据库连接过多导致被数据库拒绝连接,出现一个叫做Can not connect to MySQL server Error: Too many connections的异常错误,发现这个问题后我立马在方法的finally块中加入了
try {
				rs.close();
				statement.close();
				connection.close();
			} catch (SQLException e) {
				e.printStackTrace();
			}
		}
然后返回一个ResultSet结果集,虽然连接问题是解决了,可是新问题又出现了,控制台发出了一个异常java.sql.SQLException: Operation not allowed after ResultSet closed(结果集已关闭,无法操作。),如果我在返回结果集之前关闭了结果集,那就不能够操作结果集了;如果我不关闭结果集,数据库连接一直都会存在,然后重复操作几次又会出现数据库连接数过多,拒绝访问的异常了,那改怎么办?
最终我在这篇博文上找到了答案《java开发中如何在ResultSet结果集关闭后,还能使用数据库数据。》,只需要返回类型使用CachedRowSetImpl即可,详细请查阅这篇文章。
3.如何让用户输入的密码进行加密放到数据库中?
说到数据加密,我们不得不提到Apache公司的开发的一个常用加密工具类commons-codec。
这个项目的密码是使用MD5进行加密的(也不能说是加密,因为它不可解密,只能说是一种认证,防止后台的的数据库操作员能够轻易地获得密码)
在加入了commons-codec的JAR包后,我把加密方法做成了一个抽象方法,以便以后使用
PasswordEncryptionUtils类
package com.management.utils;

import java.security.MessageDigest;
import java.security.NoSuchAlgorithmException;

import org.apache.commons.codec.binary.Base64;

/**
 * 密码加密
 * @author CheungChingYin
 *
 */
public class PasswordEncryptionUtils {

	/**
	 * 通过MD5进行密码加密
	 * @param password
	 * @return
	 */
	public static String plainText2MD5Encrypt(String password){
		try {
			MessageDigest md = MessageDigest.getInstance("MD5");
			byte[] output = md.digest(password.getBytes());
			String ret = Base64.encodeBase64String(output);
			return ret;
		} catch (NoSuchAlgorithmException e) {
			// TODO Auto-generated catch block
			e.printStackTrace();
			return null;
		}

	}
}
像是管理员账号李白,密码是test1234,可是到了数据库后密码变成了这样
![]()
一串没有意义的乱码。
所以在注册和登录的时候,一定要先把密码加密,不然最后会应为对不上数据库所存放的密码导致密码不正确。
4.分页功能
这一次的分页功能我是在后台完成的,为此我专门做了一个分页的工具PageUtils,其中的逻辑和我上一次的项目分页逻辑大致一致。
package com.management.utils;

import java.util.LinkedList;
import java.util.List;

/**
 * 分页工具
 * @author CheungChingYin
 *
 */
public class PageUtils {

	/**
	 * 上一页逻辑
	 * @param page
	 * @return
	 */
	public static Integer prePageHandler(Integer page) {

		Integer prePage;
		if (page - 1 == 0) {//如果当前页-1为0,则表示当前页为第一页,
			prePage = 1;//前一页只能为第一页
		} else {
			prePage = page - 1;
		}
		return prePage;
	}

	/**
	 * 下一页逻辑
	 * @param page
	 * @param listCount
	 * @return
	 */
	public static Integer nextPageHandler(Integer page, Integer listCount) {

		Integer PAGESIZE = ConstantUtils.Page.PAGESIZE;
		Integer pages = (listCount % PAGESIZE == 0) ? (listCount / PAGESIZE) : (listCount / PAGESIZE + 1);
		Integer nextPage;
		if (page == pages) {//如果当前页等于最大页数
			nextPage = pages;//下一页只能等于最大页数
		} else {
			nextPage = page + 1;
		}
		return nextPage;
	}

	/**
	 * 列出页码列表
	 * @param page
	 * @param listCount
	 * @return
	 */
	public static List<Integer> pageHandler(Integer page,Integer listCount) {

		List<Integer> list = new LinkedList<Integer>();
		Integer PAGESIZE = ConstantUtils.Page.PAGESIZE;
		Integer PAGENUM = ConstantUtils.Page.PAGENUM;

		Integer pages = (listCount % PAGESIZE == 0) ? (listCount / PAGESIZE) : (listCount / PAGESIZE + 1);
		Integer minPages = (page - PAGENUM > 0) ? (page - PAGENUM) : (1);//和上一页同理
		Integer maxPages = (page + PAGENUM >= pages)?(pages):(page + PAGENUM);//与下一页同理
		for(int i = minPages;i<= maxPages;i++){
			list.add(i);//添加最小页到最大页之间的页码
		}
		return list;
	}

	/**
	 * 总共页数逻辑
	 * @param listCount
	 * @return
	 */
	public static Integer pagesHandler(Integer listCount){

		Integer PAGESIZE = ConstantUtils.Page.PAGESIZE;
		Integer pages = (listCount % PAGESIZE == 0) ? (listCount / PAGESIZE) : (listCount / PAGESIZE + 1);
		return pages;
	}

}
在每次请求需要分页的时候,首先传入一个page参数代表当前页数,还有一个就是从数据库获得内容的总条数,从而计算出需要分多少页,类中的PAGESIZE和PAGENUM其实是一个固定的常量,为了解耦才把常量抽取出来。
package com.management.utils;

/**
 * 相关常量
 * @author CheungChingYin
 *
 */
public interface ConstantUtils {

	public static class Page {
		public static final Integer PAGESIZE = 10;//一页显示多少条资料
		public static final Integer PAGENUM = 3;//页码展示数量
	}
}
在每次需要用到分页功能的时候,都会有进行分页判断,以SearchStudent的片段代码为例
	Integer page = Integer.parseUnsignedInt(request.getParameter("page"));//获取传来的参数当前页
		Integer listCount = null;
		if (search == null || page==null) {
			return;
		}

		if (search.matches("\\d+")) {
			studentList = new LinkedList<Student>();
			Student s = service.searchStudentById(search);
			studentList.add(s);
			listCount = studentList.size();
		} else {
			studentList = service.searchStudentByName(search);
			listCount = studentList.size();
			Integer pages = PageUtils.pagesHandler(listCount);
			if(page == pages){//由于搜索结果如果有多个时候,是需要分页的,若当前页等于最大页
				studentList = service.searchStudentByName(search).subList((page - 1) * 10, listCount);//列表只展示到最后一条,不然会越界
			}else{
				studentList = service.searchStudentByName(search).subList((page - 1) * 10, page * 10);//列表只能存10条数据,达到伪分页效果
			}

		}

		Integer prePage = PageUtils.prePageHandler(page);
		Integer nextPage = PageUtils.nextPageHandler(page, listCount);

		List<Integer> pageNum = PageUtils.pageHandler(page, listCount);


		map.put("studentList", studentList);
		map.put("allStudentCount", listCount);
		map.put("prePage", prePage);
		map.put("nextPage", nextPage);
		map.put("pageNum", pageNum);
		map.put("page", page);
		map.put("search",search);
通过JSON把上一页、下一页、当前页、显示的页数(即超链接中显示的数字页数)传回前端,让前端自己处理即可。
5.搜索功能如何判断搜索的是ID还是姓名?
同样以SearchStudent为例,通过前端传来了一个搜索内容search,我们只需要通过字符串自带的一个方法,String.matches()进行正则表达式判断,代码段中的"\\d+"指的是判断字符串是不是一位以上纯数字,如果返回判断是正确,则表明是学号ID搜索,只需要向service层调用searchStudentById()方法即可,由于搜索内容除了学号ID之外就只有姓名了,所以else是能是调用service层的searchStudentByName()方法。
if (search.matches("\\d+")) {
			studentList = new LinkedList<Student>();
			Student s = service.searchStudentById(search);
			studentList.add(s);
			listCount = studentList.size();
		} else {
			studentList = service.searchStudentByName(search);
			listCount = studentList.size();
			Integer pages = PageUtils.pagesHandler(listCount);
			if(page == pages){
				studentList = service.searchStudentByName(search).subList((page - 1) * 10, listCount);
			}else{
				studentList = service.searchStudentByName(search).subList((page - 1) * 10, page * 10);
			}

		}
6.学生管理中的学院栏和专业栏如何实现二级联动表单?
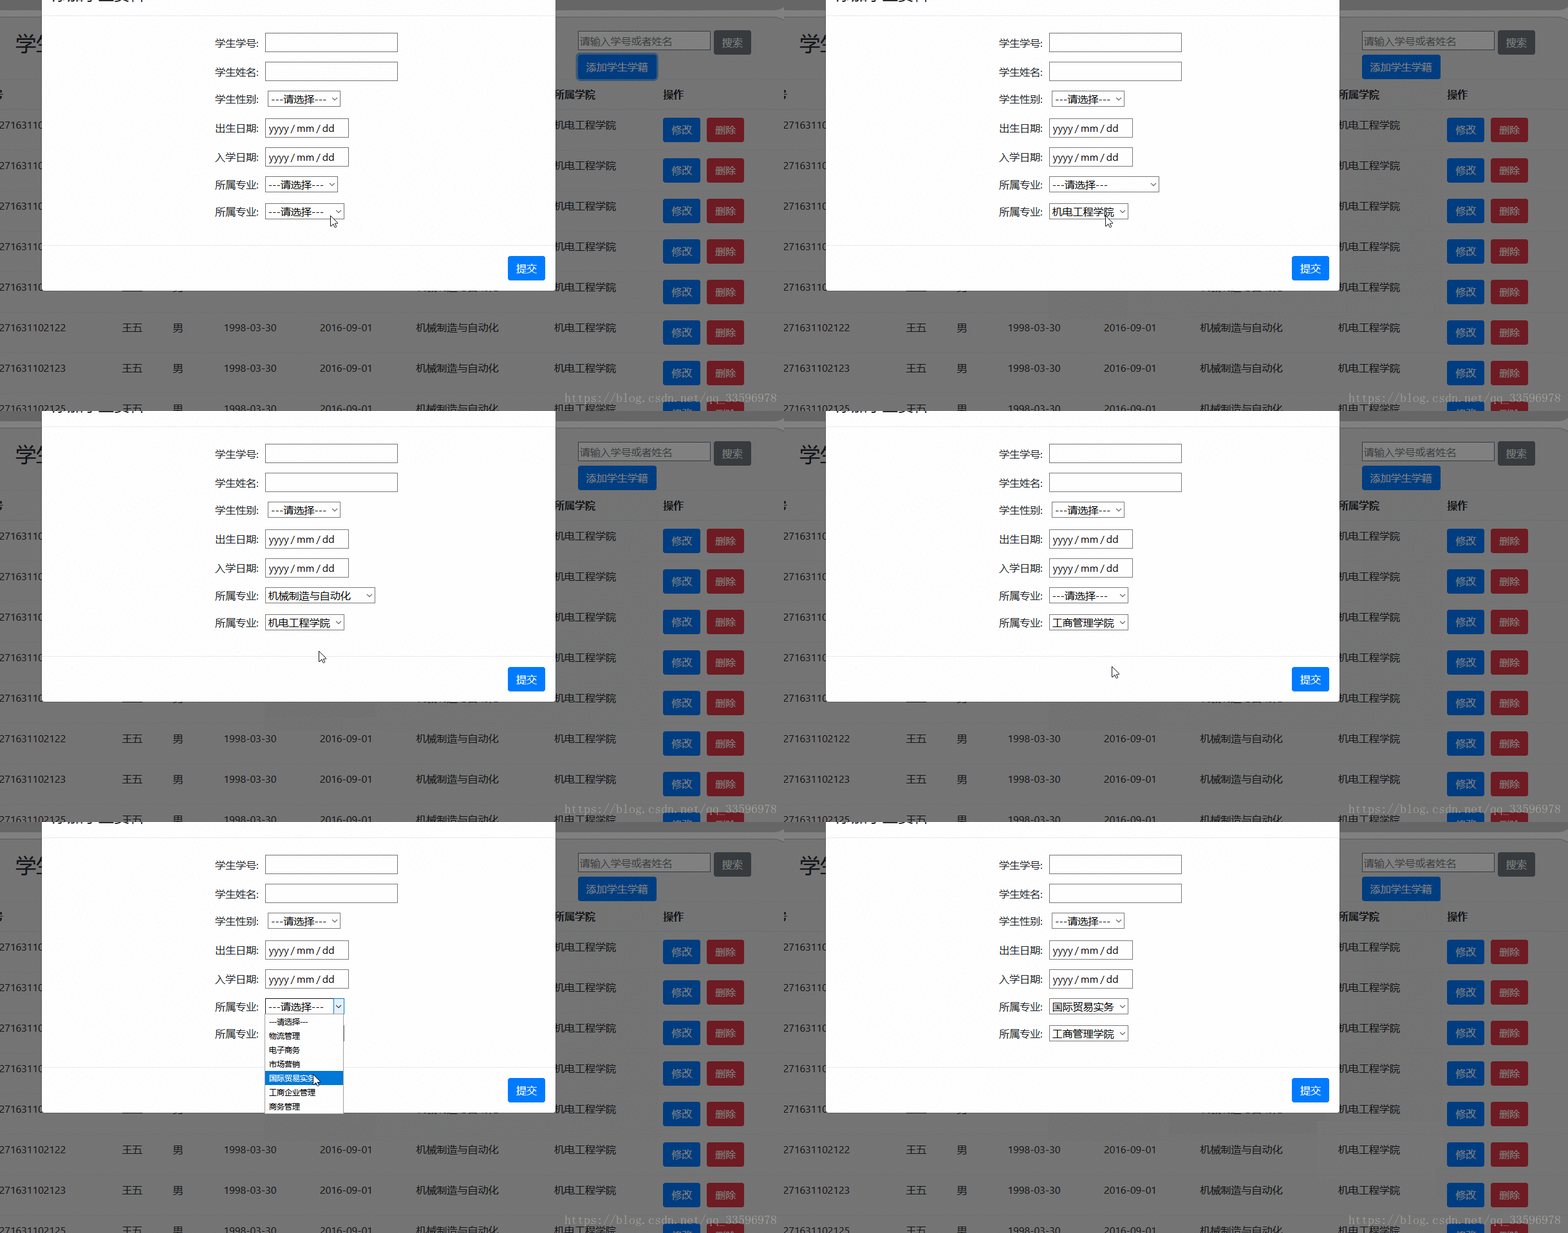
这个就涉及到了JavaScript了,我的想法是这样的(以添加学生信息为例)
- 点击
添加学生按钮的时候使用Ajax向接口/getCollege发出请求 /getCollege接口返回所有学院的信息- 使用JQuery把获得的信息做成
标签样式放在学院下拉框中 - 当用户选择其中一个学院时,触发
change()事件 - 获得学院当前的value
- 带着学院value值向接口
/getMajor请求相应的专业 - 接口
/getMajor返回来的JSON通过JavaScript把信息放入专业下拉框中
这样看起来貌似步骤很多,但其实有一些步骤是连起来做的
以下代码源自StudentManagement.js代码片段
步骤1~3代码
/*
* 添加按钮点击事件
* 使用Ajax获得相对应的学院,并且添加到学院的
$("#stu-add-button").on("click", function() {
$.get("getCollege", function(data, status) {
var college = data;
$("#college").html("");
var res ="";
for (var i = 0; i < college.length; i++) {
res += " + college[i].name + "";
}
$("#college").append(res);
});
});
步骤4~7代码
/*
* 学院按钮改变时
* 当选中学院下拉菜单中的一项时,通过Ajax加载相对应的学院专业
*/
$("#college").change(function() {
var collegeId = $(this).val();
$("#major option:not(:first)").remove();
$.get("getMajor?collegeId=" + collegeId, function(data, status) {
var major = data;
var res = "";
for (var i = 0; i < major.length; i++) {
res += " + major[i].name + "";
}
$("#major").append(res);
});
});
7.如何实现主页中部分地方刷新?
像这样实现网页中部分位置刷新,其实只要用到JQuery中的load()方法即可,以下代码出自Ajax_Main.js
$(".nav li a").click(function() {
		var type = $(this).attr("value");
		var address = $(this).attr("href");
		$("a").removeClass("active")
		$(this).addClass("active");
		$('#contain').html("");
		if(type != "logout"){
			$('#contain').load(address);
		}
		switch (type) {
		case 'StudentManagement':
			requestStudentContent("StudentManagementContent?page=1");
			break;
		case 'logout':
			if(confirm("确定退出吗")){
				window.location.replace(address);
			}
		}
		return false;
	});
指定一个id为contain的div对传来的地址进行刷新即可。
8.如何按不同权限管理员展示不同的页面
超级管理员比普通管理员登录时,侧栏会多出一个管理员管理功能,普通权限的管理员是没有的,效果如下
张三是超级管理员,李白则是普通管理员

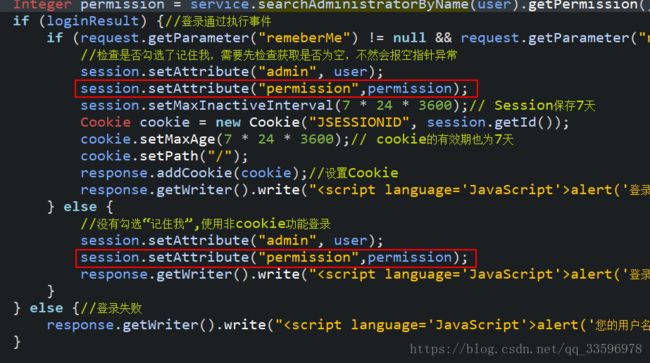
要实现这个功能,首先需要在登录成功的时候把获得的权限存放在session域中,在主页Ajax_Main.jsp中使用一个隐藏的把值取出
代码出自LoginServlet.java中
代码出自Ajax_Main.jsp
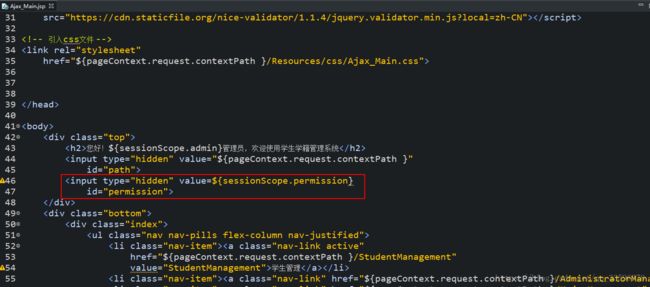
只要页面在初始化的时候检测这个id为permission的输入框中的value,只要值不等于1的话,就把管理管理员这个超链接移除,代码出自Ajax_Main.js
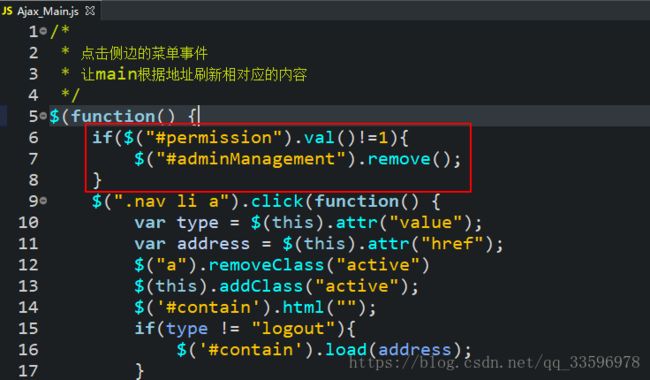
仅仅靠前端是不保险的,有些了解我的代码,直接在页面上修改值不就能显示管理员管理了吗?所以说后端我们也需要验证权限,双份保障双重保险。
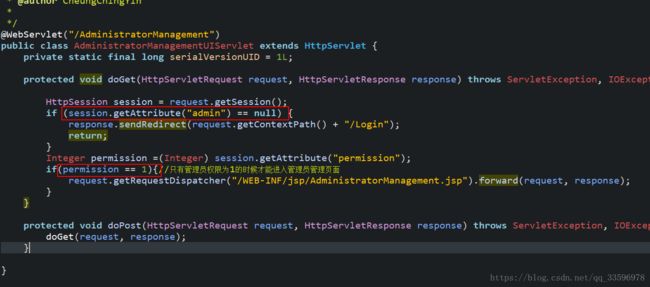
在Servlet映射管理员管理相应JSP那个接口(即AdministratorManagementUIServlet)做手脚
先判断session中有没有admin,没有即表示是跳过登录页面进行访问的,所以直接重定向回登录页面。然后再判断存在session域中的permission,只有权限(permission)为1的时候才能够跳转到管理员管理的页面中。
9.如何实现cookie免登陆?
方法很简单,只要在登录的时候,检查cookie和session是否都同时存在,如果,只要登录成功,检测多选框有没有选择(不要问我为啥不用单选框,因为多选框的展示效果比单选框好),如果选择了则写cookie,没有选择就按普通流程登录
跳转登录页面servletLoginUIServlet
package com.management.web.UI;

import java.io.IOException;

import javax.servlet.ServletException;
import javax.servlet.annotation.WebServlet;
import javax.servlet.http.Cookie;
import javax.servlet.http.HttpServlet;
import javax.servlet.http.HttpServletRequest;
import javax.servlet.http.HttpServletResponse;
import javax.servlet.http.HttpSession;

/**
 * 跳转到登录页面
 * @author CheungChingYin
 *
 */
@WebServlet(description = "跳转到登录界面", urlPatterns = { "/Login" })
public class LoginUIServlet extends HttpServlet {
	private static final long serialVersionUID = 1L;

	protected void doGet(HttpServletRequest request, HttpServletResponse response)
			throws ServletException, IOException {

		HttpSession session = request.getSession();
		Cookie[] cookies = request.getCookies();
		if(cookies != null){
			for (Cookie cookie : cookies) {
				if (cookie.getName().equals("JSESSIONID")) {// 判断是否存在第一次登录时存放的cookie
					if (session.getAttribute("admin") != null) {// 判断服务器里面的存放的cookie是否存在
						// 直接重定向到主界面
						response.sendRedirect(request.getContextPath() + "/Home");
						return;
					}
				}
			}
		}
		// 如果检测不到cookie就转发到登录界面
		request.getRequestDispatcher("/WEB-INF/jsp/Login.jsp").forward(request, response);
	}

	protected void doPost(HttpServletRequest request, HttpServletResponse response)
			throws ServletException, IOException {
		doGet(request, response);
	}

}
登录验证servletLoginUIServlet
package com.management.web.controller.administrator;
import java.io.IOException;
import javax.servlet.ServletException;
import javax.servlet.annotation.WebServlet;
import javax.servlet.http.Cookie;
import javax.servlet.http.HttpServlet;
import javax.servlet.http.HttpServletRequest;
import javax.servlet.http.HttpServletResponse;
import javax.servlet.http.HttpSession;
import com.management.entities.Administrator;
import com.management.service.AdministratorService;
import com.management.service.impl.AdministratorServiceImpl;
import com.management.utils.WebUtils;
/**
* 管理员登录功能
* 需要传入参数
* request:
* 登录界面表单:
* user(管理员姓名)
* password(管理员密码)
* rememberMe(可选)(记住我选项)
*
* @author CheungChingYin
*
*/
@WebServlet("/LoginServlet")
public class LoginServlet extends HttpServlet {
private static final long serialVersionUID = 1L;
protected void doGet(HttpServletRequest request, HttpServletResponse response)
throws ServletException, IOException {
request.setCharacterEncoding("UTF-8");
Administrator admin = WebUtils.request2Bean(request, Administrator.class);//获得表单传来的参数
AdministratorService service = new AdministratorServiceImpl();
HttpSession session = request.getSession();
String user = admin.getUser();
String password = admin.getPassword();
response.setHeader("Content-type","text/html;charset=UTF-8");
boolean loginResult = service.login(user, password);//检查用户名、密码能否通过登录
Integer permission = service.searchAdministratorByName(user).getPermission();
if (loginResult) {//登录通过执行事件
if (request.getParameter("remeberMe") != null && request.getParameter("remeberMe").equals("on")) {
//检查是否勾选了记住我,需要先检查获取是否为空,不然会报空指针异常
session.setAttribute("admin", user);
session.setAttribute("permission",permission);
session.setMaxInactiveInterval(7 * 24 * 3600);// Session保存7天
Cookie cookie = new Cookie("JSESSIONID", session.getId());
cookie.setMaxAge(7 * 24 * 3600);// cookie的有效期也为7天
cookie.setPath("/");
response.addCookie(cookie);//设置Cookie
response.getWriter().write("");
} else {
//没有勾选“记住我”,使用非cookie功能登录
session.setAttribute("admin", user);
session.setAttribute("permission",permission);
response.getWriter().write("");
}
} else {//登录失败
response.getWriter().write("");
}
}
protected void doPost(HttpServletRequest request, HttpServletResponse response)
throws ServletException, IOException {
doGet(request, response);
}
}
10.存放JSP需要注意的问题
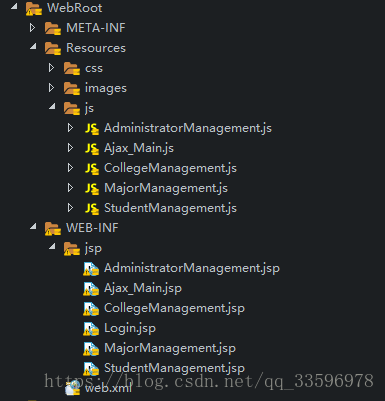
由于在servlet中,每一个jsp页面都应该由相对应的servlet进行跳转,而不是让浏览器直接访问到。所以我们必须把所有的JSP页面都存放在WEB-INF目录下,只有这样才能不被外界直接访问到JSP,而要通过相应的Servlet进行跳转。而其他静态资源,如css、JavaScript、images等的资源文件由于保护等级没有那么重要,所以可以直接把这些静态资源放在WebRoot目录下,以方便调用。
11.前端表单校验如何实现?
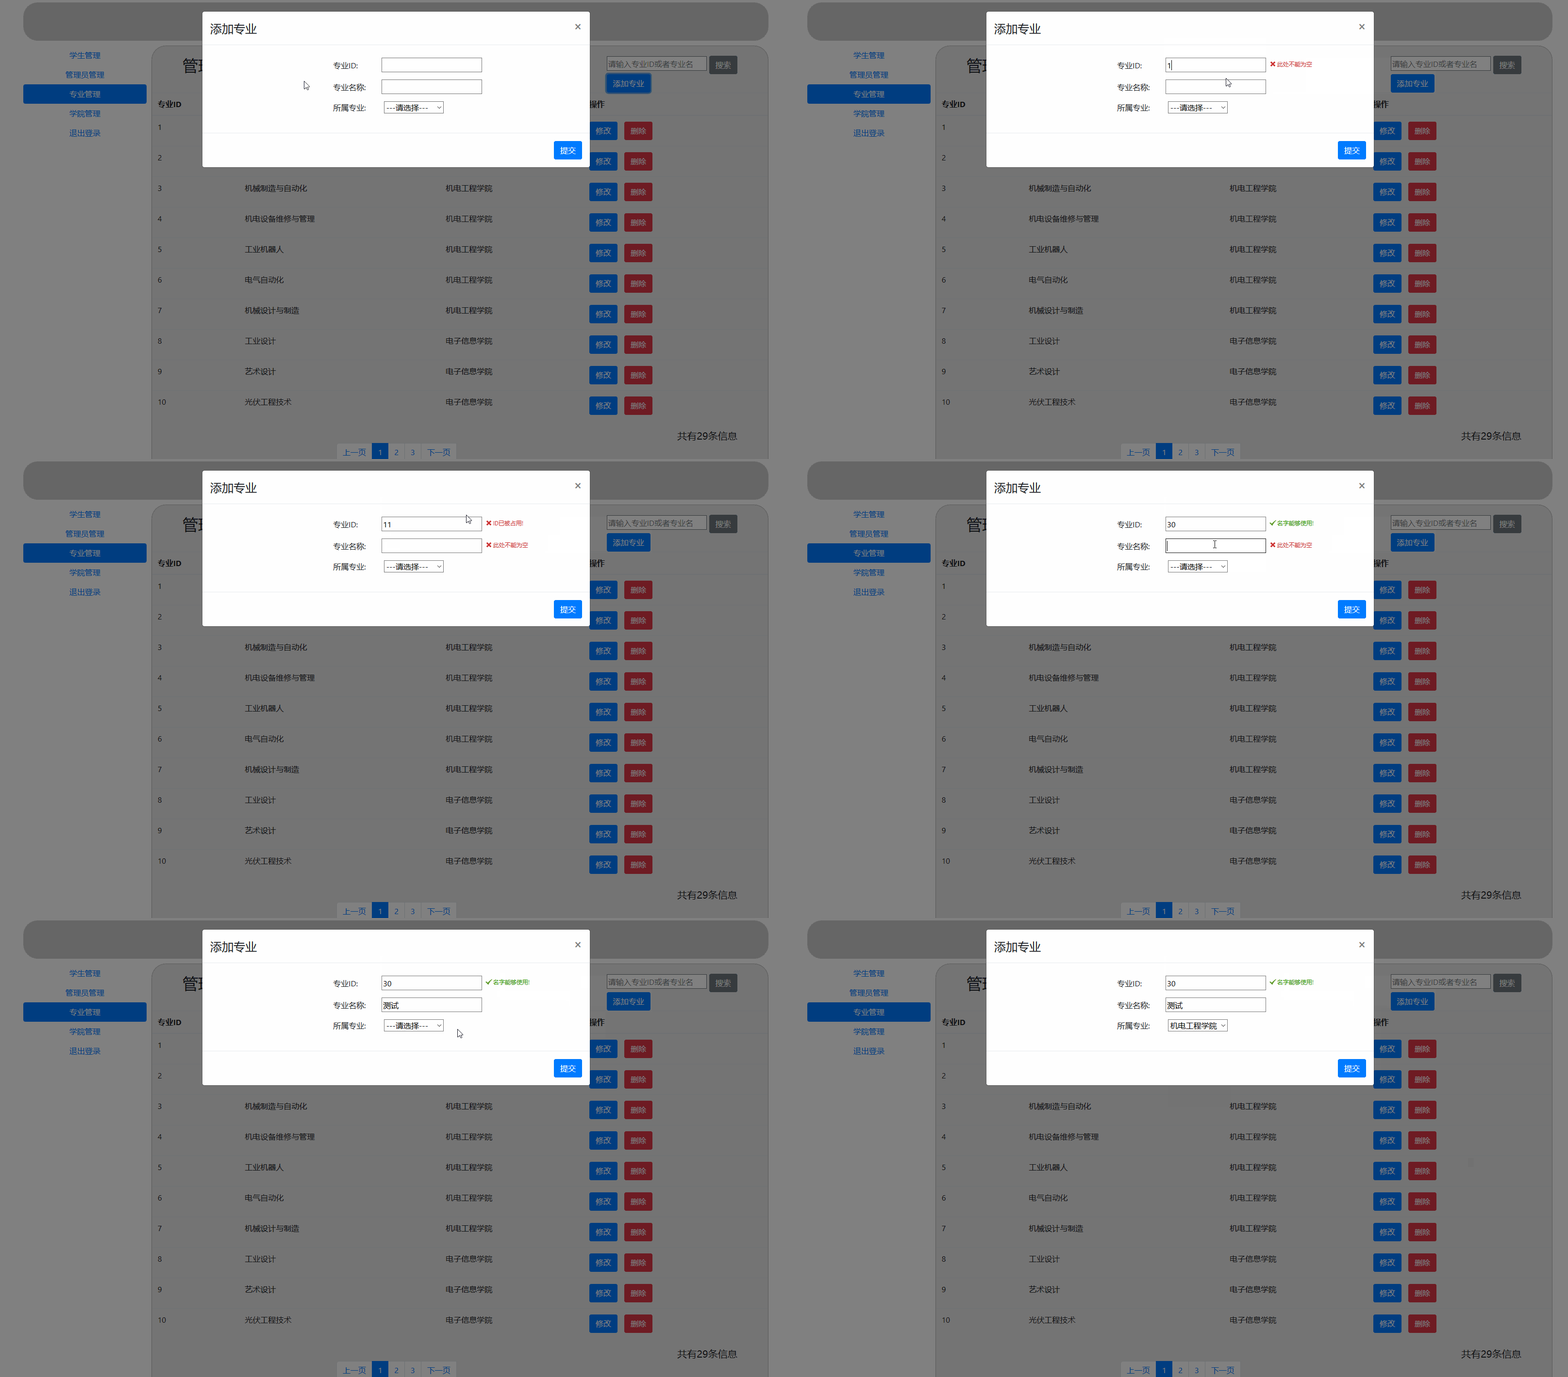
在前端的表单校验中,我使用了第三方插件nice-validator,这个插件是国人开发的,有中文文档,只要阅读了快速上手后就能够自己实现表单校验了。
以专业添加表单为例,代码出自MajorManagement.js
/*
 * 添加专业功能表单校验
 */
$("#major-add-form").validator({
	rules : {
		nameValidate : [ /[\u4e00-\u9fa5_a-zA-Z_]+/, "专业名称必须是中文或者英文" ],
	},
	fields : {
		'id' : "required;integer;remote(" + $("#path").val() + "/majorIdIsExist)",
		'name' : "required;nameValidate",
		'college_id' : "required"
	},
	/**
	 * 新增专业表单的提交按钮点击事件
	 * 提交表单
	 */
	valid : $("#major-add-input").click(function() {
		$.post("AddMajor", $("#major-add-form").serialize(), function(data, status) {
			if (status == "success") {
				alert("添加成功!");
				$("#major-add").modal('hide');
				$(".modal-backdrop").remove();
				var path = $("#path").val();
				$('#contain').load(path + "/MajorManagement");
			} else {
				alert("服务器出现未知错误,添加失败!");
			}
		})
	})
});
八、在开发的时候遇到的坑
在开发前端页面的时候,有几个按钮设置了点击事件,而这些按钮是通过JavaScript语句动态创建的,导致这些按钮的点击事件失效了,无论怎样按都不能触发点击事件。
这个好像是因为DOM渲染后,已经绑定好相应的点击事件,但是由于有一些元素如按钮,是通过JavaScript动态新建的,所以没有被绑定事件,导致无法触发点击事件。(由于本人对前端一知半解,所以如果有发现这一段话有错的同学请务必写评论纠正)
解决方法:只需要使用JQuery的on()方法即可,详细使用方法可以参考这篇博文《js/jq 动态添加的元素不能触发绑定事件解决方案》
九、开发感想
这个作业花了我24天时间才完成,当然在当中也少不了有摸鱼 的时间,估计如果在没有课,不摸鱼的情况下大概12~16天就能够完成。这一次的代码估摸2000行应该是有的,开发难度还好,就是前端的问题比较多,因为自己不太熟悉前端框架,JQuery、Vue、BootStrap这些前端框架我都是在用到的时候才学,在之前并没有系统性地学习过,用到啥功能就学啥,不求精通,只求能用。花了两个小时看了下Vue的文档,基本的功能就能够使用了,所以说不要怕学习新的东西,你越怕就越不想去学,花点心思了解一下,总会有收获的。
这次开发总会想到各种奇奇怪怪的功能,有一些功能可能暂时实现不了,总想放弃,其实可以先放下这个问题,做点别的,有时候灵感一到,问题就会迎刃而解。还有,在开发之前一定要做一份计划书,不要像我这样一边开发一边想功能,有时候你写到顶层如Web层,想实现一些功能,发现服务层没有,服务层写的时候又发现dao层没有相应的方法,这样一层层地从高层向下“补救”是不值得推荐的,就算写得不详细,不要紧,只要有大致框架即可。
就快毕业了,希望自己能在毕业之前能够做一些比较像样的项目,以至于到外面面试也不会太丢人,继续努力,“穷且益坚 不坠青云之志”!
