k8s (十一) --- Kubernetes 存储 之 Volumes配置管理
Kubernetes 存储 之 Volumes配置管理
- 一、Volumes
- 介绍
- Volume 的类型
- 二、emptyDir
- 三、hostPath
- 四、NFS
一、Volumes
介绍
容器中的文件在磁盘上是临时存放的,这给容器中运行的特殊应用程序带来一些问题。 首先,当容器崩溃时,kubelet 将重新启动容器,容器中的文件将会丢失——因为容器会以干净的状态重建。 其次,当在一个 Pod 中同时运行多个容器时,常常需要在这些容器之间共享文件。 Kubernetes 抽象出 Volume 对象来解决这两个问题。
Kubernetes 卷具有明确的生命周期——与包裹它的 Pod 相同。 因此,卷比 Pod 中运行的任何容器的存活期都长,在容器重新启动时数据也会得到保留。 当然,当一个 Pod 不再存在时,卷也将不再存在。也许更重要的是,Kubernetes 可以支持许多类型的卷,Pod 也能同时使用任意数量的卷。
卷的核心是包含一些数据的目录,Pod 中的容器可以访问该目录。 特定的卷类型可以决定这个目录如何形成的,并能决定它支持何种介质,以及目录中存放什么内容。
使用卷时, Pod 声明中需要提供卷的类型 (.spec.volumes 字段)和卷挂载的位置 (.spec.containers.volumeMounts 字段).
容器中的进程能看到由它们的 Docker 镜像和卷组成的文件系统视图。 Docker 镜像 位于文件系统层次结构的根部,并且任何 Volume 都挂载在镜像内的指定路径上。 卷不能挂载到其他卷,也不能与其他卷有硬链接。 Pod 中的每个容器必须独立地指定每个卷的挂载位置。
Volume 的类型
Kubernetes 支持下列类型的卷:
awsElasticBlockStore
azureDisk
azureFile
cephfs
cinder
configMap
csi
downwardAPI
emptyDir
fc (fibre channel)
flexVolume
flocker
gcePersistentDisk
gitRepo (deprecated)
glusterfs
hostPath
iscsi
local
nfs
persistentVolumeClaim
projected
portworxVolume
quobyte
rbd
scaleIO
secret
storageos
vsphereVolume
具体使用参考官方文档:https://kubernetes.io/zh/docs/concepts/storage/volumes/
解下来对机中常规的卷进行示例。
二、emptyDir
当 Pod 指定到某个节点上时,首先创建的是一个 emptyDir 卷,并且只要 Pod 在该节点上运行,卷就一直存在。 就像它的名称表示的那样,卷最初是空的。 尽管 Pod 中的容器挂载 emptyDir 卷的路径可能相同也可能不同,但是这些容器都可以读写 emptyDir 卷中相同的文件。 当 Pod 因为某些原因被从节点上删除时,emptyDir 卷中的数据也会永久删除。
注意: 容器崩溃并不会导致 Pod 被从节点上移除,因此容器崩溃时 emptyDir 卷中的数据是安全的。
emptyDir 的一些用途:
- 缓存空间,例如基于磁盘的归并排序。
- 为耗时较长的计算任务提供检查点,以便任务能方便地从崩溃前状态恢复执行。
- 在 Web 服务器容器服务数据时,保存内容管理器容器获取的文件。
默认情况下, emptyDir 卷存储在支持该节点所使用的介质上;这里的介质可以是磁盘或 SSD 或网络存储,这取决于您的环境。 但是,您可以将 emptyDir.medium 字段设置为 “Memory”,以告诉 Kubernetes 为您安装 tmpfs(基于 RAM 的文件系统)。 虽然 tmpfs 速度非常快,但是要注意它与磁盘不同。 tmpfs 在节点重启时会被清除,并且您所写入的所有文件都会计入容器的内存消耗,受容器内存限制约束。
pod示例:
[root@server1 ~]# cd volumes/
[root@server1 volumes]# vim pod.yaml
[root@server1 volumes]# cat pod.yaml
apiVersion: v1
kind: Pod
metadata:
  name: vol1
spec:
  containers:
  - image: busyboxplus
    name: vm1
    command: ["sleep","300"]
    volumeMounts:
    - mountPath: /cache
      name: cache-volume
  - name: vm2
    image: nginx
    volumeMounts:
    - mountPath: /usr/share/nginx/html
      name: cache-volume
  volumes:
  - name: cache-volume
    emptyDir:
      medium: Memory
      sizeLimit: 100Mi
上述文件pod中包含了两个容器,第一个容器休眠了300s,挂接了一个存储,第二个容器也将这个存储挂接到了容器内nginx 的发布目录,上述文件可以查看多个容器之间的文件共享问题。同时将卷的介质设置为内存,并设置了100M的限制。
创建pod:
[root@server1 volumes]# kubectl create -f pod.yaml
pod/vol1 created
[root@server1 volumes]# kubectl get pod
NAME   READY   STATUS    RESTARTS   AGE
vol1   2/2     Running   0          8s
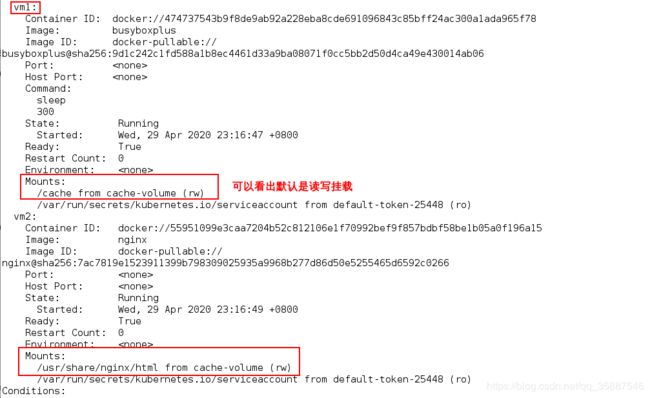
查看详细信息:
[root@server1 volumes]# kubectl describe pod vol1
[root@server1 volumes]# kubectl exec -it vol1 -- sh
Defaulting container name to vm1.
Use 'kubectl describe pod/vol1 -n default' to see all of the containers in this pod.
/ # cd cache/
/cache # ls
/cache # echo redhat > index.html
/cache # cat index.html
redhat
现在测试访问vm2的地址:
[root@server1 volumes]# kubectl get pod -o wide
NAME   READY   STATUS    RESTARTS   AGE     IP            NODE      NOMINATED NODE   READINESS GATES
vol1   2/2     Running   0          2m14s   10.244.1.78   server2   <none>           <none>
[root@server1 volumes]# curl 10.244.1.78
redhat
可以看出在vm1中写入的数据在vm2访问到了,说明他们的数据是共享的。
现在在vm1中将发布文件删除,那么vm2也就访问不到了:
[root@server1 volumes]# kubectl exec -it vol1 -- sh
Defaulting container name to vm1.
Use 'kubectl describe pod/vol1 -n default' to see all of the containers in this pod.
/ # cd /cache/
/cache # rm -f index.html
[root@server1 volumes]# curl 10.244.1.78
<html>
<head><title>403 Forbidden</title></head>
<body>
<center><h1>403 Forbidden</h1></center>
<hr><center>nginx/1.17.9</center>
</body>
</html>
可以看出没有访问到。接下来我们测试内存的限制策略(我们设置的是100M),在vm1卷的挂载目录中写入大于100M的文件:
[root@server1 volumes]# kubectl exec -it vol1 -- sh
Defaulting container name to vm1.
Use 'kubectl describe pod/vol1 -n default' to see all of the containers in this pod.
/ # cd cache/
/cache # dd if=/dev/zero of=bigfile bs=1M count=200		#写入200M的文件
200+0 records in
200+0 records out
/cache # [root@server1 volumes]#
之后查看pod的状态,-w表示持续显示:
[root@server1 volumes]# kubectl get pod -w
NAME   READY   STATUS    RESTARTS   AGE
vol1   2/2     Running   1          6m52s
vol1   0/2     Evicted   0          7m18s
可以看出等待1,2分钟后pod的状态变为Evicted(驱离),之所以不是立即被驱离,是因为kubelet是定期进行检查的,这里会有一个时间差。
因此我们可以总结一下emptyDir的缺点:
- 不能及时禁止用户使用内存,虽然过1-2分钟kubelet会见pod驱离,但是在这个时间内,其实对node还是有风险的。
- 影响kubernets调度,因为empty dir并不涉及node的resources,这样会造成Pod “偷偷”使用了node的内存,但是调度器并不知道。
- 用户不能及时感知到内存不可用。
实验后删除:
[root@server1 volumes]# kubectl delete -f pod.yaml
pod "vol1" deleted
三、hostPath
hostPath 卷能将主机节点文件系统上的文件或目录挂载到您的 Pod 中。 虽然这不是大多数 Pod 需要的,但是它为一些应用程序提供了强大的逃生舱。
例如,hostPath 的一些用法有:
- 运行一个需要访问 Docker 引擎内部机制的容器;请使用 hostPath 挂载 /var/lib/docker 路径。
- 在容器中运行 cAdvisor 时,以 hostPath 方式挂载 /sys。
- 允许 Pod 指定给定的 hostPath 在运行 Pod 之前是否应该存在,是否应该创建以及应该以什么方式存在。
除了必需的 path 属性之外,用户可以选择性地为 hostPath 卷指定 type。
支持的 type 值如下:
| 取值 | 行为 |
|---|---|
| 空字符串(默认)用于向后兼容,这意味着在安装 hostPath 卷之前不会执行任何检查。 | |
| DirectoryOrCreate | 如果在给定路径上什么都不存在,那么将根据需要创建空目录,权限设置为 0755,具有与 Kubelet 相同的组和所有权。 |
| Directory | 在给定路径上必须存在的目录。 |
| FileOrCreate | 如果在给定路径上什么都不存在,那么将在那里根据需要创建空文件,权限设置为 0644,具有与 Kubelet 相同的组和所有权。 |
| File | 在给定路径上必须存在的文件。 |
| Socket | 在给定路径上必须存在的 UNIX 套接字。 |
| CharDevice | 在给定路径上必须存在的字符设备。 |
| BlockDevice | 在给定路径上必须存在的块设备。 |
当使用这种类型的卷时要小心,因为:
- 具有相同配置(例如从 podTemplate 创建)的多个 Pod 会由于节点上文件的不同而在不同节点上有不同的行为。
- 当 Kubernetes 按照计划添加资源感知的调度时,这类调度机制将无法考虑由 hostPath 使用的资源。
- 基础主机上创建的文件或目录只能由 root 用户写入。您需要在 特权容器 中以 root
身份运行进程,或者修改主机上的文件权限以便容器能够写入 hostPath 卷。
pod示例:
[root@server1 volumes]# vim pod1.yaml
[root@server1 volumes]# cat pod1.yaml
apiVersion: v1
kind: Pod
metadata:
  name: test-pd
spec:
  containers:
  - image: nginx
    name: test-container
    volumeMounts:
    - mountPath: /test-pd
      name: test-volume
  volumes:
  - name: test-volume
    hostPath:
      # directory location on host
      path: /data
      # this field is optional
      type: DirectoryOrCreate
上述文件表示创建一个pod,挂载点为/test-pd,挂载卷为test-volume,这个卷映射的是宿主机物理地址/data,类型为DirectoryOrCreate。
创建pod查看状态:
[root@server1 volumes]# kubectl create -f pod1.yaml
pod/test-pd created
[root@server1 volumes]# kubectl get pod -o wide
NAME      READY   STATUS    RESTARTS   AGE   IP            NODE      NOMINATED NODE   READINESS GATES
test-pd   1/1     Running   0          11s   10.244.1.79   server2   <none>           <none>
可以看出这个pod运行在server2,在server2查看目录:
[root@server2 ~]# cd /data/
[root@server2 data]# ll -d .
drwxr-xr-x 2 root root 6 Apr 29 23:56 .
可以看出已经在宿主机创建了一个目录。现在尝试在容器内写入文件:
[root@server1 volumes]# kubectl exec -it test-pd -- bash
root@test-pd:/# cd /test-pd/
root@test-pd:/test-pd# ls
root@test-pd:/test-pd# echo 112233 > file
root@test-pd:/test-pd# cat file
112233
之后在宿主机查看:
[root@server2 data]# cat file
112233
可以看出已经同步。
实验后删除:
[root@server1 volumes]# kubectl delete -f pod1.yaml
pod "test-pd" deleted
四、NFS
nfs 卷能将 NFS (网络文件系统) 挂载到您的 Pod 中。 不像 emptyDir 那样会在删除 Pod 的同时也会被删除,nfs 卷的内容在删除 Pod 时会被保存,卷只是被卸载掉了。 这意味着 nfs 卷可以被预先填充数据,并且这些数据可以在 Pod 之间”传递”。
警告: 在您使用 NFS 卷之前,必须运行自己的 NFS 服务器并将目标 share 导出备用。
由于我们之前已经搭建过nfs服务器:
[root@server1 harbor]# showmount -e
Export list for server1:
/nfs *
[root@server1 harbor]# cd /nfs/
[root@server1 nfs]# ls
[root@server1 nfs]# cat /etc/exports
/nfs	*(rw,no_root_squash)
所以可以直接使用。
pod示例:
[root@server1 volumes]# vim pod2.yaml
[root@server1 volumes]# cat pod2.yaml
apiVersion: v1
kind: Pod
metadata:
  name: test-pd
spec:
  containers:
  - image: nginx
    name: test-container
    volumeMounts:
    - mountPath: /usr/share/nginx/html
      name: test-volume
  volumes:
  - name: test-volume
    nfs:
      server: 172.25.63.1			#nfs服务器地址
      path: /nfs					#共享路径
上述文件表示将nfs类型的卷挂载到容器内的nginx发布目录,创建pod并查看状态:
[root@server1 volumes]# kubectl create -f pod2.yaml
pod/test-pd created
[root@server1 volumes]# kubectl get pod -o wide
NAME READY STATUS RESTARTS AGE IP NODE NOMINATED NODE READINESS GATES
test-pd 1/1 Runnin g 0 22s 10.244.1.80 server2 <none> <none>
可以看到pod运行在server2,在server2查看挂载情况:

注意:若不能成功挂载,节点需要安装nfs挂载工具yum install nfs-utils -y
可以看成功挂载,接下来在容器内写入数据:
[root@server1 volumes]# kubectl exec -it test-pd -- bash
root@test-pd:/# cd /usr/share/nginx/html
root@test-pd:/usr/share/nginx/html# ls
root@test-pd:/usr/share/nginx/html# echo redhat > index.html
root@test-pd:/usr/share/nginx/html# cat index.html
redhat
root@test-pd:/usr/share/nginx/html# exit
这里写的文件直接写到了nfs服务器中,因此即使该pod被调度到了其他节点数据也不会丢失。
访问:
[root@server1 volumes]# curl 10.244.1.80
redhat
成功访问。
实验后删除:
[root@server1 volumes]# kubectl delete -f pod2.yaml
pod "test-pd" deleted
