基于SpringBoot2.x搭建SpringCloud的聚合项目
基于SpringBoot和SpringCloud的Greenwich.RELEASE版本使用Maven进行搭建,为了统一版本控制搭建maven的聚合工程,本文会采用Feign使用接口的方式通过消费者调用提供者服务。当当然也可以通过Ribbon的方式。
尽量少说废话直接上代码,创建项目创建工程略过
小知识点
Feign和Ribbon区别
Feign 是在 Ribbon 的基础上进行了一次改进,是一个使用起来更加方便的 HTTP 客户端。采用接口的方式,只需要创建一个接口,然后在上面添加注解即可 ,将需要调用的其他服务的方法定义成抽象方法即可, 不需要自己构建 http请求。然后就像是调用自身工程的方法调用,而感觉不到是调用远程方法,使得编写 客户端变得非常容易。 Ribbon 是一个基于 HTTP 和TCP 客户端 的负载均衡的工具。它可以 在客户端 配置 RibbonServerList(服务端列表),使用 HttpClient 或RestTemplate 模拟 http 请求,步骤相当繁琐。
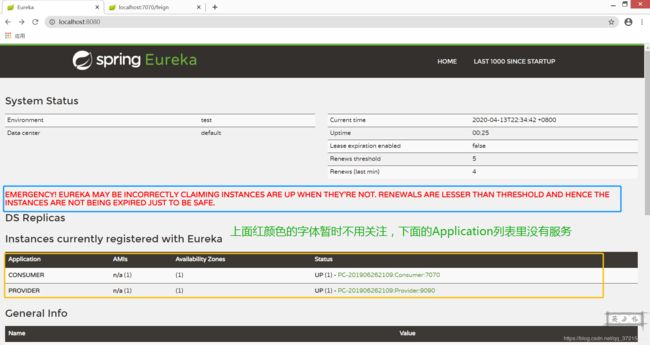
EMERGENCY! EUREKA MAY BE INCORRECTLY CLAIMING INSTANCES ARE UP WHEN THEY'RE NOT. RENEWALS ARE LESSER THAN THRESHOLD AND HENCE THE INSTANCES ARE NOT BEING EXPIRED JUST TO BE SAFE.
服务启动后,过了一会,停了其中一个,访问注册中心时,界面上显示了红色粗体警告信息:
Eureka server和client之间每隔30秒会进行一次心跳通信,告诉server,client还活着。由此引出两个名词:
Renews threshold:server期望在每分钟中收到的心跳次数
Renews (last min):上一分钟内收到的心跳次数。
禁止注册server自己为client,不管server是否禁止,阈值(threshold)是1。client个数为n,阈值为1+2n(此为一个server且禁止自注册的情况)
如果是多个server,且开启了自注册,那么就和client一样,是对于其他的server来说就是client,是要2的
Eurake有一个配置参数eureka.server.renewalPercentThreshold,定义了renews 和renews threshold的比值,默认值为0.85。当server在15分钟内,比值低于percent,即**少了15%的微服务心跳,server会进入自我保护状态,Self-Preservation。在此状态下,**server不会删除注册信息,这就有可能导致在调用微服务时,实际上服务并不存在。
这种保护状态实际上是考虑了client和server之间的心跳是因为网络问题,而非服务本身问题,不能简单的删除注册信息。总而言之用一句名言总结-----好死不如赖活着
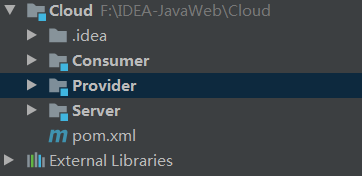
一、项目结构图(三个模块都是普通Maven工程)
二、父工程POM依赖(做统一版本控制)
<project xmlns="http://maven.apache.org/POM/4.0.0"
         xmlns:xsi="http://www.w3.org/2001/XMLSchema-instance"
         xsi:schemaLocation="http://maven.apache.org/POM/4.0.0 http://maven.apache.org/xsd/maven-4.0.0.xsd">
    <modelVersion>4.0.0modelVersion>

    <groupId>com.wanggroupId>
    <artifactId>CloudartifactId>
    <packaging>pompackaging>
    <version>1.0-SNAPSHOTversion>


    <modules>
        <module>Servermodule>
        <module>Providermodule>
        <module>Consumermodule>
    modules>


    <properties>
        <project.build.sourceEncoding>UTF-8project.build.sourceEncoding>
        <project.reporting.outputEncoding>UTF-8project.reporting.outputEncoding>
        <java.version>1.8java.version>
        <spring-cloud.version>Greenwich.RELEASEspring-cloud.version>
    properties>


    <parent>
        <groupId>org.springframework.bootgroupId>
        <artifactId>spring-boot-starter-parentartifactId>
        <version>2.1.5.RELEASEversion>
        <relativePath/>
    parent>

    <dependencies>


        <dependency>
            <groupId>org.springframework.bootgroupId>
            <artifactId>spring-boot-configuration-processorartifactId>
            <optional>trueoptional>
        dependency>


        <dependency>
            <groupId>org.projectlombokgroupId>
            <artifactId>lombokartifactId>
            <scope>providedscope>
        dependency>
    dependencies>


    <dependencyManagement>
        <dependencies>

            <dependency>
                <groupId>org.springframework.cloudgroupId>
                <artifactId>spring-cloud-dependenciesartifactId>
                <version>${spring-cloud.version}version>
                <type>pomtype>
                <scope>importscope>
            dependency>
        dependencies>
    dependencyManagement>
    <build>
        <plugins>
            <plugin>
                <groupId>org.springframework.bootgroupId>
                <artifactId>spring-boot-maven-pluginartifactId>
                <configuration>
                    <fork>truefork>
                configuration>
            plugin>
            <plugin>
                <groupId>org.apache.maven.pluginsgroupId>
                <artifactId>maven-compiler-pluginartifactId>
                <version>3.8.0version>
            plugin>
        plugins>
    build>
project>
三、搭建Eureka的注册中心(继承父工程)
1、EurekaServer的pom文件
<project xmlns="http://maven.apache.org/POM/4.0.0" xmlns:xsi="http://www.w3.org/2001/XMLSchema-instance"
         xsi:schemaLocation="http://maven.apache.org/POM/4.0.0 http://maven.apache.org/xsd/maven-4.0.0.xsd">


    <parent>
        <artifactId>CloudartifactId>
        <groupId>com.wanggroupId>
        <version>1.0-SNAPSHOTversion>
    parent>

    <modelVersion>4.0.0modelVersion>
    <artifactId>ServerartifactId>
    <packaging>jarpackaging>

    <dependencies>


        <dependency>
            <groupId>org.springframework.cloudgroupId>
            <artifactId>spring-cloud-starter-netflix-eureka-serverartifactId>
        dependency>


        <dependency>
            <groupId>org.springframework.bootgroupId>
            <artifactId>spring-boot-starter-webartifactId>
        dependency>


        <dependency>
            <groupId>org.springframework.bootgroupId>
            <artifactId>spring-boot-starter-testartifactId>
            <scope>testscope>
        dependency>

    dependencies>
project>
2、创建启动类
package com.wang;


import org.springframework.beans.factory.annotation.Value;
import org.springframework.boot.SpringApplication;
import org.springframework.cloud.netflix.eureka.server.EnableEurekaServer;
import org.springframework.boot.autoconfigure.SpringBootApplication;
import org.springframework.web.bind.annotation.GetMapping;
import org.springframework.web.bind.annotation.RestController;

/**
 * @author:坏小孩
 * @data:2020/4/8 周三
 */

@SpringBootApplication
@EnableEurekaServer
@RestController
public class SpringBootApplicationEurekaService {


    @Value("${server.port}")
    private String port;

    @GetMapping("/hello")
    public String helloWord() {

        return "我是微服务的注册中心,我的端口是:" + port;
    }

    public static void main(String[] args) {
        SpringApplication.run(SpringBootApplicationEurekaService.class, args);
    }

}
3、在resources文件夹下创建application.yml文件
#端口配置
server:
  port: 8080
#服务名称
spring:
  application:
    name: Eureka-Server
#实例地址
eureka:
  instance:
    hostname: localhost
    #配置属性,但由于 Eureka 自我保护模式以及心跳周期长的原因,经常会遇到 Eureka Server 不剔除已关停的节点的问题
    server:
      enable-self-preservation: false
      eviction-interval-timer-in-ms: 5000
      peer-eureka-nodes-update-interval-ms: 1000
      wait-time-in-ms-when-sync-empty: 0
  # 不向注册中心注册自己
  client:
    fetch-registry: false #是否从Eureka中获取注册信息 为true时,可以启动,但报异常:Cannot execute request on any known server
    register-with-eureka: false #是否将自己注册到Eureka服务中,本身就是所有无需注册
    eureka-server-total-connections: 200
    serviceUrl:
      defaultZone: http://${eureka.instance.hostname}:${server.port}/eureka/
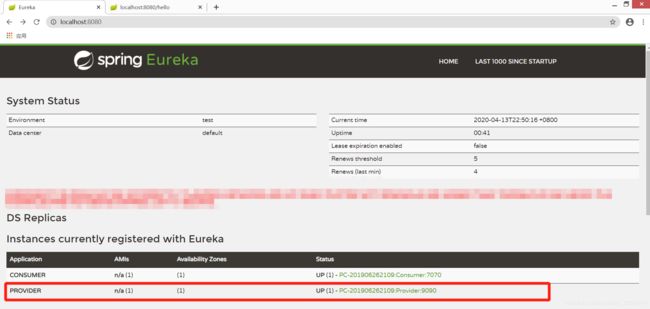
4、测试Eureka注册中心是否搭建成功
 5、测试是否可以正常访问
四、搭建服务的提供者(继承父工程)
1、提供者POM文件
<project xmlns="http://maven.apache.org/POM/4.0.0" xmlns:xsi="http://www.w3.org/2001/XMLSchema-instance"
         xsi:schemaLocation="http://maven.apache.org/POM/4.0.0 http://maven.apache.org/xsd/maven-4.0.0.xsd">
    <parent>
        <artifactId>CloudartifactId>
        <groupId>com.wanggroupId>
        <version>1.0-SNAPSHOTversion>
    parent>
    <modelVersion>4.0.0modelVersion>

    <artifactId>ProviderartifactId>
    <packaging>jarpackaging>

    <dependencies>

        <dependency>
            <groupId>org.springframework.bootgroupId>
            <artifactId>spring-boot-starter-webartifactId>
        dependency>


        <dependency>
            <groupId>org.springframework.cloudgroupId>
            <artifactId>spring-cloud-starter-netflix-eureka-clientartifactId>
        dependency>


        <dependency>
            <groupId>org.springframework.bootgroupId>
            <artifactId>spring-boot-starter-testartifactId>
            <scope>testscope>
        dependency>
    dependencies>
project>
2、在resources文件夹下创建application.yml文件
#端口配置
server:
  port: 9090

#服务名称
spring:
  application:
    name: Provider

#实例地址
#注册中心地址,可以使用","隔开配置多个注册中心形成集群形式,切记在yml的配置文件中的缩进和空格(多个地址间不要多余空格)
eureka:
  instance:
    hostname: localhost
  client:
    serviceUrl:
      defaultZone: http://localhost:8080/eureka/
3、创建启动类
package com.wang;

import org.springframework.boot.SpringApplication;
import org.springframework.boot.autoconfigure.SpringBootApplication;
import org.springframework.cloud.netflix.eureka.EnableEurekaClient;

/**
 * @author:坏小孩
 * @data:2020/4/9 周四
 */
@SpringBootApplication
@EnableEurekaClient
public class SpringApplicationEurekaClient {


    public static void main(String[] args) {
        SpringApplication.run(SpringApplicationEurekaClient.class, args);
    }
}
4、创建一个Controller用用于测试工程搭建是否成功和后续功能演示
package com.wang.controller;

import com.wang.service.ProviderService;
import org.springframework.beans.factory.annotation.Autowired;
import org.springframework.web.bind.annotation.GetMapping;
import org.springframework.web.bind.annotation.RestController;

/**
 * @Classname ProviderController
 * @author:坏小孩
 * @data:2020/4/13
 * @version:1.0
 * @desc:新规作成
 */
@RestController
public class ProviderController {


    private ProviderService providerService;

    @Autowired
    public void setProviderService(ProviderService providerService) {
        this.providerService = providerService;
    }
    @GetMapping("/get")
    public String getString() {

        return providerService.getString();
    }

}
5、创建使用Service以及ServiceImpl
package com.wang.service;

/**
 * @Classname ProviderService
 * @author:坏小孩
 * @data:2020/4/13 0013
 * @version:1.0
 * @desc:新规作成
 */
public interface ProviderService {

    public String getString();
}
package com.wang.service.impl;

import com.wang.service.ProviderService;
import org.springframework.beans.factory.annotation.Value;
import org.springframework.stereotype.Service;

/**
 * @Classname ProviderServiceImpl
 * @author:坏小孩
 * @data:2020/4/13 0013
 * @version:1.0
 * @desc:新规作成
 */
@Service
public class ProviderServiceImpl implements ProviderService {


    @Value("${server.port}")
    private String port;

    @Override
    public String getString() {
        return "我是微服务的提供者,我的端口号是:" + port;
    }
}
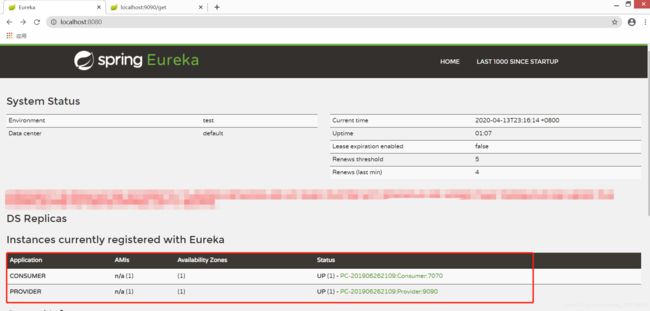
6、测试提供者是否可以注册到注册中心
 启动EurekaServer和提供者两个服务看到上面列表中提供者已经注册到注册中心,并且我们可以自行测试提供者的Controller是否可以单独使用

五、搭建服务的消费者(继承父工程)
1、消费者的POM,这里可以我们将Feign也一并导入
<project xmlns="http://maven.apache.org/POM/4.0.0" xmlns:xsi="http://www.w3.org/2001/XMLSchema-instance"
         xsi:schemaLocation="http://maven.apache.org/POM/4.0.0 http://maven.apache.org/xsd/maven-4.0.0.xsd">
    <modelVersion>4.0.0modelVersion>

    <parent>
        <artifactId>CloudartifactId>
        <groupId>com.wanggroupId>
        <version>1.0-SNAPSHOTversion>
    parent>

    <groupId>com.wanggroupId>
    <artifactId>ConsumerartifactId>
    <version>1.0-SNAPSHOTversion>
    <packaging>jarpackaging>


    <dependencies>

        <dependency>
            <groupId>org.springframework.bootgroupId>
            <artifactId>spring-boot-starter-webartifactId>
        dependency>


        <dependency>
            <groupId>org.springframework.cloudgroupId>
            <artifactId>spring-cloud-starter-netflix-eureka-clientartifactId>
        dependency>


        <dependency>
            <groupId>org.springframework.bootgroupId>
            <artifactId>spring-boot-starter-testartifactId>
            <scope>testscope>
        dependency>


        <dependency>
            <groupId>org.springframework.cloudgroupId>
            <artifactId>spring-cloud-starter-openfeignartifactId>
        dependency>
    dependencies>
project>
2、在resources文件夹下创建application.yml
#端口配置
server:
  port: 7070

#服务名称
spring:
  application:
    name: Consumer

#实例地址
#注册中心地址,可以使用","隔开配置多个注册中心形成集群形式,切记在yml的配置文件中的缩进和空格(多个地址间不要多余空格)
eureka:
  instance:
    hostname: localhost
  client:
    serviceUrl:
      defaultZone: http://localhost:8080/eureka/
3、创建消费者服务的启动类
package com.wang;

import org.springframework.boot.SpringApplication;
import org.springframework.boot.autoconfigure.SpringBootApplication;
import org.springframework.cloud.netflix.eureka.EnableEurekaClient;
import org.springframework.cloud.openfeign.EnableFeignClients;

/**
 * @Classname com.wang.SpringBootDemo
 * @author:坏小孩
 * @data:2020/4/13
 * @version:1.0
 * @desc:新规作成
 */

/**
 * @author 坏小孩
 * @EnableEurekaClient 开启客户Eureka端支持
 * @EnableFeignClients 开启Feign客户端支持
 */
@SpringBootApplication
@EnableEurekaClient
@EnableFeignClients
public class SpringBootDemo {


    public static void main(String[] args) {
        SpringApplication.run(SpringBootDemo.class, args);
    }
}
4、创建的Controller直接使用刚才提到的Feign的方式去访问提供者
package com.wang.controller;

import com.wang.service.FeignService;
import org.springframework.beans.factory.annotation.Autowired;
import org.springframework.beans.factory.annotation.Value;
import org.springframework.web.bind.annotation.GetMapping;
import org.springframework.web.bind.annotation.RestController;

/**
 * @Classname FeignController
 * @author:坏小孩
 * @data:2020/4/13 0013
 * @version:1.0
 * @desc:新规作成
 */
@RestController
public class FeignController {

    @Value("${server.port}")
    private String port;

    @GetMapping("/hello")
    public String hello() {

        return "我是微服务消费者,我的端口是:" + port;
    }


    /**
     * 注入Feign接口
     */
    private FeignService feignService;

    @Autowired
    public void setFeignService(FeignService feignService) {
        this.feignService = feignService;
    }

    /**
     * 使用接口的方式访问提供者
     * @return
     */
    @GetMapping("/feign")
    public String getString() {

        return feignService.getString();
    }
}
5、Feign是基于接口的方式进行访问提供者,因此创建所需的Service接口(只需要创建接口)
package com.wang.service;

import org.springframework.cloud.openfeign.FeignClient;
import org.springframework.web.bind.annotation.GetMapping;

/**
 * @Classname FeignService
 * @author:坏小孩
 * @data:2020/4/13
 * @version:1.0
 * @desc:新规作成
 */
@FeignClient("Provider") //使用Feign客户端基于接口通过GetMapping注解做访问映射,模拟Http请求提供者的Controller返回数据
public interface FeignService {

    /**
     * 通过提供接口使用Feign访问提供者
     *
     * @return 返回调用信息
     * @Desc Feign 则是在 Ribbon 的基础上进行了一次改进,采用接口的方式,
     * @Desc 将需要调用的其他服务的方法定义成抽象方法即可,不需要自己构建 http 请求。
     * @Desc 不过要注意的是抽象方法的注解、方法签名要和提供服务的方法完全一致
     */
    @GetMapping("/get")
    public String getString();
}


