eclipse使用mybatis generator插件自动生成bean和dao文件
转载自:最新教程:如何在eclipse中安装mybatis generator插件,并利用插件自动在自己指定得项目文件下生成代码文件
前言
在网上看了很多教程,试了很多次才发现自己的问题所在。下面做一个记录,以方便自己回头查看和帮到网上的朋友。
使用mybatis generator插件的目的
主要为了可以在项目中节省书写大量的实体类(entity,model,pojo),dao文件和映射文件(xxx.xml),为程序员节省了好多时间。
安装步骤
-
先下载mybatis generator
-
方法:在eclipse中自动下载。这种方法是个人认为是最稳妥的。
-
步骤:help->eclipse marketplace->在find搜索框中输入mybatis generator 在其右边点击Go即可搜索
正常的eclipse是很快就能搜到该最新插件的,如图下所示:

点击installed即可按步骤next下载,最后是installed anyway,然后restart eclipse即可成功完成mybatis generator插件的安装
如何利用插件自动在自己指定得项目文件下生成代码文件
步骤:首先在自己的项目下右键选择new ->other->Mybatis->如图下,然后next

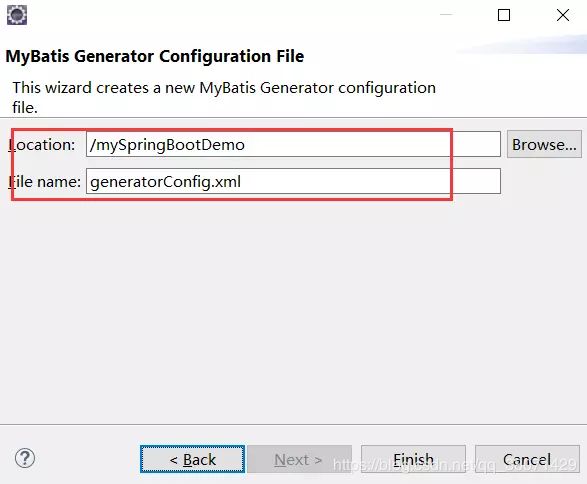
填写必要生成配置文件的路径和名称,点击finish即可生成配置文件
第二步:填写配置文件中的一些配置,这里主要是要填写
- – 连接数据库的本地jar路径
- – 连接数据库的配置:用户名,密码等
- – 还有生成实体类,dao类,映射文件的包路径等
- – 要生成的表名和对应的实体类名等
在这里的配置很关键,我就是在这配置的时候按了网上的说法去写,结果没报错,他也没给我生成,郁闷的半天。下面贴上我的generateConfig.xml,大家可以借鉴一下:
<generatorConfiguration>

    <classPathEntry  location="D:\MySQL5_7\mysql-connector-java-5.1.46.jar"/>
    <context id="DB2Tables"  targetRuntime="MyBatis3">
        <commentGenerator>
            <property name="suppressDate" value="true"/>

            <property name="suppressAllComments" value="true"/>
        commentGenerator>

        <jdbcConnection driverClass="com.mysql.jdbc.Driver" connectionURL="jdbc:mysql://127.0.0.1/mytest?useUnicode=true&characterEncoding=utf-8&serverTimezone=UTC" userId="root" password="root">
        jdbcConnection>
        <javaTypeResolver>
            <property name="forceBigDecimals" value="false"/>
        javaTypeResolver>

        <javaModelGenerator targetPackage="com.gtyyx.model" targetProject="mySpringBootDemo">
            <property name="enableSubPackages" value="true"/>
            <property name="trimStrings" value="true"/>
        javaModelGenerator>

        <sqlMapGenerator targetPackage="mapper" targetProject="mySpringBootDemo/src/main/resources">
            <property name="enableSubPackages" value="true"/>
        sqlMapGenerator>

        <javaClientGenerator type="XMLMAPPER" targetPackage="com.gtyyx.dao" targetProject="mySpringBootDemo">
            <property name="enableSubPackages" value="true"/>
        javaClientGenerator>

        <table tableName="t_user" domainObjectName="User" enableCountByExample="false" enableUpdateByExample="false" enableDeleteByExample="false" enableSelectByExample="false" selectByExampleQueryId="false">table>
    context>
generatorConfiguration>
这里最关键的是targetProject标签下的填写,没有填对的话是不能自动生成的,他还没给你报错。网上很多的例子填写的都是错的。所以很多坑需要你去跳!
例如在生成映射文件的包名和位置的时候,网上很多填的是src/main/resources,正确的是应该在src/main/resources前还要加上项目名mySpringBootDemo/src/main/resources,在这里我的项目名是mySpringBootDemo,所以是targetProject中填的是这个样子mySpringBootDemo/src/main/resources
其他地方的也应该加上项目名
第三步:就是运行generateConfig.xml了!网上很多的做法也是不对的,我也不知道为什么。可能是版本不一样了吧。这里说一下我的做法
选择generateConfig.xml文件右键,然后是选择 run,选择run mybatis generator,即可自动给你生成所要的文件,非常方面
生成的文件展示
生成的实体类
package com.gtyyx.model;

public class User {
    private Integer userId;

    private String userName;

    private String password;

    private String phone;

    public Integer getUserId() {
        return userId;
    }

    public void setUserId(Integer userId) {
        this.userId = userId;
    }

    public String getUserName() {
        return userName;
    }

    public void setUserName(String userName) {
        this.userName = userName == null ? null : userName.trim();
    }

    public String getPassword() {
        return password;
    }

    public void setPassword(String password) {
        this.password = password == null ? null : password.trim();
    }

    public String getPhone() {
        return phone;
    }

    public void setPhone(String phone) {
        this.phone = phone == null ? null : phone.trim();
    }
}
生成的dao类
package com.gtyyx.dao;

import com.gtyyx.model.User;

public interface UserMapper {
    int insert(User record);

    int insertSelective(User record);
}
生成的映射文件
<mapper namespace="com.gtyyx.dao.UserMapper">
  <resultMap id="BaseResultMap" type="com.gtyyx.model.User">
    <result column="user_id" jdbcType="INTEGER" property="userId" />
    <result column="user_name" jdbcType="VARCHAR" property="userName" />
    <result column="password" jdbcType="VARCHAR" property="password" />
    <result column="phone" jdbcType="VARCHAR" property="phone" />
  resultMap>
  <insert id="insert" parameterType="com.gtyyx.model.User">
    insert into t_user (user_id, user_name, password,
      phone)
    values (#{userId,jdbcType=INTEGER}, #{userName,jdbcType=VARCHAR}, #{password,jdbcType=VARCHAR},
      #{phone,jdbcType=VARCHAR})
  insert>
  <insert id="insertSelective" parameterType="com.gtyyx.model.User">
    insert into t_user
    <trim prefix="(" suffix=")" suffixOverrides=",">
      <if test="userId != null">
        user_id,
      if>
      <if test="userName != null">
        user_name,
      if>
      <if test="password != null">
        password,
      if>
      <if test="phone != null">
        phone,
      if>
    trim>
    <trim prefix="values (" suffix=")" suffixOverrides=",">
      <if test="userId != null">
        #{userId,jdbcType=INTEGER},
      if>
      <if test="userName != null">
        #{userName,jdbcType=VARCHAR},
      if>
      <if test="password != null">
        #{password,jdbcType=VARCHAR},
      if>
      <if test="phone != null">
        #{phone,jdbcType=VARCHAR},
      if>
    trim>
  insert>
mapper>
上面就是我在网上踩过坑时候毫无保留的跳出坑的过程记录,如果你看了还有我的还有坑的话,留言我,看我能不能把你拉出坑来!
网上的资料是好东西同时也可能是一个坑,当你无法填坑的时候,就应该另寻他法了,多尝试,不放弃,最后你才能如愿做出你想要的事情!