Android之View篇1————初识View
Android之View篇1————初识View
一. 目录
文章目录
- Android之View篇1————初识View
- 一. 目录
- 二. View的基础知识
- 1.什么是View
- 2.View的位置参数
- 3.MotionEvent
- 4.TouchSlop
- 5.VelocityTracker
- 6.GestureDetector
- 三. View的滑动
- 1.使用scrollTo/scrollBy
- 2.使用动画
- 3.改变布局参数
- 4.各种滑动方式的对比
- 四. 弹性滑动
- 1.使用Scroller
- 2.通过动画
- 3.使用延时策略
- 五.参考资料
二. View的基础知识
1.什么是View
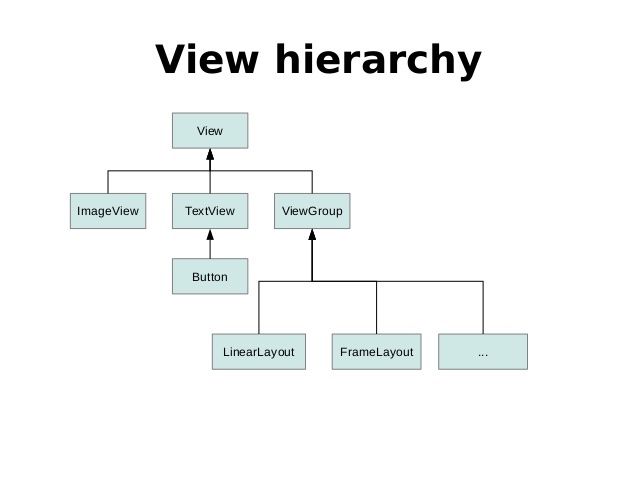
View是所有Android中所有控件的基类,是界面层次上的一种抽象
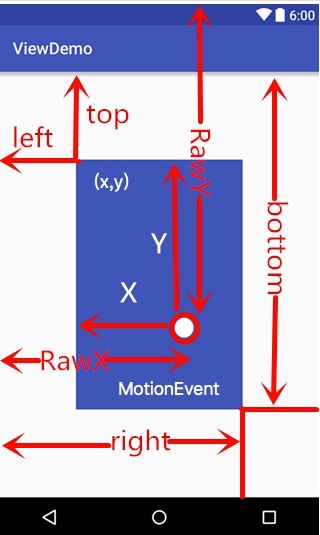
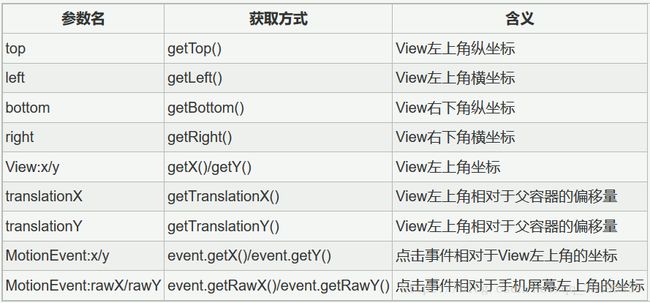
2.View的位置参数
3.MotionEvent
MotionEvent是指触屏事件(Touch事件)的相关细节(触摸发生的时间,位置)包装而成,典型的事件有以下几类:
| 事件类型 | 具体动作 |
|---|---|
| ACTION | 按下View |
| ACTION_MOVE | 手指在屏幕上移动 |
| ACTION_UP | 手指从屏幕上松开的一瞬间 |
| ACTION_CANCEL | 结束事件(非人为原因) |
通过MotionEvent对象我们可以得到点击事件的x和y坐标。
- getX/getY 相对于View左上角
- getRawX/getRawY 相对于手机屏幕左上角
获得MotionEvent的方式:
- 在View或Activity中拦截touch events,重写onTouchEvent方法
- 对于View来说也可以通过setOnTouchListener()方法来监听touch events
特别说明:事件列
4.TouchSlop
TouchSlop是系统所能识别的被认为是滑动的最小距离。这是个常量,和设备有关,在不同设备上这个值可能是不同的。
在Java代码中获取TouchSlop:ViewConfiguration.get(getContext).getScaledTouchSlop();
5.VelocityTracker
VelocityTracker是指速度追踪,用于最终手势在滑动过程的速度。包括水平和竖直方向的速度。
使用:
//在View的onTouchEvent的方法中追踪当前事件的速度
VelocityTracker velocityTracker = VelocityTracker.obtain();
velocityTracker.addMovement(event);


//1000这个参数表示时间间隔,最终得到的速度代表着1000毫秒内划过的像素大小。
velocityTracker.computeCurrentVelocity(1000);
int xVelocity = (int) velocityTracker.getXVelocity();
int yVelocity = (int) velocityTracker.getYVelocity();

//不需要是,调用clear方法回收并重置内存
velocityTracker.clear();
velocityTracker.recycle();
注意:和Android坐标轴相同方向结果为正,相反方向为负
6.GestureDetector
GestureDetector即手势检测,用于辅助检测用户的单击,滑动,长按,双击等行为.
GestureDetector内部的Listener接口:
- OnGestureListener,这个Listener监听一些手势,如单击、滑动、长按等操作:
- OnDoubleTapListener,这个Listener监听双击和单击事件。
- OnContextClickListener,鼠标右键(加入外设)
- SimpleOnGestureListener,实现了上面三个接口的类,拥有上面三个的所有回调方法。
使用:
- 实例化GestureDetectorCompat类
- 实现OnGestureListener/OnGestureListener/SimpleOnGestureListener接口
- 接管目标View的OnTouchEvent方法
public class MainActivity extends AppCompatActivity {
    private static final String TAG = "MainActivity";
    GestureDetector mGestureDetector;

    GestureDetector.SimpleOnGestureListener mSimpleOnGestureListener = new GestureDetector.SimpleOnGestureListener() {
        @Override
        public boolean onSingleTapUp(MotionEvent e) {
            Log.d(TAG, "onSingleTapUp: 手指(轻触)送开");
            return false;
        }  //手指(轻触)送开

        @Override
        public void onLongPress(MotionEvent e) {  //长按
        }

        @Override
        public boolean onScroll(MotionEvent e1, MotionEvent e2,
                                float distanceX, float distanceY) { //按下并拖动
            return false;
        }

        @Override
        public boolean onFling(MotionEvent e1, MotionEvent e2, float velocityX,
                               float velocityY) { //按下触碰长按并松开
            return false;
        }

        @Override
        public void onShowPress(MotionEvent e) { //手指轻触屏幕的一瞬间,尚未松开
        }

        @Override
        public boolean onDown(MotionEvent e) {
            return false;
        }  //手指轻触屏幕的一瞬间

        @Override
        public boolean onDoubleTap(MotionEvent e) {
            Log.d(TAG, "onDoubleTap: 双击");
            return false;
        } //双击

        @Override
        public boolean onDoubleTapEvent(MotionEvent e) {
            return false;
        }  //发生了双击,并送开

        @Override
        public boolean onSingleTapConfirmed(MotionEvent e) {
            return false;
        } //严格的单击

        @Override
        public boolean onContextClick(MotionEvent e) { //当鼠标/触摸板,右键点击时候的回调。
            return false;
        }
    };

    @Override
    protected void onCreate(Bundle savedInstanceState) {
        super.onCreate(savedInstanceState);
        setContentView(R.layout.activity_main);

        mGestureDetector = new GestureDetector(this, mSimpleOnGestureListener);  //实例

        View view= findViewById(R.id.view);
        view.setOnTouchListener(new View.OnTouchListener() { //接管View的onTouch
            @Override
            public boolean onTouch(View v, MotionEvent event) {
                return mGestureDetector.onTouchEvent(event);
            }
        });
        view.setLongClickable(true);
    }
}
三. View的滑动
View的滑动的实现有3种方法:
- 使用scrollTo/scrollBy
- 使用动画
- 改变布局参数
1.使用scrollTo/scrollBy
使用:
调用控件所在父容器的scrollTo/scrollBy方法
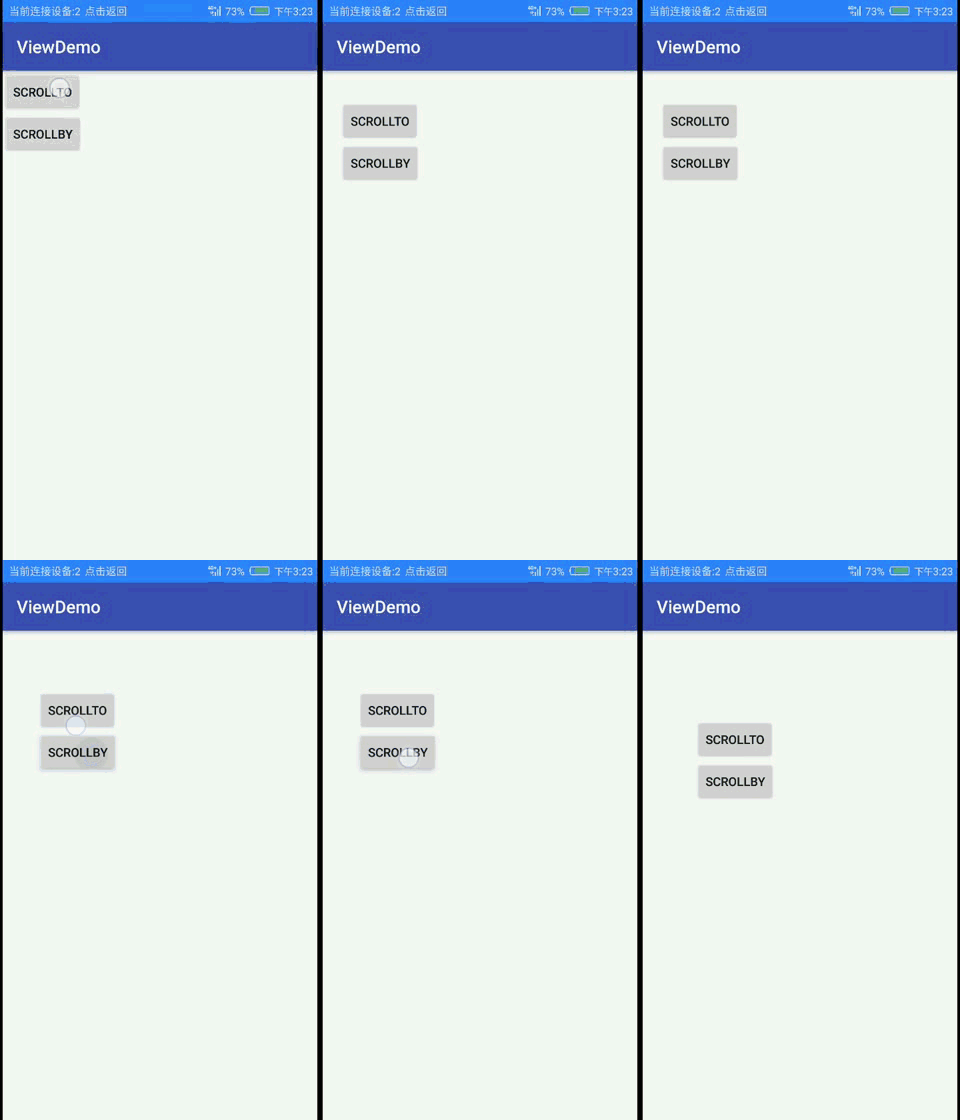
scrollTo/scrollBy的区别:
- scrollTo是基于参数的绝对滑动。
- scrollBy是基于参数的相对滑动。
- 注意,两者都是移动View的内容,而不是VIew本身
源码中scrollTo/scrollBy的实现:
/**
     * Set the scrolled position of your view. This will cause a call to
     * {@link #onScrollChanged(int, int, int, int)} and the view will be
     * invalidated.
     * @param x the x position to scroll to
     * @param y the y position to scroll to
     */
    public void scrollTo(int x, int y) {
        if (mScrollX != x || mScrollY != y) {
            int oldX = mScrollX;
            int oldY = mScrollY;
            mScrollX = x;
            mScrollY = y;
            invalidateParentCaches();
            onScrollChanged(mScrollX, mScrollY, oldX, oldY);
            if (!awakenScrollBars()) {
                postInvalidateOnAnimation();
            }
        }
    }

    /**
     * Move the scrolled position of your view. This will cause a call to
     * {@link #onScrollChanged(int, int, int, int)} and the view will be
     * invalidated.
     * @param x the amount of pixels to scroll by horizontally
     * @param y the amount of pixels to scroll by vertically
     */
    public void scrollBy(int x, int y) { //可以看出scrollBy也是调用scrollBy实现的
        scrollTo(mScrollX + x, mScrollY + y);
    }
2.使用动画
通过使用动画,我们也可以实现一个View的平移,主要也是操作View的translationX和translationY,既可以补见动画,也可以采取属性动画。
补间动画
//layout下anim包中新建translate.xml


 Animation animation = AnimationUtils.loadAnimation(this, R.anim.translate);
        layout.setAnimation(animation);
        animation.start();
属性动画
ObjectAnimator.ofFloat(layout,"translationX",0,100).setDuration(1000).start();
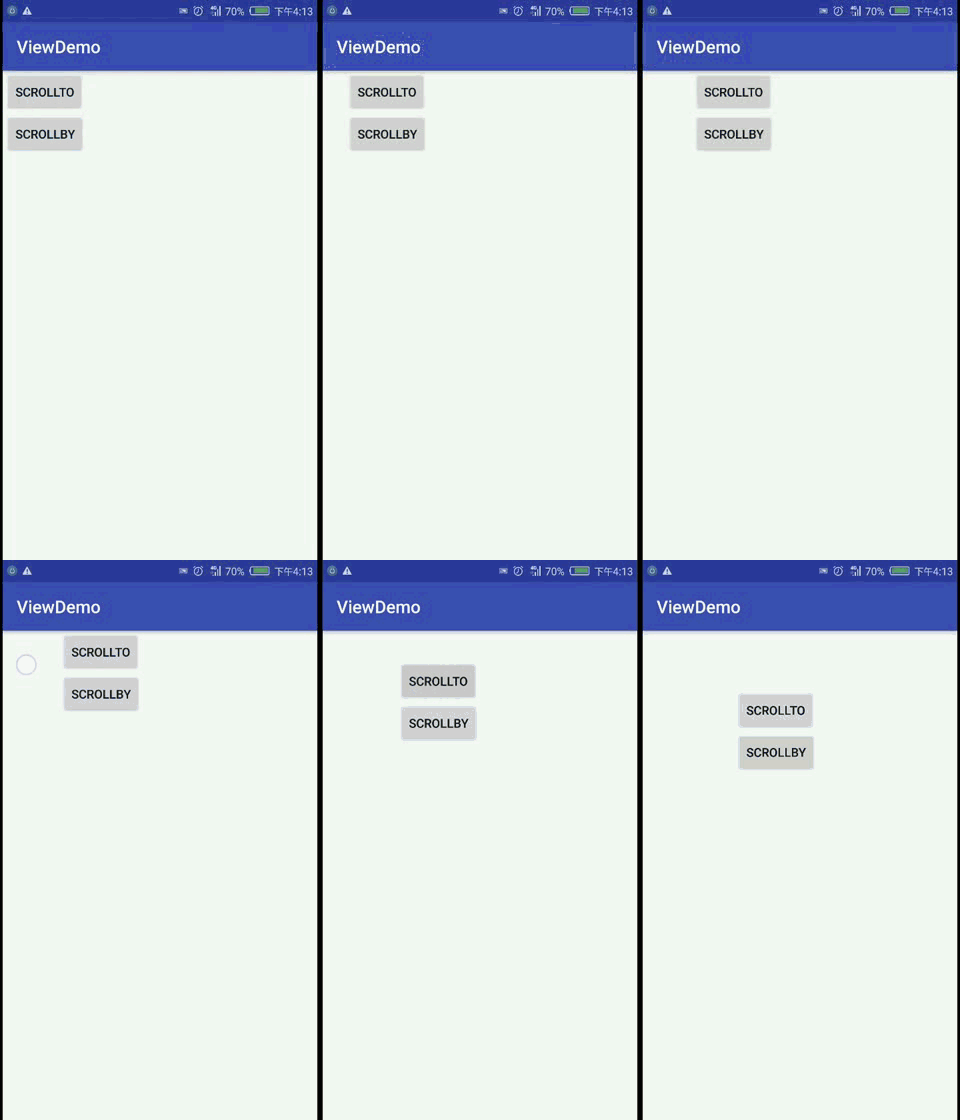
根据gif图很容易可以看出了:
View动画是对View的影像进行操作的。也就是说View动画并不能真正的改变View的位置。
属性动画是真正改变View的位置,但它是从Android3.0开始推出的。
3.改变布局参数
改变布局参数LayoutParams:
 ViewGroup.MarginLayoutParams params = (ViewGroup.MarginLayoutParams) layout.getLayoutParams();
                params.width+=300;
                params.leftMargin+=300;
                layout.requestLayout();
4.各种滑动方式的对比
四. 弹性滑动
实现View的弹性滑动,即渐进式滑动。实现的方法很多,但都有一个共同的思想,将一次大的滑动分成若干次小的滑动,并在一个时间段中完成,下面就是常见的实现滑动的方法。
1.使用Scroller
使用:
- 创建Scroller实例
- 调用startScroll()方法来初始化滚动数据并刷新界面
- 重写computeScroll()方法,并在其内部完成平滑滚动的逻辑
//第一步
 private Scroller mScroller;
 mScroller = new Scroller(context);

// 第二步,调用startScroll()方法来初始化滚动数据并刷新界面
mScroller.startScroll(getScrollX(), 0, dx, 0);

@Override
public void computeScroll() {
	// 第三步,重写computeScroll()方法,并在其内部完成平滑滚动的逻辑
	if (mScroller.computeScrollOffset()) {
		scrollTo(mScroller.getCurrX(), mScroller.getCurrY());
	invalidate();
	}
}
2.通过动画
动画本身就是一种渐进的过程,因此通过它来实现太天然就具备弹性效果。比如,下面的代码就可以让一个VIew在100ms向右移动200像素
ObjectAnimator.ofFloat(layout,"translationX",0,200).setDuration(100).start();
3.使用延时策略
延时策略的核心思想就是通过发送一系列延时消息,从而达到一种渐进式的效果,可以使用Handler,View的PostDelayed方法,或者线程的sleep方法。
以Handled为例,下面的代码将VIew的内容向左移动100像素。
    private static final int MESSAGE_SCROLL_TO = 1;
    private static final int FRAME_COUNT = 30;
    private static final int DELAYED_TIME = 33;

    private int mCount;

    private Handler mHandler = new Handler() {
        public void handleMessage(Message msg) {
            switch (msg.what) {
                case MESSAGE_SCROLL_TO: {
                    mCount++;
                    if (mCount <= FRAME_COUNT) {
                        float fraction = mCount / (float) FRAME_COUNT;
                        int scrollX = (int) (fraction * 100);
                        Button mButton;
                        mButton.scrollTo(scrollX,0);
                        mHandler.sendEmptyMessageDelayed(MESSAGE_SCROLL_TO,DELAYED_TIME);
                    }
                    break;
                }
                default:
                    break;
            }

        }
    };
五.参考资料
《Android艺术开发探索》
Android开发艺术探索笔记 ——View(一)
Android手势检测——GestureDetector全面分析
Android Scroller完全解析,关于Scroller你所需知道的一切
