Grafana+Prometheus监控系统安装
简介:
grafana 是一款采用 go 语言编写的开源应用,主要用于大规模指标数据的可视化展现,是网络架构和应用分析中最流行的时序数据展示工具,目前已经支持绝大部分常用的时序数据库。官网(http://docs.grafana.org/)。
用到的工具:
- Docker,本文大量使用了Docker来启动各个应用。
- Prometheus,负责抓取/存储指标信息,并提供查询功能。
- Grafana,负责数据可视化。
- JMX exporter,提供JMX中和JVM相关的metrics。
- Tomcat,用来模拟一个Java应用。
先讲一下大致步骤:
- 利用JMX exporter,在Java进程内启动一个小型的Http server
- 配置Prometheus抓取那个Http server提供的metrics。
- 配置Grafana连接Prometheus,配置Dashboard。
1. exporter介绍
广义上讲所有可以向Prometheus提供监控样本数据的程序都可以被称为一个Exporter。而Exporter的一个实例称为target,如下所示,Prometheus通过轮询的方式定期从这些target中获取样本数据:
 node_exporter 服务器监控
#安装node_exporter,需要放在该服务器中
tar -zxvf node_exporter-0.18.1.linux-amd64.tar.gz
nohup /basewin/grafana/node_exporter-0.18.1.linux-amd64/node_exporter&
9100端口

安装node_exporter
tar -zxvf node_exporter-0.18.1.linux-amd64.tar.gz
nohup /disk2/node_exporter-0.18.1.linux-amd64/node_exporter &
9100端口
netstat -nptl

tar -zxvf mysqld_exporter-0.12.1.linux-amd64.tar.gz
nohup /basewin/grafana/mysqld_exporter-0.12.1.linux-amd64/mysqld_exporter -config.my-cnf=".my.cnf" &

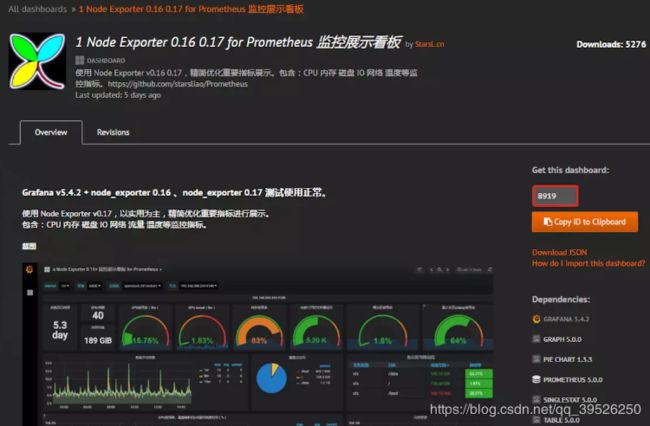
dashboard页面 linux 系统 监控 8919
redis_exporter
#不需要放在redis所在得服务器中
wget https://github.com/oliver006/redis_exporter/releases/download/v0.15.0/redis_exporter-v0.15.0.linux-amd64.tar.gz
tar -zxvf redis_exporter-v0.15.0.linux-amd64.tar.gz
cd /basewin/grafana
#启动 并指定 redis 地址密码等信息
nohup ./redis_exporter  -redis.addr 120.76.236.11:6379  -redis.password test &
#nohup ./redis_exporter -web.listen-address :9122 -redis.addr 39.104.228.111:6479  -redis.password test &

ps -aux | grep redis_exporter
#默认端口 90121
netstat -nptl
#dashboards
wget  https://grafana.com/api/dashboards/763/revisions/1/download
配置prometheus.yml 加入
- job_name: redis_exporter
  static_configs:
  - targets: ['192.168.0.17:9121']
监控不同IP不同密码Redis多实例
https://blog.csdn.net/qq_36937234/article/details/97669297
dashboard页面图标ID: 763
mysql_exporter
#需要放在mysql所在得服务器中
tar -zxvf mysqld_exporter-0.12.1.linux-amd64.tar.gz
cd /basewin/grafana/mysqld_exporter-0.12.1.linux-amd64
cd /disk2/mysqld_exporter-0.12.1.linux-amd64
#*重要!设置或显示环境变量
export DATA_SOURCE_NAME='root:test@tcp(47.75.108.111:3306)/'
#启动
nohup /basewin/grafana/mysqld_exporter-0.12.1.linux-amd64/mysqld_exporter  --config.my-cnf="/basewin/grafana/mysqld_exporter-0.12.1.linux-amd64/.my.cnf" &
nohup ./mysqld_exporter --config.my-cnf=".my.cnf" &

#其他服务器同样方法
export DATA_SOURCE_NAME='root:test@tcp(120.76.236.111:3306)/'
export DATA_SOURCE_NAME='root:test@tcp(39.104.228.111:3306)/'
export DATA_SOURCE_NAME='root:test@tcp(115.29.234.111:3306)/'
nohup ./mysqld_exporter --config.my-cnf=".my-mysql-exporter.cnf" &


ps -aux | grep mysqld_expo
netstat -nptl
#默认 9104

netstat -nptl
ps -aux | grep java
ps -aux | grep tomcat
ps -aux | grep nginx
#查看端口进程号
netstat -tunlp|grep 9104
#列出该进程的启动位置
ll /proc/23931
dashboard页面 ranfana 导入Mysql 监控图表推荐图标ID:https://grafana.com/dashboards/7362
2. Prometheus介绍
Prometheus(简称Prom)前身是SoundCloud的告警工具包,现已演化成一个独立的开源监控系统。属于Kurberntes所在的Cloud Native Computing Foundation。
2.1 linux下载安装
地址:https://prometheus.io/download/
安装prometheus
cd /basewin/grafana
[root@prometheus src]# tar -zxvf prometheus-2.14.0.linux-amd64.tar.gz
[root@prometheus local]# mv prometheus-2.14.0.linux-amd64/ prometheus/
vi /basewin/grafana/prometheus/prometheus.yml

cd /basewin/grafana/prometheus
nohup ./prometheus &
nohup /basewin/grafana/prometheus/prometheus &
9090端口
#关闭
或者通过命令热加载:
curl  -XPOST localhost:9090/-/reloadit
ps -aux | grep prometheus
#页面访问地址
http://ip:9090/targets
prometheus.yml配置
# my global config
global:
  scrape_interval: 1m # Server端抓取数据的时间间隔Set the scrape interval to every 15 seconds. Default is every 1 minute.
  evaluation_interval: 1m #评估报警规则的时间间隔 Evaluate rules every 15 seconds. The default is every 1 minute.
  #数据抓取的超时时间 scrape_timeout is set to the global default (10s).

# Alertmanager configuration
alerting:
  alertmanagers:
  - static_configs:
    - targets:
      # - alertmanager:9093

# Load rules once and periodically evaluate them according to the global 'evaluation_interval'.
rule_files:
  # - "first_rules.yml"
  # - "second_rules.yml"

# A scrape configuration containing exactly one endpoint to scrape:
# Here it's Prometheus itself.
scrape_configs:
  # The job name is added as a label `job=` to any timeseries scraped from this config.
  - job_name: 'mdmposlinux'

    # metrics_path defaults to '/metrics'
    # scheme defaults to 'http'.

    static_configs:
    - targets: ['120.76.236.111:9100']
      labels:
        instance: mdmposlinux

  - job_name: 'mdmposhklinux'
    static_configs:
    - targets: ['47.75.108.111:9100']
      labels:
        instance: mdmposhklinux

  - job_name: 'smartpeaklinux'
    static_configs:
    - targets: ['115.29.234.111:9100']
      labels:
        instance: smartpeaklinux
# testlinux
  - job_name: 'testlinux'
    static_configs:
    - targets: ['39.104.228.111:9100']
      labels:
        instance: testlinux

   # redis
  - job_name: 'redis120'
    static_configs:
    - targets: ['47.75.108.111:9121']
      labels:
        instance: redis120
  # testredis
  - job_name: 'redis-test'
    static_configs:
    - targets: ['47.75.108.111:9122']
      labels:
        instance: redis-test
# hkmysql
  - job_name: mysql_hk
    static_configs:
      - targets: ['47.75.108.111:9104']
        labels:
          instance: mysql_hk

# mysql
  - job_name: mysql120
    static_configs:
      - targets: ['120.76.236.111:9104']
        labels:
          instance: mysql120

# testmysql
  - job_name: mysqltest
    static_configs:
      - targets: ['39.104.228.111:9104']
        labels:
          instance: mysqltest

# mysql_smartpeak
  - job_name: mysql_smartpeak
    static_configs:
      - targets: ['115.29.234.111:9104']
        labels:
          instance: mysql_smartpeak
3. Grafana介绍
Grafana是一个跨平台的开源的度量分析和可视化工具,可以通过将采集的数据查询然后可视化的展示,并及时通知。它主要有以下六大特点:
1、展示方式:快速灵活的客户端图表,面板插件有许多不同方式的可视化指标和日志,官方库中具有丰富的仪表盘插件,比如热图、折线图、图表等多种展示方式;
2、数据源:Graphite,InfluxDB,OpenTSDB,Prometheus,Elasticsearch,CloudWatch和KairosDB等;
3、通知提醒:以可视方式定义最重要指标的警报规则,Grafana将不断计算并发送通知,在数据达到阈值时通过Slack、PagerDuty等获得通知;
4、混合展示:在同一图表中混合使用不同的数据源,可以基于每个查询指定数据源,甚至自定义数据源;
5、注释:使用来自不同数据源的丰富事件注释图表,将鼠标悬停在事件上会显示完整的事件元数据和标记;
6、过滤器:Ad-hoc过滤器允许动态创建新的键/值过滤器,这些过滤器会自动应用于使用该数据源的所有查询。
3.1 linux下载安装
官网下载地址:Grafana
安装指南:Grafana安装指南
根据自己的系统版本和配置,下载对应的包,官方提供了如下说明,可直接按照说明进行下载:
启动
下载安装完成后,输入命令 service grafana-server start 启动服务,打开浏览器,输入IP+端口,3000为Grafana的默认侦听端口。
系统默认用户名和密码为admin/admin,第一次登陆系统会要求修改密码,修改密码后登陆,界面显示如下:
3.2 windows下载安装
安装方式也是很简单的,下载Windows版本的zip,解压,conf目录下面的配置文件 defaults.ini copy一份命名为 custom.ini,然后双击grafana-server.exe即可。根据 custom.ini 里面配置的端口,打开本地服务,
Grafana的默认端口为3000,此端口在Windows上需要额外的权限。编辑custom.ini并取消注释http_port配置选项(;ini文件中的注释字符)并将其更改为类似8080或类似内容。该端口不需要额外的Windows特权。
默认登录名和密码admin/admin
通过执行目录grafana-server.exe中的启动Grafana bin,最好从命令行启动。如果要将Grafana作为Windows服务运行,请下载NSSM。使用该工具将Grafana添加为Windows服务非常容易。
安装插件:
使用git bash,输入命令行:./grafana-cli.exe plugins install grafana-piechart-panel,其中grafana-piechart-panel 为插件名字,可以去插件库搜索得知。
安装好之后,本地可以在data目录下面看到 \data\plugins\grafana-piechart-panel,实际上就是把源码(主要是js 和css)从GitHub(https://github.com/grafana/piechart-panel)下载到本地,然后Grafana就会从这个目录去加载插件。而插件的主要功能就是展示酷炫的效果,这个正好是js,h5的强项。


