【人脸识别(三)】:使用face_recognition库实现人脸识别,python实现
人脸识别(一):Ubuntu Python安装dlib C++ library
人脸识别(二):如何使用 dlib 实现简单的人脸识别功能
人脸识别(四):人脸识别理论、原理、分类、概括,请针对性学习所需算法,不要全学。
人脸识别(五):基于Adaboost的人脸检测算法,及实例教程
目录
前言
安装face_recognition库
人脸检测和人脸轮廓检测
人脸比对
检测视频中的人脸
人脸识别
视频中人脸识别
CNN模型与CUDA加速人脸检测
使用命令窗识别人脸
使用命令窗调整容忍度
使用命令窗显示人脸之间的匹配度/距离
使用命令窗只输出人名
使用命令窗控制CPU核数
小结
前言
人脸识别(二)https://blog.csdn.net/qq_39709813/article/details/105644815学习了使用dlib实现常用的人脸识别功能,今天将在dlib基础上使用face_recognition库实现人脸识别。
dlib的检测精度为99.13%,这次使用的face_recognition库的检测精度为99.38%,二者都是很好的人脸识别库,都支持机器学习等方面的应用。
face_recognition除了在程序中使用外,也可以在命令窗内直接使用。
dlib库文件见:https://download.csdn.net/download/qq_39709813/12339920
face_recognition库文件见:https://download.csdn.net/download/qq_39709813/12346000
本文程序实例代码见:https://download.csdn.net/download/qq_39709813/12348320
这些内容仅供学习参考使用。
安装face_recognition库
安装库之前需要安装dlib库,因为face_recognition是以dlib为支撑。安装dlib的方法见https://blog.csdn.net/qq_39709813/article/details/105614115
安装完dlib之后,进入face_recognition_master文件夹内,打开命令窗口,进入所需要的环境,输入:
pip3 install face_recognition
人脸检测和人脸轮廓检测
使用检测框框取人脸部分和绘出人脸轮廓必要的68点。具体代码保存在test1.py中,效果如下:
import face_recognition
import cv2


path = './face_images/2008_001322.jpg'

img = cv2.imread(path)
img_rgb = img[:, :, ::-1]

face_location = face_recognition.face_locations(img_rgb)  # 检测框位置
face_landmarks_list = face_recognition.face_landmarks(img_rgb)  #面部轮廓位置

for i in range(len(face_location)):#绘制检测狂
    rect = face_location[i]
    cv2.rectangle(img, (rect[3], rect[0]), (rect[1], rect[2]), (0, 0, 255), 2)

for word, face_landmarks in enumerate(face_landmarks_list):#绘制面部轮廓点
    for key, marks in face_landmarks.items():
        for i in range(len(marks)):
            point = marks[i]
            cv2.circle(img,(point[0], point[1]),2,(0,255,0))
            # img[point[1], point[0]]= [255,255,255]

cv2.imshow('img', img)
cv2.waitKey(0)
print("finish")
人脸比对
实现两张人脸的比对,如果是同一人,输出true,否则输出false。具体代码保存在test2.py中,效果如下:
import face_recognition

path_know = './people_i_know/obama.jpg'
path_unknow = './unknow_people/unknow2.jpg'

know = face_recognition.load_image_file(path_know)# 已知人的面部轮廓位置
unknow = face_recognition.load_image_file(path_unknow)# 未知人的面部轮廓位置

know_encoding = face_recognition.face_encodings(know)[0]# 已知人面部编码
unknow_encoding = face_recognition.face_encodings(unknow)[0]# 未知人面部编码

result = face_recognition.compare_faces([know_encoding],unknow_encoding)# 对比两个面部编码
print(result)
检测视频中的人脸
在检检测人脸的基础上,结合opencv实现在视频流中的人脸识别功能。具体代码保存在test3.py中,效果如下:
import face_recognition
import cv2

video_capture = cv2.VideoCapture('./video/short_hamilton_clip.mp4')
# video_capture = cv2.VideoCapture(0)

while True:
    ret, frame = video_capture.read()
    img_rgb = frame[:, :, ::-1]

    face_location = face_recognition.face_locations(img_rgb)
    # face_location = face_recognition.face_locations(img_rgb, model="cnn")# 使用CNN模型

    for (top, right,bottom, left) in face_location:
        cv2.rectangle(frame, (left, top), (right, bottom), (0, 0, 255), 2)#绘制检测框
    cv2.imshow('image',frame)

    if cv2.waitKey(1) & 0xFF == ord('q'):
        break

video_capture.release()
cv2.destroyAllWindows()
人脸识别
检测人脸之后,通过对 面部特征的编码,将其转化为特征向量,通过比对两张脸之间的特征向量确定人脸是否认识。
其中path_know是已经认识人的文件路径,path_unknow是需要识别的文件路径。这就需要事先把认识的人和不认识的人分别放在people_i_know和unknow_people文件夹中。
程序输出的是需要识别的人的具体名字或者unknow,具体的代码保存在test4.py中,效果如下:
import face_recognition
import os

path_know = './people_i_know'
path_unknow = './unknow_people'

know = {}
for path in os.listdir(path_know):#建立已知人的面部特征字典库
    img = face_recognition.load_image_file(path_know+'/'+path)
    encoding = face_recognition.face_encodings(img)[0]
    name = path.split('.')[0]
    know[name] = encoding

match = {}
for path in os.listdir(path_unknow):
    img = face_recognition.load_image_file(path_unknow+'/'+path)
    encoding = face_recognition.face_encodings(img)[0]# 获取未知人的面部特征
    name = path.split('.')[0]
    match[name] = 'unknow'
    for key, value in know.items():
        if face_recognition.compare_faces([value],encoding)[0]:#与库里的特征进行比对
            match[name] = key
            break

print(match)

for key, value in match.items():
    print(key+' is '+ value)
视频中人脸识别
在人脸识别之上,结合opencv实现视频中的人脸识别。具体代码保存在test5.py中,效果如下:
import face_recognition
import cv2
import numpy as np
import os

# video_capture = cv2.VideoCapture(0)q
video_capture = cv2.VideoCapture('./video/hamilton_clip.mp4')

path_know = './people_i_know'

known_face_encodings = []
known_face_names = []

for path in os.listdir(path_know):
    img = face_recognition.load_image_file(path_know+'/'+path)
    encoding = face_recognition.face_encodings(img)[0]
    known_face_encodings.append(encoding)
    name = path.split('.')[0]
    known_face_names.append(name)


# Initialize some variables
face_locations = []
face_encodings = []
face_names = []
process_this_frame = True

while True:
    # Grab a single frame of video
    ret, frame = video_capture.read()

    # Resize frame of video to 1/4 size for faster face recognition processing
    small_frame = cv2.resize(frame, (0, 0), fx=0.25, fy=0.25)

    # Convert the image from BGR color (which OpenCV uses) to RGB color (which face_recognition uses)
    rgb_small_frame = small_frame[:, :, ::-1]

    # Only process every other frame of video to save time
    if process_this_frame:
        # Find all the faces and face encodings in the current frame of video
        face_locations = face_recognition.face_locations(rgb_small_frame)
        face_encodings = face_recognition.face_encodings(rgb_small_frame, face_locations)

        face_names = []
        for face_encoding in face_encodings:
            # See if the face is a match for the known face(s)
            matches = face_recognition.compare_faces(known_face_encodings, face_encoding)
            name = "Unknown"

            # # If a match was found in known_face_encodings, just use the first one.
            # if True in matches:
            #     first_match_index = matches.index(True)
            #     name = known_face_names[first_match_index]

            # Or instead, use the known face with the smallest distance to the new face
            face_distances = face_recognition.face_distance(known_face_encodings, face_encoding)
            best_match_index = np.argmin(face_distances)
            if matches[best_match_index]:
                name = known_face_names[best_match_index]

            face_names.append(name)

    process_this_frame = not process_this_frame


    # Display the results
    for (top, right, bottom, left), name in zip(face_locations, face_names):
        # Scale back up face locations since the frame we detected in was scaled to 1/4 size
        top *= 4
        right *= 4
        bottom *= 4
        left *= 4

        # Draw a box around the face
        cv2.rectangle(frame, (left, top), (right, bottom), (0, 0, 255), 2)

        # Draw a label with a name below the face
        cv2.rectangle(frame, (left, bottom - 35), (right, bottom), (0, 0, 255), cv2.FILLED)
        font = cv2.FONT_HERSHEY_DUPLEX
        cv2.putText(frame, name, (left + 6, bottom - 6), font, 1.0, (255, 255, 255), 1)

    # Display the resulting image
    cv2.imshow('Video', frame)

    # Hit 'q' on the keyboard to quit!
    if cv2.waitKey(1) & 0xFF == ord('q'):
        break

# Release handle to the webcam
video_capture.release()
cv2.destroyAllWindows()
CNN模型与CUDA加速人脸检测
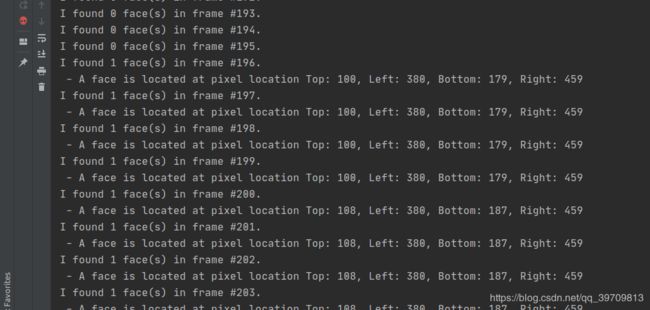
使用CNN模型批量检测视频、图片中的人脸,通过使用GPU加速,速度是原先的3倍左右。程序结果不输出图像,仅仅输出文字结果。具体代码保存在test6.py中,效果如下:
import face_recognition
import cv2

# Open video file
video_capture = cv2.VideoCapture("./video/hamilton_clip.mp4")

frames = []
frame_count = 0

while video_capture.isOpened():
    # Grab a single frame of video
    ret, frame = video_capture.read()

    # Bail out when the video file ends
    if not ret:
        break

    # Convert the image from BGR color (which OpenCV uses) to RGB color (which face_recognition uses)
    frame = frame[:, :, ::-1]

    # Save each frame of the video to a list
    frame_count += 1
    frames.append(frame)

    # Every 128 frames (the default batch size), batch process the list of frames to find faces
    if len(frames) == 128:
        batch_of_face_locations = face_recognition.batch_face_locations(frames, number_of_times_to_upsample=0)

        # Now let's list all the faces we found in all 128 frames
        for frame_number_in_batch, face_locations in enumerate(batch_of_face_locations):
            number_of_faces_in_frame = len(face_locations)

            frame_number = frame_count - 128 + frame_number_in_batch
            print("I found {} face(s) in frame #{}.".format(number_of_faces_in_frame, frame_number))

            for face_location in face_locations:
                # Print the location of each face in this frame
                top, right, bottom, left = face_location
                print(" - A face is located at pixel location Top: {}, Left: {}, Bottom: {}, Right: {}".format(top, left, bottom, right))

        # Clear the frames array to start the next batch
        frames = []
使用命令窗识别人脸
命令窗允许我们直接在文件夹中直接识别人脸,而不需要载入IDLE中。但注意使用有face_recognition包的环境。
同上,people_i_know存放已经知道的人脸图像,unknow_people存放需要识别的图像。
方法如下:
face_recognition ./people_i_know/ ./unknow_people/
使用命令窗调整容忍度
此处的--tolerance 0.54即为容忍度设置参数,方法如下:
face_recognition --tolerance 0.54 ./people_i_know/ ./unknow_people/
使用命令窗显示人脸之间的匹配度/距离
通过设置参数--show-distance true即可,方法如下:
face_recognition --show-distance true ./people_i_know/ ./unknow_people/
使用命令窗只输出人名
设置参数 |cut -d ',' -f2即可,方法如下:
face_recognition --show-distance true ./people_i_know/ ./unknow_people/ |cut -d ',' -f2
使用命令窗控制CPU核数
设置 --cpus -1使用最大核数,具体核数可以自定义,方法如下:
face_recognition --cpus -1 ./people_i_know/ ./unknow_people/
展望
人脸识别的内容很丰富,本文的内容到此结束,以上内容可以作为入门人脸识别的参考例程。更多开发的内容,希望读者可以结合自己所需的场景进行探索、开发。
小结
至此,我们已经可以使用dlib 或者 face_recognition 库实现人脸检测、识别,还推广到视频和其他的场景中。这些都是为学习人脸识别准备,如果有人脸识别的理论基础最好,若是没有理论基础,可以先跟随以上代码抄一抄、调一调参数,找一找感觉。
往后一篇将重点介绍人脸识别的理论基础,感兴趣的话可以看看。
下一篇将简要学习人脸识别的理论、算法分类,推荐读者针对性研究:
人脸识别(四):人脸识别理论、原理、分类、概括,请针对性学习所需算法,不要全学。


