Mysqlm-m同步
一.基础配置
主master IP:192.168.100.123
从master IP:192.168.100.124
首先在两台服务器上同样操作
前提:关闭iptables或者添加策略否则后面会报错;
vi /etc/sysconfig/iptables
-A INPUT -m state –state NEW -m tcp -p tcp–dport 3306 -j ACCEPT
做好本地源
安装mysql相关软件包并且开启
二.主机服务配置
2.1在主服务器配置
/etc/my.cnf下面添加
[mysqld]
log-bin=Mysql-bin
server-id=1
通过下面的命令查看bin日志文件以及pos值;
mysql> show master status;
+------------------+----------+--------------+------------------+
| File | Position |Binlog_Do_DB | Binlog_Ignore_DB |
+------------------+----------+--------------+------------------+
| Mysql-bin.000004 | 106 | | |
+------------------+----------+--------------+------------------+
1 row in set (0.00 sec)
备注:ID一致会报错;
创建同步用户并且赋予相应权限
grant replication slave on *.* to'replication'@'%' identified by 'replication';
通过show grantsfor 'replication'@'%';可以查看创建的用户以及权限可以用于排错;
2.2在从服务器配置
同样添加
[mysqld]
log-bin=Mysql-bin
server-id=2
mysql>change master tomaster_host='192.168.100.123',master_user='replication',master_password='replication',master_log_file='Mysql-bin.000005',master_log_pos=106;
然后开启slave
Sql>Start slave;
三.服务测试
查询是否可以连接到主服务器
可以通过在从slave上执行该命令检测是否可以连接到主master上的数据库,可用于排错;
mysql -u root -h 192.168.100.123 -p
Enter password:
Welcome to the MySQL monitor. Commands end with ; or \g.
Your MySQL connection id is 19
Server version: 5.1.66-log Sourcedistribution
Copyright (c) 2000, 2011, Oracle and/or itsaffiliates. All rights reserved.
Oracle is a registered trademark of OracleCorporation and/or its
affiliates. Other names may be trademarksof their respective
owners.
Type 'help;' or '\h' for help. Type '\c' toclear the current input statement.
mysql>
证明连通性正常;
mysql> show slave status\G
*************************** 1. row***************************
Slave_IO_State: Waiting formaster to send event
Master_Host: 192.168.100.123
Master_User: replication
Master_Port: 3306
Connect_Retry: 60
Master_Log_File: Mysql-bin.000004
Read_Master_Log_Pos: 433
Relay_Log_File:mysqld-relay-bin.000004
Relay_Log_Pos: 251
Relay_Master_Log_File: Mysql-bin.000004
Slave_IO_Running: Yes
Slave_SQL_Running: Yes
Replicate_Do_DB:
Replicate_Ignore_DB:
Replicate_Do_Table:
Replicate_Ignore_Table:
Replicate_Wild_Do_Table:
Replicate_Wild_Ignore_Table:
Last_Errno: 0
Last_Error:
Skip_Counter: 0
Exec_Master_Log_Pos: 433
Relay_Log_Space: 552
Until_Condition: None
Until_Log_File:
Until_Log_Pos: 0
Master_SSL_Allowed: No
Master_SSL_CA_File:
Master_SSL_CA_Path:
Master_SSL_Cert:
Master_SSL_Cipher:
Master_SSL_Key:
Seconds_Behind_Master: 0
Master_SSL_Verify_Server_Cert: No
Last_IO_Errno: 0
Last_IO_Error:
Last_SQL_Errno: 0
Last_SQL_Error:
1 row in set (0.01 sec)
mysql>
显示的加粗标红的信息为running状态则正常,否则可能存在主从bin日志不同步或主从不连通等问题,可通过上面该处的排错命令进行检查;
同步验证:
在主master上创建库以及表看从slave是否同步
验证省略,如果以上配置正常就ok;
主master——主master模式同步
此模式只要将主从服务器角色互换进行主从配置,即可实现,验证方法同上;
安装keepalived实现双机mysql M-M
M1:192.168.100.222
M2:192.168.100.150
VIP:192.168.100.200
一.准备好软件并且安装
mkdir /etc/keepalived/
./configure --prefix=/usr/local/keepalived
显示下面信息为正常
make && make install
cp /usr/local/keepalived/etc/keepalived/keepalived.conf/etc/keepalived/
cp/usr/local/keepalived/etc/rc.d/init.d/keepalived /etc/rc.d/init.d/
cp /usr/local/keepalived/etc/sysconfig/keepalived/etc/sysconfig/
cp /usr/local/keepalived/sbin /usr/sbin/
设置开机启动
vi /etc/rc.local
添加
#/etc/init.d/keepalived start
vi /etc/keepalived/keepalived.conf
! Configuration File for keepalived
global_defs {
notification_email {
}
notification_email_from [email protected]
smtp_server 127.0.0.1
# smtp_connect_timeout 30
router_id LVS_DEVEL
}
Keepalived.conf文件内容
M1主机
#VIP1
vrrp_instanceVI_1 {
stateBACKUP
interfaceeth1
virtual_router_id51
priority100
advert_int1
authentication{
auth_typePASS
auth_pass1111
}
virtual_ipaddress{
192.168.100.200
}
}
virtual_server192.168.100.200 3306 {
delay_loop2
lb_algowrr
lb_kindDR
persistence_timeout60
protocolTCP
real_server192.168.100.222 3306 {
weight3
notify_down/usr/local/MySQL/bin/MySQL.sh
TCP_CHECK{
connect_timeout10
nb_get_retry3
delay_before_retry3
connect_port3306
}
}
}
service keepalived stop
ifconfig eth0 up激活配置文件里面指定的网卡,否则不能将vip200绑定到网卡eth0
二.登录测试
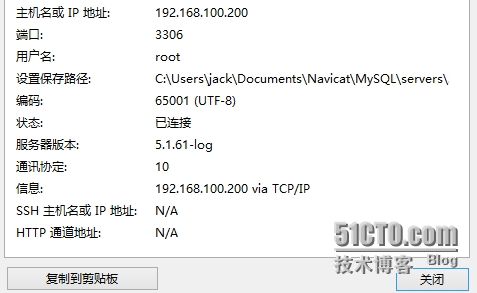
安装mysql客户端登陆虚拟地址测试
前提:分别给两个库授予权限并且关闭防火墙
连接成功
Keepalived切换测试
在windows客户端一直去ping VIP,然后关闭192.168.100.222上的keepalived,正常情况下VIP就会切换到192.168.100.150上面去
开启192.168.100.222上的keepalived,关闭192.168.100.150上的keepalived,看是否能自动切换,正常情况下VIP又会属于192.168.100.222
Mysql切换测试
在192.168.100.222上关闭MySQL服务,看VIP是否会切换到192.168.100.150上
开启192.168.100.222上的MySQL和keepalived,然后关闭192.168.100.150上的MySQL,看VIP是否会切换到192.168.100.222上
关掉mysql服务,触发机制也关闭了keepalived,在两次timeout后转移到另一台服务器;
可以用tail –F/var/log/message
查看地址192.168.100.200转到到192.168.100.150服务器的网卡eth0;
OK!


