Zuul&&Kong
网关(API Gateway )原由
之前学习分布式网站设计的时候,我们知道挡当应用体量提升的同时,我们的业务应用会逐步走向服务化,这样的架构适合大多数公司的演变,微服务的架构下,势必增加了op的工作量,每次新增一种服务,op就需要配置一套slb,还有原来的哪一套连接基础组件数据库缓存的机器ip白名单等,这些重复工作他需要反复维护,同事还需要维护一套slb机器和各个服务的对应关系,用来工作交接之类的事情,如果说我们实例增加之后,那么op就需要重新修改slb的配置,往大了吹的话,我们业务线性增长,那么他们的维护也是逐步在增加,对于我们自身而言呢,作为服务端,必做的就是权限校验和用户登录信息的判断,还有就是针对pc和移动端换需要有不同的签名认证,所以只要新增加服务的话这些验证是换需要再冗余的增加,所以处于方便编码和运维的方面来说,我们自己也需要做一个服务来解决这写冗余校验的工作,我们知道运行在OSI 7层协议的应用层的网关就是起到一个这样的作用,当你请求一个网站时,域名会通过DNS解析,但是一个网络去另一个网络内部的某个主机,这两个是无法直接通信的,要实现二者通信必须走网关,就是说A先请求到B的网关,再由网关转发到B网络内的某个主机,微服务的门面api gateway就因运而生了。这个东西类似于Facade设计模式,暴露给pc和移动的的就是门面的一个接口,具体内部调用某个服务做得事情对于调用方是一个黑盒。网关呢就是做个请求转发,至于附加的过滤校验,服务聚合这些都是为了更方便我们软件设计的职责单一,某个服务只是专注于业务逻辑,不用考虑这些过滤校验的代码编写。
技术选型
Zuul
笔者公式的技术栈就是Spring,所以做服务迁移改造就偏向Cloud全家桶这一套,所以对于路由和服务调用前的校验来说依托于Eureka的注册中心,Zuul可以默认用服务名作为山下文路径来路由,这一点比较容易结合现有的boot项目,然后校验这一块可以说说比较容易贴合Zuul的Filter机制来实现。
调用流程
![]()
上图摘自Spring Cloud微服务实战书中,上文的外部调用方就是pc或者移动端或者向外提供服务的sdk调用方,Zuul就相当于那个负载设备,简单的转发就是他根据其内部的路由转发设置,把某一类path请求转向到对应的url上,支持正则匹配,在面向服务之内呢,依托注册中心Eureka,无缝跳转即可,path就是服务名,url则直接有Eureka自动发现服务去转发,这样直接设置path和服务名的映射即可。作为统一入口接受请求先进入的 之后会先分别请求走ZuulServlet 还是DispatherServlet 默认来讲所有请求都会进过DispatherServlet 分发,只有/zuul/*的请求会不被处理,主要是用来进行大文件上传之流的,一般甚少使用,然后进过参数包装,根据配置path和服务的映射由Ribbon去发起请求,并获得返回值,然后判断时候有异常会流向默认的错误过滤器,最后返回外端调用的请求,
源码分析
过滤
我们从过滤机制(优先级=>数值越低越优先执行)入手,可以直观的理解zuul的请求转发,首先进入ServletDetectionFilter去判断是否是/zuul的请求,接着进入Servlet30WrapperFilter 将request封装为Servlet30RequestWrapper,然后进过FormBodyWrapperFilter将request封装为 FormBodyRequestWrapper, FormBodyWrapperFilter主要处理的就是form表单提交的数据包括contenr-type是 multipart/form-data的请求,接着是debug过滤器用于当出问题之后打开进行调试,然后进入preDecorationFilter
preDecorationFilter工作流程
在这个filter中会对上下文的参数进行校验。首先会读取到请求的url,然后根据url去匹配路由,若路由存在则从路由中找到代理的地址(location),在上下文中put requestURI和proxy,,然后根据location的配置判断是否是http或者https开头,如果不是http或者https开头并且是forward:开头的话,则是代理本地地址,反之则设置上下文中的代理的RouteHost然后在去设置header中的X-Forwarded-For 如果路由不存在的话,则会去判断是否是ZuulServletRequest会从配置中读取得到location,不是的话则会从请求的url中得到,然后在上下文中组装remoteAddr设置在forward.to用于之后的过滤器操作,执行完本过滤器之后会流经router级别的过滤器。
 public Object run() {
        RequestContext ctx = RequestContext.getCurrentContext();
        String requestURI = this.urlPathHelper.getPathWithinApplication(ctx.getRequest());
        Route route = this.routeLocator.getMatchingRoute(requestURI);
        String location;
        String xforwardedfor;
        String remoteAddr;
        if (route != null) {
            location = route.getLocation();
            if (location != null) {
                ctx.put("requestURI", route.getPath());
                ctx.put("proxy", route.getId());
                if (!route.isCustomSensitiveHeaders()) {
                    this.proxyRequestHelper.addIgnoredHeaders((String[])this.properties.getSensitiveHeaders().toArray(new String[0]));
                } else {
                    this.proxyRequestHelper.addIgnoredHeaders((String[])route.getSensitiveHeaders().toArray(new String[0]));
                }

                if (route.getRetryable() != null) {
                    ctx.put("retryable", route.getRetryable());
                }

                if (!location.startsWith("http:") && !location.startsWith("https:")) {
                    if (location.startsWith("forward:")) {
                        ctx.set("forward.to", StringUtils.cleanPath(location.substring("forward:".length()) + route.getPath()));
                        ctx.setRouteHost((URL)null);
                        return null;
                    }

                    ctx.set("serviceId", location);
                    ctx.setRouteHost((URL)null);
                    ctx.addOriginResponseHeader("X-Zuul-ServiceId", location);
                } else {
                    ctx.setRouteHost(this.getUrl(location));
                    ctx.addOriginResponseHeader("X-Zuul-Service", location);
                }

                if (this.properties.isAddProxyHeaders()) {
                    this.addProxyHeaders(ctx, route);
                    xforwardedfor = ctx.getRequest().getHeader("X-Forwarded-For");
                    remoteAddr = ctx.getRequest().getRemoteAddr();
                    if (xforwardedfor == null) {
                        xforwardedfor = remoteAddr;
                    } else if (!xforwardedfor.contains(remoteAddr)) {
                        xforwardedfor = xforwardedfor + ", " + remoteAddr;
                    }

                    ctx.addZuulRequestHeader("X-Forwarded-For", xforwardedfor);
                }

                if (this.properties.isAddHostHeader()) {
                    ctx.addZuulRequestHeader("Host", this.toHostHeader(ctx.getRequest()));
                }
            }
        } else {
            log.warn("No route found for uri: " + requestURI);
            xforwardedfor = this.dispatcherServletPath;
            if (RequestUtils.isZuulServletRequest()) {
                log.debug("zuulServletPath=" + this.properties.getServletPath());
                location = requestURI.replaceFirst(this.properties.getServletPath(), "");
                log.debug("Replaced Zuul servlet path:" + location);
            } else {
                log.debug("dispatcherServletPath=" + this.dispatcherServletPath);
                location = requestURI.replaceFirst(this.dispatcherServletPath, "");
                log.debug("Replaced DispatcherServlet servlet path:" + location);
            }

            if (!location.startsWith("/")) {
                location = "/" + location;
            }

            remoteAddr = xforwardedfor + location;
            remoteAddr = DOUBLE_SLASH.matcher(remoteAddr).replaceAll("/");
            ctx.set("forward.to", remoteAddr);
        }

        return null;
    }
当请求流到routerFilter之后,会获取request的header(默认情况下zuul请求路由的时候会去掉一些http头中的敏感信息,在配置文件中通过zuul.sensitiveHeaders设置敏感的信息,在zuul 中的route时默认不传 Cookie,Set-Cookie Authorization 这三个属性),url参数,请求类型以及body中的参数,然后回去校验请求中Content-Length如果小于0,则要开启支持快级传输,然后去给url设置编码,如果请求有设置编码的话,则使用设置的编码去请求远端服务,没有的话则默认ISO-8859-1编码去请求,请求方法走的则是forward方法
routerFilter的run方法
@Override
	public Object run() {
		RequestContext context = RequestContext.getCurrentContext();
		HttpServletRequest request = context.getRequest();
		MultiValueMap headers = this.helper
				.buildZuulRequestHeaders(request);
		MultiValueMap params = this.helper
				.buildZuulRequestQueryParams(request);
		String verb = getVerb(request);
		InputStream requestEntity = getRequestBody(request);
		if (getContentLength(request) < 0) {
			context.setChunkedRequestBody();
		}

		String uri = this.helper.buildZuulRequestURI(request);
		this.helper.addIgnoredHeaders();

		try {
			CloseableHttpResponse response = forward(this.httpClient, verb, uri, request,
					headers, params, requestEntity);
			setResponse(response);
		}
		catch (Exception ex) {
			throw new ZuulRuntimeException(handleException(ex));
		}
		return null;
	}
forward方法
private CloseableHttpResponse forward(CloseableHttpClient httpclient, String verb,
            String uri, HttpServletRequest request, MultiValueMap headers,
            MultiValueMap params, InputStream requestEntity)
            throws Exception {
        Map info = this.helper.debug(verb, uri, headers, params,
                requestEntity);
        URL host = RequestContext.getCurrentContext().getRouteHost();
        HttpHost httpHost = getHttpHost(host);
        uri = StringUtils.cleanPath(MULTIPLE_SLASH_PATTERN.matcher(host.getPath() + uri).replaceAll("/"));
        long contentLength = getContentLength(request);

        ContentType contentType = null;

        if (request.getContentType() != null) {
            contentType = ContentType.parse(request.getContentType());
        }

        InputStreamEntity entity = new InputStreamEntity(requestEntity, contentLength,
                contentType);

        HttpRequest httpRequest = buildHttpRequest(verb, uri, entity, headers, params,
                request);
        try {
            log.debug(httpHost.getHostName() + " " + httpHost.getPort() + " "
                    + httpHost.getSchemeName());
            CloseableHttpResponse zuulResponse = forwardRequest(httpclient, httpHost,
                    httpRequest);
            this.helper.appendDebug(info, zuulResponse.getStatusLine().getStatusCode(),
                    revertHeaders(zuulResponse.getAllHeaders()));
            return zuulResponse;
        }
        finally {
            // When HttpClient instance is no longer needed,
            // shut down the connection manager to ensure
            // immediate deallocation of all system resources
            // httpclient.getConnectionManager().shutdown();
        }
    }
forward方法首先会把所有的收集到的参数放到一个map中如下图所示,然后拿到上下文中设置的routerHost,然后构建一个HttpHost对象,再去获取url和获取content,最后build一个InputStreamEntity,获取上述的参数构建一个HttpRequest,然后通过httpclient其发起一个请求httpclient.execute(httpHost, httpRequest)得到CloseableHttpResponse
SendErrorFilter
如果有router调用出现异常会调用该filter
SendResponseFilter
router调用成功之后,会把response放置在上下文(context)中,然后在post级别的过滤器中对响应进行渲染,首先回去校验配置文件中是否有设置了忽略的header属性(zuul.includeDebugHeader=),如果有则会在response的header中增加X-Zuul-Debug-Header中,如果在context中有设置了(zuulResponseHeaders)则会将其设置在response的header中,然后设置context的长度。然后就去把做一下校验然后就输出,校验规则如果上下文中的body为null并且getResponseDataStream为null,就直接空返回,如果body不为空的话并且未设置编码则以UTF-8生成字节数组流,如果为空的话则会直接吧getResponseDataStream转换字节数组流,(在该处还回去判断是否有gzip压缩,若有则使用gzipStream转换一下)最后把生成的流通过Response.getOutputStream()输出。
@Override
	public Object run() {
		try {
			addResponseHeaders();
			writeResponse();
		}
		catch (Exception ex) {
			ReflectionUtils.rethrowRuntimeException(ex);
		}
		return null;
	}
private void writeResponse() throws Exception {
		RequestContext context = RequestContext.getCurrentContext();
		if (context.getResponseBody() == null
				&& context.getResponseDataStream() == null) {
			return;
		}
		HttpServletResponse servletResponse = context.getResponse();
		if (servletResponse.getCharacterEncoding() == null) { // only set if not set
			servletResponse.setCharacterEncoding("UTF-8");
		}
		OutputStream outStream = servletResponse.getOutputStream();
		InputStream is = null;
		try {
			if (context.getResponseBody() != null) {
				String body = context.getResponseBody();
				is = new ByteArrayInputStream(
								body.getBytes(servletResponse.getCharacterEncoding()));
			}
			else {
				is = context.getResponseDataStream();
				if (is!=null && context.getResponseGZipped()) {
					if (isGzipRequested(context)) {
						servletResponse.setHeader(ZuulHeaders.CONTENT_ENCODING, "gzip");
					}
					else {
						is = handleGzipStream(is);
					}
				}
			}
			if (is!=null) {
				writeResponse(is, outStream);
			}
		}
		finally {
			if (is != null) {
				try {
					is.close();
				}
				catch (Exception ex) {
					log.warn("Error while closing upstream input stream", ex);
				}
			}

			try {
				Object zuulResponse = context.get("zuulResponse");
				if (zuulResponse instanceof Closeable) {
					((Closeable) zuulResponse).close();
				}
				outStream.flush();
			}
			catch (IOException ex) {
				log.warn("Error while sending response to client: " + ex.getMessage());
			}
		}
	}
private void addResponseHeaders() {
		RequestContext context = RequestContext.getCurrentContext();
		HttpServletResponse servletResponse = context.getResponse();
		if (this.zuulProperties.isIncludeDebugHeader()) {
			@SuppressWarnings("unchecked")
			List rd = (List) context.get(ROUTING_DEBUG_KEY);
			if (rd != null) {
				StringBuilder debugHeader = new StringBuilder();
				for (String it : rd) {
					debugHeader.append("[[[" + it + "]]]");
				}
				servletResponse.addHeader(X_ZUUL_DEBUG_HEADER, debugHeader.toString());
			}
		}
		List> zuulResponseHeaders = context.getZuulResponseHeaders();
		if (zuulResponseHeaders != null) {
			for (Pair it : zuulResponseHeaders) {
				servletResponse.addHeader(it.first(), it.second());
			}
		}
		if (includeContentLengthHeader(context)) {
			Long contentLength = context.getOriginContentLength();
			if(useServlet31) {
				servletResponse.setContentLengthLong(contentLength);
			} else {
				if (isLongSafe(contentLength)) {
					servletResponse.setContentLength(contentLength.intValue());
				}
			}
		}
	}
使用实战
依赖引入pom文件加入如下配置
       <dependency>
			<groupId>org.springframework.cloud</groupId>
			<artifactId>spring-cloud-starter-netflix-zuul</artifactId>
		</dependency>
boot启动类
@SpringBootApplication
@EnableZuulProxy
public class DemoApplication {
	@Autowired
	private RestTemplateBuilder builder;

	@Bean
	public RestTemplate restTemplate() {
		return builder.build();
	}
	@Bean
	public SimpleFilter simpleFilter() {
		return new SimpleFilter();
	}
	public static void main(String[] args) {
		SpringApplication.run(DemoApplication.class, args);
	}
}
简单配置路由代理
zuul:
    routes:
        aftersale-archive-external:
            url: http://localhost:8008
--- 多实例配置 支持自定义配置
server-provide:
  ribbon:
    listOfServers: http://127.0.0.1:8008/,http://127.0.0.1:8009/
ribbon:
  eureka:
    enabled: false
zuul:
  routes:
    server-provide:
      path: /aftersale-archive-external/**
      serviceId: aftersale-archive-external
请求zuul
http://localhost:9999/aftersale-archive-external/queryRemote
服务聚合
我们在网关开发的过程中,除了有鉴权,参数和返回值校验之外,比较切实关注的一点就是我们有的需求是需要在网关处把不同的服务进行聚合,因为不同的服务直接为了保证职责单一,复杂的跨数据源的操作在单服务中就是非常困难的,所以这些工作可以交由网关处进行处理,处理的方式呢无非就是同时调用不同的服务,然后拿到结果之后做一些数据遍历结果组合,最终返回给调用方,下面的是两种一步的处理方式,大家可以参考这个思路。应为同步调用的话不是很推介,应为调用的远端服务返回的等待时间,同步的话很可能导致调用网关的调用方断开连接。
-
RxJava
可以利用rxjava的弹射来发起请求,最后在使用zip方法汇总结果
public class ZuulAggregationService { @Autowired RestTemplate restTemplate; public Observable getuptoken(String id){ return Observable.create(observer -> { Object resp = restTemplate.getForObject("http://localhost:8008/api/archiveImg/upload/uptoken", Object.class, id); observer.onNext(resp.toString()); observer.onCompleted(); }); } public Observable getOrderByorderId(String id){ return Observable.create(observer -> { Object resp = restTemplate.getForObject("http://localhost:8008/api/archiveImg/queryOrderId?order_id="+id, Object.class); observer.onNext(resp.toString()); observer.onCompleted(); }); } } @RestController public class ZuulAggregationController { @Autowired ZuulAggregationService zuulAggregationService; @RequestMapping(value = "/aggregationRxjava/{id}", method = RequestMethod.GET) public DeferredResult queryAfterSaleArchiveRXjava(@PathVariable String id) { Observable> result = this.aggregateObservable(id); return this.toDeferredResult(result); } public Observable> aggregateObservable(String id) { Map ret=new HashMap<>(); return Observable.zip( this.zuulAggregationService.getOrderByorderId(id), this.zuulAggregationService.getuptoken(id), (x, y) -> { Map result=new HashMap<>(); result.put("qiniutoken", x); result.put("orderid", y); return result; } ); } public DeferredResult> toDeferredResult(Observable> details) { DeferredResult> result = new DeferredResult<>(); // 订阅 details.subscribe(new Observer>() { @Override public void onCompleted() { System.out.println("完成..."); } @Override public void onError(Throwable throwable) { System.out.println("发生错误..."); } @Override public void onNext(Map movieDetails) { result.setResult(movieDetails); } }); return result; } } -
Future
package com.example.demo;

import org.springframework.beans.factory.annotation.Autowired;
import org.springframework.stereotype.Service;
import org.springframework.web.client.RestTemplate;
import rx.Observable;

@Service
public class ZuulAggregationService {
    @Autowired
    RestTemplate restTemplate;
    public String getuptokenFuture(String id){
        Object resp = restTemplate.getForObject("http://localhost:8008/api/archiveImg/upload/uptoken", Object.class, id);
        return resp.toString();
    }
    public String getOrderByorderIdFuture(String id){
        Object resp = restTemplate.getForObject("http://localhost:8008/api/archiveImg/queryOrderId?order_id="+id, Object.class);
        return resp.toString();
    }
}
@RestController
public class ZuulAggregationController {
    @Autowired
    ZuulAggregationService zuulAggregationService;
    @RequestMapping(value = "/aggregationFuture/{id}", method = RequestMethod.GET)
    public HashMap queryAfterSaleArchiveFuture(@PathVariable String id) {
        Future> future=CompletableFuture.supplyAsync(
                ()->{  HashMap result = new HashMap<>();
                    String x=this.zuulAggregationService.getuptokenFuture(id);
                    result.put("qiniutoken", x);
                    return result;
                }
        ).thenApplyAsync( (x)->{
            String y= this.zuulAggregationService.getOrderByorderIdFuture(id);
            x.put("orderid", y);
            return  x;
        });
        try {
            return future.get();
        } catch (InterruptedException e) {
            e.printStackTrace();
        } catch (ExecutionException e) {
            e.printStackTrace();
        }
        return new HashMap<>();
    }

}
Kong
Kong 由Mashape公司开源的API Gateway项目,以高可用、易扩展著称,其插件机制是其高可扩展性的根源,Kong 可以很方便地为路由和服务提供各种插件,网关所需要的基本特性,Kong 都如数支持:
-
云原生: 与平台无关,Kong可以从裸机运行到Kubernetes
-
动态路由:Kong 的背后是 OpenResty+Lua,所以从 OpenResty 继承了动态路由的特性
-
熔断
-
健康检查
-
日志: 可以记录通过 Kong 的 HTTP,TCP,UDP 请求和响应。
-
鉴权: 权限控制,IP 黑白名单,同样是 OpenResty 的特性
-
SSL: Setup a Specific SSL Certificate for an underlying service or API.
-
监控: Kong 提供了实时监控插件
-
认证: 如数支持 HMAC, JWT, Basic, OAuth2.0 等常用协议
-
限流
-
REST API: 通过 Rest API 进行配置管理,从繁琐的配置文件中解放
-
可用性: 天然支持分布式
-
高性能: 背靠非阻塞通信的 nginx,性能自不用说
-
插件机制: 提供众多开箱即用的插件,且有易于扩展的自定义插件接口,用户可以使用 Lua 自行开发插件
Kong 是基于 OpenResty,Kong 的相当于是 Nginx 的plus。 Kong = OpenResty + Nginx + Lua
安装Kong
环境准备
我是利用的WIN10的linux子系统(ubuntu)安装的kong,安装Kong之前需要先安装数据库,kong提供了两种数据存放介质的支持,一个是postgresql 另一个是Cassandra 我这里选的是pg
- 安装命令
sudo apt-get install postgresql-version
- 配置postgresql
sudo vim /etc/postgresql/version/main/postgresql.conf
修改的内容
#任何地址都可以连接
listen_addresses = '*'
#启用密码加密
password_encryption = on
sudo vim /etc/postgresql/version/main/pg_hba.conf
修改内容:
#代表任何地址连接pg时候均采用MD5加密
host all all 0.0.0.0 0.0.0.0 md5
然后重启postgresql
sudo service postgresql restart
- 添加postgresql用户
然后 添加用户 kong,设置密码为kong 添加数据库kong 同时还需要授权该用户可以登录数据库进行CRUD
- 安装OpenResty
最主要的是需要安装OpenResty,在安装之前一定要看好kong所需要的版本,不然就像我一样编译安装了一个1.11但是kong的版本比较高是最新版,导致无法启动 最新版的kong需要的OpenResty版本为Kong requires version 1.13.6.2,不过也学会了编译低版本之后进行升级。手动滑稽
编译安装OpenResty需要准备下列条件
sudo  apt-get install libreadline-dev libncurses5-dev libpcre3-dev
libssl-dev perl make build-essential libpq-dev
然后就是下载源码压缩包 解压之后执行如下命令进行编译
./configure --with-pcre-jit --with-http_ssl_module --with-http_realip_module --with-http_stub_status_module --with-http_v2_module
编译通过之后下列命令即可
make && make install
如果编译失败。可以先执行一下
sudo apt-get update
然后再去执行下列命令
make && make install
ps:对于升级呢则是
下载新版本的OpenResty软件包解压之后,执行configure 进行编译,然后把原来的文件覆盖,然后删除原来的文件,继续执行make install,即可
- 安装Kong
OpenResty安装完毕之后就可以去安装Kong了,首先先去官网下载对应系统的安装包传送门
准备环境
sudo apt-get install netcat openssl libpcre3 dnsmasq procps
上述准备环境安装完毕之后,就可以安装kong了。从官网下载到deb包直接dpkg即可
sudo dpkg -i kong*.deb
安装完毕之后会在/etc/kong/下存放kong.conf.default文件,复制一份重命名为kong.conf然后修改其中的database

database = postgres             # Determines which of PostgreSQL or Cassandra
                                 # this node will use as its datastore.
                                 # Accepted values are `postgres` and
                                 # `cassandra`.

pg_host = 127.0.0.1             # The PostgreSQL host to connect to.
pg_port = 5432                  # The port to connect to.
pg_user = postgres                  # The username to authenticate if required.
pg_password =root                   # The password to authenticate if required.
pg_database = vertx              # The database name to connect to.

pg_ssl = off                    # Toggles client-server TLS connections
                                 # between Kong and PostgreSQL.

pg_ssl_verify = off             # Toggles server certificate verification if

上述准备完成之后,执行 kong migrations up,去初始化postgresql表结构。
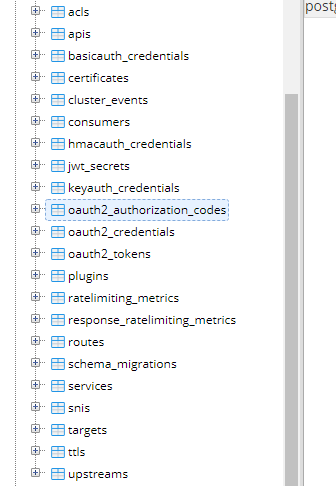
- kong连接pg初始化之后生成的数据表
- 启动Kong遇到的问题
1编译的openresty版本过低
解决方案:重新编译升级版本即可。
2 编译的openresty错误
解决方案:unknown directive "real_ip_header" in /usr/local/kong/nginx-kong.conf:73
nginx: [emerg] unknown directive "real_ip_header" in /usr/local/kong/nginx-kong.conf:73
这是因为编译的openresty的时候,没有指定--with-http_realip_module,重新编译安装:
./configure --with-pcre-jit --with-http_ssl_module --with-http_realip_module --with-http_stub_status_module --with-http_v2_module
make -j2
make install     //默认安装在/usr/local/bin/openresty
export PATH=/usr/local/openresty/bin:$PATH
kong操作命令
sudo kong start||stop||restart
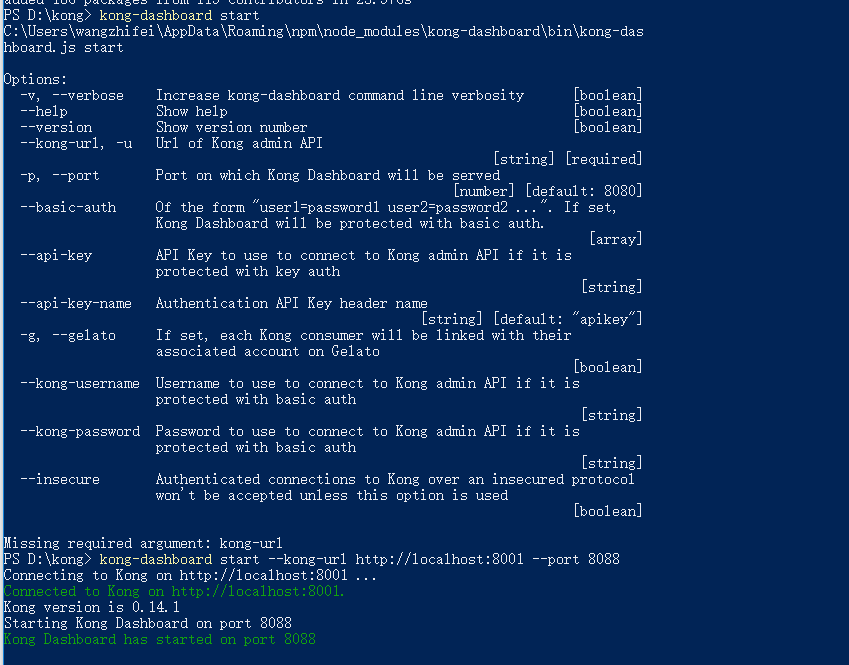
到目前为止Kong就安装成功了kong的访问为8001管理端口 8000为代理端口,提供网关服务你可以直接使用curl来操作admin API也可以使用可视化管理界面来处理.我这里推介一个kong-dashboard
- 添加一个api实例(CURL)
curl -i -X POST --url http://localhost:8001/apis/ --data 'name=ideabuffer' --data 'hosts=www.ideabuffer.cn' --data 'upstream_url=https://www.ideabuffer.cn'
- 安装管理界面UI
#安装命令(需要具备node环境)
npm install -g kong-dashboard

#启动
kong-dashboard start

#浏览器访问
http://localhost:8088/
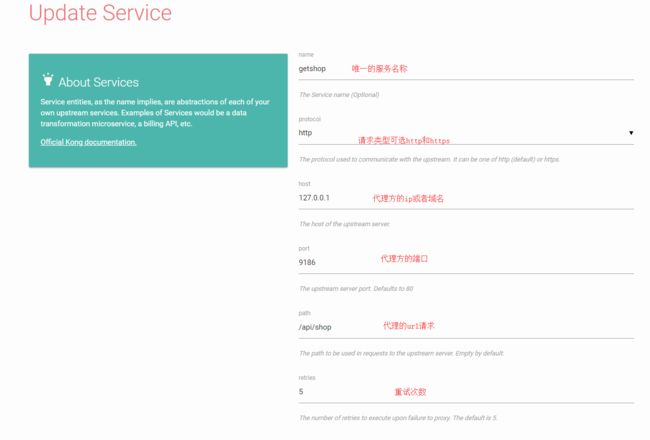
实际上只要kong安装启动之后,操作是非常简单的,全是RESTful的请求操作即可,
首先添加服务
curl -i -X POST \
  --url http://localhost:8001/services/ \
  --data 'name=example-service' \
  --data 'url=http://mockbin.org'
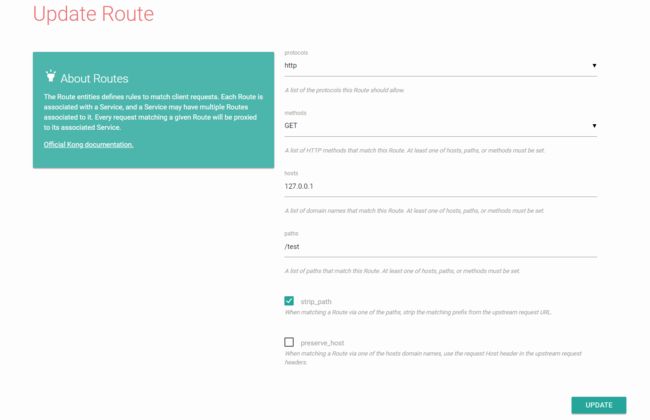
给对应的服务添加路由
curl -i -X POST \
  --url http://localhost:8001/services/example-service/routes \
  --data 'hosts[]=example.com'
发起访问
curl -i -X GET \
  --url http://localhost:8000/ \
  --header 'Host: example.com'
