Android开发实战《手机安全卫士》——13.“缓存清理”模块实现
文章目录
- 1.缓存清理——获取缓存过程
- 2.缓存清理——获取有缓存的应用 & 添加到线性布局
- 3.缓存清理——获取缓存界面进度条更新
- 4.缓存清理——清理缓存功能
- 5.缓存清理——单个应用缓存清理
- 6.缓存清理——选项卡使用
- 7.缓存清理——SD卡的缓存清理
- 8.流量统计——布局 & 逻辑实现
- 9.拓展功能——Application的使用
- 10.拓展功能——代码混淆
- 11.拓展功能——广告集成
1.缓存清理——获取缓存过程
前面的小节中,我们完成了“手机杀毒”模块的功能,接下来我们完成该项目最后一个模块——缓存清理。
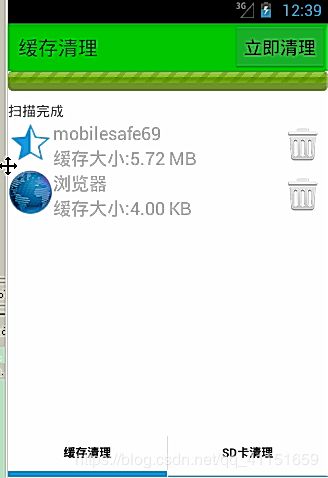
进入“缓存清理”模块后,会出现如图所示的界面:
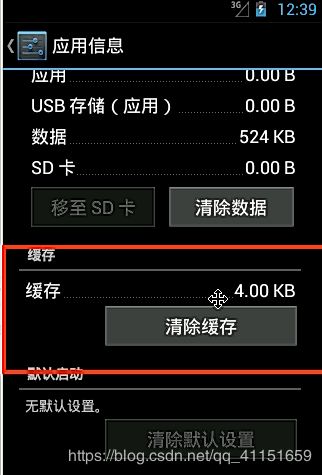
该功能获取的缓存大小和设置界面中应用的缓存大小一致,例如浏览器的缓存大小都是4kb,如图所示:
首先修改HomeActivity,修改initData(),添加跳转到清理缓存的界面的逻辑,代码如下:
/**
     * 2.初始化数据
     */
    private void initData() {
        // 1.初始化每个图标的标题
        mTitleStrs = new String[]{"手机防盗","通信卫士","软件管理","进程管理","流量统计","手机杀毒","缓存清理","高级工具","设置中心"};
        // 2.初始化每个图标的图像
        mDrawableIds = new int[]{R.drawable.home_safe,R.drawable.home_callmsgsafe,R.drawable.home_apps,R.drawable.home_taskmanager,R.drawable.home_netmanager,R.drawable.home_trojan,R.drawable.home_sysoptimize,R.drawable.home_tools,R.drawable.home_settings};
        // 3.为GridView设置数据适配器
        gv_home.setAdapter(new MyAdapter());
        // 4.注册GridView中单个条目的点击事件
        gv_home.setOnItemClickListener(new AdapterView.OnItemClickListener() {
            @Override
            public void onItemClick(AdapterView<?> parent, View view, int position, long id) {
                switch (position){
                    case 0:
                        // 手机防盗
                        showDialog();
                        break;
                    case 1:
                        // 通信卫士
                        startActivity(new Intent(getApplicationContext(),BlackNumberActivity.class));
                        break;
                    case 2:
                        // 软件管理
                        startActivity(new Intent(getApplicationContext(),AppManagerActivity.class));
                        break;
                    case 3:
                        // 进程管理
                        startActivity(new Intent(getApplicationContext(),ProcessManagerActivity.class));
                        break;
                    case 5:
                        // 手机杀毒
                        startActivity(new Intent(getApplicationContext(),AnitVirusActivity.class));
                        break;
                    case 6:
                        // 缓存清理
                        startActivity(new Intent(getApplicationContext(),CacheCleanActivity.class));
                        break;
                    case 7:
                        // 高级工具
                        startActivity(new Intent(getApplicationContext(),AToolActivity.class));
                        break;
                    case 8:
                        // 设置中心
                        Intent intent = new Intent(getApplicationContext(), SettingActivity.class);
                        startActivity(intent);
                        break;
                    default:
                        break;
                }
            }
        });
    }
在activity下新建CacheCleanActivity,作为缓存清理的界面,首先修改其布局文件activity_cache_clean.xml,代码如下:
<LinearLayout
    xmlns:android="http://schemas.android.com/apk/res/android"
    xmlns:tools="http://schemas.android.com/tools"
    android:layout_width="match_parent"
    android:layout_height="match_parent"
    tools:context=".activity.CacheCleanActivity"
    android:orientation="vertical">

    <RelativeLayout
        android:layout_width="match_parent"
        android:layout_height="wrap_content">

        <TextView
            android:text="缓存清理"
            style="@style/TitleStyle"
            android:gravity="left"/>

        <Button
            android:id="@+id/btn_clear"
            android:layout_alignParentRight="true"
            android:layout_centerVertical="true"
            android:layout_width="wrap_content"
            android:layout_height="wrap_content"
            android:text="立即清理"/>
    RelativeLayout>

    <ProgressBar
        android:id="@+id/pb_bar"
        android:progressDrawable="@drawable/progress_bg"
        style="@style/Widget.AppCompat.ProgressBar.Horizontal"
        android:layout_width="match_parent"
        android:layout_height="wrap_content"/>

    <TextView
        android:text="正在清理缓存应用"
        android:id="@+id/tv_name"
        android:layout_width="wrap_content"
        android:layout_height="wrap_content"/>


    <ScrollView
        android:layout_width="match_parent"
        android:layout_height="wrap_content">


        <LinearLayout
            android:id="@+id/ll_add_text"
            android:orientation="vertical"
            android:layout_width="wrap_content"
            android:layout_height="wrap_content">

        LinearLayout>

    ScrollView>

LinearLayout>
2.缓存清理——获取有缓存的应用 & 添加到线性布局
为了将缓存中的一些属性作为一个对象进行封装,在domain包下新建CacheInfo实体类,代码如下:
package com.example.mobilesafe.domain;

import android.graphics.drawable.Drawable;

public class CacheInfo {

    public String name;
    public Drawable icon;
    public String packageName;
    public long cacheSize;

    public String getName() {
        return name;
    }

    public void setName(String name) {
        this.name = name;
    }

    public Drawable getIcon() {
        return icon;
    }

    public void setIcon(Drawable icon) {
        this.icon = icon;
    }

    public String getPackageName() {
        return packageName;
    }

    public void setPackageName(String packageName) {
        this.packageName = packageName;
    }

    public long getCacheSize() {
        return cacheSize;
    }

    public void setCacheSize(long cacheSize) {
        this.cacheSize = cacheSize;
    }
}
在res/layout下新建list_cache_item.xml,作为有缓存应用的条目布局,代码如下:
<RelativeLayout
    xmlns:android="http://schemas.android.com/apk/res/android"
    android:layout_width="match_parent"
    android:layout_height="wrap_content">

    <ImageView
        android:id="@+id/iv_icon_application"
        android:background="@drawable/ic_launcher"
        android:layout_width="wrap_content"
        android:layout_height="wrap_content"/>

    <TextView
        android:id="@+id/tv_app_name"
        android:layout_toRightOf="@id/iv_icon_application"
        android:text="应用名称"
        android:textColor="#000"
        android:layout_width="wrap_content"
        android:layout_height="wrap_content"/>

    <TextView
        android:id="@+id/tv_memory"
        android:layout_toRightOf="@id/iv_icon_application"
        android:layout_below="@id/tv_app_name"
        android:text="缓存大小"
        android:textColor="#000"
        android:layout_width="wrap_content"
        android:layout_height="wrap_content"/>

    <ImageView
        android:id="@+id/iv_delete"
        android:background="@drawable/selector_blacknumber_delete_btn_bg"
        android:layout_alignParentRight="true"
        android:layout_centerVertical="true"
        android:layout_width="wrap_content"
        android:layout_height="wrap_content"/>

RelativeLayout>
修改CacheCleanActivity,首先获取有缓存的应用,然后再添加到线性布局中,完善相应逻辑,代码如下:
package com.example.mobilesafe.activity;

import androidx.annotation.NonNull;
import androidx.appcompat.app.AppCompatActivity;

import android.annotation.TargetApi;
import android.content.pm.IPackageStatsObserver;
import android.content.pm.PackageInfo;
import android.content.pm.PackageManager;
import android.content.pm.PackageStats;
import android.os.Bundle;
import android.os.Handler;
import android.os.Message;
import android.os.RemoteException;
import android.text.format.Formatter;
import android.view.View;
import android.widget.Button;
import android.widget.ImageView;
import android.widget.LinearLayout;
import android.widget.ProgressBar;
import android.widget.TextView;

import com.example.mobilesafe.R;
import com.example.mobilesafe.domain.CacheInfo;

import java.lang.reflect.Method;
import java.util.List;

public class CacheCleanActivity extends AppCompatActivity {

    private static final int UPDATE_CACHE_APP = 100;
    private Button btn_clear;
    private ProgressBar pb_bar;
    private TextView tv_name;
    private LinearLayout ll_add_text;
    private PackageManager mPm;
    private Handler mHandler = new Handler(){
        @Override
        public void handleMessage(@NonNull Message msg) {
            switch (msg.what){
                case UPDATE_CACHE_APP:
                    // 9.在线性布局中添加有缓存应用的条目
                    View view = View.inflate(getApplicationContext(), R.layout.list_cache_item, null);

                    ImageView iv_icon_application = view.findViewById(R.id.iv_icon_application);
                    TextView tv_app_name = view.findViewById(R.id.tv_app_name);
                    TextView tv_memory = view.findViewById(R.id.tv_memory);
                    ImageView iv_delete = view.findViewById(R.id.iv_delete);

                    CacheInfo cacheInfo = (CacheInfo) msg.obj;
                    iv_icon_application.setBackground(cacheInfo.getIcon());
                    tv_app_name.setText(cacheInfo.getName());
                    tv_memory.setText(Formatter.formatFileSize(getApplicationContext(),cacheInfo.getCacheSize()));

                    ll_add_text.addView(view,0);
                    break;
            }
        }
    };

    @Override
    protected void onCreate(Bundle savedInstanceState) {
        super.onCreate(savedInstanceState);
        setContentView(R.layout.activity_cache_clean);

        // 初始化UI
        initUI();

        // 初始化数据
        initData();
    }

    /**
     * 初始化UI
     */
    private void initUI() {
        btn_clear = findViewById(R.id.btn_clear);
        pb_bar = findViewById(R.id.pb_bar);
        tv_name = findViewById(R.id.tv_name);
        ll_add_text = findViewById(R.id.ll_add_text);
    }

    /**
     * 遍历手机中所有的应用,获取有缓存的应用,用作显示
     */
    private void initData() {
        new Thread(){
            @Override
            public void run() {
                // 1.获取包的管理者对象
                mPm = getPackageManager();
                // 2.获取安装在手机上的所有应用
                List<PackageInfo> installedPackages = mPm.getInstalledPackages(0);
                // 3.给进度条设置最大值(手机中所有应用的总数)
                pb_bar.setMax(installedPackages.size());
                // 4.遍历每一个应用,获取有缓存的应用(应用名称、图标、缓存大小、包名)
                for (PackageInfo packageInfo : installedPackages) {
                    String packageName = packageInfo.packageName; // 包名作为获取缓存信息的条件
                    getPackageCache(packageName);
                }
            }
        }.start();
    }

    /**
     * 获取应用的缓存大小
     * @param packageName 应用包名
     */
    @TargetApi(26)
    private void getPackageCache(String packageName) {
        // 0.创建IPackageStatsObserver对象
        IPackageStatsObserver.Stub mStatsObserver = new IPackageStatsObserver.Stub() {
            @Override
            public void onGetStatsCompleted(PackageStats pStats, boolean succeeded) throws RemoteException {
                // 4.获取指定包名的缓存大小的过程,子线程中的代码,不能处理UI
                long cacheSize = pStats.cacheSize;
                // 5.判断缓存大小是否大于0
                if (cacheSize > 0) {
                    CacheInfo cacheInfo = null;
                    // 6.告知主线程更新UI
                    Message message = Message.obtain();
                    message.what = UPDATE_CACHE_APP;
                    try {
                        // 7.维护有缓存应用的Java Bean
                        cacheInfo = new CacheInfo();
                        cacheInfo.setCacheSize(cacheSize);
                        cacheInfo.setPackageName(pStats.packageName);
                        cacheInfo.setName(mPm.getApplicationInfo(pStats.packageName,0).loadLabel(mPm).toString());
                        cacheInfo.setIcon(mPm.getApplicationInfo(pStats.packageName,0).loadIcon(mPm));
                    } catch (PackageManager.NameNotFoundException e) {
                        e.printStackTrace();
                    }
                    message.obj = cacheInfo;
                    // 8.发送消息
                    mHandler.sendMessage(message);
                }

            }
        };
        // 1.获取指定类的字节码文件
        try {
            Class<?> clazz = Class.forName("android.content.pm.PackageManager");
            // 2.获取调用方法对象
            Method method = clazz.getMethod("getPackageSizeInfo", String.class, IPackageStatsObserver.class);
            // 3.获取对象调用方法
            method.invoke(mPm,"com.android.browser",mStatsObserver);
        }catch (Exception e){
            e.printStackTrace();
        }
    }
}
注意,由于涉及到获取包的大小,需要在清单文件中声明相应权限,代码如下:
<uses-permission android:name="android.permission.GET_PACKAGE_SIZE" />
除此之外,在api26以上调用getPackageSizeInfo()运行程序会抛出以下错误,最好更换api:
W/System.err: java.lang.reflect.InvocationTargetException
        at java.lang.reflect.Method.invoke(Native Method)
W/System.err:     at com.example.mobilesafe.activity.CacheCleanActivity.getPackageCache(CacheCleanActivity.java:144)
        at com.example.mobilesafe.activity.CacheCleanActivity.access$300(CacheCleanActivity.java:28)
        at com.example.mobilesafe.activity.CacheCleanActivity$2.run(CacheCleanActivity.java:98)
    Caused by: java.lang.UnsupportedOperationException: Shame on you for calling the hidden API getPackageSizeInfoAsUser(). Shame!
3.缓存清理——获取缓存界面进度条更新
修改CacheCleanActivity,将获取缓存的过程通过进度条的反映出来,代码如下:
package com.example.mobilesafe.activity;

import androidx.annotation.NonNull;
import androidx.appcompat.app.AppCompatActivity;

import android.annotation.TargetApi;
import android.content.pm.IPackageStatsObserver;
import android.content.pm.PackageInfo;
import android.content.pm.PackageManager;
import android.content.pm.PackageStats;
import android.os.Bundle;
import android.os.Handler;
import android.os.Message;
import android.os.RemoteException;
import android.text.format.Formatter;
import android.view.View;
import android.widget.Button;
import android.widget.ImageView;
import android.widget.LinearLayout;
import android.widget.ProgressBar;
import android.widget.TextView;

import com.example.mobilesafe.R;
import com.example.mobilesafe.domain.CacheInfo;

import java.lang.reflect.Method;
import java.util.List;

public class CacheCleanActivity extends AppCompatActivity {

    private static final int UPDATE_CACHE_APP = 100;
    private static final int CHECK_CACHE_APP = 101;
    private static final int CHECK_FINISH = 102;
    private Button btn_clear;
    private ProgressBar pb_bar;
    private TextView tv_name;
    private LinearLayout ll_add_text;
    private PackageManager mPm;
    private int index = 0;
    private Handler mHandler = new Handler(){
        @Override
        public void handleMessage(@NonNull Message msg) {
            switch (msg.what){
                case UPDATE_CACHE_APP:
                    // 9.在线性布局中添加有缓存应用的条目
                    View view = View.inflate(getApplicationContext(), R.layout.list_cache_item, null);

                    ImageView iv_icon_application = view.findViewById(R.id.iv_icon_application);
                    TextView tv_app_name = view.findViewById(R.id.tv_app_name);
                    TextView tv_memory = view.findViewById(R.id.tv_memory);
                    ImageView iv_delete = view.findViewById(R.id.iv_delete);

                    CacheInfo cacheInfo = (CacheInfo) msg.obj;
                    iv_icon_application.setBackground(cacheInfo.getIcon());
                    tv_app_name.setText(cacheInfo.getName());
                    tv_memory.setText(Formatter.formatFileSize(getApplicationContext(),cacheInfo.getCacheSize()));

                    ll_add_text.addView(view,0);
                    break;
                case CHECK_CACHE_APP:
                    tv_name.setText((String)msg.obj);
                    break;
                case CHECK_FINISH:
                    tv_name.setText("扫描完成");
                    break;
            }
        }
    };

    @Override
    protected void onCreate(Bundle savedInstanceState) {
        super.onCreate(savedInstanceState);
        setContentView(R.layout.activity_cache_clean);

        // 初始化UI
        initUI();

        // 初始化数据
        initData();
    }

    /**
     * 初始化UI
     */
    private void initUI() {
        btn_clear = findViewById(R.id.btn_clear);
        pb_bar = findViewById(R.id.pb_bar);
        tv_name = findViewById(R.id.tv_name);
        ll_add_text = findViewById(R.id.ll_add_text);
    }

    /**
     * 遍历手机中所有的应用,获取有缓存的应用,用作显示
     */
    private void initData() {
        new Thread(){
            @Override
            public void run() {
                // 1.获取包的管理者对象
                mPm = getPackageManager();
                // 2.获取安装在手机上的所有应用
                List<PackageInfo> installedPackages = mPm.getInstalledPackages(0);
                // 3.给进度条设置最大值(手机中所有应用的总数)
                pb_bar.setMax(installedPackages.size());
                // 4.遍历每一个应用,获取有缓存的应用(应用名称、图标、缓存大小、包名)
                for (PackageInfo packageInfo : installedPackages) {
                    String packageName = packageInfo.packageName; // 包名作为获取缓存信息的条件
                    getPackageCache(packageName);
                    pb_bar.setProgress(index++);
                    // 每循环一次就将检测应用的名称发送给主线程显示
                    Message message = Message.obtain();
                    message.what = CHECK_CACHE_APP;
                    String name = null;
                    try {
                        name = mPm.getApplicationInfo(packageName,0).loadLabel(mPm).toString();
                    } catch (PackageManager.NameNotFoundException e) {
                        e.printStackTrace();
                    }
                    message.obj = name;
                    mHandler.sendMessage(message);
                }
                Message message = Message.obtain();
                message.what = CHECK_FINISH;
                mHandler.sendMessage(message);
            }
        }.start();
    }

    /**
     * 获取应用的缓存大小
     * @param packageName 应用包名
     */
    @TargetApi(26)
    private void getPackageCache(String packageName) {
        // 0.创建IPackageStatsObserver对象
        IPackageStatsObserver.Stub mStatsObserver = new IPackageStatsObserver.Stub() {
            @Override
            public void onGetStatsCompleted(PackageStats pStats, boolean succeeded) throws RemoteException {
                // 4.获取指定包名的缓存大小的过程,子线程中的代码,不能处理UI
                long cacheSize = pStats.cacheSize;
                // 5.判断缓存大小是否大于0
                if (cacheSize > 0) {
                    CacheInfo cacheInfo = null;
                    // 6.告知主线程更新UI
                    Message message = Message.obtain();
                    message.what = UPDATE_CACHE_APP;
                    try {
                        // 7.维护有缓存应用的Java Bean
                        cacheInfo = new CacheInfo();
                        cacheInfo.setCacheSize(cacheSize);
                        cacheInfo.setPackageName(pStats.packageName);
                        cacheInfo.setName(mPm.getApplicationInfo(pStats.packageName,0).loadLabel(mPm).toString());
                        cacheInfo.setIcon(mPm.getApplicationInfo(pStats.packageName,0).loadIcon(mPm));
                    } catch (PackageManager.NameNotFoundException e) {
                        e.printStackTrace();
                    }
                    message.obj = cacheInfo;
                    // 8.发送消息
                    mHandler.sendMessage(message);
                }

            }
        };
        // 1.获取指定类的字节码文件
        try {
            Class<?> clazz = Class.forName("android.content.pm.PackageManager");
            // 2.获取调用方法对象
            Method method = clazz.getMethod("getPackageSizeInfo", String.class, IPackageStatsObserver.class);
            // 3.获取对象调用方法
            method.invoke(mPm,"com.android.browser",mStatsObserver);
        }catch (Exception e){
            e.printStackTrace();
        }
    }
}
4.缓存清理——清理缓存功能
修改CacheCleanActivity,为"一键清理"按钮注册点击事件,完善一次性清理全部缓存的功能,主要需要使用到packageManager中的freeStorageAndNotify(),代码如下:
package com.example.mobilesafe.activity;

import androidx.annotation.NonNull;
import androidx.appcompat.app.AppCompatActivity;

import android.annotation.TargetApi;
import android.content.pm.IPackageDataObserver;
import android.content.pm.IPackageStatsObserver;
import android.content.pm.PackageInfo;
import android.content.pm.PackageManager;
import android.content.pm.PackageStats;
import android.os.Bundle;
import android.os.Handler;
import android.os.Message;
import android.os.RemoteException;
import android.text.format.Formatter;
import android.view.View;
import android.widget.Button;
import android.widget.ImageView;
import android.widget.LinearLayout;
import android.widget.ProgressBar;
import android.widget.TextView;

import com.example.mobilesafe.R;
import com.example.mobilesafe.domain.CacheInfo;

import java.lang.reflect.Method;
import java.util.List;

public class CacheCleanActivity extends AppCompatActivity {

    private static final int UPDATE_CACHE_APP = 100;
    private static final int CHECK_CACHE_APP = 101;
    private static final int CHECK_FINISH = 102;
    private static final int CLEAR_FINISH = 103;
    private Button btn_clear;
    private ProgressBar pb_bar;
    private TextView tv_name;
    private LinearLayout ll_add_text;
    private PackageManager mPm;
    private int index = 0;
    private Handler mHandler = new Handler(){
        @Override
        public void handleMessage(@NonNull Message msg) {
            switch (msg.what){
                case UPDATE_CACHE_APP:
                    // 9.在线性布局中添加有缓存应用的条目
                    View view = View.inflate(getApplicationContext(), R.layout.list_cache_item, null);

                    ImageView iv_icon_application = view.findViewById(R.id.iv_icon_application);
                    TextView tv_app_name = view.findViewById(R.id.tv_app_name);
                    TextView tv_memory = view.findViewById(R.id.tv_memory);
                    ImageView iv_delete = view.findViewById(R.id.iv_delete);

                    CacheInfo cacheInfo = (CacheInfo) msg.obj;
                    iv_icon_application.setBackground(cacheInfo.getIcon());
                    tv_app_name.setText(cacheInfo.getName());
                    tv_memory.setText(Formatter.formatFileSize(getApplicationContext(),cacheInfo.getCacheSize()));

                    ll_add_text.addView(view,0);
                    break;
                case CHECK_CACHE_APP:
                    tv_name.setText((String)msg.obj);
                    break;
                case CHECK_FINISH:
                    tv_name.setText("扫描完成");
                    break;
                case CLEAR_FINISH:
                    // 从线性布局中移除所有的条目
                    ll_add_text.removeAllViews();
                    break;
            }
        }
    };

    @Override
    protected void onCreate(Bundle savedInstanceState) {
        super.onCreate(savedInstanceState);
        setContentView(R.layout.activity_cache_clean);

        // 初始化UI
        initUI();

        // 初始化数据
        initData();
    }

    /**
     * 初始化UI
     */
    private void initUI() {
        btn_clear = findViewById(R.id.btn_clear);
        pb_bar = findViewById(R.id.pb_bar);
        tv_name = findViewById(R.id.tv_name);
        ll_add_text = findViewById(R.id.ll_add_text);

        btn_clear.setOnClickListener(new View.OnClickListener() {
            @Override
            public void onClick(View v) {
                // 1.获取指定类的字节码文件
                try {
                    Class<?> clazz = Class.forName("android.content.pm.PackageManager");
                    // 2.获取调用方法对象
                    Method method = clazz.getMethod("freeStorageAndNotify", long.class, IPackageDataObserver.class);
                    // 3.获取对象调用方法
                    method.invoke(mPm, Long.MAX_VALUE, new IPackageDataObserver.Stub() {
                        @Override
                        public void onRemoveCompleted(String packageName, boolean succeeded) throws RemoteException {
                            // 清除缓存完成后调用(考虑权限),运行在子线程中
                            Message message = Message.obtain();
                            message.what = CLEAR_FINISH;
                            mHandler.sendMessage(message);
                        }
                    });
                }catch (Exception e){
                    e.printStackTrace();
                }
            }
        });
    }

    /**
     * 遍历手机中所有的应用,获取有缓存的应用,用作显示
     */
    private void initData() {
        new Thread(){
            @Override
            public void run() {
                // 1.获取包的管理者对象
                mPm = getPackageManager();
                // 2.获取安装在手机上的所有应用
                List<PackageInfo> installedPackages = mPm.getInstalledPackages(0);
                // 3.给进度条设置最大值(手机中所有应用的总数)
                pb_bar.setMax(installedPackages.size());
                // 4.遍历每一个应用,获取有缓存的应用(应用名称、图标、缓存大小、包名)
                for (PackageInfo packageInfo : installedPackages) {
                    String packageName = packageInfo.packageName; // 包名作为获取缓存信息的条件
                    getPackageCache(packageName);
                    pb_bar.setProgress(index++);
                    // 每循环一次就将检测应用的名称发送给主线程显示
                    Message message = Message.obtain();
                    message.what = CHECK_CACHE_APP;
                    String name = null;
                    try {
                        name = mPm.getApplicationInfo(packageName,0).loadLabel(mPm).toString();
                    } catch (PackageManager.NameNotFoundException e) {
                        e.printStackTrace();
                    }
                    message.obj = name;
                    mHandler.sendMessage(message);
                }
                Message message = Message.obtain();
                message.what = CHECK_FINISH;
                mHandler.sendMessage(message);
            }
        }.start();
    }

    /**
     * 获取应用的缓存大小
     * @param packageName 应用包名
     */
    @TargetApi(26)
    private void getPackageCache(String packageName) {
        // 0.创建IPackageStatsObserver对象
        IPackageStatsObserver.Stub mStatsObserver = new IPackageStatsObserver.Stub() {
            @Override
            public void onGetStatsCompleted(PackageStats pStats, boolean succeeded) throws RemoteException {
                // 4.获取指定包名的缓存大小的过程,子线程中的代码,不能处理UI
                long cacheSize = pStats.cacheSize;
                // 5.判断缓存大小是否大于0
                if (cacheSize > 0) {
                    CacheInfo cacheInfo = null;
                    // 6.告知主线程更新UI
                    Message message = Message.obtain();
                    message.what = UPDATE_CACHE_APP;
                    try {
                        // 7.维护有缓存应用的Java Bean
                        cacheInfo = new CacheInfo();
                        cacheInfo.setCacheSize(cacheSize);
                        cacheInfo.setPackageName(pStats.packageName);
                        cacheInfo.setName(mPm.getApplicationInfo(pStats.packageName,0).loadLabel(mPm).toString());
                        cacheInfo.setIcon(mPm.getApplicationInfo(pStats.packageName,0).loadIcon(mPm));
                    } catch (PackageManager.NameNotFoundException e) {
                        e.printStackTrace();
                    }
                    message.obj = cacheInfo;
                    // 8.发送消息
                    mHandler.sendMessage(message);
                }

            }
        };
        // 1.获取指定类的字节码文件
        try {
            Class<?> clazz = Class.forName("android.content.pm.PackageManager");
            // 2.获取调用方法对象
            Method method = clazz.getMethod("getPackageSizeInfo", String.class, IPackageStatsObserver.class);
            // 3.获取对象调用方法
            method.invoke(mPm,"com.android.browser",mStatsObserver);
        }catch (Exception e){
            e.printStackTrace();
        }
    }
}
由于该操作设计到缓存的清理,需要在清单文件中声明相应权限,代码如下:
    <uses-permission android:name="android.permission.CLEAR_APP_CACHE"
        tools:ignore="ProtectedPermissions" />
5.缓存清理——单个应用缓存清理
除了一次性清理掉全部应用的缓存之外,还需要提供修改单个条目的缓存,即点击条目的“垃圾桶”图标后清理掉应用的缓存,修改CacheCleanActivity主要需要使用到packageManager中的deleteApplicationCacheFiles(),代码如下:
package com.example.mobilesafe.activity;

import androidx.annotation.NonNull;
import androidx.appcompat.app.AppCompatActivity;

import android.annotation.TargetApi;
import android.content.Intent;
import android.content.pm.IPackageDataObserver;
import android.content.pm.IPackageStatsObserver;
import android.content.pm.PackageInfo;
import android.content.pm.PackageManager;
import android.content.pm.PackageStats;
import android.net.Uri;
import android.os.Bundle;
import android.os.Handler;
import android.os.Message;
import android.os.RemoteException;
import android.text.format.Formatter;
import android.view.View;
import android.widget.Button;
import android.widget.ImageView;
import android.widget.LinearLayout;
import android.widget.ProgressBar;
import android.widget.TextView;

import com.example.mobilesafe.R;
import com.example.mobilesafe.domain.CacheInfo;

import java.lang.reflect.Method;
import java.util.List;

public class CacheCleanActivity extends AppCompatActivity {

    private static final int UPDATE_CACHE_APP = 100;
    private static final int CHECK_CACHE_APP = 101;
    private static final int CHECK_FINISH = 102;
    private static final int CLEAR_FINISH = 103;
    private Button btn_clear;
    private ProgressBar pb_bar;
    private TextView tv_name;
    private LinearLayout ll_add_text;
    private PackageManager mPm;
    private int index = 0;
    private Handler mHandler = new Handler(){
        @Override
        public void handleMessage(@NonNull Message msg) {
            switch (msg.what){
                case UPDATE_CACHE_APP:
                    // 9.在线性布局中添加有缓存应用的条目
                    View view = View.inflate(getApplicationContext(), R.layout.list_cache_item, null);

                    ImageView iv_icon_application = view.findViewById(R.id.iv_icon_application);
                    TextView tv_app_name = view.findViewById(R.id.tv_app_name);
                    TextView tv_memory = view.findViewById(R.id.tv_memory);
                    ImageView iv_delete = view.findViewById(R.id.iv_delete);

                    final CacheInfo cacheInfo = (CacheInfo) msg.obj;
                    iv_icon_application.setBackground(cacheInfo.getIcon());
                    tv_app_name.setText(cacheInfo.getName());
                    tv_memory.setText(Formatter.formatFileSize(getApplicationContext(),cacheInfo.getCacheSize()));

                    ll_add_text.addView(view,0);

                    iv_delete.setOnClickListener(new View.OnClickListener() {
                        @Override
                        public void onClick(View v) {
                            // 清除单项条目对应的应用的缓存内容
                            try {
                                Class<?> clazz = Class.forName("android.content.pm.PackageManager");
                                // 2.获取调用方法对象
                                Method method = clazz.getMethod("deleteApplicationCacheFiles", String.class, IPackageDataObserver.class);
                                // 3.获取对象调用方法
                                method.invoke(mPm, cacheInfo.getPackageName(), new IPackageDataObserver.Stub() {
                                    @Override
                                    public void onRemoveCompleted(String packageName, boolean succeeded) throws RemoteException {
                                        // 删除此应用缓存后,调用在子线程中

                                    }
                                });
                            }catch (Exception e){
                                e.printStackTrace();
                            }
                        }
                    });
                    /* 清理单项应用缓存的第二种方式
                    Intent intent = new Intent("android.settings.APPLICATION_DETAILS_SETTINGS");
                    intent.setData(Uri.parse("package:" + cacheInfo.getPackageName()));
                    startActivity(intent);
                     */
                    break;
                case CHECK_CACHE_APP:
                    tv_name.setText((String)msg.obj);
                    break;
                case CHECK_FINISH:
                    tv_name.setText("扫描完成");
                    break;
                case CLEAR_FINISH:
                    // 从线性布局中移除所有的条目
                    ll_add_text.removeAllViews();
                    break;
            }
        }
    };

    @Override
    protected void onCreate(Bundle savedInstanceState) {
        super.onCreate(savedInstanceState);
        setContentView(R.layout.activity_cache_clean);

        // 初始化UI
        initUI();

        // 初始化数据
        initData();
    }

    /**
     * 初始化UI
     */
    private void initUI() {
        btn_clear = findViewById(R.id.btn_clear);
        pb_bar = findViewById(R.id.pb_bar);
        tv_name = findViewById(R.id.tv_name);
        ll_add_text = findViewById(R.id.ll_add_text);

        btn_clear.setOnClickListener(new View.OnClickListener() {
            @Override
            public void onClick(View v) {
                // 1.获取指定类的字节码文件
                try {
                    Class<?> clazz = Class.forName("android.content.pm.PackageManager");
                    // 2.获取调用方法对象
                    Method method = clazz.getMethod("freeStorageAndNotify", long.class, IPackageDataObserver.class);
                    // 3.获取对象调用方法
                    method.invoke(mPm, Long.MAX_VALUE, new IPackageDataObserver.Stub() {
                        @Override
                        public void onRemoveCompleted(String packageName, boolean succeeded) throws RemoteException {
                            // 清除缓存完成后调用(考虑权限),运行在子线程中
                            Message message = Message.obtain();
                            message.what = CLEAR_FINISH;
                            mHandler.sendMessage(message);
                        }
                    });
                }catch (Exception e){
                    e.printStackTrace();
                }
            }
        });
    }

    /**
     * 遍历手机中所有的应用,获取有缓存的应用,用作显示
     */
    private void initData() {
        new Thread(){
            @Override
            public void run() {
                // 1.获取包的管理者对象
                mPm = getPackageManager();
                // 2.获取安装在手机上的所有应用
                List<PackageInfo> installedPackages = mPm.getInstalledPackages(0);
                // 3.给进度条设置最大值(手机中所有应用的总数)
                pb_bar.setMax(installedPackages.size());
                // 4.遍历每一个应用,获取有缓存的应用(应用名称、图标、缓存大小、包名)
                for (PackageInfo packageInfo : installedPackages) {
                    String packageName = packageInfo.packageName; // 包名作为获取缓存信息的条件
                    getPackageCache(packageName);
                    pb_bar.setProgress(index++);
                    // 每循环一次就将检测应用的名称发送给主线程显示
                    Message message = Message.obtain();
                    message.what = CHECK_CACHE_APP;
                    String name = null;
                    try {
                        name = mPm.getApplicationInfo(packageName,0).loadLabel(mPm).toString();
                    } catch (PackageManager.NameNotFoundException e) {
                        e.printStackTrace();
                    }
                    message.obj = name;
                    mHandler.sendMessage(message);
                }
                Message message = Message.obtain();
                message.what = CHECK_FINISH;
                mHandler.sendMessage(message);
            }
        }.start();
    }

    /**
     * 获取应用的缓存大小
     * @param packageName 应用包名
     */
    @TargetApi(26)
    private void getPackageCache(String packageName) {
        // 0.创建IPackageStatsObserver对象
        IPackageStatsObserver.Stub mStatsObserver = new IPackageStatsObserver.Stub() {
            @Override
            public void onGetStatsCompleted(PackageStats pStats, boolean succeeded) throws RemoteException {
                // 4.获取指定包名的缓存大小的过程,子线程中的代码,不能处理UI
                long cacheSize = pStats.cacheSize;
                // 5.判断缓存大小是否大于0
                if (cacheSize > 0) {
                    CacheInfo cacheInfo = null;
                    // 6.告知主线程更新UI
                    Message message = Message.obtain();
                    message.what = UPDATE_CACHE_APP;
                    try {
                        // 7.维护有缓存应用的Java Bean
                        cacheInfo = new CacheInfo();
                        cacheInfo.setCacheSize(cacheSize);
                        cacheInfo.setPackageName(pStats.packageName);
                        cacheInfo.setName(mPm.getApplicationInfo(pStats.packageName,0).loadLabel(mPm).toString());
                        cacheInfo.setIcon(mPm.getApplicationInfo(pStats.packageName,0).loadIcon(mPm));
                    } catch (PackageManager.NameNotFoundException e) {
                        e.printStackTrace();
                    }
                    message.obj = cacheInfo;
                    // 8.发送消息
                    mHandler.sendMessage(message);
                }

            }
        };
        // 1.获取指定类的字节码文件
        try {
            Class<?> clazz = Class.forName("android.content.pm.PackageManager");
            // 2.获取调用方法对象
            Method method = clazz.getMethod("getPackageSizeInfo", String.class, IPackageStatsObserver.class);
            // 3.获取对象调用方法
            method.invoke(mPm,"com.android.browser",mStatsObserver);
        }catch (Exception e){
            e.printStackTrace();
        }
    }
}
由于该操作设计到缓存文件的删除,需要在清单文件中声明相应权限,代码如下:
    <uses-permission android:name="android.permission.DELETE_CACHE_FILES"
        tools:ignore="ProtectedPermissions" />
6.缓存清理——选项卡使用
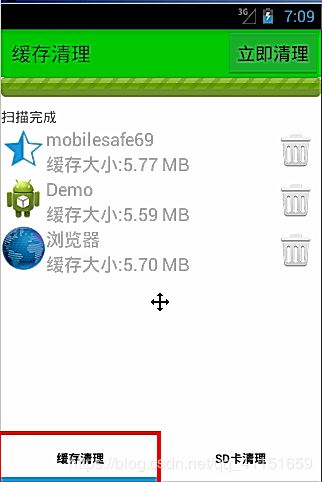
前面我们完成了单项应用和全部应用进行缓存清理的功能,现在需要在“缓存清理”模块界面的底部添加一个选项卡,如图中红框所示:
要想实现这个效果,需要去使用Google提供的名为TabHost的控件。实现思路是使用一个大的Activity包裹两个Activity,修改HomeActivity,修改initData()方法,完善跳转到缓存清理模块的代码,代码如下:
/**
     * 2.初始化数据
     */
    private void initData() {
        // 1.初始化每个图标的标题
        mTitleStrs = new String[]{"手机防盗","通信卫士","软件管理","进程管理","流量统计","手机杀毒","缓存清理","高级工具","设置中心"};
        // 2.初始化每个图标的图像
        mDrawableIds = new int[]{R.drawable.home_safe,R.drawable.home_callmsgsafe,R.drawable.home_apps,R.drawable.home_taskmanager,R.drawable.home_netmanager,R.drawable.home_trojan,R.drawable.home_sysoptimize,R.drawable.home_tools,R.drawable.home_settings};
        // 3.为GridView设置数据适配器
        gv_home.setAdapter(new MyAdapter());
        // 4.注册GridView中单个条目的点击事件
        gv_home.setOnItemClickListener(new AdapterView.OnItemClickListener() {
            @Override
            public void onItemClick(AdapterView<?> parent, View view, int position, long id) {
                switch (position){
                    case 0:
                        // 手机防盗
                        showDialog();
                        break;
                    case 1:
                        // 通信卫士
                        startActivity(new Intent(getApplicationContext(),BlackNumberActivity.class));
                        break;
                    case 2:
                        // 软件管理
                        startActivity(new Intent(getApplicationContext(),AppManagerActivity.class));
                        break;
                    case 3:
                        // 进程管理
                        startActivity(new Intent(getApplicationContext(),ProcessManagerActivity.class));
                        break;
                    case 5:
                        // 手机杀毒
                        startActivity(new Intent(getApplicationContext(),AnitVirusActivity.class));
                        break;
                    case 6:
                        // 缓存清理
                        // startActivity(new Intent(getApplicationContext(),CacheCleanActivity.class));
                        startActivity(new Intent(getApplicationContext(),BaseCacheCleanActivity.class));
                        break;
                    case 7:
                        // 高级工具
                        startActivity(new Intent(getApplicationContext(),AToolActivity.class));
                        break;
                    case 8:
                        // 设置中心
                        Intent intent = new Intent(getApplicationContext(), SettingActivity.class);
                        startActivity(intent);
                        break;
                    default:
                        break;
                }
            }
        });
    }
在activity包下新建BaseCacheCleanActivity,作为包裹原来的CacheCleanActivity,首先修改其布局文件activity_base_cache_clean.xml,代码如下:
<TabHost xmlns:android="http://schemas.android.com/apk/res/android"
    xmlns:tools="http://schemas.android.com/tools"
    android:layout_width="match_parent"
    android:layout_height="match_parent"
    tools:context=".activity.BaseCacheCleanActivity"
    android:id="@android:id/tabhost">


    <FrameLayout
        android:id="@android:id/tabcontent"
        android:layout_marginBottom="50dp"
        android:layout_width="match_parent"
        android:layout_height="match_parent"/>


    <TabWidget
        android:id="@android:id/tabs"
        android:layout_gravity="bottom"
        android:layout_width="match_parent"
        android:layout_height="50dp"/>

TabHost>
修改BaseCacheCleanActivity,需要继承TabActivity,并且完善对应的选项卡逻辑,代码如下:
package com.example.mobilesafe.activity;

import android.app.TabActivity;
import android.content.Intent;
import android.os.Bundle;
import android.widget.TabHost;

import com.example.mobilesafe.R;

public class BaseCacheCleanActivity extends TabActivity {

    @Override
    protected void onCreate(Bundle savedInstanceState) {
        super.onCreate(savedInstanceState);
        setContentView(R.layout.activity_base_cache_clean);

        // 1.生成选项卡1
        TabHost.TabSpec tab1 = getTabHost().newTabSpec("clear_cache").setIndicator("缓存清理");
        // 2.生成选项卡2
        TabHost.TabSpec tab2 = getTabHost().newTabSpec("sd_clear_cache").setIndicator("sd卡清理");

        // 3.告知点中选项卡的后续操作
        tab1.setContent(new Intent(this,CacheCleanActivity.class));
        tab2.setContent(new Intent(this,SDCacheClearActivity.class)); // 测试跳转

        // 4.将此两个选项卡维护到host(选项卡宿主)中
        getTabHost().addTab(tab1);
        getTabHost().addTab(tab2);
    }
}
7.缓存清理——SD卡的缓存清理
前面我们完成了缓存清理的功能,现在想要清理“缓存清理”模块中第二个选项卡的功能——即SD卡中的应用缓存。要想清理SD卡中应用的缓存,需要提前载入应用缓存数据库,通过数据库中数据表里提供的字段进行比对,从而达到清理该应用所遗留下来的缓存的功能。
可以参考360对于此功能的编写,这里限于篇幅不再赘述。
8.流量统计——布局 & 逻辑实现
前面我们已经完成了手机卫士中的8个模块,现在需要完成最后一个模块——流量统计。
在该模块中,需要统计以下信息:
- 上传流量
- 下载流量
一般每个应用使用的流量大小的记录数据放置在proc/uid_stat中。
修改HomeActivity,修改initData()方法,完善跳转到流量统计模块的代码,代码如下:
/**
     * 2.初始化数据
     */
    private void initData() {
        // 1.初始化每个图标的标题
        mTitleStrs = new String[]{"手机防盗","通信卫士","软件管理","进程管理","流量统计","手机杀毒","缓存清理","高级工具","设置中心"};
        // 2.初始化每个图标的图像
        mDrawableIds = new int[]{R.drawable.home_safe,R.drawable.home_callmsgsafe,R.drawable.home_apps,R.drawable.home_taskmanager,R.drawable.home_netmanager,R.drawable.home_trojan,R.drawable.home_sysoptimize,R.drawable.home_tools,R.drawable.home_settings};
        // 3.为GridView设置数据适配器
        gv_home.setAdapter(new MyAdapter());
        // 4.注册GridView中单个条目的点击事件
        gv_home.setOnItemClickListener(new AdapterView.OnItemClickListener() {
            @Override
            public void onItemClick(AdapterView<?> parent, View view, int position, long id) {
                switch (position){
                    case 0:
                        // 手机防盗
                        showDialog();
                        break;
                    case 1:
                        // 通信卫士
                        startActivity(new Intent(getApplicationContext(),BlackNumberActivity.class));
                        break;
                    case 2:
                        // 软件管理
                        startActivity(new Intent(getApplicationContext(),AppManagerActivity.class));
                        break;
                    case 3:
                        // 进程管理
                        startActivity(new Intent(getApplicationContext(),ProcessManagerActivity.class));
                        break;
                    case 4:
                        // 流量统计
                        startActivity(new Intent(getApplicationContext(),TrafficActivity.class));
                        break;
                    case 5:
                        // 手机杀毒
                        startActivity(new Intent(getApplicationContext(),AnitVirusActivity.class));
                        break;
                    case 6:
                        // 缓存清理
                        // startActivity(new Intent(getApplicationContext(),CacheCleanActivity.class));
                        startActivity(new Intent(getApplicationContext(),BaseCacheCleanActivity.class));
                        break;
                    case 7:
                        // 高级工具
                        startActivity(new Intent(getApplicationContext(),AToolActivity.class));
                        break;
                    case 8:
                        // 设置中心
                        Intent intent = new Intent(getApplicationContext(), SettingActivity.class);
                        startActivity(intent);
                        break;
                    default:
                        break;
                }
            }
        });
    }
在activity包下新增TrafficActivity,作为流量监控的界面,首先修改其布局文件activity_traffic.xml,添加一个抽屉控件,代码如下:
<LinearLayout xmlns:android="http://schemas.android.com/apk/res/android"
    xmlns:tools="http://schemas.android.com/tools"
    android:layout_width="match_parent"
    android:layout_height="match_parent"
    tools:context=".activity.TrafficActivity"
    android:orientation="vertical">

    <SlidingDrawer
        android:handle="@+id/handler"
        android:content="@+id/content"
        android:orientation="horizontal"
        android:layout_width="match_parent"
        android:layout_height="match_parent">

        <ImageView
            android:id="@id/handler"
            android:background="@drawable/ic_launcher"
            android:layout_width="wrap_content"
            android:layout_height="wrap_content"/>

        <TextView
            android:id="@id/content"
            android:background="#f00"
            android:layout_width="match_parent"
            android:layout_height="match_parent"/>

    SlidingDrawer>

LinearLayout>
相应的流量统计api在当下许多第三方sdk提供商中均有提及,这里就不再实现了。
9.拓展功能——Application的使用
为了对整个项目进行某种程度的配置,可以自定义一个名为MyApplication的类,继承自Application,以此来对整个项目进行相关信息的设置。
首先,在包下新建MyApplication类,继承自Application,然后在清单文件中的application标签中的name属性声明这个类,代码如下:
<application
        android:name=".MyApplication"
        android:allowBackup="true"
        android:icon="@mipmap/ic_launcher"
        android:label="@string/app_name"
        android:roundIcon="@mipmap/ic_launcher_round"
        android:supportsRtl="true"
        android:theme="@style/AppTheme"
        android:usesCleartextTraffic="true">
修改MyApplication,在其中增加一些常用的对整个项目的工具逻辑,代码如下:
package com.example.mobilesafe;

import android.app.Application;
import android.os.Environment;

import androidx.annotation.NonNull;

import java.io.File;
import java.io.FileNotFoundException;
import java.io.PrintWriter;

public class MyApplication extends Application {

    @Override
    public void onCreate() {
        super.onCreate();
        // 1.捕获全局(应用任意模块)异常
        Thread.setDefaultUncaughtExceptionHandler(new Thread.UncaughtExceptionHandler() {
            @Override
            public void uncaughtException(@NonNull Thread t, @NonNull Throwable e) {
                // 获取到了未捕获的异常,处理方法
                e.printStackTrace();
                // 将捕获的异常存储到sd卡中
                String path = Environment.getExternalStorageDirectory().getAbsolutePath() + File.separator + "error.log";
                File file = new File(path);
                try {
                    PrintWriter printWriter = new PrintWriter(file);
                    e.printStackTrace(printWriter);
                    printWriter.close();
                } catch (FileNotFoundException ex) {
                    ex.printStackTrace();
                }
            }
        });
    }
}
10.拓展功能——代码混淆
Android项目包下一般有一个以.dex为后缀的文件,其中就是Java代码。Android项目编译时文件名后缀的变动为:.java——>.class——>.dex。
如果不混淆代码,通过.dex文件就可以获取Java代码,并且可以阅读。要想混淆代码,需要使用dex2jar工具。当然,在Android Studio中也已经集成了混淆功能,只需要配置gradle文件,并且在proguard文件编写代码混淆规则即可达到效果。
11.拓展功能——广告集成
为了让App赚取流量费用,需要将广告集成到App中。目前有很多第三方广告SDK集成教程,这里就不再赘述了。


