Spring Cloud 学习 之 Spring Cloud Bus实现修改远程仓库后配置自动刷新
版本号:
Spring Boot:2.1.3.RELEASE
Spring Cloud:G版
开发工具:IDEA
-
搭建配置中心,这里我们搭建一个简单版的就行
POM:
<project xmlns="http://maven.apache.org/POM/4.0.0" xmlns:xsi="http://www.w3.org/2001/XMLSchema-instance"
         xsi:schemaLocation="http://maven.apache.org/POM/4.0.0 http://maven.apache.org/xsd/maven-4.0.0.xsd">
    <modelVersion>4.0.0modelVersion>
    <parent>
        <groupId>com.study.cloudgroupId>
        <artifactId>spring_cloudartifactId>
        <version>1.0-SNAPSHOTversion>
    parent>
    <artifactId>config-serverartifactId>
    <version>0.0.1-SNAPSHOTversion>
    <name>config-servername>
    <description>Demo project for Spring Bootdescription>

    <properties>
        <java.version>1.8java.version>
        <spring-cloud.version>Greenwich.SR1spring-cloud.version>
    properties>

    <dependencies>
        <dependency>
            <groupId>org.springframework.cloudgroupId>
            <artifactId>spring-cloud-config-serverartifactId>
        dependency>

        <dependency>
            <groupId>org.springframework.bootgroupId>
            <artifactId>spring-boot-starter-testartifactId>
            <scope>testscope>
        dependency>
    dependencies>

    <dependencyManagement>
        <dependencies>
            <dependency>
                <groupId>org.springframework.cloudgroupId>
                <artifactId>spring-cloud-dependenciesartifactId>
                <version>${spring-cloud.version}version>
                <type>pomtype>
                <scope>importscope>
            dependency>
        dependencies>
    dependencyManagement>

    <build>
        <plugins>
            <plugin>
                <groupId>org.springframework.bootgroupId>
                <artifactId>spring-boot-maven-pluginartifactId>
            plugin>
        plugins>
    build>

project>
启动类:
@SpringBootApplication @EnableConfigServer public class ConfigServerApplication { public static void main(String[] args) { SpringApplication.run(ConfigServerApplication.class, args); } }spring: cloud: config: server: git: uri: https://github.com/daimingzhi/config skipSslValidation: true timeout: 5 clone-on-start: true # username: # password: server: port: 8888 -
搭建客户端
POM:
<project xmlns="http://maven.apache.org/POM/4.0.0" xmlns:xsi="http://www.w3.org/2001/XMLSchema-instance" xsi:schemaLocation="http://maven.apache.org/POM/4.0.0 http://maven.apache.org/xsd/maven-4.0.0.xsd"> <modelVersion>4.0.0modelVersion> <parent> <groupId>com.study.cloudgroupId> <artifactId>spring_cloudartifactId> <version>1.0-SNAPSHOTversion> parent> <artifactId>eureka_clientartifactId> <version>0.0.1-SNAPSHOTversion> <name>eureka_clientname> <description>Demo project for Spring Bootdescription> <properties> <java.version>1.8java.version> <spring-cloud.version>Greenwich.SR1spring-cloud.version> properties> <dependencies> <dependency> <groupId>org.springframework.cloudgroupId> <artifactId>spring-cloud-starter-netflix-eureka-clientartifactId> dependency> <dependency> <groupId>org.springframework.bootgroupId> <artifactId>spring-boot-starter-testartifactId> <scope>testscope> dependency> <dependency> <groupId>com.stuyd.cloudgroupId> <artifactId>apiartifactId> <version>0.0.1-SNAPSHOTversion> dependency> <dependency> <groupId>org.springframework.bootgroupId> <artifactId>spring-boot-starter-webartifactId> dependency> <dependency> <groupId>org.springframework.bootgroupId> <artifactId>spring-boot-starter-actuatorartifactId> dependency> <dependency> <groupId>org.springframework.cloudgroupId> <artifactId>spring-cloud-config-clientartifactId> dependency> dependencies> project>spring: application: name: application http: log-request-details: true cloud: config: label: master profile: dev uri: http://localhost:8888 server: port: ${port} management: endpoints: web: exposure: include: "*"启动类:
@SpringBootApplication @EnableDiscoveryClient public class EurekaClientApplication implements ApplicationRunner { @Value("${myname}") String name; public static void main(String[] args) { SpringApplication.run(EurekaClientApplication.class, args); } @Override public void run(ApplicationArguments args) throws Exception { System.out.println(name); } } -
启动配置中心
-
分别用不同的启动参数启动两个客户端-----Dport=10020,-Dport=10010
我们现在想要实现的是,当我们在git上修改了配置后,能够实现配置的自动刷新,并且我们两个客户端都能实现配置的自动刷新,我们可以分几步进行
-
我们先实现单个客户端配置的刷新
假设我们要实现端口为10010的服务的配置刷新,这个时候我们需要做这么几件事
-
添加
@RefreshScope注解 -
@SpringBootApplication @EnableDiscoveryClient // 添加这个注解 @RefreshScope @RestController @RequestMapping("/config") public class EurekaClientApplication { @Value("${myname}") String name; public static void main(String[] args) { SpringApplication.run(EurekaClientApplication.class, args); } @RequestMapping("/get") public String run(){ return name; } } -
重新启动服务
-
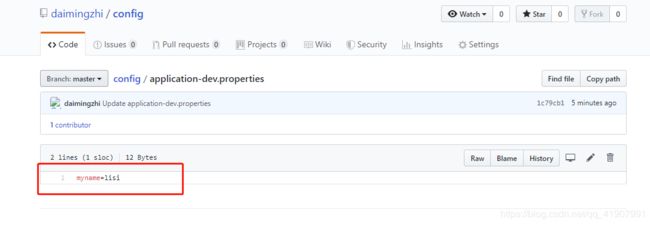
修改git中的键值对为myname=zhazha
-
访问get方法
-
可以看到配置已经被刷新了
虽然这种方式可以实现配置的刷新,但是当我们的系统发展壮大后,维护一个刷新清单将会成为一个非常大的负担,而且很容易犯错,那么有什么办法可以解决这个复杂度呢?这里就要用到我们在开篇中说过的Spring Cloud Bus(消息总线)
在了解消息总线之前,我们先需要了解下RibbitMQ,这里可以参考我之前的文章:
https://blog.csdn.net/qq_41907991/article/details/89050473
https://blog.csdn.net/qq_41907991/article/category/8833517
这里对RibbitMQ就不在多赘述了。
整合Spring Cloud Bus,我们需要引入下面这个依赖
<dependency>
    <groupId>org.springframework.cloudgroupId>
    <artifactId>spring-cloud-starter-bus-amqpartifactId>
dependency>
修改配置文件,新增这段配置:
spring:
    rabbitmq:
      host: 192.168.10.83
      port: 5672
      username: admin
      password: admin
      virtual-host: my_vhost
这个时候,我们再修改git中的配置:myname=大神
这里我碰到了一个问题,就是配置中心读取到的配置会乱码,解决方式如下:
新增一个类:
/**
 * 解决配置中心中文乱码
 * @author dmz
 * @date Create in 15:43 2019/6/29
 */
public class MyPropertiesHandler implements PropertySourceLoader {

    private Logger logger = LoggerFactory.getLogger(MyPropertiesHandler.class);

    @Override
    public String[] getFileExtensions() {
        return new String[]{"properties", "xml"};
    }

    @Override
    public List<PropertySource<?>> load(String name, Resource resource) throws IOException {
        Properties properties = new Properties();
        InputStream inputStream = null;
        try {
            inputStream = resource.getInputStream();
            properties.load(new InputStreamReader(inputStream, StandardCharsets.UTF_8));
        } catch (IOException ioEx) {
            logger.error("load inputStream failed", ioEx);
            throw ioEx;
        } catch (Exception e) {
            logger.error("load inputStream failed", e);
        } finally {
            if (inputStream != null) {
                inputStream.close();
            }
        }

        List<PropertySource<?>> propertySourceList = null;
        if (!properties.isEmpty()) {

            PropertiesPropertySource propertiesPropertySource = new PropertiesPropertySource(name, properties);
            propertySourceList = new ArrayList<>();
            propertySourceList.add(propertiesPropertySource);
        }
        return propertySourceList;

    }
}
在resources目录下新建META-INF\spring.factories文件,并配置:
org.springframework.boot.env.PropertySourceLoader=com.study.cloud.configserver.config.MyPropertiesHandler
POST方式访问:http://localhost:10010/actuator/refresh
之后分别访问http://localhost:10010/config/get,http://localhost:10020/config/get
可以看到配置已经被刷新。到这里我们已经实现了通过一次接口调用刷新同一个服务所有实例配置的需求,现在我们要做就是能实现一次接口调用刷新所有服务配置
其实要实现这个目的很简单,只需要将刷新的请求发送到配置中心就行了,而不是发送到我们的服务实例上,
这里我们需要做的就是,在配置中心中新增我们之前新增的配置跟依赖,这里就不重复多说了。
接下来,我们还剩最后一件事,现在我们都需要手动调用接口去刷新配置,那么能不能实现,只要我们在git上修改了配置就自动刷新呢?答案显然是可以的,这里需要我们去接入GIT的webhook。具体的接入就不说了,很简单,大家可以参考https://blog.csdn.net/qq_38423105/article/details/88080464


