微人事第十二天:Spring Boot整合 RabbitMQ
首先关于Window上安装RabbitMQ的教程,https://www.jianshu.com/p/681f6554ef25 上写的十分详细。开始我尝试了各种版本的安装都没能成功,照着这篇文章操作一下就成功了。(这里强烈安利)
安装好之后访问http://localhost:15672/#/网址,用户名和密码都写上guest看到如下页面就代表你安装成功了:

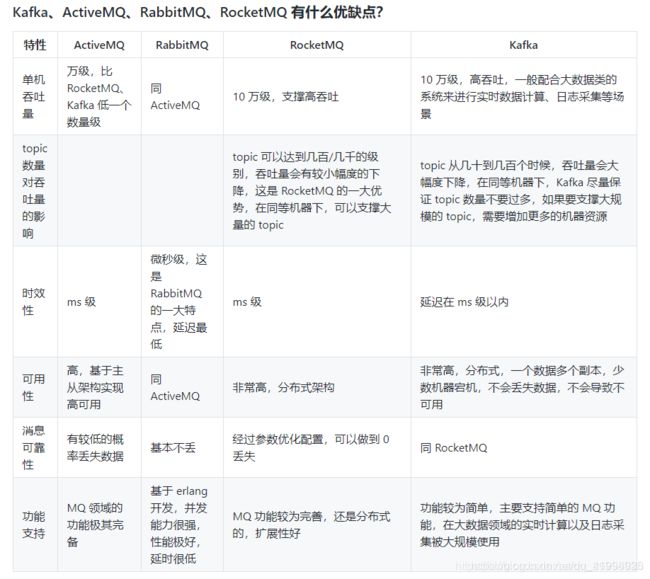
相较之下RabbitMQ的优缺点:

RabbitMQ常用的交换器类型有四种:fanout、direct、topic、headers。
fanout
它会把所有发送到该交换器的消息路由到所有与该交换器绑定的队列中,即无视RoutingKey和BindingKey的匹配规则。
direct
它会把消息路由到那些BindingKey和RoutingKey完全匹配的队列中。
topic
上面讲到direct类型的交换器路由规则是必须完全匹配BindingKey和RoutingKey,但这种严格的匹配方式在很多情况下无法满足实际业务的需求。topic类型的交换器在 匹配规则上进行了扩展,它与direct类型的交换器类似,也是将消息路由到BindingKey和RoutingKey相匹配的队列中,但匹配规则略有不同,约定如下:
1.RoutingKey为一个点号“.”分隔的字符串,被“.”号分隔的每一段独立的字符串称为一个单词,如“com.rabbitmq.client”等。
2.BindingKey和RoutingKey一样也是“.”分隔的字符串。
3.BindingKey中存在两种特殊字符串“”和“#”,用于做模糊匹配,其中“.”用于匹配一个单词,“#”用于匹配多个单词(可以是零个)。
headers
headers类型的交换器不依赖于路由键的匹配规则来路由消息,而是根据发送的消息内容中的headers属性进行匹配。当发送消息到交换器时,RabbitMQ会获取到该消息的headers(也是一个键值对的形式),对比其中的键值对是否完全匹配队列和交换器绑定时指定的键值对,若完全匹配则消息会路由到该队列,否则不会路由到该队列。headers类型的交换器性能较差,不太实用,基本上不会看到它的存在。
集体整合步骤(这里只写direct的):
引入web和rabbitmq依赖,pom.xml文件如下:
	4.0.0

		org.springframework.boot
		spring-boot-starter-parent
		2.2.4.RELEASE


	org.javaboy
	rabbitmq
	0.0.1-SNAPSHOT
	rabbitmq
	Demo project for Spring Boot


		1.8


			org.springframework.boot
			spring-boot-starter-amqp


			org.springframework.boot
			spring-boot-starter-web


			org.springframework.boot
			spring-boot-starter-test
			test


					org.junit.vintage
					junit-vintage-engine


			org.springframework.amqp
			spring-rabbit-test
			test


				org.springframework.boot
				spring-boot-maven-plugin
配置RabbitMQ的信息
包括用户名,密码,端口等…
spring.rabbitmq.host=192.168.66.131
spring.rabbitmq.username=guest
spring.rabbitmq.password=guest
spring.rabbitmq.port=15672
配置消息队列,directExchange
package org.javaboy.rabbitmq.config;

import org.springframework.amqp.core.Binding;
import org.springframework.amqp.core.BindingBuilder;
import org.springframework.amqp.core.DirectExchange;
import org.springframework.amqp.core.Queue;
import org.springframework.context.annotation.Bean;
import org.springframework.context.annotation.Configuration;


@Configuration
public class RabbitDirectConfig {

    public final static String DIRECTNAME = "javaboy-direct";

    //消息队列
    @Bean
    Queue queue() {
        return new Queue("hello.javaboy");
    }

    @Bean
    DirectExchange directExchange() {
        return new DirectExchange(DIRECTNAME,true,false);
    }


    //将队列Queue和DirectExchange绑定在Binging中
    Binding binding() {
        return BindingBuilder.bind(queue()).to(directExchange()).with("direct");
    }
}
定义消费者
package org.javaboy.rabbitmq.receiver;

import org.springframework.amqp.rabbit.annotation.RabbitListener;
import org.springframework.stereotype.Component;

//定义消费者
@Component
public class DirectReceiver {
    //定义消费方法  方法参数就是具体消息队列的名称
    @RabbitListener(queues = "hello.javaboy")
    public void handler1(String msg) {
        System.out.println("handler1>>>>" + msg);
    }
}
测试类
package org.javaboy.rabbitmq;

import org.junit.jupiter.api.Test;
import org.springframework.amqp.rabbit.core.RabbitTemplate;
import org.springframework.beans.factory.annotation.Autowired;
import org.springframework.boot.test.context.SpringBootTest;

@SpringBootTest
public class RabbitmqApplicationTests {

    @Autowired
    RabbitTemplate rabbitTemplate;

    @Test
    public void contextLoads() {
        rabbitTemplate.convertAndSend("hello.javaboy","hello javaboy!hhhh");
    }

}
启动之后打印handler1>>>>hello javaboy!hhhh