Nginx+Keepalived+Haproxy+DNS+DHCP综合实验
准备工作
1、DNS(网卡模式:Host-only)ens33:192.168.191.128
2、DHCP	192.168.191.128
3、server1(网卡模式:NAT)ens33:192.168.2.128
4、server2(网卡模式:NAT)ens33:192.168.2.129
5、keepalived+haproxy主:(网卡模式:NAT+Host-only)ens33:192.168.2.148、ens37192.168.191.22(ens37是通过dhcp获取的)
6、keepalived+haproxy备:(网卡模式:NAT+Host-only)ens33:192.168.2.208、ens37192.168.191.21(ens37是通过dhcp获取的)
7、客户端(通过dhcp获取)
一、配置dns+dhcp
配置dns
安装dns服务
yum install bind*

修改dns配置文件
vi /etc/named.conf
 	listen-on port 53 { any; };
	allow-query     { any; };

vi /etc/named.rfc1912.zones (末尾添加)
zone "test.com" IN {
        type master;
       	file "test.com.zone";
        allow-update { none; };
};

cp -a /var/named/named.localhost /var/named/test.com.zone
vi /var/named/test.com.zone
$TTL 1D
@      IN SOA  test.com. root.test.com. (2019011512 1H 15M 1W 1D)
          IN NS   www.test.com.
www  IN A    192.168.191.100

启动服务
systemctl start named
systemctl anable named
systemctl status named

关闭防火墙
systemctl stop firewalld
setenforce 0

配置静态IP地址
BOOTPROTO=static
IPADDR=192.168.192.191.128
NETMASK=255.255.255.0
GATEWAY=192.168.191.2
DNS1=192.168.191.128
测试dns服务
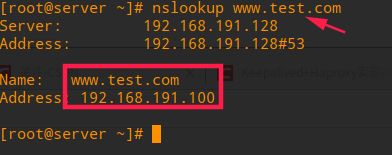
!!!如果dns解析没成功请用named-checkzo、nenamed-checkconf命令检查配置文件
配置dhcp
安装dhcp
yum -y install dhcp

修改主配置文件
vi /etc/dhcp/dhcpd.conf
	ddns-update-style none;
	ignore client-updates;
	default-lease-time 259200;
	max-lease-time 518400;
	option domain-name-servers 192.168.191.128;    # 服务器域名

	subnet 192.168.191.0 netmask 255.255.255.0 {        # 分配和的网段
    	range 192.168.191.20 192.168.191.100;               # IP地址范围
    	option subnet-mask 255.255.255.0;					   # IP地址子网掩码
    	option routers 192.168.191.2;								   # IP地址的网关
}
dhcp要关掉vmware自动分发功能

启动dhcp服务
systemctl restart dhcpd
systemctl enable dhcpd
systemctl status dhcpd
客户机(网卡和dhcp服务在同一种模式中)

二、服务服务器(主从)
Server1
安装nginx
yum -y install epel-release
yum -y install nginx
修改nginx主页
mv /usr/share/nginx/html/index.html /usr/share/nginx/html/111  # 备份主页
echo "server 11111111" > /usr/share/nginx/html/index.html
启动服务
systemctl start nginx
systemctl enable nginx
systemctl status nginx
关闭防火前
systemctl stop firewalld
setenforce 0
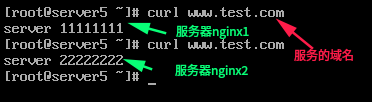
测试nginx服务
Server2
安装nginx
yum -y install epel-release
yum -y install nginx
修改nginx主页
mv /usr/share/nginx/html/index.html /usr/share/nginx/html/222  # 备份主页
echo "server 2222222" > /usr/share/nginx/html/index.html
启动服务
systemctl start nginx
systemctl enable nginx
systemctl status nginx
关闭防火前
systemctl stop firewalld
setenforce 0
测试nginx服务
三、配置Keepalive
配置keepalive(主)
添加网卡

安装
yum -y install keepalived
修改配置文件
mv /etc/keepalived/keepalived.conf /etc/keepalived/keepalived.conf.bak   #   备份主配置文件

vi /etc/keepalived/keepalived.conf
	global_defs {
    router_id test
}
vrrp_instance VI_1 {
    state MASTER
    interface ens37
    virtual_router_id 51
    priority 99
    advert_int 1
    authentication {
        auth_type PASS
        auth_pass 1234
    }
    virtual_ipaddress {
        192.168.191.100
    }
}

启动服务
systemctl start keepalived
systemctl enable keepalived
systemctl status keepalived
关闭防火墙
systemctl stop firewalld
setenforce 0
检验

配置keepalive(从)
添加网卡

安装
yum -y install keepalived
修改配置文件
mv /etc/keepalived/keepalived.conf /etc/keepalived/keepalived.conf.bak   #   备份主配置文件

vi /etc/keepalived/keepalived.conf
	global_defs {
    router_id test
}
vrrp_instance VI_1 {
    state BACKUP		# 为备份
    interface ens37
    virtual_router_id 51
    priority 90				# 优先级小于主
    advert_int 1
    authentication {
        auth_type PASS
        auth_pass 1234
    }
    virtual_ipaddress {
        192.168.191.100
    }
}

启动服务
systemctl start keepalived
systemctl enable keepalived
systemctl status keepalived
关闭防火墙
systemctl stop firewalld
setenforce 0
验证

配置haproxy 1
安装服务
yum -y install haproxy

修改主配置文件
mv /etc/haproxy/haproxy.cfg /etc/haproxy/haproxy.cfg.bak      # 备份主配置文件
vi /etc/haproxy/haproxy.cfg
global
    log 127.0.0.1 local3 info
    chroot /var/lib/haproxy
    maxconn 4000
    daemon
    user haproxy
    group haproxy

defaults
    log global
    mode http
    option httplog
    retries 3
    timeout connect 5000
    timeout client 50000
    timeout server 50000

listen stats
    mode http
    bind 0.0.0.0:8080
    stats enable
    stats uri /stats
    stats realm Haproxy\ Statistics
    stats auth admin:admin

listen nginxserver
    bind 192.168.191.100:80      	# 监听虚拟IP地址
    mode http
    default_backend nginx

backend nginx
    balance roundrobin
    option httpchk GET /index.html
    server nginx1 192.168.2.128:80 check inter 2000 rise 3 fall 3 weight 30    # nginx1服务健康检查
    server nginx2 192.168.2.129:80 check inter 2000 rise 3 fall 3 weight 30    # nginx2服务健康检查


启动服务
systemctl start haproxy
systemctl enable haproxy
systemctl status haproxy
配置haproxy 2
安装服务
yum -y install haproxy

修改主配置文件
mv /etc/haproxy/haproxy.cfg /etc/haproxy/haproxy.cfg.bak      # 备份主配置文件
vi /etc/haproxy/haproxy.cfg
global
    log 127.0.0.1 local3 info
    chroot /var/lib/haproxy
    maxconn 4000
    daemon
    user haproxy
    group haproxy

defaults
    log global
    mode http
    option httplog
    retries 3
    timeout connect 5000
    timeout client 50000
    timeout server 50000

listen stats
    mode http
    bind 0.0.0.0:8080
    stats enable
    stats uri /stats
    stats realm Haproxy\ Statistics
    stats auth admin:admin

listen nginxserver
    bind 192.168.191.100:80      	# 监听虚拟IP地址
    mode http
    default_backend nginx

backend nginx
    balance roundrobin
    option httpchk GET /index.html
    server nginx1 192.168.2.128:80 check inter 2000 rise 3 fall 3 weight 30    # nginx1服务健康检查
    server nginx2 192.168.2.129:80 check inter 2000 rise 3 fall 3 weight 30    # nginx2服务健康检查


启动服务
systemctl start haproxy
systemctl enable haproxy
systemctl status haproxy
关于keepalived和haproxy出现de问题:
在主上面启动keepalived和haproxy成功之后,在从上面启动keepalived可以成功,但启动haproxy就失败,报错在监听的端口。

原因:
keepalive的主上面会有虚拟IP地址就可以启动keepalived+haproxy成功,在keepalive的主的没有死掉,从的上面没有IP地址,所以从的上面haproxy不知道监听那个虚拟IP地址,所以启动haproxy就失败

解决办法
方法1:
把从服务器的监听端口的IP地址改为*号,让它监听所有IP地址,重启就不会报错了
listen nginxserver
    bind *:80
    mode http
    default_backend nginx

方法2:
先关闭主的keepalive的服务,虚拟IP就会到从的服务上,启动haproxy服务,再去主的上面启动keepalive服务
主	systemctl stop keepalived
从	systemctl start haproxy
主	systemctl start keepalived
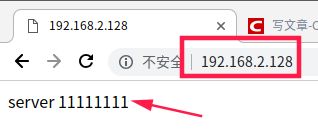
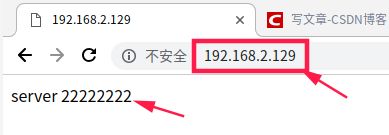
在浏览器验证haproxy


在客户机验证