手把手教你iOS控件之如何创建自定义cell(超详细)
如何创建自定义cell
UITableView控件应用十分广泛,因为它呈现的是一个列表,比如通讯录,微信好友,美团菜单等等,这些东西呈现在用户面前都是通过列表的形式,所以它的重要性不用多说,因此,组成表格的基本单元:单元格(cell)的重要性就更不用说了。
今天我们一起来学习一下
首先,为什么要自定义单元格?
因为苹果系统提供给我们的表格样式是有限的,只有几种,最常用的一种也仅仅只能放一张图片,两个label, 但是,我们平时可能会制作更为复杂的表格,或者加一些自己的想法,这个时候就需要自己来自定义了
以下为具体操作
第一步设置窗口创建(老生常谈了)
在AppDelegate.m
- (BOOL)application:(UIApplication *)application didFinishLaunchingWithOptions:(NSDictionary *)launchOptions {
    // Override point for customization after application launch.

    self.window = [[UIWindow alloc] initWithFrame:[UIScreen mainScreen].bounds];


    //注意使用rootViewController来初始化。
    self.window.rootViewController = [[rootViewController alloc] init];

    self.window.backgroundColor = [UIColor whiteColor];

    [self.window makeKeyAndVisible];
    return YES;
}
下面开始自定义Cell
首先我们先自己定义一个类,记住它是继承于UITableViewCell
这里我定义它名为MyTableViewCell
然后下面是MyTableViewCell.h里面的
#import

NS_ASSUME_NONNULL_BEGIN

@interface MyTableViewCell : UITableViewCell

//这是第一步,定义你所需要的属性(控件)
//就是你想要你自定义的Cell里面包含哪些元素项,就在这里定义哪些。
@property (nonatomic, strong) UIButton* icon1;

@property (nonatomic, strong) UILabel* label1;

@property (nonatomic, strong) UILabel* label2;

@property (nonatomic, strong) UILabel* label3;

@end

NS_ASSUME_NONNULL_END
下面是MyTableViewCell.m的内容
#import "MyTableViewCell.h"

@implementation MyTableViewCell

//第二步:重写初始化方法
- (instancetype)initWithStyle:(UITableViewCellStyle)style reuseIdentifier:(NSString *)reuseIdentifier {

    self = [super initWithStyle:style reuseIdentifier:reuseIdentifier];
    if (self) {
        //在初始化方法中完成控件的初始化,并添加到Cell上
        self.icon1 = [[UIButton alloc] init];
        [self.contentView addSubview:_icon1];

        self.label1 = [[UILabel alloc] init];
        [self.contentView addSubview:_label1];

        self.label2 = [[UILabel alloc] init];
        [self.contentView addSubview:_label2];

        self.label3 = [[UILabel alloc] init];
        [self.contentView addSubview:_label3];

        //这里一共定义了一个Button,三个label
    }
    //记得返回
    return self;
}

//第三步:设置控件的信息:位置,宽高
- (void)layoutSubviews {
    [super layoutSubviews];

    //设置每一个控件的位置,大小
//    _icon1.frame = CGRectMake(0, 0, 55, 50);
//    _label1.frame = CGRectMake(65, 0, 200, 50);
//    _label2.frame = CGRectMake(100, 0, 70, 50);
//    _label3.frame = CGRectMake(120, 0, 100, 50);

    //或者也可以这样
    self.icon1.frame = CGRectMake(20, 20, 50, 50);
    self.label1.frame = CGRectMake(90, 10, 200, 20);
    self.label2.frame = CGRectMake(90, 40, 200, 20);
    self.label3.frame = CGRectMake(90, 70, 200, 20);

    //当然还可以设置背景颜色。等等
}
- (void)awakeFromNib {
    [super awakeFromNib];
    // Initialization code
}

- (void)setSelected:(BOOL)selected animated:(BOOL)animated {
    [super setSelected:selected animated:animated];

    // Configure the view for the selected state
}

@end

//做完以上工作后你就已经自定义好了一个自己的Cell,然后就可以拿去使用了,在你要显示的UIViewController里
如何来使用呢
首先来到视图控制器编辑区,这里我定义了一个rootViewController.h 显然它是继承于UIViewController
这里rootViewController.h里面不需要添加任何内容
//这段代码是写在rootViewController.m里面
#import "rootViewController.h"
#import "MyTableViewCell.h"//这里引入我们自定义的头文件,不可少
//在这里设置相应的两个协议
//UITableViewDelegate
//UITableViewDataSource
//千万不要忘记
//这里是一个延展类(扩展类)体现封装。安全
@interface rootViewController ()
//定义一个tableView
@property UITableView* tableView;
@end
@implementation rootViewController
- (void)viewDidLoad {
[super viewDidLoad];
// Do any additional setup after loading the view
//创建tableView并且初始化
self.tableView = [[UITableView alloc] initWithFrame:self.view.bounds style:UITableViewStyleGrouped];
//在DidLoad函数里对该Cell进行注册
[self.tableView registerClass:[MyTableViewCell class] forCellReuseIdentifier:@"myCell"];
//千万不要忘记
self.tableView.delegate = self;
//千万不要忘记
self.tableView.dataSource = self;
//添加到视图并显示
[self.view addSubview:_tableView];
}
- (UITableViewCell *)tableView:(UITableView *)tableView cellForRowAtIndexPath:(nonnull NSIndexPath *)indexPath {
//自定义cell使用方法:三步法
//1.创建静态标志符
static NSString* identifier = @"myCell";
//2.根据标志符从重用池中取cell
//UITableViewCell* cell = [_tableView dequeueReusableCellWithIdentifier:cellStr];
MyTableViewCell* cell = [tableView dequeueReusableCellWithIdentifier:identifier];
//3.如果没有取到就创建一个新的
if (cell == nil) {
cell = [[MyTableViewCell alloc] initWithStyle:UITableViewCellStyleSubtitle reuseIdentifier:identifier];
}
//这里就可以调用自己写的控件了
//设置它们的属性
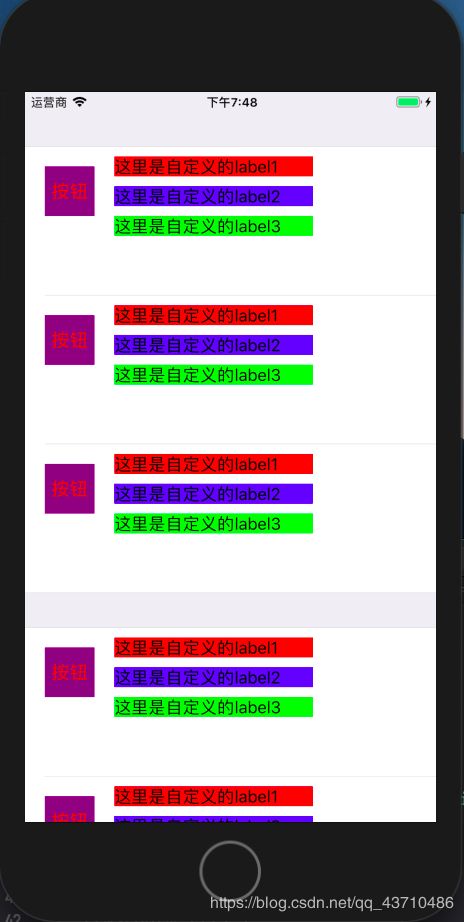
cell.icon1.backgroundColor = [UIColor purpleColor];
cell.label1.backgroundColor = [UIColor redColor];
cell.label2.backgroundColor = [UIColor blueColor];
cell.label3.backgroundColor = [UIColor greenColor];
[cell.icon1 setTitle:@"按钮" forState:UIControlStateNormal];
[cell.icon1 setTitle:@"按下" forState:UIControlStateHighlighted];
[cell.icon1 setTitleColor:[UIColor redColor] forState:UIControlStateNormal];
[cell.icon1 setTitleColor:[UIColor greenColor] forState:UIControlStateHighlighted];
cell.label1.text = @"这里是自定义的label1";
cell.label2.text = @"这里是自定义的label2";
cell.label3.text = @"这里是自定义的label3";
return cell;
}
- (NSInteger)tableView:(UITableView *)tableView numberOfRowsInSection:(NSInteger)section {
return 3;
}
- (NSInteger)numberOfSectionsInTableView:(UITableView *)tableView {
return 2;
}
- (CGFloat)tableView:(UITableView *)tableView heightForRowAtIndexPath:(NSIndexPath *)indexPath {
return 150;
}
-(CGFloat)tableView:(UITableView *)tableView heightForHeaderInSection:(NSInteger)section {
return 60;
}
/*
#pragma mark - Navigation
// In a storyboard-based application, you will often want to do a little preparation before navigation
- (void)prepareForSegue:(UIStoryboardSegue *)segue sender:(id)sender {
// Get the new view controller using [segue destinationViewController].
// Pass the selected object to the new view controller.
}
*/
@end
为什么这条语句static NSString* identifier = @“myCell”;要加static,可以看我的另一条博客UITableView
效果如下: