Vue重点学习经验(1)MvvM,Vue生命周期,父子组件通信
1.对于MVVM的理解
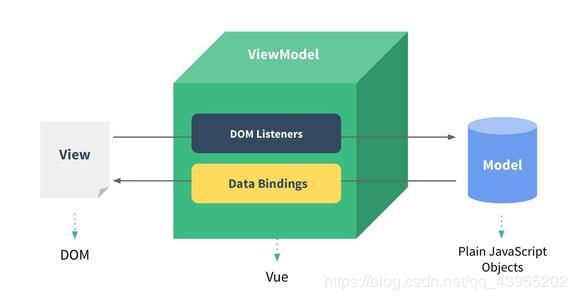
- MVVM图示

Mvvm定义MVVM是Model-View-ViewModel的简写。即模型-视图-视图模型。 - (1) 模型Model层:也是数据层。
- 数据可能是我们固定的模拟数据,更多的是来自我们的服务器,从网络上请求下来的数据。
- 实际处理中,数据会比较复杂
- (2) 视图View层:也是视图层。
- 在我们的前端开发中,通常就是DOM层。
- 主要作用是给用户展示各种信息。
- (3) 视图模型层VueModel:也是视图模型层。
- 视图模型层是View和Model沟通的桥梁。
- 一方面它实现了Data Binding,也就是数据绑定,将Model的改变实时的反应到View中。
- 另外一方面它实现了DOM Listener,也就是DOM监听,在一些必要条件下改变对应的Data。
- (4) 总结:在MVVM的框架下视图和模型是不能直接通信的。它们通过ViewModel来通信,ViewModel通常要实现一个observer观察者,当数据发生变化,ViewModel能够监听到数据的这种变化,然后通知到对应的视图做自动更新,而当用户操作视图,ViewModel也能监听到视图的变化,然后通知数据做改动,这实际上就实现了数据的双向绑定。并且MVVM中的View 和 ViewModel可以互相通信。
2.Vue生命周期
- (1)什么是Vue生命周期?
Vue 实例从创建到销毁的过程,就是生命周期。从开始创建、初始化数据、编译模板、挂载Dom→渲染、更新→渲染、销毁等一系列过程,称之为 Vue 的生命周期。 - (2)vue生命周期的作用是什么?
它的生命周期中有多个事件钩子,让我们在控制整个Vue实例的过程时更容易形成好的逻辑。 - (3)vue生命周期总共有几个阶段?
它可以总共分为8个阶段:创建前/后, 载入前/后,更新前/后,销毁前/销毁后。 - 下面是一个大佬对vue生命周期的总结,我觉得非常不错,这里引用一下。
大佬的测试代码:
<!DOCTYPE html>
<html>
<head>
    <title></title>
    <script type="text/javascript" src="https://cdn.jsdelivr.net/vue/2.1.3/vue.js"></script>
</head>
<body>

<div id="app">
     <p>{{ message }}</p>
</div>

<script type="text/javascript">

  var app = new Vue({
      el: '#app',
      data: {
          message : "xuxiao is boy"
      },
       beforeCreate: function () {
                console.group('beforeCreate 创建前状态===============》');
               console.log("%c%s", "color:red" , "el     : " + this.$el); //undefined
               console.log("%c%s", "color:red","data   : " + this.$data); //undefined
               console.log("%c%s", "color:red","message: " + this.message)
        },
        created: function () {
            console.group('created 创建完毕状态===============》');
            console.log("%c%s", "color:red","el     : " + this.$el); //undefined
               console.log("%c%s", "color:red","data   : " + this.$data); //已被初始化
               console.log("%c%s", "color:red","message: " + this.message); //已被初始化
        },
        beforeMount: function () {
            console.group('beforeMount 挂载前状态===============》');
            console.log("%c%s", "color:red","el     : " + (this.$el)); //已被初始化
            console.log(this.$el);
               console.log("%c%s", "color:red","data   : " + this.$data); //已被初始化
               console.log("%c%s", "color:red","message: " + this.message); //已被初始化
        },
        mounted: function () {
            console.group('mounted 挂载结束状态===============》');
            console.log("%c%s", "color:red","el     : " + this.$el); //已被初始化
            console.log(this.$el);
               console.log("%c%s", "color:red","data   : " + this.$data); //已被初始化
               console.log("%c%s", "color:red","message: " + this.message); //已被初始化
        },
        beforeUpdate: function () {
            console.group('beforeUpdate 更新前状态===============》');
            console.log("%c%s", "color:red","el     : " + this.$el);
            console.log(this.$el);
               console.log("%c%s", "color:red","data   : " + this.$data);
               console.log("%c%s", "color:red","message: " + this.message);
        },
        updated: function () {
            console.group('updated 更新完成状态===============》');
            console.log("%c%s", "color:red","el     : " + this.$el);
            console.log(this.$el);
               console.log("%c%s", "color:red","data   : " + this.$data);
               console.log("%c%s", "color:red","message: " + this.message);
        },
        beforeDestroy: function () {
            console.group('beforeDestroy 销毁前状态===============》');
            console.log("%c%s", "color:red","el     : " + this.$el);
            console.log(this.$el);
               console.log("%c%s", "color:red","data   : " + this.$data);
               console.log("%c%s", "color:red","message: " + this.message);
        },
        destroyed: function () {
            console.group('destroyed 销毁完成状态===============》');
            console.log("%c%s", "color:red","el     : " + this.$el);
            console.log(this.$el);
               console.log("%c%s", "color:red","data   : " + this.$data);
               console.log("%c%s", "color:red","message: " + this.message)
        }
    })
</script>
</body>
</html>
首先这里有两个已经解决了的问题。
- 页面在第一次加载时会触发哪几个钩子函数?
很明显我们可以看到beforeCreate,create,beforeMounted,mounted。 - DOM 渲染在 哪个周期中就已经完成?
+很明显是在mounted中完成了挂载,DOM渲染。
继续往下看:
第一次加载页面的钩子函数
- beforeCreate:数据观测和初始化事件还没有开始。也就是el和data还没有初始化。
- create:完成了data数据的初始化以及属性和方法的运算,初始化事件,此时$el属性还没有显示出来。(个人一般较多的在这里请求后端数据)。
- beforeMounted:完成了el和data的初始化,实例编译模板,将data里面的数据和模板生成html,但此时还没有挂在html到页面上。
- mounted:用新创建的$el替换el,将编译好的html替换el属性挂载到页面上去。
更新数据时的钩子函数
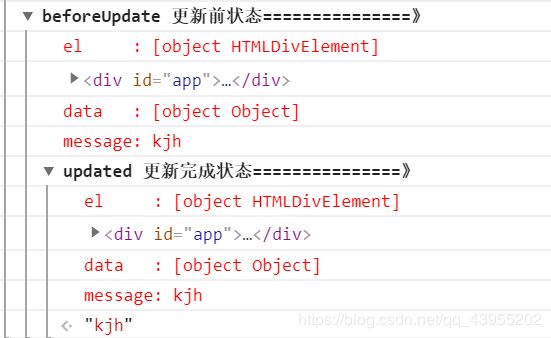
当我们在F12里面修改app.message数据的时候,上述代码执行以下结果。

- beforeUpdata:在数据更新前调用。
- Updata:数据更新后调用,虚拟dom修改数据并且渲染。
- 可以看到数据更新后两个生命周期函数中的data时同步的。
页面销毁时的钩子函数
- beforeDestroy(销毁前) 在实例销毁之前调用。实例仍然完全可用。
- 销毁后) 在实例销毁之后调用。调用后,所有的事件监听器会被移除,所有的子实例也会被销毁。
3.父子组件传值。
父组件通过 props (properties 属性的意思)向子组件传递数据
- 父组件里面将要传递的数据以变量的形式传递给子组件
<home-swiper :banners="banners" @swiperImageLoad="swiperImage"></home-swiper>
- 子组件里面定义props
props: {
      banners: {
        type: Array,
        required: true
      }
    },
- 子组件使用数据
<swiper-item v-for="(item, index) in banners" :key="index">
-
props 数据验证
// 1.通过数组传值
props:[‘cmessage’,‘cmovies’],//2.类型限制传值 props:{ //类型限制 cmovies:Array, cmessage:String }, //3.类型限制+ 提供默认值 + required : 必须传入的值 //如果类型是对象或者数组的时候,默认值必须是一个函数 props:{ cmovies:{ type:Array, default(){ return ['宝鸡市','西安市','玉玲市','四川市'] } }, cmessage:{ type:String, default:'北京欢迎你' } }, -
props 中的驼峰标识问题
v-bind 绑定的时候 不支持驼峰标识 如果是 cMovies 需要写成 c-movies 这样才可以达到我们想要的效果.
子组件通过事件向父组件发送消息
- 子组件传给父组件:$emit方法传递参数
- 代码实例
<!-- 子组件定义事件change(item)并且将要传递的数据当作参数传递过去-->
<button v-for='item in shopList' @click='change(item)'>{{ item.name }}</button>

<!--子组件发射自定义的函数,并且传递参数item-->
 change(item){
                    this.$emit('itemclick',item)
                }
<!-- 父组件监听子组件发送的事件-->
<cpn @itemclick='shopclick'></cpn>

<!-- 父组件定义函数拿到数据-->
 shopclick(item){
                    console.log(item.id + item.name)
                }
下一篇:Vue重点学习经验2
- Vue双向绑定原理,以及简单双向绑定的实现
- Vue定义路由以及Vue的路由实现:hash模式 和 history模式
- 对keep-alive 的了解?
文章参考1:https://segmentfault.com/a/1190000016344599?utm_source=tag-newest
作者:沉静的闪光
文章参考2:https://segmentfault.com/a/1190000008010666
作者:城南


