玩转Linux三大防火墙工具!
一:iptables
精华:iptables和firewalld都不是防火墙,他们都只是管理防火墙的工具、服务而已!
重点:iptables防火墙策略规则是按照从上到下的顺序匹配的,因此一定要把允许动作放到拒绝动作前面,否则所有的流量就将被拒绝掉,从而导致任何主机都无法访问我们的服务
1.常用操作
iptables -I INPUT -s 网段/掩码 -p tcp --dport 端口号 -j ACCEPT
iptables -A INPUT-p tcp --dport 端口号 -j REJECT
iptables -L
端口转发
iptables -t nat -A PREROUTING -p tcp --dport 80 -j REDIRECT --to-port 8080
查看已有的防火墙规则链:
iptables -L
清空规则链
iptables -F
删除用户自定义 chain 或者所有用户自定义chain (chain就是链的意思)
iptables -X
把 chain 或者所有 chain(当未指定 chain 名称时)的包及字节的计数器清空
iptables -Z
2.在centos系统下想要保存iptables的规则链需要安装iptables服务,因为centos下默认是firewalld服务没有iptables,所以需要手动安装iptables服务后重启服务才行
以下两个都可以保存iptables的配置
[root@b sysconfig]# service iptables save
iptables: Saving firewall rules to /etc/sysconfig/iptables:[  OK  ]

[root@b sysconfig]#systemctl enable iptables
[root@b sysconfig]# systemctl restart iptables
3.把所有input规则链的默认策略设置拒绝
iptables -P INPUT DROP
4.向INPUT链中添加允许ICMP流量进入的策略规则:
iptables -I INPUT -p icmp -j ACCEPT
5.删除INPUT规则链中刚刚加入的那条策略(允许ICMP流量)
iptables -D INPUT 1
6.将INPUT规则链设置为只允许指定网段的主机访问本机的22端口,拒绝来自其他所有主机的流量:
iptables -I INPUT -s 192.168.10.0/24 -p tcp --dport 22 -j ACCEPT
iptables -A INPUT -p tcp --dport 22 -j REJECT
iptables -L
7.向INPUT规则链中添加拒绝所有人访问本机12345端口的策略规则:
iptables -I INPUT -p tcp --dport 12345 -j REJECT
iptables -I INPUT -p udp --dport 12345 -j REJECT
iptables -L
8.向INPUT规则链中添加拒绝所有主机访问本机1000~1024端口的策略规则:
iptables -A INPUT -p tcp --dport 1000:1024 -j REJECT
iptables -A INPUT -p udp --dport 1000:1024 -j REJECT
iptables -L
二:Firewalld
精华:firewalld支持动态更新技术并加入了区域(zone)的概念
重点:区域就是我提前准备几套防火墙策略针对不通的场景来用,在firewalld中可以来回切换域,这样就满足工作生产中不同的需求啦!
1.查看firewalld服务当前所使用的区域
firewall-cmd --get-default-zone
public
2.把firewalld服务的当前默认区域设置为public
firewall-cmd --set-default-zone=public
success
firewall-cmd --get-default-zone
public
3.启动/关闭firewalld防火墙服务的应急状况模式,阻断一切网络连接(当远程控制服务器时请慎用):
firewall-cmd --panic-on
success
[root@linuxprobe ~]# firewall-cmd --panic-off
success
4.重点:流量转发命令格式为firewall-cmd --permanent --zone=<区域> --add-forward-port=port=<源端口号>:proto=<协议>:toport=<目标端口号>:toaddr=<目标IP地址>)*
firewall-cmd --permanent --zone=public --add-forward-port=port=888:proto=tcp:toport=22:toaddr=192.168.10.10
firewall-cmd --reload
success
5.我们可以在firewalld服务中配置一条规则,使其拒绝192.168.10.0/24网段的所有用户访问本机的ssh服务(22端口):
firewall-cmd --permanent --zone=public --add-rich-rule="rule family="ipv4" source address="192.168.10.0/24" service name="ssh" reject"
success
firewall-cmd --reload
success
三:TCP wrappers
精华:
TCP Wrappers服务的防火墙策略由两个控制列表文件所控制,用户可以编辑允许控制列表文件来放行对服务的请求流量,也可以编辑拒绝控制列表文件来阻止对服务的请求流量。
重点文件:
控制列表文件(/etc/hosts.allow)
拒绝控制列表文件(/etc/hosts.deny)
编写规则:
编写拒绝策略规则时,填写的是服务名称,而非协议名称;
建议先编写拒绝策略规则,再编写允许策略规则,以便直观地看到相应的效果。
1.只允许192.168.10.0网段能够访问sshd服务
vim /etc/hosts.deny
#
#hosts.deny This file contains access rules which are used to
#deny connections to network services that either use
#the tcp_wrappers library or that have been
#started through a tcp_wrappers-enabled xinetd.
#
#The rules in this file can also be set up in
#/etc/hosts.allow with a 'deny' option instead.
#
#See 'man 5 hosts_options' and 'man 5 hosts_access'
#for information on rule syntax.
#See 'man tcpd' for information on tcp_wrappers
sshd:
ssh 192.168.10.10
ssh_exchange_identification: read: Connection reset by peer
 vim /etc/hosts.allow
#
# hosts.allow This file contains access rules which are used to
# allow or deny connections to network services that
# either use the tcp_wrappers library or that have been
# started through a tcp_wrappers-enabled xinetd.
#
# See 'man 5 hosts_options' and 'man 5 hosts_access'
# for information on rule syntax.
# See 'man tcpd' for information on tcp_wrappers
sshd:192.168.10.
ssh 192.168.10.10
The authenticity of host '192.168.10.10 (192.168.10.10)' can't be established.
ECDSA key fingerprint is 70:3b:5d:37:96:7b:2e:a5:28:0d:7e:dc:47:6a:fe:5c.
Are you sure you want to continue connecting (yes/no)? yes
Warning: Permanently added '192.168.10.10' (ECDSA) to the list of known hosts.
[email protected]'s password:
Last login: Wed May 4 07:56:29 2017
小结:三者之间有着相似的地方也有不同的地方,没有必要把各种参数都背会,在实际工作做能够根据工作需求灵活的使用这些工具才是王道!
四、实操演练
1.配置端口转发
在系统 serverx 中配置端口转发
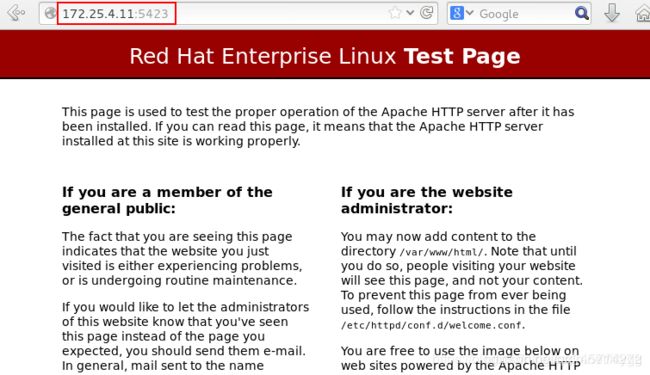
在 172.25.x.0/24 网络中的系统,访问 server1 的本地端口 5423 将被转发到 80 此设定时永久生效的
#1.允许172.25.4.0/24 网段的主机可以访问本机(添加到信任域)
[root@server4 ~]# firewall-cmd --permanent --add-source=172.25.4.0/24 --zone=trusted
success
#重启火墙,注意:每此添加火墙策略都需要重启
[root@server4 ~]# systemctl restart firewalld
[root@server4 ~]# firewall-cmd --list-all --zone=trusted

#2.端口转发
[root@server4 ~]# firewall-cmd --permanent --direct --add-rule ipv4 nat PREROUTING 1 -s 172.25.4.0/24 -p tcp --dport 5423 -j DNAT --to-dest :80
success
[root@server4 ~]# systemctl restart firewalld
[root@server4 ~]# firewall-cmd --direct --get-all-rules
ipv4 filter INPUT 1 -s 192.168.0.0/24 -p tcp --dport 22 -j REJECT
ipv4 nat PREROUTING 1 -s 172.25.4.0/24 -p tcp --dport 5423 -j DNAT --to-dest :80
 **实验测试:**

```bash
[root@server4 ~]# yum install -y httpd
[root@server4 ~]# systemctl start httpd
[root@server4 ~]# systemctl enable httpd
ln -s '/usr/lib/systemd/system/httpd.service' '/etc/systemd/system/multi-user.target.wants/httpd.service'
输入:172.25.4.11 可访问到apahce的默认发布页面(默认使用的是80端口)

输入:172.25.4.11:5423 也可访问到apahce的默认发布页面,即说明5423端口转发到80端口