Ansible 是一个配置管理和应用部署工具,功能类似于目前业界的配置管理工具 Chef,Puppet,Saltstack。Ansible 是通过 Python 语言开发。Ansible 平台由 Michael DeHaan 创建,他同时也是知名软件 Cobbler 与 Func 的作者。Ansible 的第一个版本发布于 2012 年 2 月。Ansible 默认通过 SSH 协议管理机器,所以 Ansible 不需要安装客户端程序在服务器上。您只需要将 Ansible 安装在一台服务器,在 Ansible 安装完后,您就可以去管理控制其它服务器。不需要为它配置数据库,Ansible 不会以 daemons 方式来启动或保持运行状态。Ansible 可以实现以下目标:
自动化部署应用
自动化管理配置
自动化的持续交付
自动化的(AWS)云服务管理。
根据 Ansible 官方提供的信息,当前使用 Ansible 的用户有:evernote、rackspace、NASA、Atlassian、twitter 等。
1、分别配置各自主机名,并配置hosts文件(能互相解析)
8.20、8.39、8.40
#vim /etc/hosts
# hostname node1.chinasoft.com
vim /etc/hosts
192.168.8.20 node1.chinasoft.com node1
192.168.8.39 node2.chinasoft.com node2
2、在ansible服务器8.40上配置ssh免密码访问
# ssh-keygen
# ssh-copy-id -i .ssh/id_rsa.pub [email protected]
# ssh-copy-id -i .ssh/id_rsa.pub [email protected]
测试是否成功
# ssh node1.chinasoft.com 'date';date
# ssh node2.chinasoft.com 'date';date
3、安装ansible服务
# yum install -y epel-relase
# yum install -y ansible1.9
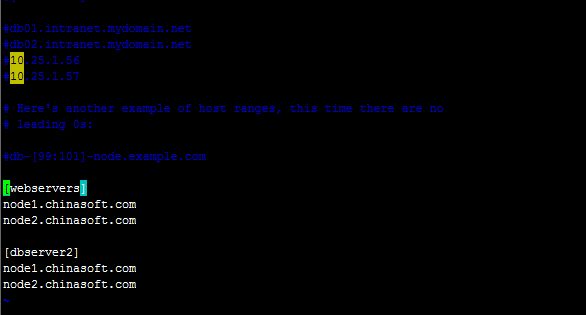
配置服务器组
# vim /etc/ansible/hosts
[webservers]
node1.chinasoft.com
node2.chinasoft.com
[dbserver2]
node1.chinasoft.com
node2.chinasoft.com
4、常用服务及模块的使用
查看命令的帮助文档,如copy
# ansible-doc -s copy
简单的命令测试:
①ping响应
# ansible all -m ping
node2.chinasoft.com | success >> {
"changed": false,
"ping": "pong"
}
node1.chinasoft.com | success >> {
"changed": false,
"ping": "pong"
}
②各服务器时间
# ansible all -a 'date'
node2.chinasoft.com | success | rc=0 >>
Mon Apr 18 20:43:48 CST 2016
node1.chinasoft.com | success | rc=0 >>
Mon Apr 18 20:43:48 CST 2016
③文件拷贝
# ansible dbservers -m copy -a "src=/etc/fstab dest=/root/fstab"
验证拷贝是否成功
# ansible dbservers -a "ls /root"
node1.chinasoft.com | success | rc=0 >>
anaconda-ks.cfg
fstab
install.log
install.log.syslog
node2.chinasoft.com | success | rc=0 >>
anaconda-ks.cfg
fstab
install.log
install.log.syslog
④添加计划任务
# ansible all -m cron -a 'name="custom job" minute=*/3 hour=* day=* month=* weekday=* job="/usr/sbin/ntpdate 192.168.8.102"'
node2.chinasoft.com | success >> {
"changed": false,
"jobs": [
"customjob",
"custom job"
]
}
node1.chinasoft.com | success >> {
"changed": true,
"jobs": [
"custom job"
]
}
# ansible all -a "crontab -l"
node1.chinasoft.com | success | rc=0 >>
#Ansible: custom job
*/3 * * * * /usr/sbin/ntpdate 192.168.8.102
node2.chinasoft.com | success | rc=0 >>
#Ansible: customjob
*/3 * * * * /usr/sbin/ntpdate 192.168.8.102
④在节点中添加组
# ansible-doc -s group
action: group
gid # Optional `GID' to set for the group.
name= # Name of the group to manage.
state # Whether the group should be present or not on the remote host.
system # If `yes', indicates that the group created is a system group.
添加mysql组
# ansible all -m group -a "gid=306 system=yes name=mysql"
node1.chinasoft.com | success >> {
"changed": true,
"gid": 306,
"name": "mysql",
"state": "present",
"system": true
}
node2.chinasoft.com | success >> {
"changed": true,
"gid": 306,
"name": "mysql",
"state": "present",
"system": true
}
# ansible all -a "tail -1 /etc/group"
node2.chinasoft.com | success | rc=0 >>
mysql:x:306:
node1.chinasoft.com | success | rc=0 >>
mysql:x:306:
⑥yum命令的使用
# ansible-doc -s yum
action: yum
conf_file # The remote yum configuration file to use for the transaction.
disable_gpg_check # Whether to disable the GPG checking of signatures of packages being installed. Has an effect only if state is `present' or `latest'.
disablerepo # `Repoid' of repositories to disable for the install/update operation. These repos will not persist beyond the transaction. When specifying multiple repos, separ
enablerepo # `Repoid' of repositories to enable for the install/update operation. These repos will not persist beyond the transaction. When specifying multiple repos, separa
list # Various (non-idempotent) commands for usage with `/usr/bin/ansible' and `not' playbooks. See examples.
name= # Package name, or package specifier with version, like `name-1.0'. When using state=latest, this can be '*' which means run: yum -y update. You can also pass a u
state # Whether to install (`present', `latest'), or remove (`absent') a package.
update_cache # Force updating the cache. Has an effect only if state is `present' or `latest'.
安装httpd软件
# ansible all -m yum -a "name=httpd state=present"
查看是否安装了httpd
# ansible all -a "rpm -q httpd"
node1.chinasoft.com | success | rc=0 >>
httpd-2.2.15-47.el6.centos.4.x86_64
node2.chinasoft.com | success | rc=0 >>
httpd-2.2.15-47.el6.centos.4.x86_64
⑦查看服务状态
# ansible all -a "service httpd status"
node2.chinasoft.com | FAILED | rc=3 >>
httpd 已停
node1.chinasoft.com | FAILED | rc=3 >>
httpd 已停
启动httpd服务,并设置开机自启动
# ansible all -m service -a "state=started enabled=yes name=httpd"
node1.chinasoft.com | success >> {
"changed": true,
"enabled": true,
"name": "httpd",
"state": "started"
}
node2.chinasoft.com | success >> {
"changed": true,
"enabled": true,
"name": "httpd",
"state": "started"
}
# ansible all -a "service httpd status"
node1.chinasoft.com | success | rc=0 >>
httpd (pid 2575) 正在运行...
node2.chinasoft.com | success | rc=0 >>
httpd (pid 2371) 正在运行...
校验是否开机自启动
# ansible all -a "chkconfig --list httpd"
node1.chinasoft.com | success | rc=0 >>
httpd 0:off1:off2:on3:on4:on5:on6:off
node2.chinasoft.com | success | rc=0 >>
httpd 0:off1:off2:on3:on4:on5:on6:off
5、剧本的简单使用
①通过脚本添加组
# vim test.yaml
- hosts: all
remote_user: root
tasks:
- name: add a group
group: gid=1000 name=testgroup1 system=no
- name: execute a commond
command: /bin/date
执行剧本
# ansible-playbook test.yaml
PLAY [all] ********************************************************************
GATHERING FACTS ***************************************************************
ok: [node2.chinasoft.com]
ok: [node1.chinasoft.com]
TASK: [add a group] ***********************************************************
changed: [node2.chinasoft.com]
changed: [node1.chinasoft.com]
TASK: [execute a commond] *****************************************************
changed: [node2.chinasoft.com]
changed: [node1.chinasoft.com]
PLAY RECAP ********************************************************************
node1.chinasoft.com : ok=3 changed=2 unreachable=0 failed=0
node2.chinasoft.com : ok=3 changed=2 unreachable=0 failed=0
②通过脚本修改httpd配置文件,修改端口为8080
# vim web.yaml
- hosts: all
remote_user: root
tasks:
- name: ensure apache latest version
yum: state=latest name=httpd
- name: apache configure file
copy: src=/root/httpd.conf dest=/etc/httpd/conf/httpd.conf force=yes
notify:
- restart httpd
handlers:
- name: restart httpd
service: name=httpd state=restarted
执行剧本
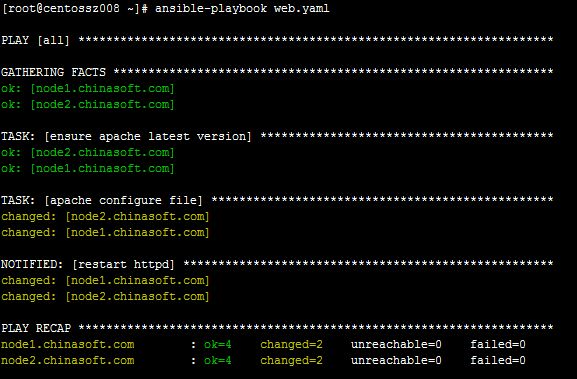
# ansible-playbook web.yaml


